2012 SUBARU TRIBECA check engine light
[x] Cancel search: check engine lightPage 304 of 420
.Check that the vehicle and trailer are
connected properly. Confirm that
–the trailer tongue is connected
properly to the hitch ball. – the trailer lights connector is con-
nected properly and trailer ’s brake
lights illuminate when the vehicle ’s
brake pedal is pressed, and that the trailer ’s turn signal lights flash when
the vehicle ’s turn signal lever is oper-
ated. – the safety chains are connected
properly.– all cargo in the trailer is secured
safely in position.– the side mirrors provide a good
rearward field of view without a sig-
nificant blind spot.
. Sufficient time should be taken to learn
the “feel ”of the vehicle/trailer combination
before starting out on a trip. In an area free
of traffic, practice turning, stopping and
backing up. ! Driving with a trailer
. You should allow for considerably more
stopping distance when towing a trailer.
Avoid sudden braking because it may
result in skidding or jackknifing and loss ofcontrol. . Avoid uneven steering, sharp turns and
rapid lane changes. .
Slow down before turning. Make a
longer than normal turning radius because
the trailer wheels will be closer than the
vehicle wheels to the inside of the turn. In
a tight turn, the trailer could hit yourvehicle. . Crosswinds will adversely affect the
handling of your vehicle and trailer, caus-
ing sway. Crosswinds can be due to
weather conditions or the passing of large
trucks or buses. If swaying occurs, firmly
grip the steering wheel and slow down
immediately but gradually. . When passing other vehicles, consid-
erable distance is required because of the
added weight and length caused by
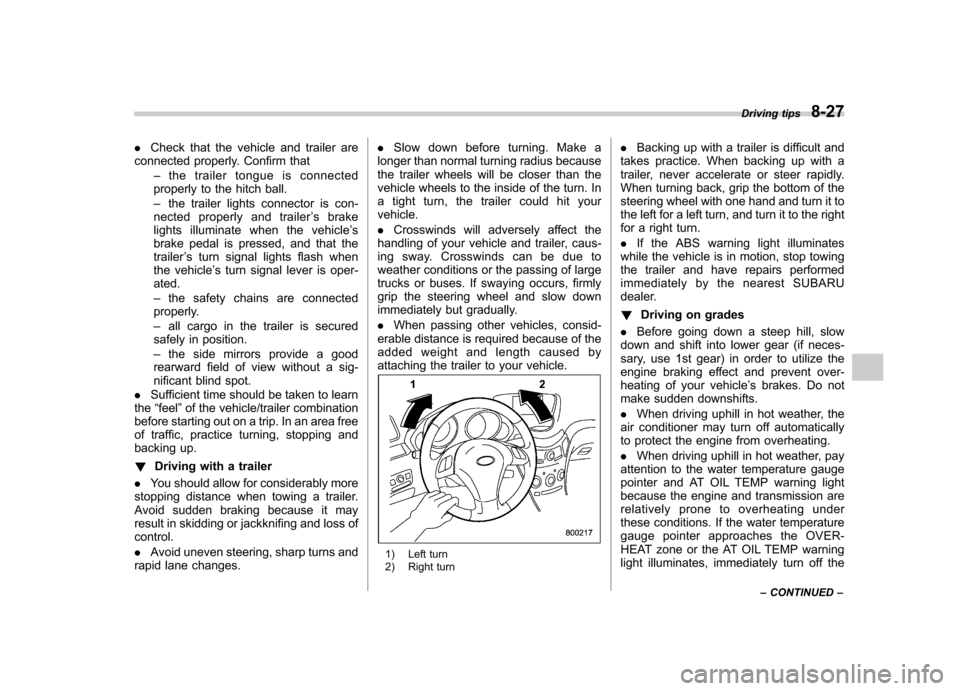
attaching the trailer to your vehicle.
1) Left turn
2) Right turn .
Backing up with a trailer is difficult and
takes practice. When backing up with a
trailer, never accelerate or steer rapidly.
When turning back, grip the bottom of the
steering wheel with one hand and turn it to
the left for a left turn, and turn it to the right
for a right turn. . If the ABS warning light illuminates
while the vehicle is in motion, stop towing
the trailer and have repairs performed
immediately by the nearest SUBARU
dealer. ! Driving on grades
. Before going down a steep hill, slow
down and shift into lower gear (if neces-
sary, use 1st gear) in order to utilize the
engine braking effect and prevent over-
heating of your vehicle ’s brakes. Do not
make sudden downshifts. . When driving uphill in hot weather, the
air conditioner may turn off automatically
to protect the engine from overheating. . When driving uphill in hot weather, pay
attention to the water temperature gauge
pointer and AT OIL TEMP warning light
because the engine and transmission are
relatively prone to overheating under
these conditions. If the water temperature
gauge pointer approaches the OVER-
HEAT zone or the AT OIL TEMP warning
light illuminates, immediately turn off the Driving tips
8-27
– CONTINUED –
Page 340 of 420
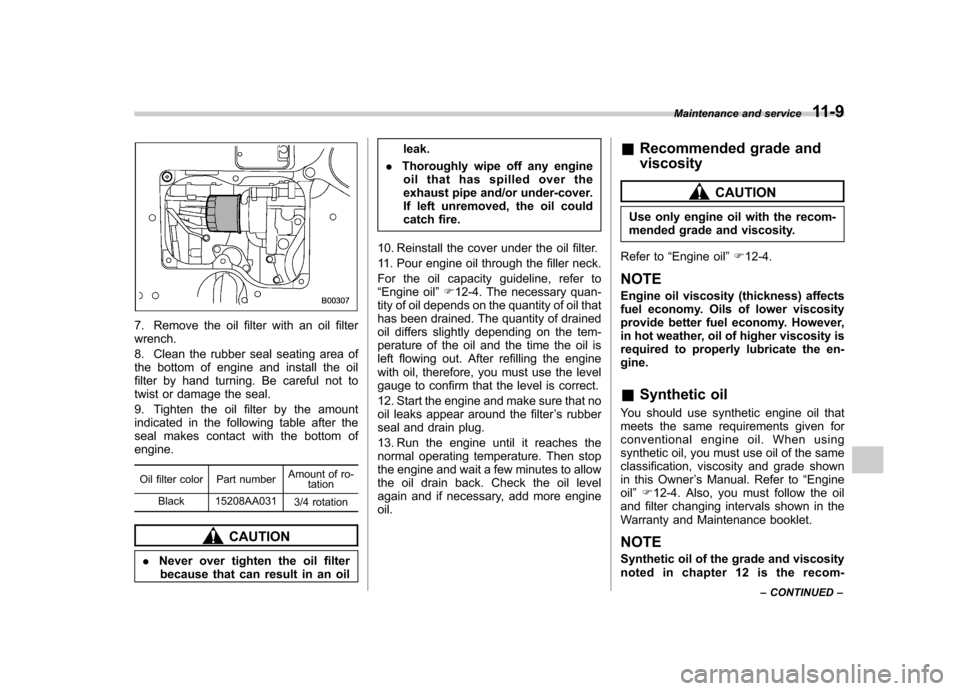
7. Remove the oil filter with an oil filter wrench.
8. Clean the rubber seal seating area of
the bottom of engine and install the oil
filter by hand turning. Be careful not to
twist or damage the seal.
9. Tighten the oil filter by the amount
indicated in the following table after the
seal makes contact with the bottom ofengine.Oil filter color Part number Amount of ro-
tation
Black 15208AA031 3/4 rotation
CAUTION
. Never over tighten the oil filter
because that can result in an oil leak.
. Thoroughly wipe off any engine
oil that has spilled over the
exhaust pipe and/or under-cover.
If left unremoved, the oil could
catch fire.
10. Reinstall the cover under the oil filter.
11. Pour engine oil through the filler neck.
For the oil capacity guideline, refer to “ Engine oil ”F 12-4. The necessary quan-
tity of oil depends on the quantity of oil that
has been drained. The quantity of drained
oil differs slightly depending on the tem-
perature of the oil and the time the oil is
left flowing out. After refilling the engine
with oil, therefore, you must use the level
gauge to confirm that the level is correct.
12. Start the engine and make sure that no
oil leaks appear around the filter ’s rubber
seal and drain plug.
13. Run the engine until it reaches the
normal operating temperature. Then stop
the engine and wait a few minutes to allow
the oil drain back. Check the oil level
again and if necessary, add more engineoil. &
Recommended grade and viscosity
CAUTION
Use only engine oil with the recom-
mended grade and viscosity.
Refer to “Engine oil ”F 12-4.
NOTE
Engine oil viscosity (thickness) affects
fuel economy. Oils of lower viscosity
provide better fuel economy. However,
in hot weather, oil of higher viscosity is
required to properly lubricate the en-gine. & Synthetic oil
You should use synthetic engine oil that
meets the same requirements given for
conventional engine oil. When using
synthetic oil, you must use oil of the same
classification, viscosity and grade shown
in this Owner ’s Manual. Refer to “Engine
oil ”F 12-4. Also, you must follow the oil
and filter changing intervals shown in the
Warranty and Maintenance booklet.
NOTE
Synthetic oil of the grade and viscosity
noted in chapter 12 is the recom- Maintenance and service
11-9
– CONTINUED –
Page 349 of 420
11-18Maintenance and service
Alcohol contained in the brake
fluid may damage them.
. Be careful not to spill brake fluid
when adding it. If brake fluid
touches the exhaust pipe, it may
cause a bad smell, smoke, and/or
a fire. If brake fluid gets on the
exhaust pipe, be sure to wipe itoff.
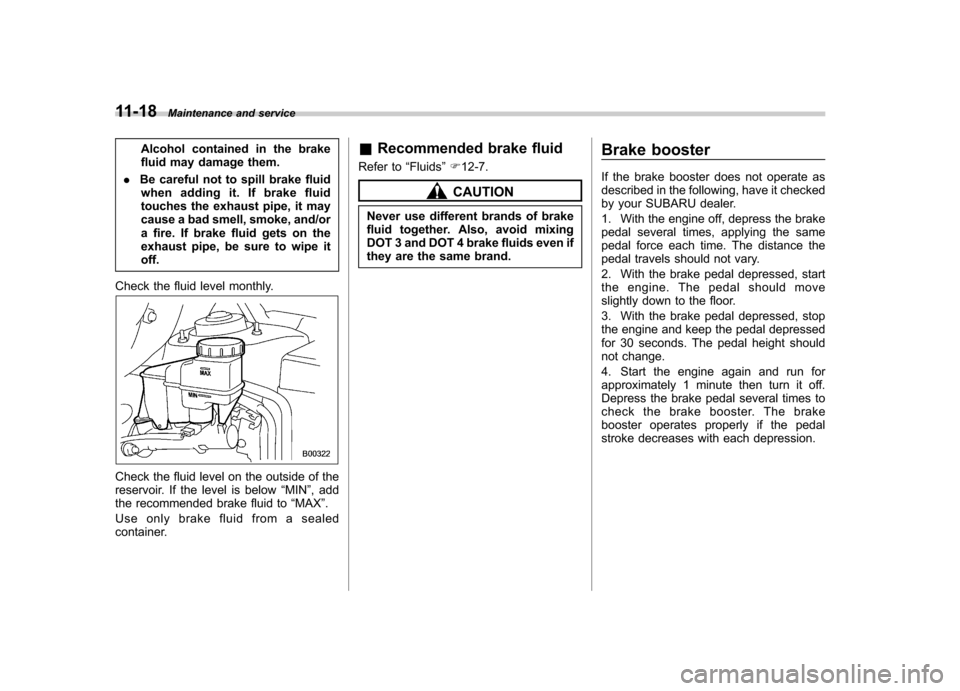
Check the fluid level monthly.
Check the fluid level on the outside of the
reservoir. If the level is below “MIN ”, add
the recommended brake fluid to “MAX ”.
Use only brake fluid from a sealed
container. &
Recommended brake fluid
Refer to “Fluids ”F 12-7.
CAUTION
Never use different brands of brake
fluid together. Also, avoid mixing
DOT 3 and DOT 4 brake fluids even if
they are the same brand. Brake booster
If the brake booster does not operate as
described in the following, have it checked
by your SUBARU dealer.
1. With the engine off, depress the brake
pedal several times, applying the same
pedal force each time. The distance the
pedal travels should not vary.
2. With the brake pedal depressed, start
the engine. The pedal should move
slightly down to the floor.
3. With the brake pedal depressed, stop
the engine and keep the pedal depressed
for 30 seconds. The pedal height should
not change.
4. Start the engine again and run for
approximately 1 minute then turn it off.
Depress the brake pedal several times to
check the brake booster. The brake
booster operates properly if the pedal
stroke decreases with each depression.
Page 350 of 420
Brake pedal
Check the brake pedal free play and
reserve distance according to the main-
tenance schedule in the“Warranty and
Maintenance Booklet ”.
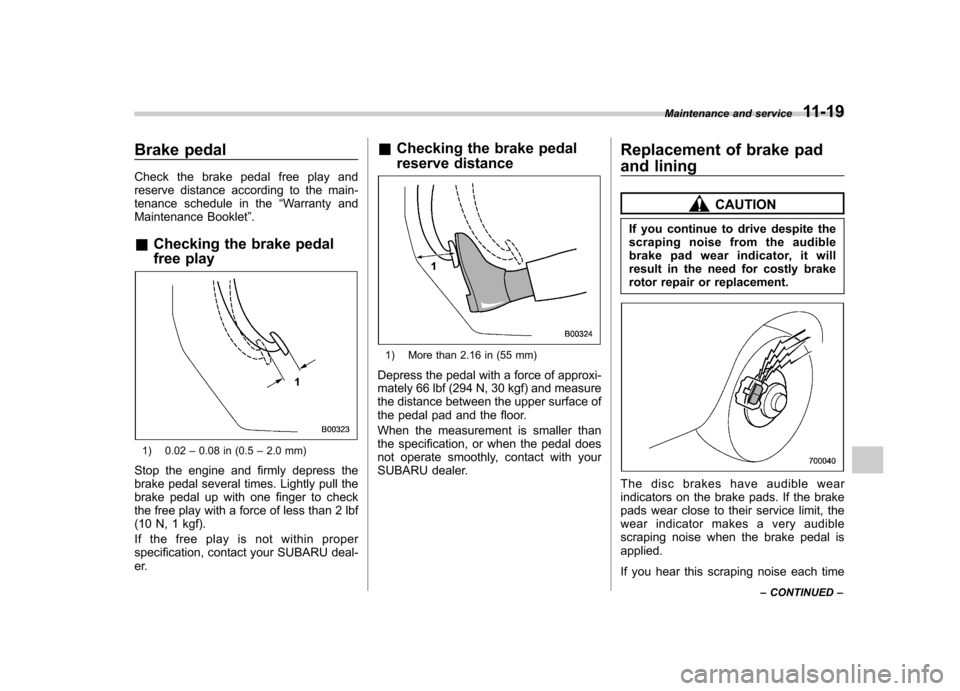
& Checking the brake pedal
free play
1) 0.02 –0.08 in (0.5 –2.0 mm)
Stop the engine and firmly depress the
brake pedal several times. Lightly pull the
brake pedal up with one finger to check
the free play with a force of less than 2 lbf
(10 N, 1 kgf).
If the free play is not within proper
specification, contact your SUBARU deal-
er. &
Checking the brake pedal
reserve distance
1) More than 2.16 in (55 mm)
Depress the pedal with a force of approxi-
mately 66 lbf (294 N, 30 kgf) and measure
the distance between the upper surface of
the pedal pad and the floor.
When the measurement is smaller than
the specification, or when the pedal does
not operate smoothly, contact with your
SUBARU dealer. Replacement of brake pad
and lining
CAUTION
If you continue to drive despite the
scraping noise from the audible
brake pad wear indicator, it will
result in the need for costly brake
rotor repair or replacement.
The disc brakes have audible wear
indicators on the brake pads. If the brake
pads wear close to their service limit, the
wear indicator makes a very audible
scraping noise when the brake pedal isapplied.
If you hear this scraping noise each time Maintenance and service
11-19
– CONTINUED –
Page 359 of 420
11-28Maintenance and service
Windshield washer fluid
CAUTION
Never use engine coolant as washer
fluid because it could cause paintdamage.
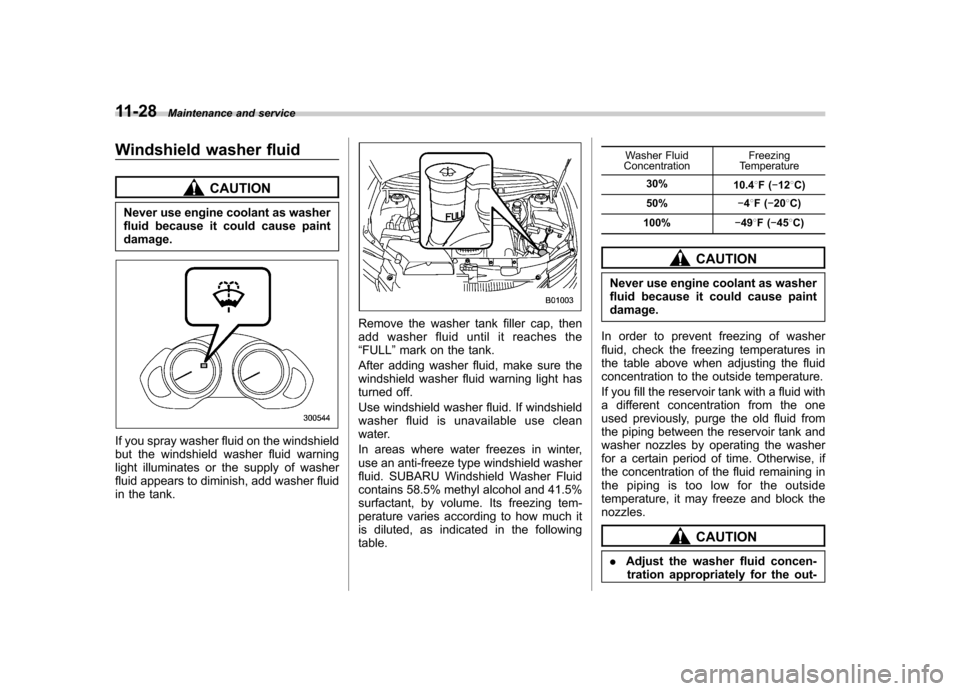
If you spray washer fluid on the windshield
but the windshield washer fluid warning
light illuminates or the supply of washer
fluid appears to diminish, add washer fluid
in the tank.
Remove the washer tank filler cap, then
add washer fluid until it reaches the“ FULL ”mark on the tank.
After adding washer fluid, make sure the
windshield washer fluid warning light has
turned off.
Use windshield washer fluid. If windshield
washer fluid is unavailable use clean
water.
In areas where water freezes in winter,
use an anti-freeze type windshield washer
fluid. SUBARU Windshield Washer Fluid
contains 58.5% methyl alcohol and 41.5%
surfactant, by volume. Its freezing tem-
perature varies according to how much it
is diluted, as indicated in the followingtable. Washer Fluid
Concentration Freezing
Temperature
30% 10.48F( �12 8C)
50% �48F( �20 8C)
100% �49 8F( �45 8C)
CAUTION
Never use engine coolant as washer
fluid because it could cause paint damage.
In order to prevent freezing of washer
fluid, check the freezing temperatures in
the table above when adjusting the fluid
concentration to the outside temperature.
If you fill the reservoir tank with a fluid with
a different concentration from the one
used previously, purge the old fluid from
the piping between the reservoir tank and
washer nozzles by operating the washer
for a certain period of time. Otherwise, if
the concentration of the fluid remaining in
the piping is too low for the outside
temperature, it may freeze and block thenozzles.
CAUTION
. Adjust the washer fluid concen-
tration appropriately for the out-
Page 379 of 420
12-4Specifications
& Engine oil
For the checking, adding and replacing procedure or other details, refer to “Engine oil ”F 11-7.
NOTE
The procedure for changing the engine oil and oil filter should be performed by a properly-trained expert. It is recommended
that you have this service performed by your SUBARU dealer. ! Approved engine oil
Always use the SUBARU approved engine oil. For further details, please contact your SUBARU dealer.
If the approved engine oil is unavailable, use the alternative engine oil described on the next page. ! Alternative engine oil
If the SUBARU approved oil is unavailable, the following alternative oil can be used. NOTE . Each quantity indicated is only a guideline. The necessary quantity for replacement may differ slightly depending on the
temperature and other factors. . In choosing an oil, you want the proper quality and viscosity, as well as one that will enhance fuel economy. Oils of lower
viscosity provide better fuel economy. However, in hot weather, oil of higher viscosity is required to properly lubricate the
engine. The following table lists the recommended viscosities and applicable temperatures.. When adding oil, different brands may be used together as long as they are the same API classification and SAE viscosity
as those recommended by SUBARU.
Page 410 of 420
Braking..................................................................... 7-19
Tips...................................................................... 7-19
Breaking-in of new brake pads and linings ................... 11-20
Bulb Chart .................................................................. 12-12
Replacing ............................................................. 11-36
C
Cargo area Cover ................................................................... 6-14
Light ....................................................................... 6-3
Tie-down hooks ..................................................... 6-16
Catalytic converter ....................................................... 8-3
Center Console .................................................................. 6-6
Ventilators ............................................................... 4-4
Changing
Coolant ................................................................ 11-11
Flat tire ................................................................... 9-6
Oil and oil filter ...................................................... 11-8
Charge warning light .................................................. 3-13
CHECK ENGINE warning light/Malfunction indicator light ....................................................................... 3-12
Checking
Brake pedal free play ............................................ 11-19
Brake pedal reserve distance ................................. 11-19
Coolant level ........................................................ 11-11
Fluid level (automatic transmission fluid) .................. 11-14
Fluid level (brake fluid) .......................................... 11-17
Fluid level (power steering fluid) .............................. 11-16
Fluid level (washer fluid) ........................................ 11-28 Oil level (engine oil)
................................................ 11-7
Oil level (front differential gear oil) .......................... 11-15
Child restraint systems ................................................ 1-29
Installation of a booster seat .................................... 1-36
Installation with A/ELR seatbelt ... ............................. 1-32
Lower and tether anchorages ................................... 1-37
Top tether anchorages ............................................ 1-40
Child safety ................................................................... 5
Locks .................................................................... 2-21
Chime Key........................................................................ 3-4Light ..................................................................... 3-27
Seatbelt. ................................................................ 3-10
Cleaning
Aluminum wheels ................................................... 10-3
Interior .................................................................. 10-5
Ventilation grille ...................................................... 4-10
Climate control system Automatic ............................................................... 4-5
Clock ................................................................ 3-22, 3-24
Coat hook. ................................................................. 6-12
Compass ........................................................... 3-38, 3-41
Console ..................................................................... 6-6
Coolant ........................................................... 11-11, 12-7
Cooling system ........................................................ 11-10
Corrosion protection .................................................... 10-4
Cruise control ............................................................ 7-29
Indicator light ......................................................... 3-22
Set indicator light .................................................... 3-22
Cup holder ................................................................. 6-8
Front passenger ’s.................................................... 6-8 Index
14-3
Page 413 of 420
14-6Index
High beam ............................................................ 3-22
Immobilizer. ........................................................... 3-21
Security .......................................................... 2-4, 3-21
Select lever/Gear position ....................................... 3-21
SPORT mode ........................................................ 3-21
Traction control system OFF .................................... 3-19
Turn signal ............................................................ 3-21
Vehicle Dynamics Control OFF ................................ 3-19
Vehicle Dynamics Control operation ................. 3-18, 3-19
Inside mirror .............................................................. 3-38
Interior lights ............................................................... 6-2
J
Jack and jack handle .................................................. 9-19
Jack-up point ............................................................... 9-6
Jump starting. ............................................................ 9-11
K
Key ............................................................................ 2-2 Number .................................................................. 2-2
Reminder chime. ...................................................... 3-4
Replacement ........................................................... 2-4
Keyless entry system ................................................... 2-8
L
Leather seat materials ................................................ 10-5
License plate light ..................................................... 11-41
Light Back-up ............................................................... 11-39
Back-up (Station wagon) ........................................ 11-40
Cargo area .................................................... 6-3, 11-44 Control switch
........................................................ 3-27
Dome ............................................................ 6-2, 11-42
Door step ............................................................ 11-43
Front fog ..................................................... 3-32, 11-39
Front side marker ................................................... 3-28
Ignition switch ......................................................... 3-4
License plate ....................................................... 11-41
Map .............................................................. 6-3, 11-43
Rear combination ................................................. 11-39
Rear gate ............................................................... 6-3
Turn signal .................................................. 3-29, 11-39
Vanity mirror .................................................. 6-5, 11-43
Loading your vehicle ................................................... 8-12
Low fuel warning light ................................................. 3-17
Low tire pressure warning light ..................................... 3-14
Lower and tether anchorage ........................................ 1-37
Lumbar support ........................................................... 1-7
M
Main fuse ................................................................ 11-35
Maintenance Precautions ........................................................... 11-3
Schedule ............................................................... 11-3
Seatbelt. ................................................................ 1-26
Tools ..................................................................... 9-19
Malfunction indicator light (check engine warning light) .... 3-12Manual Transmission oil ..................................................... 12-6
Map light ........................................................... 6-3, 11-43
Maximum load limits ................................................... 8-21
Meters and gauges ...................................................... 3-5