2012 SUBARU TRIBECA window
[x] Cancel search: windowPage 40 of 420

By pulling the tab on the center seat, you
can fold only the seatback of the centerseat.
To return the seatback to its original
position, raise the seatback until it locks
into place. Make sure it is securely locked.1) Bar
CAUTION
. Folding the seatback of the cen-
ter seat will expose the bar that
retains it in the raised position.
Be careful not to hurt yourself on
it. Especially, do not rest your
finger on the bar. Otherwise,
when the seatback is raised, your
finger could be pinched between
the bar and seatback and thusinjured. .
Raise the seatback of the center
seat while taking care not to trap
your hands or other parts of the
body between the center seat
and window-side seat.
NOTE
1) Holder
With the seatback folded, attach the
tongue plate of each rear/second-row
seatbelt to the corresponding holder.
Do the same also before someone gets
into the third-row seat. Seat, seatbelt and SRS airbags
1-11
– CONTINUED –
Page 41 of 420
1-12Seat, seatbelt and SRS airbags
&Head restraint adjustment
Both the second-row window side seats
and the second-row center seat are
equipped with head restraints.
WARNING
. Never drive the vehicle with the
head restraints removed because
they are designed to reduce the
risk of serious neck injury in the
event that the vehicle is struck
from the rear. Therefore, when
you remove the head restraints,
you must reinstall all head re-
straints to protect vehicle occu-pants.
. All occupants, including the dri-
ver, should not operate a vehicle
or sit in a vehicle ’s seat until the
head restraints are placed in their
proper positions in order to mini-
mize the risk of neck injury in the
event of a crash. !
Window side seats
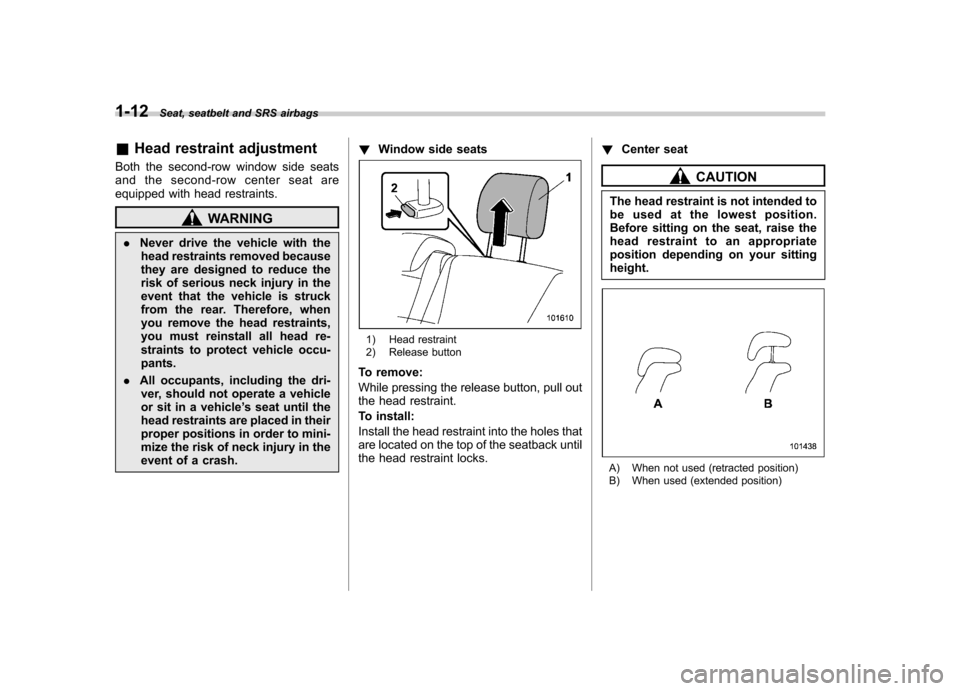
1) Head restraint
2) Release button
To remove:
While pressing the release button, pull out
the head restraint.
To install:
Install the head restraint into the holes that
are located on the top of the seatback until
the head restraint locks. !
Center seat
CAUTION
The head restraint is not intended to
be used at the lowest position.
Before sitting on the seat, raise the
head restraint to an appropriate
position depending on your sittingheight.
A) When not used (retracted position)
B) When used (extended position)
Page 47 of 420
1-18Seat, seatbelt and SRS airbags
the face or neck, adjust the shoulder belt
anchor height (window-side seating posi-
tions only) and then if necessary move the
child closer to the belt buckle to help
provide a good shoulder belt fit. Care must
be taken to securely place the lap belt as
low as possible on the hips and not on thechild’s waist. If the shoulder portion of the
belt cannot be properly positioned, a child
restraint system should be used. Never
place the shoulder belt under the child ’s
arm or behind the child ’s back.
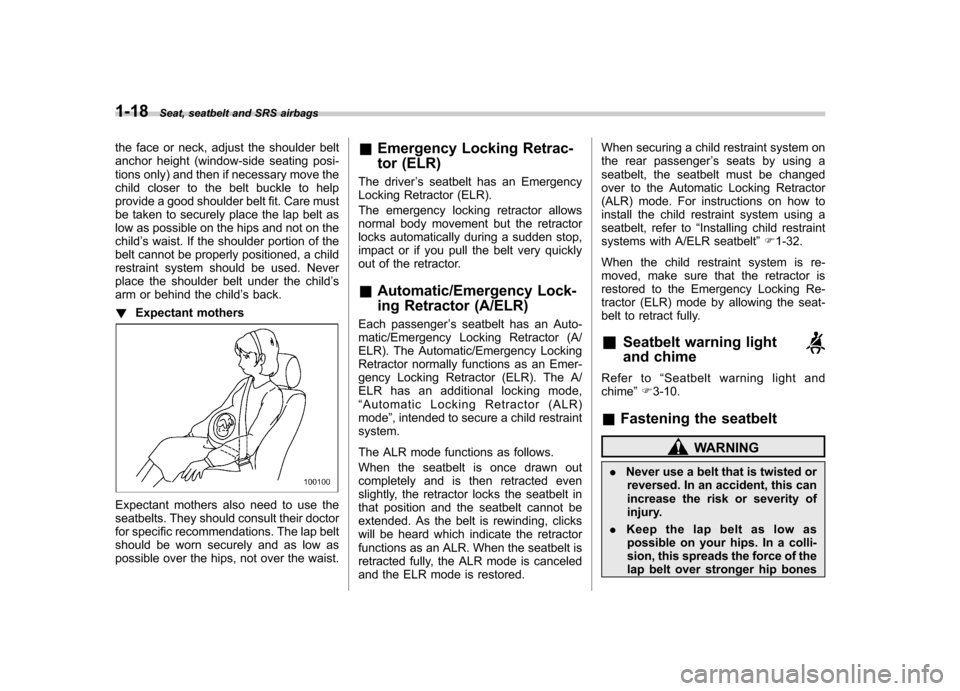
! Expectant mothers
Expectant mothers also need to use the
seatbelts. They should consult their doctor
for specific recommendations. The lap belt
should be worn securely and as low as
possible over the hips, not over the waist. &
Emergency Locking Retrac-
tor (ELR)
The driver ’s seatbelt has an Emergency
Locking Retractor (ELR).
The emergency locking retractor allows
normal body movement but the retractor
locks automatically during a sudden stop,
impact or if you pull the belt very quickly
out of the retractor. & Automatic/Emergency Lock-
ing Retractor (A/ELR)
Each passenger ’s seatbelt has an Auto-
matic/Emergency Locking Retractor (A/
ELR). The Automatic/Emergency Locking
Retractor normally functions as an Emer-
gency Locking Retractor (ELR). The A/
ELR has an additional locking mode,“ Automatic Locking Retractor (ALR)
mode ”, intended to secure a child restraint
system.
The ALR mode functions as follows.
When the seatbelt is once drawn out
completely and is then retracted even
slightly, the retractor locks the seatbelt in
that position and the seatbelt cannot be
extended. As the belt is rewinding, clicks
will be heard which indicate the retractor
functions as an ALR. When the seatbelt is
retracted fully, the ALR mode is canceled
and the ELR mode is restored. When securing a child restraint system on
the rear passenger
’s seats by using a
seatbelt, the seatbelt must be changed
over to the Automatic Locking Retractor
(ALR) mode. For instructions on how to
install the child restraint system using a
seatbelt, refer to “Installing child restraint
systems with A/ELR seatbelt ”F 1-32.
When the child restraint system is re-
moved, make sure that the retractor is
restored to the Emergency Locking Re-
tractor (ELR) mode by allowing the seat-
belt to retract fully.
& Seatbelt warning light
and chime
Refer to “Seatbelt warning light and
chime ”F 3-10.
& Fastening the seatbelt
WARNING
. Never use a belt that is twisted or
reversed. In an accident, this can
increase the risk or severity of
injury.
. Keep the lap belt as low as
possible on your hips. In a colli-
sion, this spreads the force of the
lap belt over stronger hip bones
Page 67 of 420
1-38Seat, seatbelt and SRS airbags
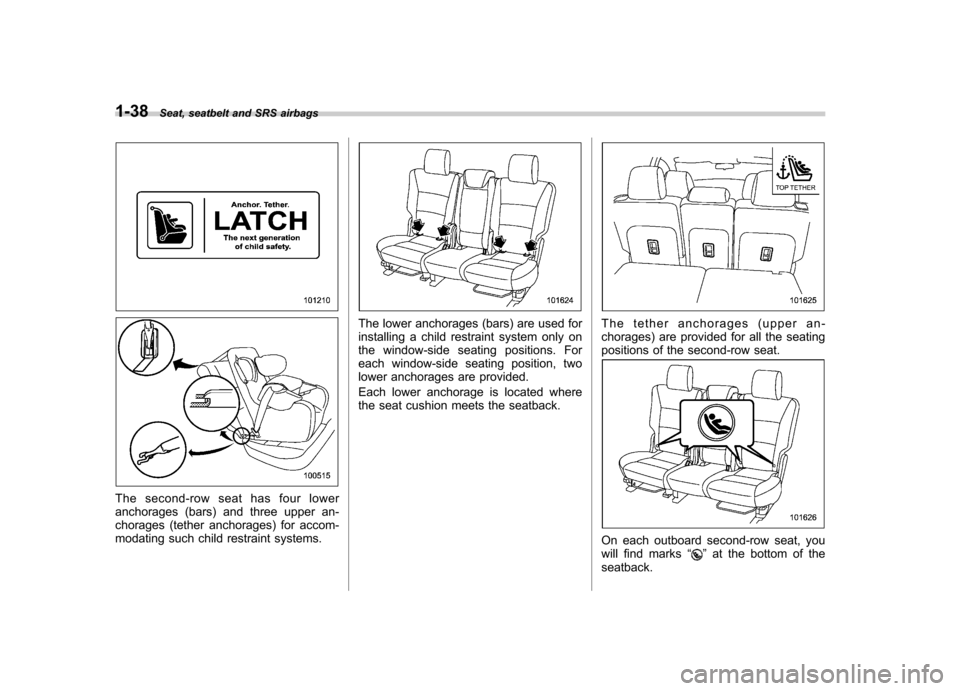
The second-row seat has four lower
anchorages (bars) and three upper an-
chorages (tether anchorages) for accom-
modating such child restraint systems.
The lower anchorages (bars) are used for
installing a child restraint system only on
the window-side seating positions. For
each window-side seating position, two
lower anchorages are provided.
Each lower anchorage is located where
the seat cushion meets the seatback.The tether anchorages (upper an-
chorages) are provided for all the seating
positions of the second-row seat.
On each outboard second-row seat, you
will find marks “”at the bottom of the
seatback.
Page 70 of 420
!To hook the top tether
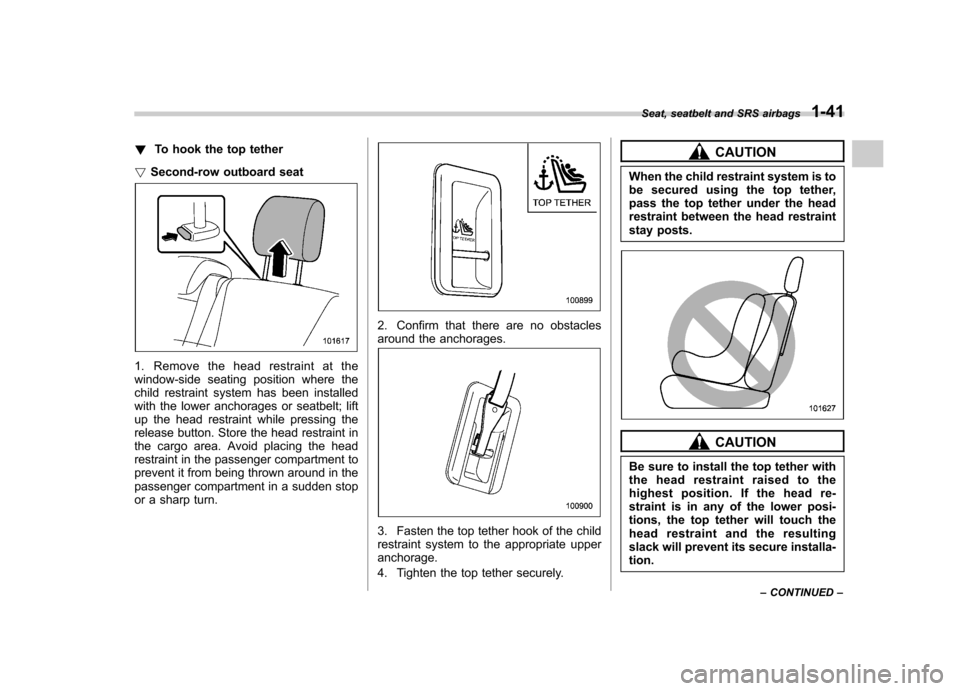
! Second-row outboard seat
1. Remove the head restraint at the
window-side seating position where the
child restraint system has been installed
with the lower anchorages or seatbelt; lift
up the head restraint while pressing the
release button. Store the head restraint in
the cargo area. Avoid placing the head
restraint in the passenger compartment to
prevent it from being thrown around in the
passenger compartment in a sudden stop
or a sharp turn.
2. Confirm that there are no obstacles
around the anchorages.
3. Fasten the top tether hook of the child
restraint system to the appropriate upperanchorage.
4. Tighten the top tether securely.
CAUTION
When the child restraint system is to
be secured using the top tether,
pass the top tether under the head
restraint between the head restraint
stay posts.
CAUTION
Be sure to install the top tether with
the head restraint raised to the
highest position. If the head re-
straint is in any of the lower posi-
tions, the top tether will touch the
head restraint and the resulting
slack will prevent its secure installa-tion. Seat, seatbelt and SRS airbags
1-41
– CONTINUED –
Page 89 of 420
1-60Seat, seatbelt and SRS airbags
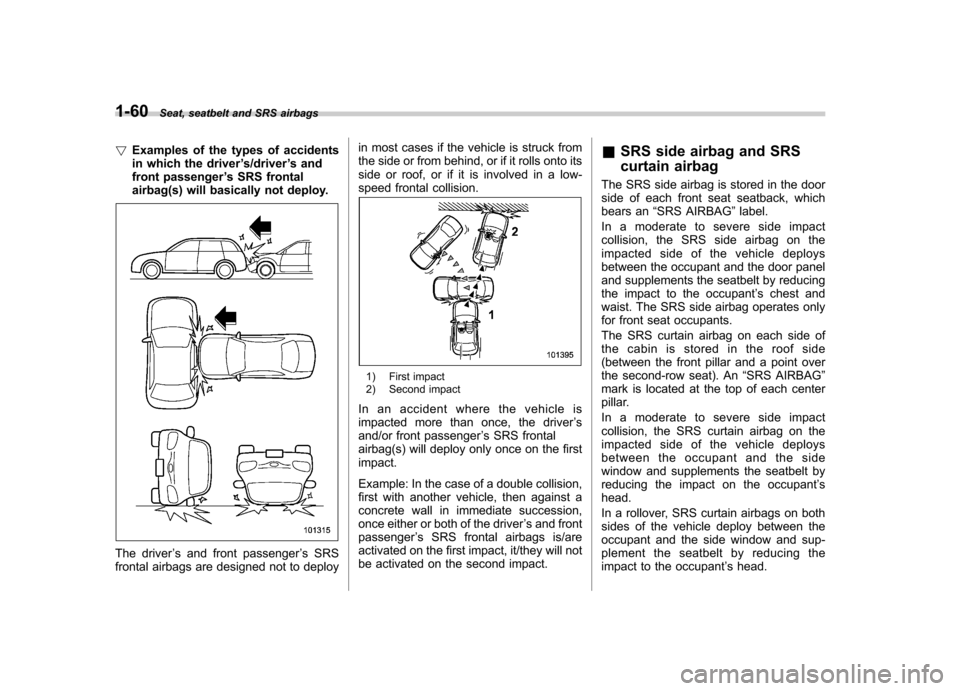
! Examples of the types of accidents
in which the driver ’s/driver ’s and
front passenger ’s SRS frontal
airbag(s) will basically not deploy.
The driver ’s and front passenger ’s SRS
frontal airbags are designed not to deploy in most cases if the vehicle is struck from
the side or from behind, or if it rolls onto its
side or roof, or if it is involved in a low-
speed frontal collision.
1) First impact
2) Second impact
In an accident where the vehicle is
impacted more than once, the driver ’s
and/or front passenger ’s SRS frontal
airbag(s) will deploy only once on the firstimpact.
Example: In the case of a double collision,
first with another vehicle, then against a
concrete wall in immediate succession,
once either or both of the driver ’s and front
passenger ’s SRS frontal airbags is/are
activated on the first impact, it/they will not
be activated on the second impact. &
SRS side airbag and SRS
curtain airbag
The SRS side airbag is stored in the door
side of each front seat seatback, which
bears an “SRS AIRBAG ”label.
Inamoderatetoseveresideimpact
collision, the SRS side airbag on the
impacted side of the vehicle deploys
between the occupant and the door panel
and supplements the seatbelt by reducing
the impact to the occupant ’s chest and
waist. The SRS side airbag operates only
for front seat occupants.
The SRS curtain airbag on each side of
the cabin is stored in the roof side
(between the front pillar and a point over
the second-row seat). An “SRS AIRBAG ”
mark is located at the top of each center
pillar.
Inamoderatetoseveresideimpact
collision, the SRS curtain airbag on the
impacted side of the vehicle deploys
between the occupant and the side
window and supplements the seatbelt by
reducing the impact on the occupant ’s
head.
In a rollover, SRS curtain airbags on both
sides of the vehicle deploy between the
occupant and the side window and sup-
plement the seatbelt by reducing the
impact to the occupant ’s head.
Page 91 of 420
1-62Seat, seatbelt and SRS airbags
WARNING
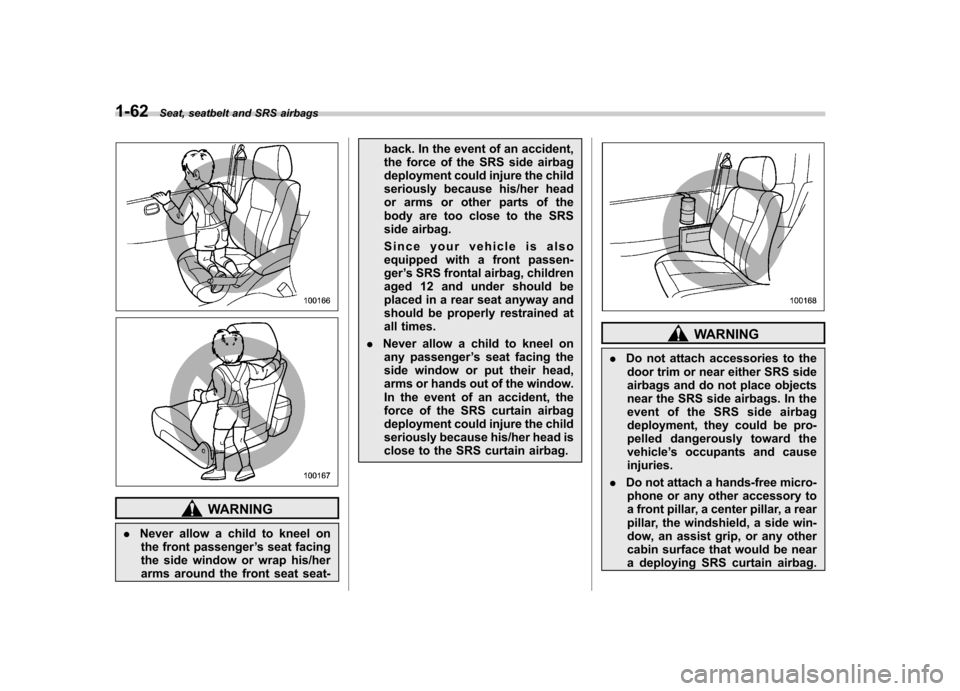
. Never allow a child to kneel on
the front passenger ’s seat facing
the side window or wrap his/her
arms around the front seat seat- back. In the event of an accident,
the force of the SRS side airbag
deployment could injure the child
seriously because his/her head
or arms or other parts of the
body are too close to the SRS
side airbag.
Since your vehicle is also
equipped with a front passen-ger
’s SRS frontal airbag, children
aged 12 and under should be
placed in a rear seat anyway and
should be properly restrained at
all times.
. Never allow a child to kneel on
any passenger ’s seat facing the
side window or put their head,
arms or hands out of the window.
In the event of an accident, the
force of the SRS curtain airbag
deployment could injure the child
seriously because his/her head is
close to the SRS curtain airbag.
WARNING
. Do not attach accessories to the
door trim or near either SRS side
airbags and do not place objects
near the SRS side airbags. In the
event of the SRS side airbag
deployment, they could be pro-
pelled dangerously toward thevehicle ’s occupants and cause
injuries.
. Do not attach a hands-free micro-
phone or any other accessory to
a front pillar, a center pillar, a rear
pillar, the windshield, a side win-
dow, an assist grip, or any other
cabin surface that would be near
a deploying SRS curtain airbag.
Page 102 of 420
or wiring of the SRS airbag system.
This includes following modifica- tions. .Installation of custom steering
wheels
. Attachment of additional trim
materials to the dashboard
. Installation of custom seats
. Replacement of seat fabric or
leather
. Installation of additional fabric or
leather on the front seat
. Attachment of a hands-free mi-
crophone or any other accessory
to a front pillar, a center pillar, a
rear pillar, the windshield, a side
window, an assist grip, or any
other cabin surface that would be
near a deploying SRS curtainairbag.
. Installation of additional electri-
cal/electronic equipment such as
a mobile two-way radio on or
near the SRS airbag system
components and/or wiring is not
advisable. This could interfere
with proper operation of the
SRS airbag system.CAUTION
Do not perform any of the following
modifications. Such modifications
can interfere with proper operation
of the SRS airbag system. . Attachment of any equipment
(bush bar, winches, snow plow,
skid plate, etc.) other than genu-
ine SUBARU accessory parts.
. Modification of the suspension
system or front end structure.
. Installation of a tire of different
size and construction from the
tires specified on the vehicle
placard attached to the driver ’s
door pillar or specified for indivi-
dual vehicle models in this Own-er ’s Manual.
. Attachment of any equipment
(side steps or side sill protectors,
etc.) other than genuine SUBARU
accessory parts to the side body.
Always consult your SUBARU dealer if
you want to install any accessory parts on
your vehicle. Seat, seatbelt and SRS airbags
1-73