2012 SUBARU OUTBACK tow
[x] Cancel search: towPage 164 of 474

&Auto-dimming mirror with
compass and HomeLink
®(if
equipped)
1) HomeLink®button 1
2) HomeLink®button 2
3) LED
4) HomeLink
®button 3
5) Sensor
6) Automatic dimming on/off button
7) Compass display button
8) Compass display
The auto-dimming mirror has an anti-glare
feature which automatically reduces glare
coming from headlights of vehicles behind
you. It also contains a built-in compass
and HomeLink
®wireless control system.
. By pressing the automatic dimming on/
off button, the automatic dimming function
is toggled on or off. When the automatic dimming function is on, the LED indicator
will illuminate.
Even with the mirror in the automatic
dimming mode, the mirror surface turns
bright if the transmission is shifted into
reverse. This is to ensure good rearward
visibility during reversing. .
By pressing the compass display but-
ton, the compass display is toggled on or
off. When the compass is on, an illumi-
nated compass reading will appear in the
upper right corner of the mirror.
When cleaning the mirror, use a paper
towel or similar material dampened with
glass cleaner. Do not spray glass cleaner
directly on the mirror as that may cause
the liquid cleaner to enter the mirror
housing and damage the mirror. !
Photosensors
The mirror has a photosensor attached on
both the front and back sides. During
nighttime driving, these sensors detect
distracting glare from vehicle headlights
behind you and automatically dim the
mirror to eliminate glare and preserve
your vision. For this reason, use care not
to cover the sensors with stickers, or other
similar items. Periodically wipe the sen-
sors clean using a piece of dry soft cotton
cloth or an applicator. Instruments and controls
3-45
– CONTINUED –
Page 198 of 474

mode after approximately 10 seconds. &HD Radio
®Technology (Digi-
tal AM and FM Radio) (type C audio)
! HD Radio Technology Information
! What is HD Radio
®Technology and
how does it work?
HD Radio
TMTechnology is the digital
evolution of analog AM/FM radio. Your
radio product has a special receiver which
allows it to receive digital broadcasts
(where available) in addition to the analog
broadcasts it already receives. Digital
broadcasts have better sound quality than
analog broadcasts as digital broadcasts
provide free, crystal clear audio with no static or distortion. For more information,
and a guide to available radio stations and
programming, please visit www.hdradio.com. !
Using HD Radio
®Technology
As a consumer works through the analog
radio stations, (where applicable) the radio
receiver will automatically tune from an
analog signal to a digital signal within five
seconds. An orange
logo indicator will
be seen on the screen when in digital. NOTE The
logo will first appear in a gray
color indicating the station is indeed
(an analog and) a digital station. Once
the digital signal is acquired, the logo
will be a bright orange color. ! Benefits of HD Radio
®Technology
1.
Information: The song title, artist name
and music genre will appear on the screen
when available by the radio station. 2.
Multicast: On the FM radio frequency
most digital stations have “multiple ”or
supplemental programs on one FM sta-
tion. When the consumer pushes the
multicast button, they will move between
the multiple unique program content. 3.
Clear Reception: Unlike analog radio
signals, digital signals do not pass along static, hiss or pops. !
HD Radio
®Technology Trouble-
shooting
1.
Station blending: When acquiring a
radio station, as usual, the radio will play
content in analog. If the radio verifies the
broadcast is an HD Radio Technology
station, it will then shift or blend smoothly
to a digital signal within five seconds.
Depending on the station quality, the
consumer may hear a slight sound change
when the station switches from the analog
to digital signal. 2.
Reception area: Topography of the
earth can affect radio signals. For exam-
ple, when a vehicle is behind a hill or large
building from the radio tower location
analog reception will be poor and it is
highly likely that HD Radio reception will
not occur. When a consumer is on the
multicast or supplemental programming
(HD2/HD3/HD4) and the reception is
weak or lost, this will result in a “mute ”
condition. On the main or HD1 program, a
weak or lost digital signal will result in the
playing of an analog signal until a digital
signal is available. 3.
Station issues: In order to provide the
best experience, a contact form has been
developed to report any radio station
issues found while listening to a broad- Audio
5-15
– CONTINUED –
Page 232 of 474

Hands-free system (if equipped) NOTE .For models with the genuine
SUBARU navigation system, refer to
the Owner ’s Manual supplement for the
navigation system.. When selling your vehicle, make
sure that you initialize the Hands-free
system to prevent personal data from
being improperly accessed.
The Hands-free system operates while the
ignition switch is in the “Acc ”or “ON ”
position.
& Tips for the Hands-free sys- tem
! Bluetooth
®
It is possible to connect a cell phone to the
in-vehicle equipment through the Blue-
tooth
®format (wireless) to make a phone
call from the in-vehicle equipment or take
an incoming phone call.
Since the Bluetooth
®format is wireless, a
connection between the in-vehicle equip-
ment and the cell phone can be made
without placing them in close vicinity of
each other. The cell phone can be used
with it left in the breast pocket or bag. NOTE .
The Hands-free system may not
operate properly under the following conditions.
–The cell phone is turned off.
– The cell phone is not in the
phone call area. – The battery of the cell phone has
run down.– The cell phone is not connected
to the Hands-free system.– The cell phone is behind the seat
or in the glove box.– A metal material covers or
touches the cell phone.
. Depending on the type of cell phone
that is used, the screen on the cell
phone may remain illuminated while
the ignition switch is in the “ON ”
position. If this occurs, turn the illumi-
nation off by adjusting the cell phonesettings. . Depending on the setting of the cell
phone, the dial lock function may be
activated after making a call. Deacti-
vate the automatic dial lock function of
the cell phone before using the Hands-
free system. . Depending on the type of cell phone
that is used, operation and the sound
volume may be different from those of
cell phones currently used. .
When the ignition switch is turned to
the “LOCK ”position during a call, the
call may be disconnected or continued
on the cell phone depending on the
type of cell phone that is used. Note
that operation of the cell phone may be
necessary if the call is continued on the
cell phone. . Do not speak at the same time as the
other party during a call. If you and the
party speak at the same time, it may be
difficult for the other party to hear your
voice and vice versa. This is normal. . The receiver sound volume should
be set as low as possible. Otherwise,
the party you are calling may notice an
undesirable echo sound. . Speak clearly and loudly.
. Your voice may be difficult to be
heard by the party under the following conditions.
–Driving on a rough road.
– Driving at a high speed.
– Driving with a window open.
– When air from the ventilator
blows directly towards the micro-phone. – When the sound coming from the
ventilator is loud.– When the cell phone is too close
to the microphone. Audio
5-49
– CONTINUED –
Page 254 of 474

Interior light......................................................... 6-2
Dome light .......................................................... 6-2
Map light ............................................................. 6-2
Cargo area light (Outback) ................................... 6-3
Sun visors ........................................................... 6-4
Sun visor extension plate .................................... 6-4
Vanity mirror with light ........................................ 6-5
Storage compartment ......................................... 6-5
Glove box ........................................................... 6-6
Center console box ............................................. 6-6
Overhead console ............................................... 6-8
Pocket (if equipped) ............................................ 6-8
Cup holder ........................................................... 6-8
Front passenger ’s cup holder .............................. 6-9
Rear passenger ’s cup holder ............................... 6-9
Bottle holders ...................................................... 6-9
Accessory power outlets ................................... 6-10 Ashtray (if equipped)
......................................... 6-12
Coat hook ........................................................... 6-13
Shopping bag hook ........................................... 6-13
Legacy .............................................................. 6-13
Outback ............................................................ 6-14
Floor mat ............................................................ 6-14
Cargo area cover (Outback –if equipped) ....... 6-15
Using the cover ................................................. 6-15
To remove the cover housing ... .......................... 6-16
Stowage of the cargo area cover ........................ 6-16
To install the cover housing ............................... 6-17
Convenient tie-down hooks (Outback) ............. 6-17
Under-floor storage compartment .................... 6-18
Rear view camera (if equipped) ........................ 6-19
How to use the rear view camera ....................... 6-20
Viewing range on the screen .............................. 6-21
Help line ............................................................ 6-22 Interior equipment
6
Page 257 of 474

6-4Interior equipment
.The ignition switch is turned from the
“ LOCK ”position to the “Acc ”or “ON ”
position. . The rear gate is locked using the
remote keyless entry transmitter.
The setting of the period for which the
lights remain on (OFF delay timer) can be
changed by a SUBARU dealer. Contact
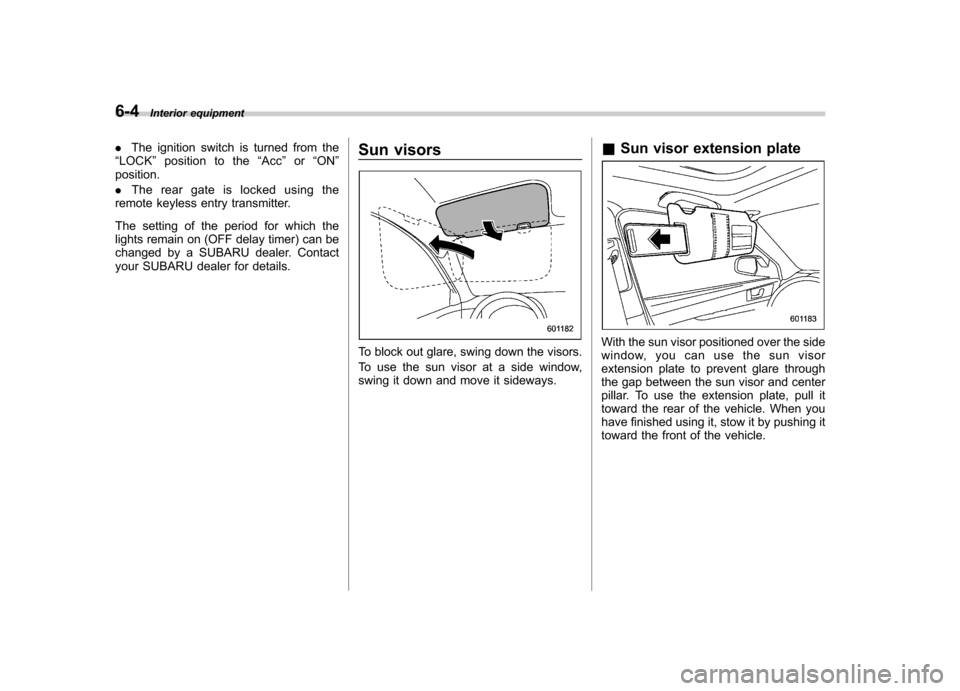
your SUBARU dealer for details. Sun visors
To block out glare, swing down the visors.
To use the sun visor at a side window,
swing it down and move it sideways.&
Sun visor extension plateWith the sun visor positioned over the side
window, you can use the sun visor
extension plate to prevent glare through
the gap between the sun visor and center
pillar. To use the extension plate, pull it
toward the rear of the vehicle. When you
have finished using it, stow it by pushing it
toward the front of the vehicle.
Page 269 of 474

6-16Interior equipment
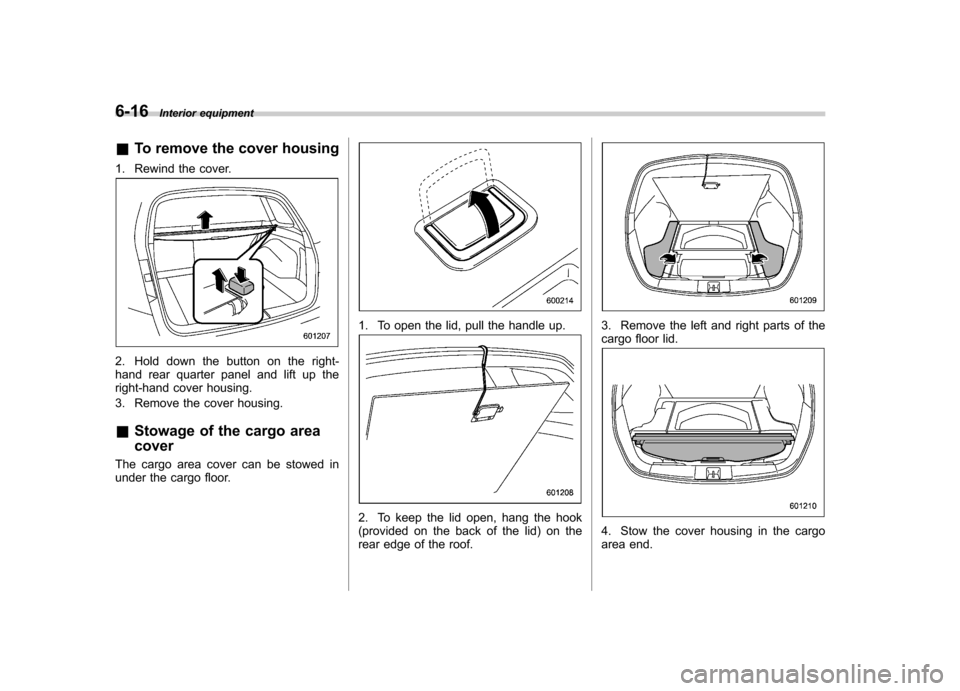
& To remove the cover housing
1. Rewind the cover.
2. Hold down the button on the right-
hand rear quarter panel and lift up the
right-hand cover housing.
3. Remove the cover housing. & Stowage of the cargo area cover
The cargo area cover can be stowed in
under the cargo floor.
1. To open the lid, pull the handle up.
2. To keep the lid open, hang the hook
(provided on the back of the lid) on the
rear edge of the roof.
3. Remove the left and right parts of the
cargo floor lid.
4. Stow the cover housing in the cargo
area end.
Page 295 of 474

7-18Starting and operating
than 5 seconds in any position
except the “N ” or “P ” position
when the brake is applied or
when chocks are used in the
wheels. This may cause the
transmission fluid to overheat.
. Avoid shifting from one of the
forward driving positions into the“ R ” position or vice versa until
the vehicle has completely
stopped. Such shifting may
cause damage to the transmis-sion.
. When parking the vehicle, first
securely apply the parking brake
and then place the select lever inthe “P ” position. Avoid parking
for a long time with the select
lever in any other position as
doing so could result in a dead
battery.
NOTE . For AT models, when the engine
coolant temperature is still low, the
transmission will upshift to higher
engine speeds than when the coolant
temperature is sufficiently high in order
to shorten the warm-up time and
improve driveability. The gearshift tim-
ing will automatically shift to the nor- mal timing after the engine has warmedup..
Immediately after transmission fluid
is replaced, you may feel that the
transmission operation is somewhat
unusual. This results from invalidation
of data which the on-board computer
has collected and stored in memory to
allow the transmission to shift at the
most appropriate times for the current
condition of your vehicle. Optimized
shifting will be restored as the vehicle
continues to be driven for a while.. When driving a vehicle that is
equipped with CVT under continuous
heavy load conditions such as towing a
camper or climbing a long, steep hill,
the engine speed or the vehicle speed
may automatically be reduced. This is
not a malfunction. This phenomenon
results from the engine control func-
tion maintaining the cooling perfor-
mance of the vehicle. The engine and
vehicle speed will return to a normal
speed when the engine is able to
maintain the optimum cooling perfor-
mance after the heavy load decreases.
Driving under a heavy load must be
performed with extreme care. Do not
try to pass a vehicle in front when
driving on an uphill slope while towing.. The continuously variable transmis-
sion is a chain type system that provides superior transmission effi-
ciency for maximum fuel economy. At
times, depending on varying driving
conditions, a chain operating sound
may be heard that is characteristic of
this type of system.
& Select lever
: With the brake pedal depressed, shift
while pressing the button in
: Shift while pressing the button in: Shift without pressing the button
The select lever has four positions, “P ”,
“ R ”, “N ”, “D ”and also has a manual gate
for using the manual mode. ! P (Park)
This position is for parking the vehicle and
starting the engine.
Page 303 of 474

7-26Starting and operating
warning light illuminate simultaneously,
take the following steps.
1. Stop the vehicle in the nearest safe,
flat place.
2. Shut down the engine, then restart it.
3. Release the parking brake. If both
warning lights turn off, the EBD system
may be malfunctioning.
Drive carefully to the nearest SUBARU
dealer and have the system inspected.
4. If both warning lights illuminate again
and remain illuminated after the engine
has been restarted, shut down the engine
again, apply the parking brake, and check
the brake fluid level. Refer to “Brake fluid ”
F 11-25.
5. If the brake fluid level is not below the“ MIN ”mark, the EBD system may be
malfunctioning. Drive carefully to the
nearest SUBARU dealer and have the
system inspected.
6. If the brake fluid level is below the “ MIN ”mark, DO NOT drive the vehicle.
Instead, have the vehicle towed to the
nearest SUBARU dealer for repair.
WARNING
. Driving with the brake system
warning light on is dangerous.
This indicates your brake system may not be working properly. If
the light remains on, have the
brakes inspected by a SUBARU
dealer immediately.
. If at all in doubt about whether
the brakes are operating prop-
erly, do not drive the vehicle.
Have your vehicle towed to the
nearest SUBARU dealer for re-
pair. Vehicle Dynamics Control system
WARNING
Always use the utmost care in driving –overconfidence because
you are driving with a Vehicle Dy-
namics Control system equipped
vehicle could easily lead to a ser-
ious accident.
CAUTION
. Even if your vehicle is equipped
with Vehicle Dynamics Control
system, winter tires should be
used when driving on snow-cov-
ered or icy roads; in addition,
vehicle speed should be reduced
considerably. Simply having a
Vehicle Dynamics Control sys-
tem does not guarantee that the
vehicle will be able to avoid
accidents in any situation.
. Activation of the Vehicle Dy-
namics Control system is an
indication that the road being
travelled on has a slippery sur-
face; since having Vehicle Dy-
namics Control is no guarantee