2012 SUBARU OUTBACK Car seat
[x] Cancel search: Car seatPage 58 of 474
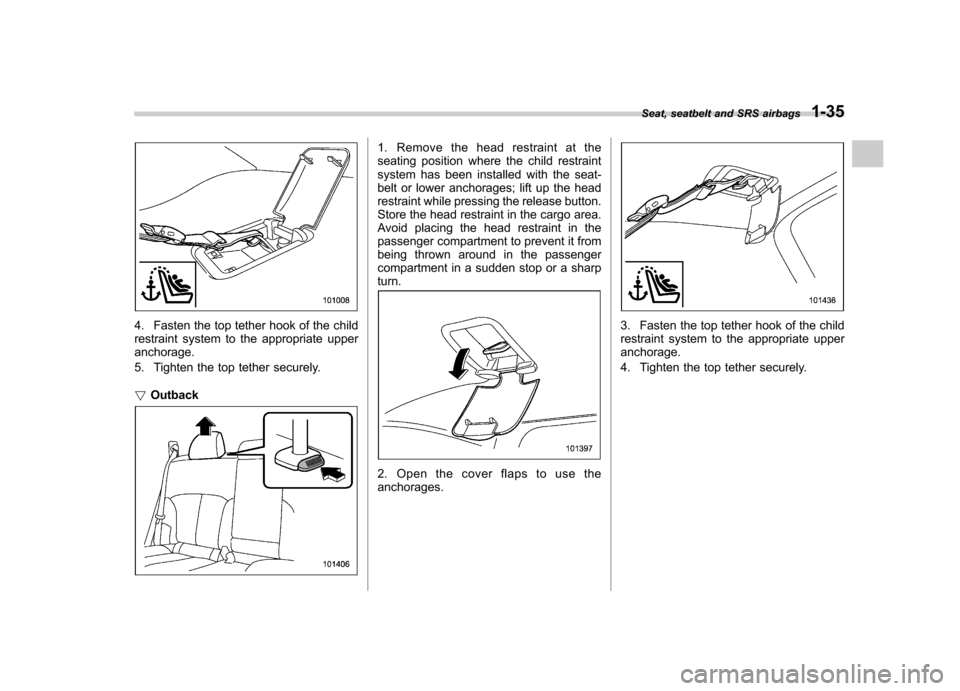
4. Fasten the top tether hook of the child
restraint system to the appropriate upperanchorage.
5. Tighten the top tether securely. !Outback
1. Remove the head restraint at the
seating position where the child restraint
system has been installed with the seat-
belt or lower anchorages; lift up the head
restraint while pressing the release button.
Store the head restraint in the cargo area.
Avoid placing the head restraint in the
passenger compartment to prevent it from
being thrown around in the passenger
compartment in a sudden stop or a sharpturn.
2. Open the cover flaps to use the anchorages.
3. Fasten the top tether hook of the child
restraint system to the appropriate upperanchorage.
4. Tighten the top tether securely. Seat, seatbelt and SRS airbags
1-35
Page 68 of 474

1) Rear wheel house impact sensor (left-hand side)
2) Curtain airbag module (left-hand side)
3) Front door impact sensor (left-hand side)
4) Curtain airbag module (right-hand side)
5) Front passenger ’s occupant detection
control module
6) Center pillar impact sensor (left-hand side)
7) Seatbelt pretensioner (left-hand side)
8) Side airbag module (left-hand side)
9) Seatbelt buckle switch (right-hand side)
10) Rear wheel house impact sensor (right- hand side)
11) Side airbag module (right-hand side)
12) Seatbelt pretensioner (right-hand side)
13) Center pillar impact sensor (right-hand side)
14) Front passenger ’s occupant detection
system weight sensor
15) Front door impact sensor (right-hand side) &
SUBARU advanced frontal
airbag system, SRS side air-
bag and SRS curtain airbag
Your vehicle is equipped with a SUBARU
advanced frontal airbag system that com-
plies with the new advanced frontal airbag
requirements in the amended Federal
Motor Vehicle Safety Standard (FMVSS)
No. 208.
The SUBARU advanced frontal airbag
system automatically determines the de-
ployment force of the driver ’s SRS frontal
airbag at the time of deployment as well as
whether or not to activate the frontpassenger ’s SRS frontal airbag and, if
activated, the deployment force of the
SRS frontal airbag at the time of deploy-ment.
Your vehicle has warning labels on the driver ’s and front passenger ’s sun visors
beginning with the phrase “EVEN WITH
ADVANCED AIR BAGS ”and a tag
attached to the glove box lid beginning
with the phrase “Even with Advanced Air
Bags ”. Make sure that you carefully read
the instructions on the warning labels andtag.
Always wear your seatbelt. The SUBARU
advanced frontal airbag system is a
supplemental restraint system and must
be used in combination with a seatbelt. All occupants should wear a seatbelt or be
seated in an appropriate child restraintsystem.
For the locations of the driver
’s SRS
frontal airbag, front passenger ’sSRS
frontal airbag, SRS side airbag and SRS
curtain airbag, refer to “Components ”F 1-
42.
In a moderate to severe frontal collision,
the driver ’s and front passenger ’s SRS
frontal airbags deploy and supplement the
seatbelts by reducing the impact on thedriver ’s and front passenger ’s head and
chest.
Inamoderatetoseveresideimpact
collision, the SRS side airbag on the
impacted side of the vehicle deploys
between the occupant and the door panel
and supplements the seatbelt by reducing
the impact to the occupant ’s chest and
waist.
Inamoderatetoseveresideimpact
collision, the SRS curtain airbag on the
impacted side of the vehicle deploys
between the occupant and the side
window and supplements the seatbelt by
reducing the impact to the occupant ’s
head.
NOTE
The SRS side airbag, SRS curtain air-
bag and seatbelt pretensioner are not Seat, seatbelt and SRS airbags
1-45
– CONTINUED –
Page 75 of 474
1-52Seat, seatbelt and SRS airbags
both driver ’s and front passenger ’s SRS
frontal airbags may be activated when the
vehicle sustains a hard impact in the
undercarriage area from the road surface
(such as when the vehicle plunges into a
deep ditch, is severely impacted or
knocked hard against an obstacle on the
road such as a curb).
Page 86 of 474
![SUBARU OUTBACK 2012 5.G Owners Manual .Front sub sensor
– Right-hand side
– Left-hand side
. Airbag control module (including im-
pact sensors [all models] and rollover
sensors [Outback]) . Frontal airbag module
– Driver ’s side
SUBARU OUTBACK 2012 5.G Owners Manual .Front sub sensor
– Right-hand side
– Left-hand side
. Airbag control module (including im-
pact sensors [all models] and rollover
sensors [Outback]) . Frontal airbag module
– Driver ’s side](/manual-img/17/7304/w960_7304-85.png)
.Front sub sensor
– Right-hand side
– Left-hand side
. Airbag control module (including im-
pact sensors [all models] and rollover
sensors [Outback]) . Frontal airbag module
– Driver ’s side
– Front passenger ’s side
. Center pillar impact sensor
– Right-hand side
– Left-hand side
. Front door impact sensor
– Right-hand side
– Left-hand side
. Side airbag module
– Driver ’s side
– Front passenger ’s side
. Rear wheel house impact sensor
– Right-hand side
– Left-hand side
. Curtain airbag module
– Right-hand side
– Left-hand side
. Seatbelt pretensioner
– Driver ’s side
– Front passenger ’s side
. Seatbelt buckle switch (front passen-
ger ’s side)
. Front passenger ’s occupant detection system weight sensor.
Front passenger ’s occupant detection
control module. Front passenger ’s frontal airbag ON
and OFF indicator. All related wiring
WARNING
If the warning light exhibits any of
the following conditions, there may
be a malfunction in the seatbelt
pretensioners and/or SRS airbag
system. Immediately take your vehi-
cle to your nearest SUBARU dealer
to have the system checked. Unless
checked and properly repaired, the
seatbelt pretensioners and/or SRS
airbags will operate improperly (e.g.
SRS airbags may inflate in a very
minor collision or not inflate in a
severe collision), which may in-
crease the risk of injury. . Flashing or flickering of the warn-
ing light
. No illumination of the warning
light when the ignition switch is
first turned to the “ON ”position
. Continuous illumination of the
warning light
. Illumination of the warning light while driving
& SRS airbag system servicing
WARNING
. When discarding an airbag mod-
ule or scrapping the entire vehi-
cle damaged by a collision, con-
sult your SUBARU dealer.
. The SRS airbag has no user-
serviceable parts. Do not use
electrical test equipment on any
circuit related to the SRS airbag
system. For required servicing of
the SRS airbag, consult your
nearest SUBARU dealer. Tamper-
ing with or disconnecting thesystem ’s wiring could result in
accidental inflation of the SRS
airbag or could make the system
inoperative, which may result in
serious injury.
Seat, seatbelt and SRS airbags
1-63
– CONTINUED –
Page 88 of 474
.Installation of additional electri-
cal/electronic equipment such as
a mobile two-way radio on or
near the SRS airbag system
components and/or wiring
. Modifications on or inside the
front door panels for the purpose
of a speaker replacement or
sound insulation
CAUTION
Do not perform any of the following
modifications. Such modifications
can interfere with proper operation
of the SRS airbag system. . Attachment of any equipment
(bush bar, bullbar, winches, snow
plow, skid/sump plate, etc.) other
than genuine SUBARU acces-
sory parts.
. Modification of the suspension
system or front end structure.
. Installation of a tire of different
size and construction from the
tires specified on the vehicle
placard attached to the driver ’s
door pillar or specified for indivi-
dual vehicle models in this Own- er ’s Manual. .
Attachment of any equipment
(side steps or side sill protectors,
etc.) other than genuine SUBARU
accessory parts to the side body.
Always consult your SUBARU dealer if
you want to install any accessory parts on
your vehicle. Seat, seatbelt and SRS airbags
1-65
Page 99 of 474
2-10Keys and doors
NOTE
If the interval between presses is too
short when you press the “
”button
three times, the system may not re-
spond to the signals from the remote
transmitter.
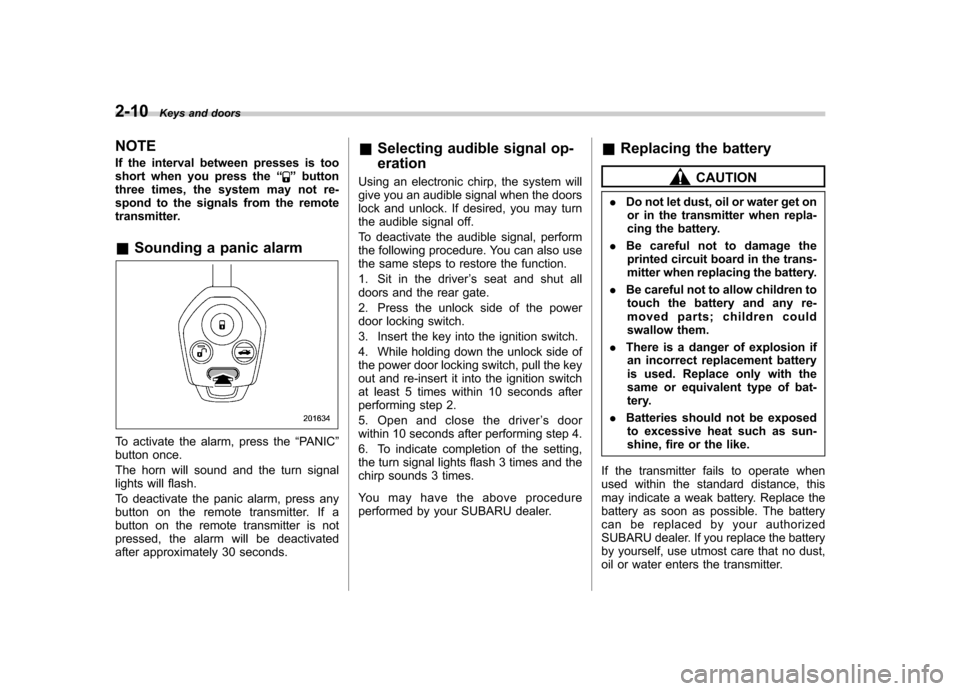
& Sounding a panic alarm
To activate the alarm, press the “PANIC ”
button once.
The horn will sound and the turn signal
lights will flash.
To deactivate the panic alarm, press any
button on the remote transmitter. If a
button on the remote transmitter is not
pressed, the alarm will be deactivated
after approximately 30 seconds. &
Selecting audible signal op- eration
Using an electronic chirp, the system will
give you an audible signal when the doors
lock and unlock. If desired, you may turn
the audible signal off.
To deactivate the audible signal, perform
the following procedure. You can also use
the same steps to restore the function.
1. Sit in the driver ’s seat and shut all
doors and the rear gate.
2. Press the unlock side of the power
door locking switch.
3. Insert the key into the ignition switch.
4. While holding down the unlock side of
the power door locking switch, pull the key
out and re-insert it into the ignition switch
at least 5 times within 10 seconds after
performing step 2.
5. Open and close the driver ’s door
within 10 seconds after performing step 4.
6. To indicate completion of the setting,
the turn signal lights flash 3 times and the
chirp sounds 3 times.
You may have the above procedure
performed by your SUBARU dealer. &
Replacing the battery
CAUTION
. Do not let dust, oil or water get on
or in the transmitter when repla-
cing the battery.
. Be careful not to damage the
printed circuit board in the trans-
mitter when replacing the battery.
. Be careful not to allow children to
touch the battery and any re-
moved parts; children could
swallow them.
. There is a danger of explosion if
an incorrect replacement battery
is used. Replace only with the
same or equivalent type of bat-
tery.
. Batteries should not be exposed
to excessive heat such as sun-
shine, fire or the like.
If the transmitter fails to operate when
used within the standard distance, this
may indicate a weak battery. Replace the
battery as soon as possible. The battery
can be replaced by your authorized
SUBARU dealer. If you replace the battery
by yourself, use utmost care that no dust,
oil or water enters the transmitter.
Page 108 of 474

!Disarming the system
To disarm the system, briefly press the “
” button on the transmitter.
& Tripped sensor identification
The security indicator light flashes when
the alarm system has been triggered.
Also, the number of flashes indicates the
location of unauthorized intrusion or the
severity of impact on the vehicle.
When the ignition switch is turned to the “ ON ”position, the indicator light will
illuminate for 1 second and then flash asfollows: . When a door or rear gate (Outback)
was opened: 5 times. When the trunk (Legacy) was opened:
4 times . When a strong impact or multiple
impacts were sensed: twice (only models
with shock sensors (dealer option)) . When a light impact was sensed: once
(only models with shock sensors (dealer option))
& Shock sensors (dealer op- tion)
The shock sensors trigger the alarm
system when they sense impacts applied
to the vehicle and when any of their
electric wires is cut. The alarm system causes the horn to sound and the turn
signal lights to flash for a short time when
the sensed impact is weak, but it warns of
a strong impact or multiple impacts by
sounding the horn and flashing the turn
signal lights, both lasting approximately 30seconds.
If you desire, your SUBARU dealer can
connect them and set them for activation
or deactivation.
NOTE . The shock sensors are not always
able to sense impacts caused by break-
ing in, and cannot sense an impact that
does not cause vibration (such as
breaking the glass using a rescuehammer).. The shock sensors may sense vi-
bration like those shown in the follow-
ing and trigger the alarm system.
Select the settings of the alarm system
and shock sensors appropriately de-
pending on where you usually park
your vehicle.Examples:
–Vibration from construction site
– Vibration in multistory car park
– Vibration from trains
. You can have the sensitivity of the
shock sensors adjusted to your pre-
ference by your SUBARU dealer. Child safety locksWARNING
Always turn the child safety locks to the “LOCK ”position when children
sit on the rear seat. Serious injury
could result if a child accidentally
opens the door and falls out.
Each rear door has a child safety lock that
prevents the door from being opened even
if the inside door handle is pulled.
When the child safety lock lever is in the “ LOCK ”position, the door cannot be
opened from inside regardless of the
position of the inner door handle lock
lever. The door can only be opened from Keys and doors
2-19
– CONTINUED –
Page 268 of 474
.Do not use more than one floor
mat. Cargo area cover (Outback
–if equipped)
The cargo area cover is provided for
covering the cargo area and to protect its
contents from direct sunlight. This cover is
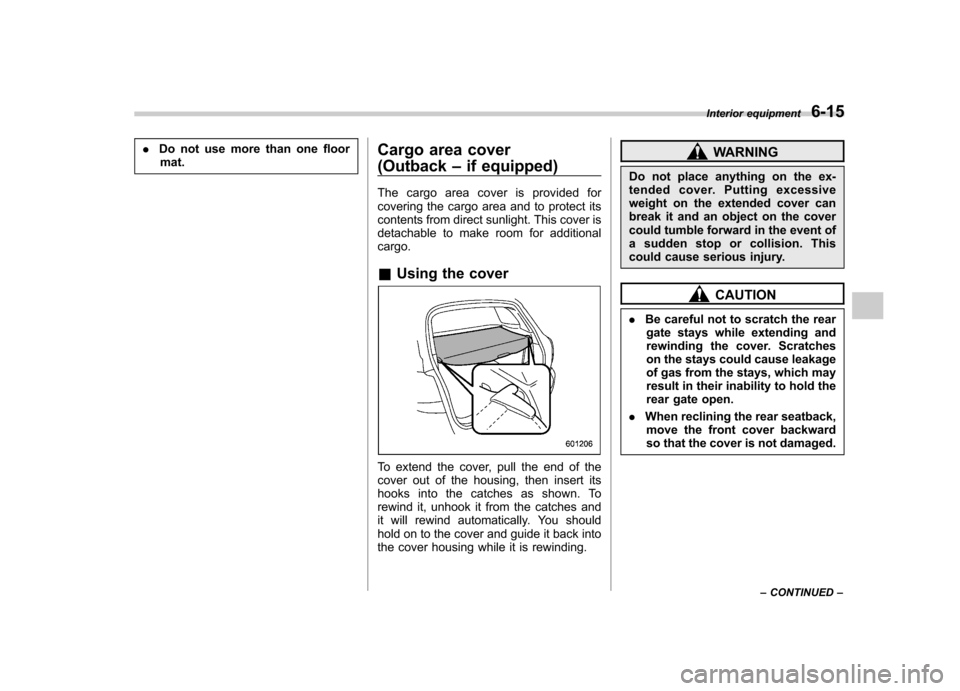
detachable to make room for additionalcargo. & Using the cover
To extend the cover, pull the end of the
cover out of the housing, then insert its
hooks into the catches as shown. To
rewind it, unhook it from the catches and
it will rewind automatically. You should
hold on to the cover and guide it back into
the cover housing while it is rewinding.
WARNING
Do not place anything on the ex-
tended cover. Putting excessive
weight on the extended cover can
break it and an object on the cover
could tumble forward in the event of
a sudden stop or collision. This
could cause serious injury.
CAUTION
. Be careful not to scratch the rear
gate stays while extending and
rewinding the cover. Scratches
on the stays could cause leakage
of gas from the stays, which may
result in their inability to hold the
rear gate open.
. When reclining the rear seatback,
move the front cover backward
so that the cover is not damaged. Interior equipment
6-15
– CONTINUED –