2012 SUBARU OUTBACK neutral
[x] Cancel search: neutralPage 293 of 474
7-16Starting and operating
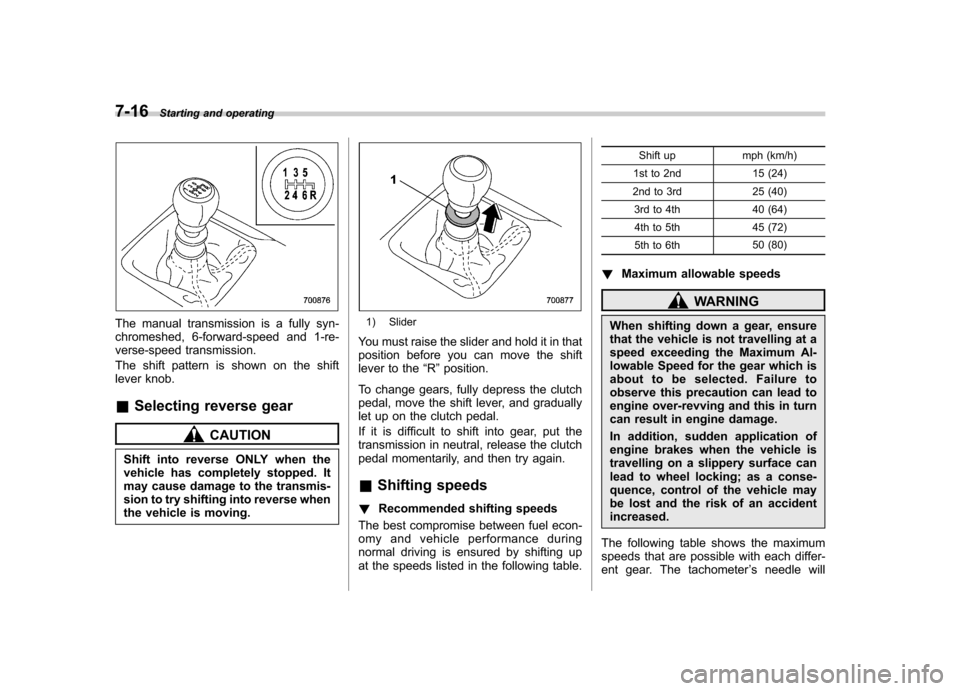
The manual transmission is a fully syn-
chromeshed, 6-forward-speed and 1-re-
verse-speed transmission.
The shift pattern is shown on the shift
lever knob. &Selecting reverse gear
CAUTION
Shift into reverse ONLY when the
vehicle has completely stopped. It
may cause damage to the transmis-
sion to try shifting into reverse when
the vehicle is moving.
1) Slider
You must raise the slider and hold it in that
position before you can move the shift
lever to the “R ”position.
To change gears, fully depress the clutch
pedal, move the shift lever, and gradually
let up on the clutch pedal.
If it is difficult to shift into gear, put the
transmission in neutral, release the clutch
pedal momentarily, and then try again.
& Shifting speeds
! Recommended shifting speeds
The best compromise between fuel econ-
omy and vehicle performance during
normal driving is ensured by shifting up
at the speeds listed in the following table. Shift up mph (km/h)
1st to 2nd 15 (24)
2nd to 3rd 25 (40) 3rd to 4th 40 (64)4th to 5th 45 (72)
5th to 6th 50 (80)
! Maximum allowable speeds
WARNING
When shifting down a gear, ensure
that the vehicle is not travelling at a
speed exceeding the Maximum Al-
lowable Speed for the gear which is
about to be selected. Failure to
observe this precaution can lead to
engine over-revving and this in turn
can result in engine damage.
In addition, sudden application of
engine brakes when the vehicle is
travelling on a slippery surface can
lead to wheel locking; as a conse-
quence, control of the vehicle may
be lost and the risk of an accidentincreased.
The following table shows the maximum
speeds that are possible with each differ-
ent gear. The tachometer ’s needle will
Page 296 of 474
In this position, the transmission is me-
chanically locked to prevent the vehicle
from rolling freely.
When you park the vehicle, first apply the
parking brake, then shift into the“P ”
position. Do not hold the vehicle with only
the transmission.
To shift the select lever from the “P ”to any
other position, you should depress the
brake pedal fully then move the select
lever. This prevents the vehicle from
lurching when it is started. NOTE
To protect the engine while the “P ”
position is selected, the engine is
controlled such that the engine speed
may not become too high even if the
accelerator pedal is depressed hard. ! R (Reverse)
This position is for backing the vehicle.
To shift from the “N ” to “R ”position, stop
the vehicle completely then move the
lever to the “R ”position.
! N (Neutral)
This position is for restarting a stalledengine.
In this position the wheels and transmis-
sion are not locked. In this position, the transmission is neutral; the vehicle will roll
freely, even on the slightest incline unless
the parking brake or foot brake is applied.
Avoid coasting with the transmission neutral.
During coasting, there is no engine brak-
ing effect.
NOTE . To protect the engine while the “N ”
position is selected, the engine is
controlled such that the engine speed
may not become too high even if the
accelerator pedal is depressed hard.. If the select lever is in the “N ”
position when you stop the engine for
parking, you may not subsequently be
able to move it to the “R ” and “P ”
positions. If this happens, turn the
ignition switch to the “ON ”position.
You will then be able to move the select
lever to the “P ” position.
WARNING
Do not drive the vehicle with the
select lever in the “N ” (neutral)
position. Engine braking has no
effect in this condition and the risk
of an accident is consequently in-creased. !
D (Drive)
This position is for normal driving. The
transmission automatically shifts into a
suitable gear according to the vehicle
speed and the acceleration you require.
When more acceleration is required in this
position, depress the accelerator pedal
fully to the floor and hold that position. The
transmission will automatically downshift.
When you release the pedal, the transmis-
sion will return to the original gear posi-tion.
To use the manual mode, move the lever
from this position into the manual gate.
NOTE (AT models only)
Automatic downshifts to 4th or 3rd may
occur even when driving on a level
road depending on conditions, such as
how hard you depress the brake pedal. ! While climbing a grade
When driving up a hill, undesired upshift is
prevented from taking place when the
accelerator is released. This minimizes
the chance of subsequent downshifting to
a lower gear when accelerating again.
This prevents repeated upshifting and
downshifting resulting in a smoother op-
eration of the vehicle. Starting and operating
7-19
– CONTINUED –
Page 313 of 474
7-36Starting and operating
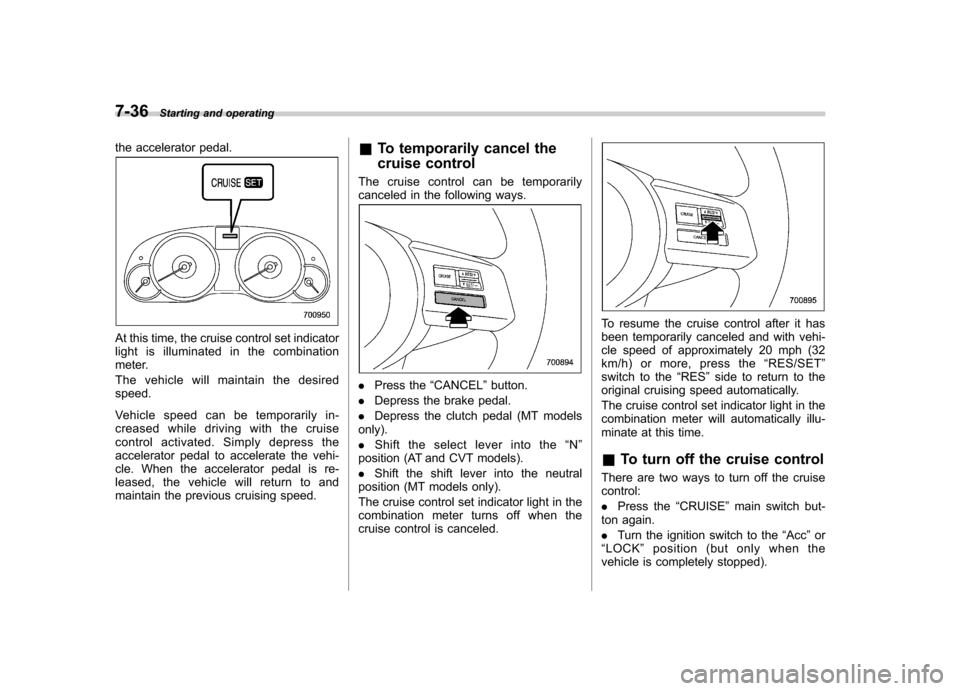
the accelerator pedal.
At this time, the cruise control set indicator
light is illuminated in the combination
meter.
The vehicle will maintain the desired speed.
Vehicle speed can be temporarily in-
creased while driving with the cruise
control activated. Simply depress the
accelerator pedal to accelerate the vehi-
cle. When the accelerator pedal is re-
leased, the vehicle will return to and
maintain the previous cruising speed. &
To temporarily cancel the
cruise control
The cruise control can be temporarily
canceled in the following ways.
. Press the “CANCEL ”button.
. Depress the brake pedal.
. Depress the clutch pedal (MT models
only). . Shift the select lever into the “N ”
position (AT and CVT models).. Shift the shift lever into the neutral
position (MT models only).
The cruise control set indicator light in the
combination meter turns off when the
cruise control is canceled.
To resume the cruise control after it has
been temporarily canceled and with vehi-
cle speed of approximately 20 mph (32
km/h) or more, press the “RES/SET ”
switch to the “RES ”side to return to the
original cruising speed automatically.
The cruise control set indicator light in the
combination meter will automatically illu-
minate at this time. & To turn off the cruise control
There are two ways to turn off the cruise control: . Press the “CRUISE ”main switch but-
ton again.. Turn the ignition switch to the “Acc ”or
“ LOCK ”position (but only when the
vehicle is completely stopped).
Page 360 of 474
turned off, it will take greater
effort to operate the brake pedal
and steering wheel.
CAUTION
. If transmission failure occurs,
transport your vehicle on a flat-
bed truck.
. Do not run the engine while being
towed using this method. Trans-
mission damage could result if
the vehicle is towed with the
engine running.
. For AT and CVT models, the
traveling speed must be limited
to less than 20 mph (30 km/h) and
the traveling distance to less
than 31 miles (50 km). For greater
speeds and distances, transport
your vehicle on a flat-bed truck.
1. Release the parking brake and put the
transmission in neutral.
2. The ignition switch should be in the “ Acc ”position while the vehicle is being
towed.
3. Take up slack in the towline slowly to
prevent damage to the vehicle. Electronic parking brake
–if
the electronic parking brake
cannot be releasedWARNING
. When the electronic parking
brake cannot be released, the
electronic parking brake system
may malfunction. Driving in such
conditions may cause an unex-
pected accident. Contact your
SUBARU dealer for inspection
as soon as possible.
. You can release the electronic
parking brake by using the elec-
tronic parking brake release tool
in case of an emergency. How-
ever, after releasing the electro-
nic parking brake by using the
electronic parking brake release
tool, contact your SUBARU deal-
er for inspection as soon aspossible.
. Release the electronic parking
brakebyusingtheelectronic
parking brake release tool on a
level road. Otherwise, the vehicle
may move, which could cause anaccident. .
When releasing th e electronic
parking brake by using the elec-
tronic parking brake release tool,
always perform the followingitems. – Shift the shift lever in the “1 ”
or “R ” position (MT models).
– Shift the select lever in the “P ”
position (AT and CVT models).
– Use tire stops under the tires.
. When releasing th e electronic
parking brake by using the elec-
tronic parking brake release tool,
make sure that the ignition
switch is in the “LOCK ”position.
Otherwise, the electronic parking
brake system may operate and
the electronic parking brake re-
lease tool may rotate and unex-
pected accident may occur.
CAUTION
. Under certain weather conditions
(rain, snow, sandstorm, etc.), do
not release the electronic parking
brakebyusingtheelectronic
parking brake release tool. If
water or dust enters the device,
the device may malfunction. In case of emergency
9-17
– CONTINUED –
Page 367 of 474

10-2Appearance care
Exterior care &Washing
CAUTION
. When washing the vehicle, the
brakes may get wet. As a result,
the brake stopping distance will
be longer. To dry the brakes,
drive the vehicle at a safe speed
while lightly pressing the brake
pedal to heat up the brakes.
. Do not wash the engine compart-
ment and areas adjacent to it. If
water enters the engine air in-
take, electrical parts or the power
steering fluid reservoir, it will
cause engine trouble or a mal-
function of the power steering.
. Do not use any organic solvents
when washing the surface of the
bulb assembly cover. However, if
a detergent with organic solvents
is used to wash the cover sur-
face, completely rinse off the
detergent with water. Otherwise,
the cover surface may be da-maged.
. Outback: Since your vehicle is
equipped with a rear wiper, auto-
matic car-wash brushes could become tangled around it, dama-
ging the wiper arm and other
components. Ask the automatic
car-wash operator not to let the
brushes touch the wiper arm or
to fix the wiper arm on the rear
window glass with adhesive tape
before operating the machine.
NOTE
When having your vehicle washed in
an automatic car wash, make sure
beforehand that the car wash is of
suitable type.
The best way to preserve your vehicle ’s
beauty is frequent washing. Wash the
vehicle at least once a month to avoid
contamination by road grime.
Wash dirt off with a wet sponge and plenty
of lukewarm or cold water. Do not wash
the vehicle with hot water and in directsunlight.
Salt, chemicals, insects, tar, soot, tree
sap, and bird droppings should be washed
off by using a light detergent, as required.
If you use a light detergent, make certain
that it is a neutral detergent. Do not use
strong soap or chemical detergents. All
cleaning agents should be promptly
flushed from the surface and not allowed to dry there. Rinse the vehicle thoroughly
with plenty of lukewarm water. Wipe the
remaining water off with a chamois or softcloth. !
Washing the underbody
Chemicals, salts and gravel used for
deicing road surfaces are extremely cor-
rosive, accelerating the corrosion of un-
derbody components, such as the exhaust
system, fuel and brake lines, brake
cables, floor pan and fenders, and sus-pension.
Thoroughly flush the underbody and in-
side of the fenders with lukewarm or cold
water at frequent intervals to reduce the
harmful effects of such agents.
Mud and sand adhering to the underbody
components may accelerate their corro-sion.
After driving off-road or on muddy or
sandy roads, wash the mud and sand off
the underbody.
Carefully flush the suspension and axle
parts, as they are particularly prone to
mud and sand buildup. Do not use a
sharp-edged tool to remove caked mud.
CAUTION
. Be careful not to damage brake
hoses, sensor harnesses, and
Page 368 of 474

other parts when washing sus-
pension components.
. Be careful not to flush the engine
bottom for a long time. It may
cause damage of some electricalparts.
! Using a warm water washer
. Keep a good distance of 12 in (30 cm)
or more between the washer nozzle and
the vehicle. . Do not wash the same area continu-
ously.. If a stain will not come out easily, wash
by hand. Some warm water washers are
of the high temperature, high pressure
type, and they can damage or deform the
resin parts such as mouldings, or cause
water to leak into the vehicle.
& Waxing and polishing
Always wash and dry the vehicle before
waxing and polishing.
Use a good quality polish and wax and
apply them according to the manufac-turer ’s instructions. Wax or polish when
the painted surface is cool.
Be sure to polish and wax the chrome trim,
as well as the painted surfaces. Loss of
wax on a painted surface leads to loss of
the original luster and also quickens the deterioration of the surface. It is recom-
mended that a coat of wax be applied at
least once a month, or whenever the
surface no longer repels water.
If the appearance of the paint has dimin-
ished to the point where the luster or tone
cannot be restored, lightly polish the
surface with a fine-grained compound.
Never polish just the affected area, but
include the surrounding area as well.
Always polish in only one direction. A
No. 2000 grain compound is recom-
mended. Never use a coarse-grained
compound. Coarser grained compounds
have a smaller grain-size number and
could damage the paint. After polishing
with a compound, coat with wax to restore
the original luster. Frequent polishing with
acompoundoranincorrectpolishing
technique will result in removing the paint
layer and exposing the undercoat. When
in doubt, it is always best to contact your
SUBARU dealer or an auto paint specia-list.
CAUTION
Do not use any agents with organic
solvents on the surface of the bulb
assembly cover. However, if a polish
or wax with organic solvents is
applied to the cover surface, com- pletely wipe off the polish or wax.
Otherwise, the cover surface may bedamaged.
NOTE
Be careful not to block the windshield
washer nozzles with wax when waxing
the vehicle. & Cleaning aluminum wheels
. Promptly wipe the aluminum wheels
clean of any kind of grime or agent. If dirt
is left on too long, it may be difficult to
clean off. . Do not use soap containing grit to
clean the wheels. Be sure to use a neutral
cleaning agent, and later rinse thoroughly
with water. Do not clean the wheels with a
stiff brush or expose them to a high-speed
washing device. . Clean the vehicle (including the alumi-
num wheels) with water as soon as
possible when it has been splashed with
sea water, exposed to sea breezes, or
driven on roads treated with salt or otheragents. Appearance care
10-3
Page 371 of 474

10-6Appearance care
& Monitor (if equipped)
To clean the audio/navigation monitor,
wipe it with a silicone cloth or with a soft
cloth. If the monitor is extremely dirty,
clean it with a soft cloth moistened with
neutral detergent then carefully wipe off
any remaining detergent. NOTE . Do not spray neutral detergent di-
rectly onto the monitor. Doing so could
damage the monitor ’s components.
. Do not wipe the monitor with a hard
cloth. Doing so could scratch the
monitor.. Do not use cleaning fluid that con-
tains thinner, gasoline, or any other
volatile substance. Such cleaning fluid
could erase the lettering on the
switches at the bottom of the monitor.
Page 410 of 474
Replacement of wiper blades
Grease, wax, insects, or other materials
on the windshield or the wiper blade
results in jerky wiper operation and streak-
ing on the glass. If you cannot remove the
streaks after operating the windshield
washer or if the wiper operation is jerky,
clean the outer surface of the windshield
(or rear window) and the wiper blades
using a sponge or soft cloth with a neutral
detergent or mild abrasive cleaner. After
cleaning, rinse the windshield and wiper
blades with clean water. The windshield is
clean if beads do not form when you rinse
the windshield with water.
CAUTION
. Do not clean the wiper blades
with gasoline or a solvent, such
as paint thinner or benzine. This
will cause deterioration of the
wiper blades.
. Whenyouwishtoraisethe
passenger-side wiper arm, first
raise the driver-side wiper arm.
Otherwise, the passenger-side
wiper assembly and driver-side
wiper assembly will touch each
other, possibly resulting inscratches. .
Return the passenger-side wiper
arm to its original position before
returning the driver-side wiper
arm to its original position.
Otherwise, the passenger-side
wiper assembly and driver-side
wiper assembly will touch each
other, possibly resulting inscratches.
. When returning the raised wipers
to the original positions, return
the wipers slowly on the wind-
shield by hand. Returning the
wipers from the detached posi-
tions by the spring operation
might change the shape of the
wiper arm or scratch the wind-shield.
If you cannot eliminate the streaking even
after following this method, replace the
wiper blades using the following proce-dures. &
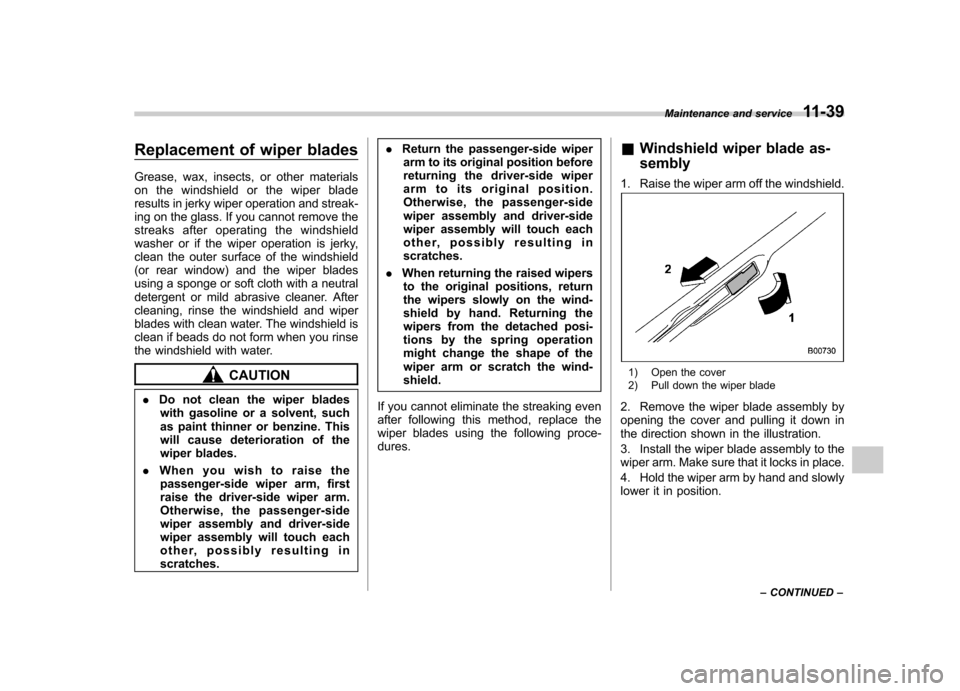
Windshield wiper blade as- sembly
1. Raise the wiper arm off the windshield.1) Open the cover
2) Pull down the wiper blade
2. Remove the wiper blade assembly by
opening the cover and pulling it down in
the direction shown in the illustration.
3. Install the wiper blade assembly to the
wiper arm. Make sure that it locks in place.
4. Hold the wiper arm by hand and slowly
lower it in position. Maintenance and service
11-39
– CONTINUED –