2012 SUBARU OUTBACK high beam
[x] Cancel search: high beamPage 19 of 474

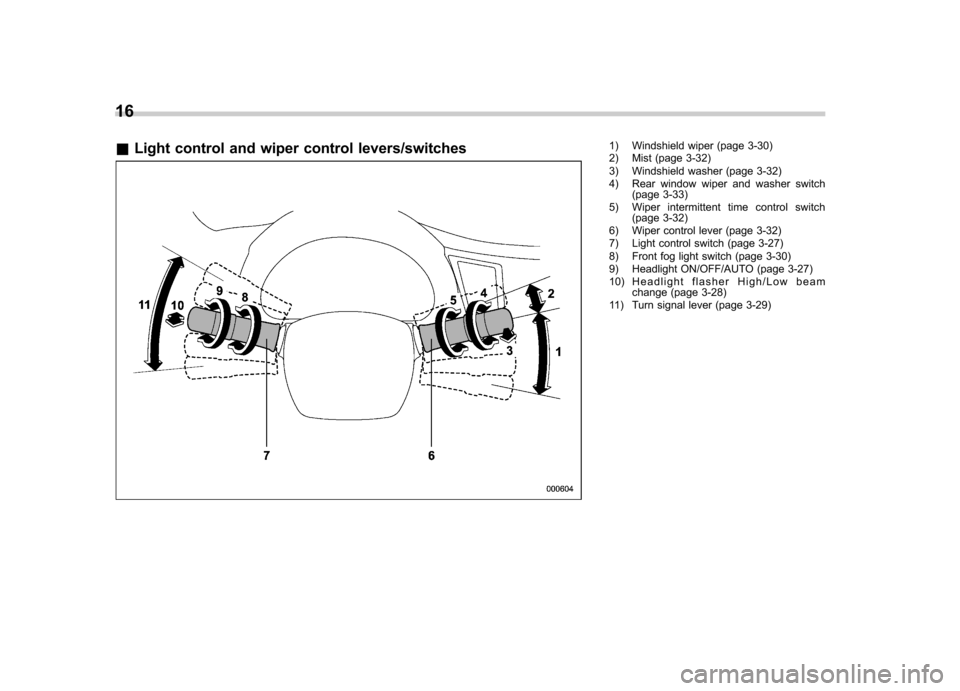
16 &Light control and wiper control levers/switches
1) Windshield wiper (page 3-30)
2) Mist (page 3-32)
3) Windshield washer (page 3-32)
4) Rear window wiper and washer switch
(page 3-33)
5) Wiper intermittent time control switch (page 3-32)
6) Wiper control lever (page 3-32)
7) Light control switch (page 3-27)
8) Front fog light switch (page 3-30)
9) Headlight ON/OFF/AUTO (page 3-27)
10) Headlight flasher High/Low beam change (page 3-28)
11) Turn signal lever (page 3-29)
Page 22 of 474

&Warning and indicator lights
Mark Name Page
Seatbelt warning light 3-9
Front passenger ’s
seatbelt warning light 3-9
SRS airbag system
warning light3-11
CHECK ENGINE warn-
ing light/Malfunction in-
dicator light3-12
Coolant temperature
low indicator light/Cool-
ant temperature high
warning light3-13
Charge warning light 3-14
Oil pressure warning light
3-14
Engine oil level warning light3-14
AT OIL TEMP warning
light (AT and CVT mod- els)3-14
/ABS warning light 3-16 Mark Name Page
/Brake system warning light
3-17
Hill Holder indicator light3-19
Door open indicator light
3-19
Low fuel warning light 3-19
All-Wheel Drive warn-
ing light (AT and CVT models)3-20
Vehicle Dynamics Con-
trol warning light/Vehi-
cle Dynamics Control
operation indicator light3-20
Vehicle Dynamics Con-
trol OFF indicator light
3-21
Security indicator light 3-21
Turn signal indicator lights
3-22
High beam indicator light3-22
Front fog light indicator
light (if equipped)3-23Mark Name Page
Cruise control indicator light
3-23
Cruise control set indi-
cator light3-23
Headlight indicator light 3-23
Low tire pressure
warning light
(U.S. spec. models)3-15
/Front passenger
’s fron-
tal airbag ON indicator light 3-11
/Front passenger
’s fron-
tal airbag OFF indicator light 3-11
Shift-up indicator 3-22
Windshield washer fluid
warning light
3-1919
Page 120 of 474

Ignition switch..................................................... 3-3
LOCK .................................................................. 3-3
Acc..................................................................... 3-4
ON...................................................................... 3-4
START ................................................................ 3-4
Key reminder chime ............................................ 3-4
Ignition switch light ............................................. 3-4
Hazard warning flasher ....................................... 3-5
Meters and gauges. ............................................. 3-5
Combination meter illumination ........................... 3-5
Canceling the function for meter/gauge needle movement upon turning on the ignition switch ............................................................... 3-5
Speedometer ....................................................... 3-6
Odometer ............................................................ 3-6
Double trip meter ................................................ 3-6
Tachometer ......................................................... 3-7
Fuel gauge .......................................................... 3-7
ECO gauge ......................................................... 3-8
Warning and indicator lights .............................. 3-9
Seatbelt warning light and chime ......................... 3-9
SRS airbag system warning light ........................ 3-11
Front passenger ’s frontal airbag ON and OFF
indicators ......................................................... 3-11
CHECK ENGINE warning light/Malfunction indicator light ................................................... 3-12
Coolant temperature low indicator light/Coolant temperature high warning light ......................... 3-13
Charge warning light .......................................... 3-14
Oil pressure warning light .................................. 3-14
Engine low oil level warning light ....................... 3-14AT OIL TEMP warning light (AT and CVT
models) ........................................................... 3-14
Low tire pressure warning light (U.S. spec. models) ........................................................... 3-15
ABS warning light .............................................. 3-16
Brake system warning light ................................ 3-17
Hill Holder indicator light ................................... 3-19
Low fuel warning light ....................................... 3-19
Door open indicator light ................................... 3-19
Windshield washer fluid warning light ................ 3-19
All-Wheel Drive warning light (AT and CVT models) ........................................................... 3-20
Vehicle Dynamics Control warning light/Vehicle Dynamics Control operation indicator light .. ..... 3-20
Vehicle Dynamics Control OFF indicator light ..... 3-21
Security indicator light ....................................... 3-21
Select lever/gear position indicator ..................... 3-22
Turn signal indicator lights ................................. 3-22
High beam indicator light ................................... 3-22
Cruise control indicator light .............................. 3-23
Cruise control set indicator light ........................ 3-23
Headlight indicator light ..................................... 3-23
Front fog light indicator light (if equipped) ..... ..... 3-23
Clock .................................................................. 3-23
Multi function display ........................................ 3-24
Outside temperature indicator .. .......................... 3-24
Average fuel consumption ................................. 3-25
Current fuel consumption .................................. 3-26
Driving range on remaining fuel ......................... 3-26
Light control switch ........................................... 3-27
Headlights ......................................................... 3-27
Instruments and controls
3
Page 121 of 474

Instruments and controlsHigh/low beam change (dimmer) ......................... 3-28
Headlight flasher ................................................ 3-28
Daytime running light system ............................. 3-28
Turn signal lever ................................................ 3-29
Illumination brightness control ......................... 3-29
Front fog light switch (if equipped) .................. 3-30
Wiper and washer .............................................. 3-30
Windshield wiper and washer switches ............... 3-32
Rear window wiper and washer switch (Outback) ......................................................... 3-33 Defogger and deicer
.......................................... 3-34
Mirrors ................................................................ 3-35
Type A inside mirror (if equipped) . ..................... 3-35
Type B inside mirror (if equipped) . ..................... 3-36
Auto-dimming mirror with compass (if equipped) .................................................... 3-43
Auto-dimming mirror with compass and HomeLink
®(if equipped) ................................... 3-45
Outside mirrors ................................................. 3-50
Tilt/telescopic steering wheel ........................... 3-52
Horn .................................................................... 3-52
Page 141 of 474

3-22Instruments and controls
& Select lever/gear position in- dicator
1) Upshift/downshift indicator (AT and CVT
models)
This indicator shows the position of the
shift lever (MT models) or select lever (AT
and CVT models). ! Upshift/downshift indicator (AT and
CVT models)
When the manual mode is selected, the
gear position indicator (which shows the
current gear selection) and the upshift/
downshift indicator light up. Refer to“ Selection of manual mode ”F 7-21. !
Gear position indicator setting (MTmodels)
The gear position indicator light can be
activated or deactivated by performing the
following procedure.
1. Turn the ignition switch to the “LOCK ”
position.
2. Press the trip knob to show “
”or
“” on the trip meter display.
The display can be switched as shown in
the following illustration by pressing the
trip knob.
*1: “” or “”and “”or “”cannot
be displayed when the ignition switch is
in the “ON ”position.
*
2: MT models only
3. To change the current setting, press
the trip knob for at least 2 seconds.
: Activated
: Deactivated NOTE .
The initial setting for your vehicle of
the gear position indicator has been set
for activation “
”at the time of
shipment from the factory. . It is not possible to change the
setting of the gear position indicator
when the ignition switch is in the “ON ”
position. Change the setting when the
ignition switch is in the “LOCK ”or
“ Acc ”position.
& Turn signal indicator lights
These lights show the operation of the turn
signal or lane change signal.
If the indicator lights do not blink or blink
rapidly, the turn signal bulb may be burned
out. Replace the bulb as soon as possible.
Refer to “Replacing bulbs ”F 11-45.
& High beam indicator light
This light shows that the headlights are in
the high beam mode.
This indicator light also illuminates when
the headlight flasher is operated.
Page 147 of 474

3-28Instruments and controls
CAUTION
If any object is placed on or near the
sensor, the sensor may not detect
the level of the ambient light cor-
rectly and the auto on/off headlights
may not operate properly.
& High/low beam change (dimmer)
To change from low beam to high beam,
push the turn signal lever forward. When
the headlights are on high beam, the high
beam indicator light “
”on the combina-
tion meter is also on.
To switch back to low beam, pull the lever
back to the detent position. &
Headlight flasher
CAUTION
Do not hold the lever in the flashing
position for more than just a fewseconds.
To flash the headlights, pull the lever
toward you and then release it. The high
beam will stay on for as long as you hold
the lever. The headlight flasher works
even though the lighting switch is in the“ OFF ”position.
When the headlights are on high beam,
the high beam indicator light “
”on the
combination meter also illuminates. &
Daytime running light system
WARNING
The brightness of the illumination of
the high beam headlights is reduced
by the daytime running light system.
The light switch must always be
turned to the “
”position when it
is dark outside.
The high beam headlights will automati-
cally illuminate at reduced brightness
when the engine has started, under the
following conditions. . The parking brake is fully released.
. The light switch is in the “OFF ”or “
”
position. . The light switch is in the “AUTO ”
position and the headlights do not turn
on automatically. . The select lever is in a position other
than the “P ” position (AT and CVT mod-
els).
NOTE
When the light switch is in the “
”
position, the front side marker lights,
tail lights and license plate lights areilluminated.
Page 149 of 474

3-30Instruments and controls
Front fog light switch
(if equipped)
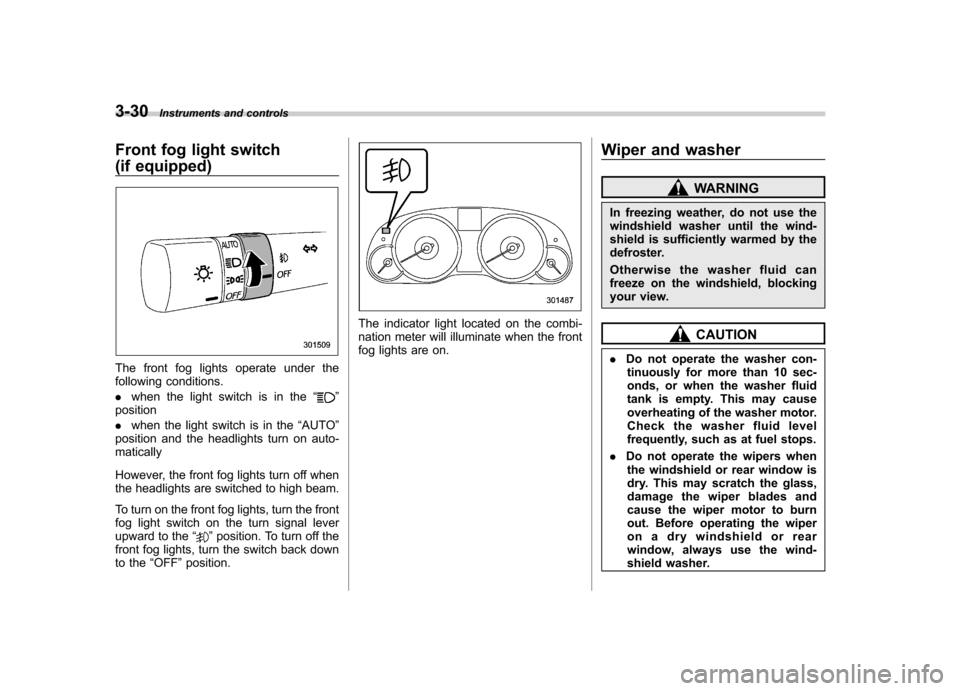
The front fog lights operate under the
following conditions. .when the light switch is in the “
”
position . when the light switch is in the “AUTO ”
position and the headlights turn on auto- matically
However, the front fog lights turn off when
the headlights are switched to high beam.
To turn on the front fog lights, turn the front
fog light switch on the turn signal lever
upward to the “
”position. To turn off the
front fog lights, turn the switch back down
to the “OFF ”position.
The indicator light located on the combi-
nation meter will illuminate when the front
fog lights are on. Wiper and washer
WARNING
In freezing weather, do not use the
windshield washer until the wind-
shield is sufficiently warmed by the
defroster.
Otherwise the washer fluid can
freeze on the windshield, blocking
your view.
CAUTION
. Do not operate the washer con-
tinuously for more than 10 sec-
onds, or when the washer fluid
tank is empty. This may cause
overheating of the washer motor.
Check the washer fluid level
frequently, such as at fuel stops.
. Do not operate the wipers when
the windshield or rear window is
dry. This may scratch the glass,
damage the wiper blades and
cause the wiper motor to burn
out. Before operating the wiper
on a dry windshield or rear
window, always use the wind-
shield washer.
Page 418 of 474

!High beam light bulbs
1. Remove the air intake duct (right-hand
side). For the method to remove the air
intake duct, refer to “Removing air intake
duct ”F 11-7.
Left-hand side
2. Use a screwdriver to remove the
secured clip of the washer tank. To make
it easy to access the bulb, move the
washer tank to the horizontal direction
(left-hand side).
3. Disconnect the electrical connector
from the bulb.
4. Remove the bulb from the headlight
assembly by turning it counterclockwise.
5. Replace the bulb with new one. At this
time, use care not to touch the bulb surface.
6. Reconnect the electrical connector.
7. To install the bulb to the headlight
assembly, turn it clockwise until it clicks.
8. Install the air intake duct with clips
(right-hand side).
9. Set the washer tank to the original
place and secure it by clip (left-hand side).
Maintenance and service
11-47
– CONTINUED –