Page 27 of 90
Navigation 41
Setting Route
1First, choose either of the two procedures below to fol-
low the "home" category.
Press the button.
2Select (home) or the preset keys (Preset 1)
through (Preset 5).
NOTE
(home) and the preset keys(Preset 1) through (Preset
5) are displayed only when you have stored the home location and other loca-
tions in the memory.
3Select (destination) or (waypoint).
The map including the home location or the selected location will
be displayed.
■"Point of Interest" category
You can use a selection from the "Point of Interest" listing as the desti-
nation or a waypoint.
1Press the button and select (point of inter-
est).
2Enter the name of the desired point of interest and
select .
: Use this key to delete the character last entered. Select it
repeatedly if you want to delete all of the characters
entered.
NOTE
During character entry, the system shows the point of interest list automatically
when the amount of matching points of interest is four or less.
Page 29 of 90

Navigation 43
Setting Route
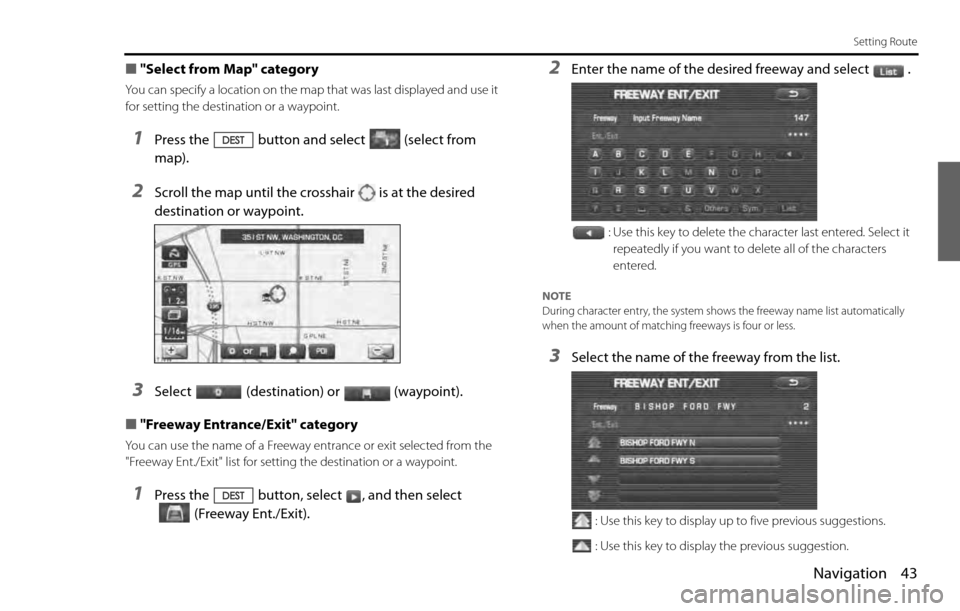
■"Select from Map" category
You can specify a location on the map that was last displayed and use it
for setting the destination or a waypoint.
1Press the button and select (select from
map).
2Scroll the map until the crosshair is at the desired
destination or waypoint.
3Select (destination) or (waypoint).
■"Freeway Entrance/Exit" category
You can use the name of a Freeway entrance or exit selected from the
"Freeway Ent./Exit" list for setting the destination or a waypoint.
1Press the button, select , and then select
(Freeway Ent./Exit).
2Enter the name of the desired freeway and select .
: Use this key to delete the character last entered. Select it
repeatedly if you want to delete all of the characters
entered.
NOTE
During character entry, the system shows the freeway name list automatically
when the amount of matching freeways is four or less.
3Select the name of the freeway from the list.
: Use this key to display up to five previous suggestions.
: Use this key to display the previous suggestion.
Page 32 of 90
46 Navigation
Setting Route
3Enter the longitude of the location.
: Use this key to switch over to the north latitude.
: Use this key to switch over to the south latitude.
: Use this key to switch over to the west longitude.
: Use this key to switch over to the east longitude.
: Use this key to delete the character last entered. Select it
repeatedly if you want to delete all the characters entered.
4Select (OK).
5Select (destination) or (waypoint).
■"Intersection" category
You can use a intersection defined by two street names as a location for
setting your destination or a waypoint.
1Press the button, select , and then
select (Intersection).
2Enter the name of the first street and then select .
: Use this key to delete the character last entered. Select it
repeatedly if you want to delete all of the characters
entered.
NOTE
During character entry, the system shows the street name list automatically
when the amount of matching streets is four or less.
Page 35 of 90

Navigation 49
Setting Route
■Using "Change Search Area" function
This function designates a general geographical area where the desti-
nation or waypoint you want to set is located.
1Press the button and select (change).
2Select the desired area.
The DESTINATION ENTRY menu screen will appear.
NOTE
•The SEARCH AREA screen shown above is a sample image. It may be slightly
different from the actual screen image.
•Three map discs are contained in this system. When performing a search for a
different area in your destination search, it is necessary to change the map
disc with another map disc. If an area you want to find is not displayed on the
screen shown above, take out the map disc and change it with a map disc
containing the relevant area.
For details of the map disc, refer to the description below.
■Map Discs
The three map discs contain different areas, respectively. ( West, Mid and
East) Select the map disc containing the destination area you wish and
insert the disc in the navigation system.
Make sure to reselect the destination when changing the map disc.
Refer to the section Set Route in the Instruction Manual for instructions
on reselecting the destination.
■Area (West)
Arizona, California, Colorado, Idaho, Kansas, Montana, Nebraska,
Nevada, New Mexico, North Dakota, Oklahoma, Oregon, South Dakota,
Texas, Utah, Washington, Wyoming, Canada
Page 36 of 90

50 Navigation
Setting Route
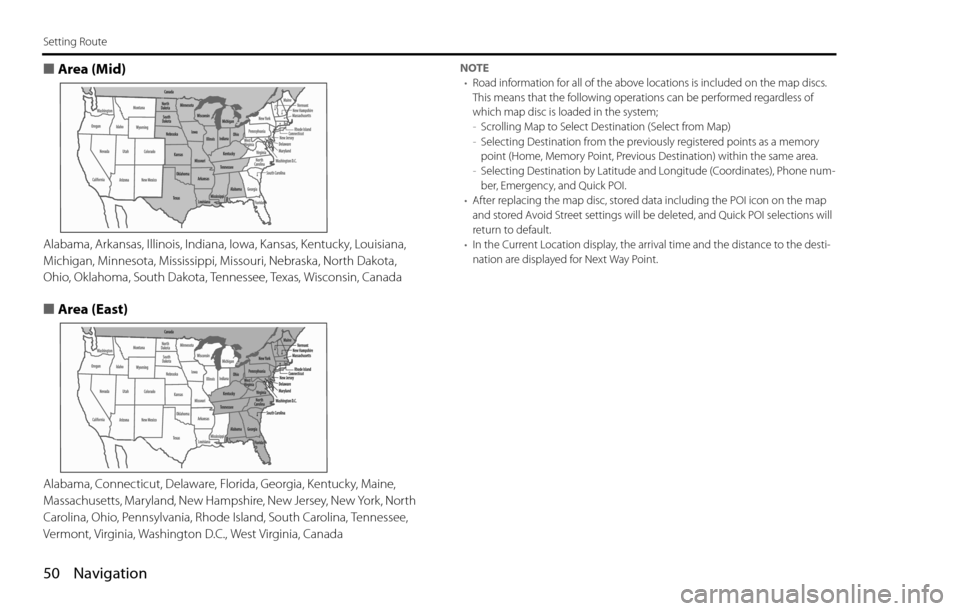
■Area (Mid)
Alabama, Arkansas, Illinois, Indiana, Iowa, Kansas, Kentucky, Louisiana,
Michigan, Minnesota, Mississippi, Missouri, Nebraska, North Dakota,
Ohio, Oklahoma, South Dakota, Tennessee, Texas, Wisconsin, Canada
■Area (East)
Alabama, Connecticut, Delaware, Florida, Georgia, Kentucky, Maine,
Massachusetts, Maryland, New Hampshire, New Jersey, New York, North
Carolina, Ohio, Pennsylvania, Rhode Island, South Carolina, Tennessee,
Vermont, Virginia, Washington D.C., West Virginia, Canada
NOTE
•Road information for all of the above locations is included on the map discs.
This means that the following operations can be performed regardless of
which map disc is loaded in the system;
-Scrolling Map to Select Destination (Select from Map)
-Selecting Destination from the previously registered points as a memory
point (Home, Memory Point, Previous Destination) within the same area.
-Selecting Destination by Latitude and Longitude (Coordinates), Phone num-
ber, Emergency, and Quick POI.
•After replacing the map disc, stored data including the POI icon on the map
and stored Avoid Street settings will be deleted, and Quick POI selections will
return to default.
•In the Current Location display, the arrival time and the distance to the desti-
nation are displayed for Next Way Point.
Page 37 of 90
Navigation 51
Route Guidance
Route Guidance Screen
During route guidance, the system can indicate on a second
screen the directions in which you must make turns at the
next and following intersection in either of two ways: "turn
arrow" or "turn list". Specify your preferred method of indica-
tion as follows:1Select (screen configuration).
2Select for turn arrow indication or for turn list
indication.
If you do not need to make any further selections, select .
The displayed keys will be hidden.
Turn direction is indicated by an arrow.
Turn directions are indicated in a list.
Page 38 of 90
52 Navigation
Route Guidance
Zoom-in Map at Intersection
Before you arrive at an intersection, the system will automati-
cally show a zoom-in map of the intersection on a second
screen to make the guidance clearer.
As you approach an intersection during route guidance, a zoom-in map
of the intersection automatically appears on a second screen. After you
drive past the intersection, the zoom-in map disappears.
As you approach a fork on a freeway during route guidance, a zoom-in
map of the freeway automatically appears on a second screen, making
the route guidance clearer.
NOTE
Use the following procedure to recall the most recently displayed zoom-in map
of an intersection or a freeway fork.
1. Select (screen configuration).
2. Select (re-display of intersection/range guidance).
If you do not need to make any further selections, select . The displayed
keys will be hidden.
Page 43 of 90
Navigation 57
Route Options
Setting Route Options
Using the functions available from the Route Options screen,
you can change the route options, stop the route guidance or
check the route. Use the following procedures:
1Press the button.
2Select (route options).
3The Route Options screen will appear. Select any of the
following displayed functions as necessary:
(search condition):
This function allows you to specify the way in which the system
calculates the route to the destination. (See Page 58.)
(detour):
This function allows you to prompt the system to calculates an
alternative route from the current position within a specified dis-
tance. (See Page 59.)
(route preferences):
This function allows you to prompt the system to alter the route
search conditions and recalculate the route accordingly. (See Page
60.)