2012 SUBARU IMPREZA WRX warning
[x] Cancel search: warningPage 73 of 416
1-44Seat, seatbelt and SRS airbags
CAUTION
Observe the following precautions.
Failure to do so may prevent the
SUBARU advanced frontal airbag
system from functioning correctly
or cause the system to fail. . Do not apply any strong impact
to the front passenger ’sseat
such as by kicking.
. Do not spill liquid on the front
passenger ’s seat. If liquid is
spilled, wipe it off immediately.
. Do not remove or disassemble
the front passenger ’s seat.
. Do not install any accessory
(such as an audio amplifier) other
than a genuine SUBARU acces-
sory under the front passenger ’s
seat.
. Do not place anything (shoes,
umbrella, etc.) under the front passenger ’s seat.
. The front passenger ’s seat must
not be used with the head re-
straint removed.
. Do not leave any article including
a child restraint system on the
front passenger ’s seat or the
seatbelt tongue and buckle en- gaged when you leave your ve-hicle.
. Do not place a magnet near the
seatbelt buckle and the seatbelt
retractor.
. Do not use front seats with their
backward-forward position and
seatback not being locked into
place securely. If any of them are
not locked securely, adjust them
again. For adjusting procedure,
refer to “Front seats ”F 1-2.
If the seatbelt buckle switch and/or frontpassenger ’s occupant detection system
have failed, the SRS airbag system
warning light will illuminate. Have the
system inspected by your SUBARU deal-
er immediately if the SRS airbag system
warning light illuminates.
If your vehicle has sustained impact, this
may affect the proper function of the
SUBARU advanced frontal airbag system.
Have your vehicle inspected at your
SUBARU dealer. ! Passenger ’s frontal airbag ON and
OFF indicators
Refer to “Front passenger ’s frontal airbag
ON and OFF indicators ”F 3-14. !
Conditions in which front passen- ger’s SRS frontal airbag is not
activated
The front passenger ’s SRS frontal airbag
will not be activated when any of the
following conditions are met regarding the
front passenger ’s seat:
. The seat is empty.
. The seat is equipped with a rearward
facing child restraint system and an infant
is restrained with it. (See WARNING thatfollows.) . The seat is equipped with a forward
facing child restraint system and a small
child is restrained with it. (See WARNING
that follows.) . The seat is equipped with a booster
seat and a small child is in the booster
seat. (See WARNING that follows.) . The seat is relieved of the occupant
load for a time exceeding the predeter-
mined monitoring time period. . The seat is occupied by a child who
has outgrown a child restraint system
(See WARNING that follows.) or by a
small adult. . The front passenger ’s occupant detec-
tion system is malfunctioning.
Page 74 of 416
WARNING
NEVER INSTALL A REARWARD FA-
CING CHILD SEAT IN THE FRONT
PASSENGER ’S SEAT EVEN IF THE
FRONT PASSENGER ’S SRS FRON-
TAL AIRBAG IS DEACTIVATED. Be
sure to install it in the REAR seat in
a correct manner. Also, it is strongly
recommended that any forward fa-
cing child seat or booster seat be
installed in the REAR seat, and that
even children who have outgrown a
child restraint system be also
seated in the REAR seat. This is
because children sitting in the frontpassenger ’s seat may be killed or
severely injured should the frontpassenger ’s SRS frontal airbag de-
ploy. REAR seats are the safest
place for children.
CAUTION
When the front passenger ’s seat is
occupied by a child, observe the
following precautions. Failure to do
so may increase the load on the
front passenger ’s seat, activating
the front passenger ’s SRS frontal
airbag even though that seat is
occupied by a child. .
Do not place any article on the
seat other than the child occu-
pant and a child restraint system.
. Do not place more than one child
on the seat.
. Do not install any accessory
such as a table or TV onto theseatback.
. Do not store a heavy load in the
seatback pocket.
. Do not allow the rear seat occu-
pant to place his/her hands or
legs on the front passenger ’s
seatback, or allow him/her to pull
the seatback.
! If the front passenger ’s frontal air-
bag ON indicator illuminates and the
OFF indicator turns off even when
an infant or a small child is in a child
restraint system (including boosterseat)
1. Turn the ignition switch to the “LOCK ”
position.
2. Remove the child restraint system
from the seat.
3. By referring to the child restraint manufacturer ’s recommendations as well
as the child restraint system installation
procedures in “Child restraint systems ”F
1-21, correctly install the child restraint
system.
4. Turn the ignition switch to the “ON ”
position and make sure that the front passenger ’s frontal airbag ON indicator
turns off and the OFF indicator illuminates.
If still the ON indicator remains illuminated
while the OFF indicator turns off, take the
following actions. . Ensure that no article is placed on the
seat other than the child restraint system
and the child occupant. . Ensure that there is no article left in the
seatback pocket. . Ensure that the backward-forward po-
sition and seatback of front passenger ’s
seat are locked into place securely by
moving the seat back and forth.
If the ON indicator still remains illuminated
while the OFF indicator turns off after
taking relevant corrective actions de-
scribed above, relocate the child restraint
system to the rear seat and immediately
contact your SUBARU dealer for aninspection. NOTE
When a child who has outgrown a child
restraint system or a small adult is
seated in the front passenger ’s seat,
the SUBARU advanced frontal airbag Seat, seatbelt and SRS airbags
1-45
– CONTINUED –
Page 84 of 416
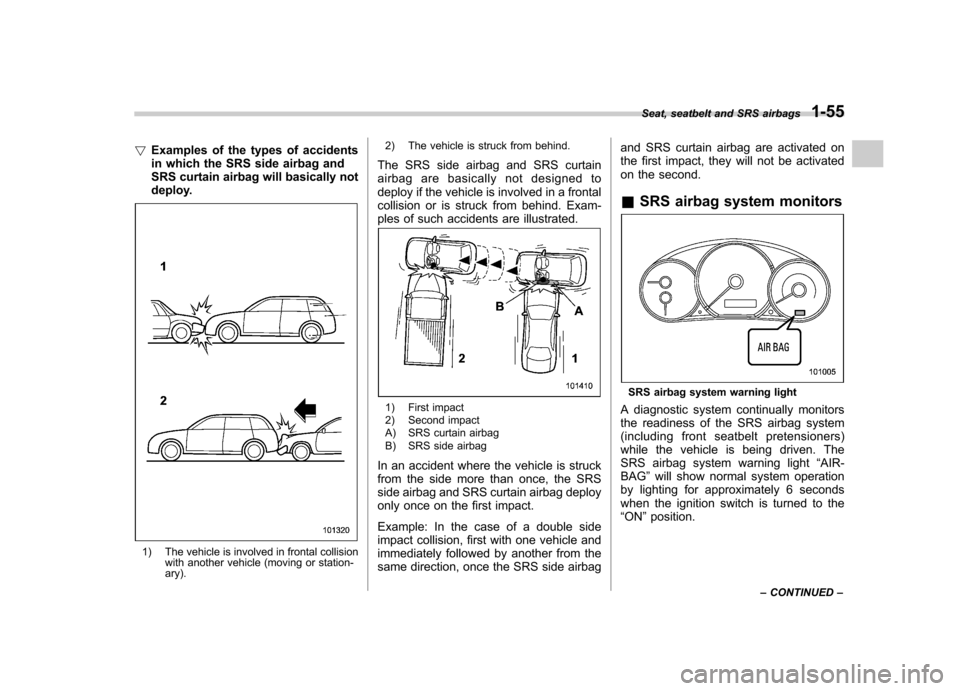
!Examples of the types of accidents
in which the SRS side airbag and
SRS curtain airbag will basically not
deploy.
1) The vehicle is involved in frontal collision
with another vehicle (moving or station- ary). 2) The vehicle is struck from behind.
The SRS side airbag and SRS curtain
airbag are basically not designed to
deploy if the vehicle is involved in a frontal
collision or is struck from behind. Exam-
ples of such accidents are illustrated.
1) First impact
2) Second impact
A) SRS curtain airbag
B) SRS side airbag
In an accident where the vehicle is struck
from the side more than once, the SRS
side airbag and SRS curtain airbag deploy
only once on the first impact.
Example: In the case of a double side
impact collision, first with one vehicle and
immediately followed by another from the
same direction, once the SRS side airbag and SRS curtain airbag are activated on
the first impact, they will not be activated
on the second. &
SRS airbag system monitors
SRS airbag system warning light
A diagnostic system continually monitors
the readiness of the SRS airbag system
(including front seatbelt pretensioners)
while the vehicle is being driven. The
SRS airbag system warning light “AIR-
BAG ”will show normal system operation
by lighting for approximately 6 seconds
when the ignition switch is turned to the“ ON ”position.
Seat, seatbelt and SRS airbags
1-55
– CONTINUED –
Page 85 of 416
1-56Seat, seatbelt and SRS airbags
The following components are monitored
by the indicator: .Front sub sensor
– Right-hand side
– Left-hand side
. Airbag control module (including im-
pact sensors). Frontal airbag module
– Driver ’s side
– Front passenger ’s side
. Side airbag sensor
– Center pillar right-hand side
– Center pillar left-hand side
. Side airbag module
– Driver ’s side
– Front passenger ’s side
. Curtain airbag sensor
– Rear wheel house right-hand side
– Rear wheel house left-hand side
. Curtain airbag module
– Right-hand side
– Left-hand side
. Satellite safing sensor (under the rear
center seat). Seatbelt pretensioner
– Driver ’s side
– Front passenger ’s side
. Seatbelt buckle switch (front passen-
ger ’s side)
. Front passenger ’s seatbelt tension sensor.
Front passenger ’s occupant detection
system weight sensor. Front passenger ’s occupant detection
control module. Front passenger ’s frontal airbag ON
and OFF indicator. All related wiring
WARNING
If the warning light exhibits any of
the following conditions, there may
be a malfunction in the seatbelt
pretensioners and/or SRS airbag
system. Immediately take your vehi-
cle to your nearest SUBARU dealer
to have the system checked. Unless
checked and properly repaired, the
seatbelt pretensioners and/or SRS
airbag will not operate properly in
the event of a collision, which may
increase the risk of injury. . Flashing or flickering of the warn-
ing light
. No illumination of the warning
light when the ignition switch is
first turned to the “ON ”position
. Continuous illumination of the
warning light
. Illumination of the warning light while driving
& SRS airbag system servicing
WARNING
. When discarding an airbag mod-
ule or scrapping the entire vehi-
cle damaged by a collision, con-
sult your SUBARU dealer.
. The SRS airbag has no user-
serviceable parts. Do not use
electrical test equipment on any
circuit related to the SRS airbag
system. For required servicing of
the SRS airbag, consult your
nearest SUBARU dealer. Tamper-
ing with or disconnecting thesystem ’s wiring could result in
accidental inflation of the SRS
airbag or could make the system
inoperative, which may result in
serious injury.
CAUTION
If you need service or repair in areas
indicated in the following list, have
the work performed by an author-
ized SUBARU dealer. The SRS air-
Page 86 of 416
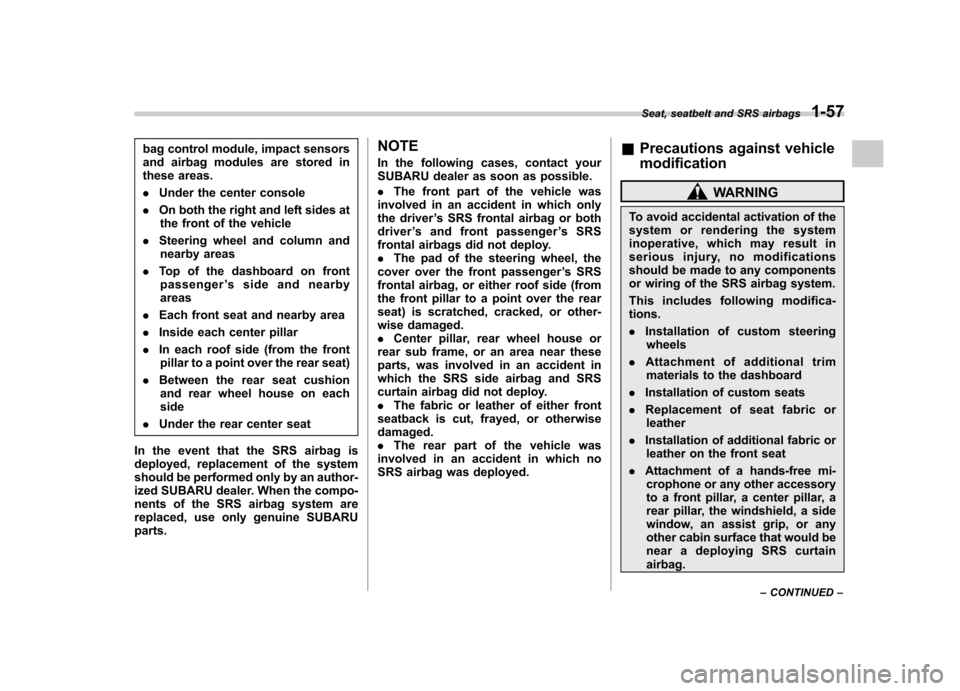
bag control module, impact sensors
and airbag modules are stored in
these areas. .Under the center console
. On both the right and left sides at
the front of the vehicle
. Steering wheel and column and
nearby areas
. Top of the dashboard on front
passenger ’ssideandnearby
areas
. Each front seat and nearby area
. Inside each center pillar
. In each roof side (from the front
pillar to a point over the rear seat)
. Between the rear seat cushion
and rear wheel house on each side
. Under the rear center seat
In the event that the SRS airbag is
deployed, replacement of the system
should be performed only by an author-
ized SUBARU dealer. When the compo-
nents of the SRS airbag system are
replaced, use only genuine SUBARUparts. NOTE
In the following cases, contact your
SUBARU dealer as soon as possible. .
The front part of the vehicle was
involved in an accident in which only
the driver ’s SRS frontal airbag or both
driver ’s and front passenger ’sSRS
frontal airbags did not deploy.. The pad of the steering wheel, the
cover over the front passenger ’s SRS
frontal airbag, or either roof side (from
the front pillar to a point over the rear
seat) is scratched, cracked, or other-
wise damaged.. Center pillar, rear wheel house or
rear sub frame, or an area near these
parts, was involved in an accident in
which the SRS side airbag and SRS
curtain airbag did not deploy.. The fabric or leather of either front
seatback is cut, frayed, or otherwisedamaged.. The rear part of the vehicle was
involved in an accident in which no
SRS airbag was deployed. &
Precautions against vehicle modification
WARNING
To avoid accidental activation of the
system or rendering the system
inoperative, which may result in
serious injury, no modifications
should be made to any components
or wiring of the SRS airbag system.
This includes following modifica- tions. . Installation of custom steering
wheels
. Attachment of additional trim
materials to the dashboard
. Installation of custom seats
. Replacement of seat fabric or
leather
. Installation of additional fabric or
leather on the front seat
. Attachment of a hands-free mi-
crophone or any other accessory
to a front pillar, a center pillar, a
rear pillar, the windshield, a side
window, an assist grip, or any
other cabin surface that would be
near a deploying SRS curtainairbag.
Seat, seatbelt and SRS airbags
1-57
– CONTINUED –
Page 89 of 416

2-2Keys and doors
Keys
1) Master key (Black)
2) Submaster key (Black)
3) Valet key (Gray)
4) Key number plate
5) Security ID plate
Three types of keys are provided for your vehicle:
Master key, submaster key and valet key.
The master key and submaster key fit all
locks on your vehicle. . Ignition switch
. Driver ’s door
. Trunk lid release lever (4-door)
. Glove box
The valet key fits only the ignition switch and driver
’s door lock. You can keep the
trunk and glove box locked when you
leave your vehicle and valet key at a
parking facility.
CAUTION
Do not attach a large key holder or
key case to either key. If it bangs
against your knees while you are
driving, it could turn the ignition
switch from the “ON ”position to the
“ Acc ”or “LOCK ”position, thereby
stopping the engine.
& Key number plate
The key number is stamped on the key
number plate attached to the key set.
Write down the key number and keep it in
another safe place, not in the vehicle. This
number is needed to make a replacement
key if you lose your key or lock it inside the
vehicle. Refer to “Key replacement ”F 2-3. Immobilizer
CAUTION
FCC WARNING
Changes or modifications not ex-
pressly approved by the party re-
sponsible for compliance could void
the user ’s authority to operate the
equipment.
The immobilizer system is designed to
prevent an unauthorized person from
starting the engine. Only keys registered
with your vehicle ’s immobilizer system can
be used to operate your vehicle. Even if
an unregistered key fits into the ignition
switch and can be turned to the “START ”
position, the engine will automatically stop
after several seconds.
Each immobilizer key contains a trans-
ponder in which the key ’s ID code is
stored. When a key is inserted into the
ignition switch and turned to the “ON ”
position, the transponder transmits thekey ’s ID code to the immobilizer system ’s
receiver. If the transmitted ID code
matches the ID code registered in the
immobilizer system, the system allows the
engine to be started. Since the ID code is
transmitted and acted upon almost in-
Page 92 of 416
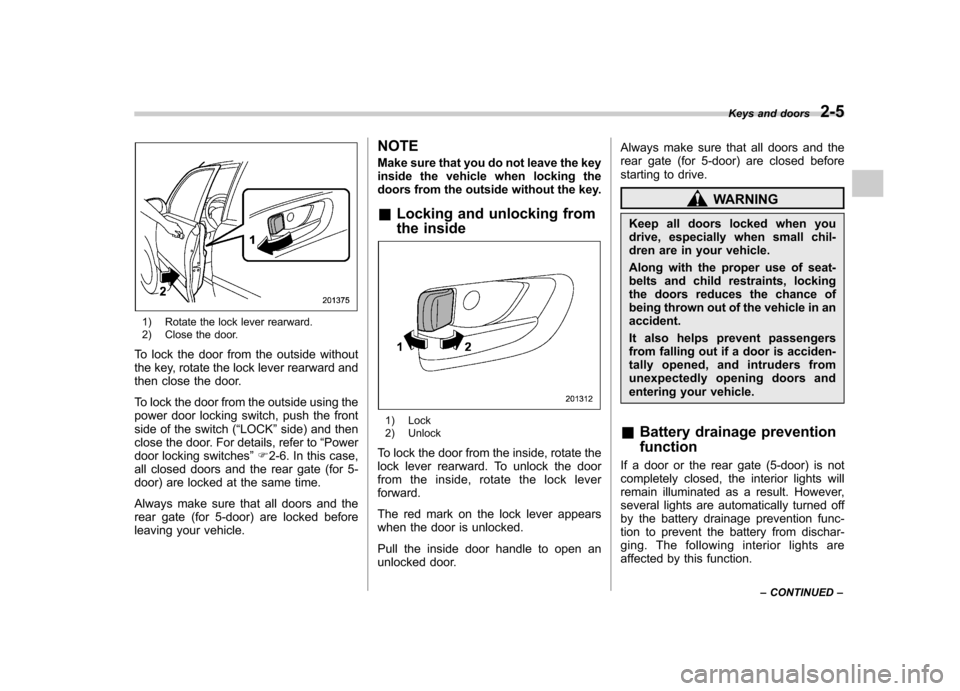
1) Rotate the lock lever rearward.
2) Close the door.
To lock the door from the outside without
the key, rotate the lock lever rearward and
then close the door.
To lock the door from the outside using the
power door locking switch, push the front
side of the switch ( “LOCK ”side) and then
close the door. For details, refer to “Power
door locking switches ”F 2-6. In this case,
all closed doors and the rear gate (for 5-
door) are locked at the same time.
Always make sure that all doors and the
rear gate (for 5-door) are locked before
leaving your vehicle. NOTE
Make sure that you do not leave the key
inside the vehicle when locking the
doors from the outside without the key. &
Locking and unlocking from
the inside
1) Lock
2) Unlock
To lock the door from the inside, rotate the
lock lever rearward. To unlock the door
from the inside, rotate the lock leverforward.
The red mark on the lock lever appears
when the door is unlocked.
Pull the inside door handle to open an
unlocked door. Always make sure that all doors and the
rear gate (for 5-door) are closed before
starting to drive.
WARNING
Keep all doors locked when you
drive, especially when small chil-
dren are in your vehicle.
Along with the proper use of seat-
belts and child restraints, locking
the doors reduces the chance of
being thrown out of the vehicle in anaccident.
It also helps prevent passengers
from falling out if a door is acciden-
tally opened, and intruders from
unexpectedly opening doors and
entering your vehicle.
& Battery drainage prevention function
If a door or the rear gate (5-door) is not
completely closed, the interior lights will
remain illuminated as a result. However,
several lights are automatically turned off
by the battery drainage prevention func-
tion to prevent the battery from dischar-
ging. The following interior lights are
affected by this function. Keys and doors
2-5
– CONTINUED –
Page 94 of 416

doors from the outside using the power
door locking switches. &Key lock-in prevention func- tion
This function prevents the doors from
being locked with the key still in the
ignition switch. ! Behavior with key lock-in preven-
tion function operational
With the driver ’s door open, the doors are
automatically kept unlocked even if the
front side of the power door locking switch
is pressed. ! Behavior with key lock-in preven-
tion function non-operational
. If the lock lever is turned to the rear
( “LOCK ”) position with the driver ’s door
open and the driver ’s door is then closed
with the lock lever in that position, thedriver ’s door is locked.
. If the spare key is used to lock the
driver ’s door from the outside of the
vehicle, the door is locked.
This function ’s operational/non-opera-
tional setting can be changed as follows. . Models with genuine SUBARU navi-
gation system:
The setting can be changed using the navigation monitor. For details, please
refer to the Owner
’s Manual supplement
for the navigation system. Also, the setting
can be changed by a SUBARU dealer.
Contact your SUBARU dealer for details. . Models without genuine SUBARU
navigation system:
The setting can be changed by a
SUBARU dealer. Contact your SUBARU
dealer for details.
NOTE
When leaving the vehicle, make sure
you are holding the key before locking
the doors. Remote keyless entry system
CAUTION
. Do not expose the remote trans-
mitter to severe shocks, such as
those experienced as a result of
dropping or throwing.
. Do not take the remote transmit-
ter apart except when replacing
the battery.
. Do not get the remote transmitter
wet. If it gets wet, wipe it dry with
a cloth immediately.
. When you carry the remote trans-
mitteronanairplane,donot
press the button of the remote
transmitter while in the airplane.
When any button of the remote
transmitter is pressed, radio
waves are sent and may affect
the operation of the airplane.
When you carry the remote trans-
mitter in a bag on an airplane,
take measures to prevent the
buttons of the remote transmitter
from being pressed.
. FCC WARNING
Changes or modifications not
expressly approved by the party Keys and doors
2-7
– CONTINUED –