2012 SUBARU IMPREZA WRX lock
[x] Cancel search: lockPage 42 of 416
.Seatbelts provide maximum re-
straint when the occupant sits
well back and upright in the seat.
To reduce the risk of sliding
under the seatbelt in a collision,
the front seatbacks should be
always used in the upright posi-
tion while the vehicle is running.
If the front seatbacks are not
used in the upright position in a
collision, the risk of sliding under
the lap belt and of the lap belt
sliding up over the abdomen will
increase, and both can result in
serious internal injury or death.
. Do not put cushions or any other
materials between occupants
and seatbacks or seat cushions.
If you do so, the risk of sliding
under the lap belt and of the lap
belt sliding up over the abdomen
will increase, and both can result
in serious internal injury ordeath.
WARNING
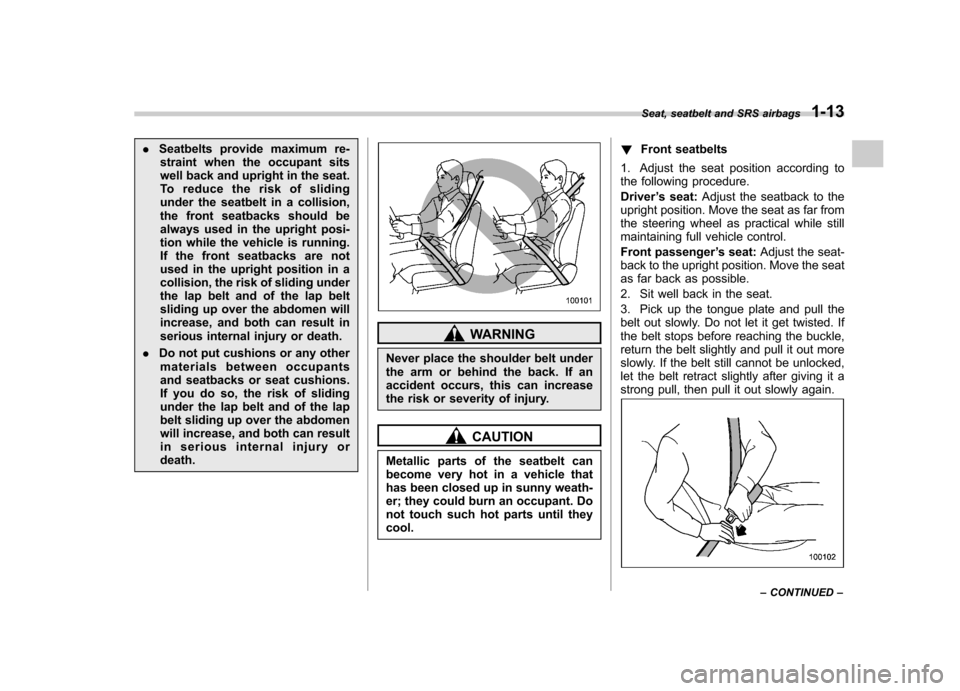
Never place the shoulder belt under
the arm or behind the back. If an
accident occurs, this can increase
the risk or severity of injury.
CAUTION
Metallic parts of the seatbelt can
become very hot in a vehicle that
has been closed up in sunny weath-
er; they could burn an occupant. Do
not touch such hot parts until theycool. !
Front seatbelts
1. Adjust the seat position according to
the following procedure. Driver ’s seat: Adjust the seatback to the
upright position. Move the seat as far from
the steering wheel as practical while still
maintaining full vehicle control.
Front passenger ’s seat: Adjust the seat-
back to the upright position. Move the seat
as far back as possible.
2. Sit well back in the seat.
3. Pick up the tongue plate and pull the
belt out slowly. Do not let it get twisted. If
the belt stops before reaching the buckle,
return the belt slightly and pull it out more
slowly. If the belt still cannot be unlocked,
let the belt retract slightly after giving it a
strong pull, then pull it out slowly again.
Seat, seatbelt and SRS airbags 1-13
– CONTINUED –
Page 43 of 416
1-14Seat, seatbelt and SRS airbags
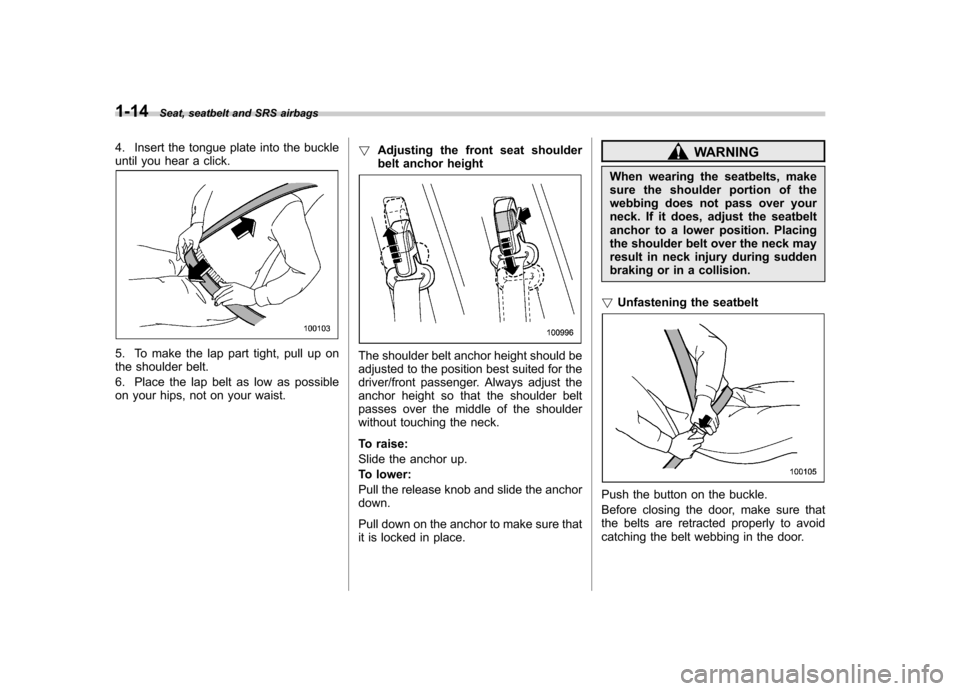
4. Insert the tongue plate into the buckle
until you hear a click.
5. To make the lap part tight, pull up on
the shoulder belt.
6. Place the lap belt as low as possible
on your hips, not on your waist. !
Adjusting the front seat shoulder
belt anchor heightThe shoulder belt anchor height should be
adjusted to the position best suited for the
driver/front passenger. Always adjust the
anchor height so that the shoulder belt
passes over the middle of the shoulder
without touching the neck.
To raise:
Slide the anchor up.
To lower:
Pull the release knob and slide the anchor down.
Pull down on the anchor to make sure that
it is locked in place.
WARNING
When wearing the seatbelts, make
sure the shoulder portion of the
webbing does not pass over your
neck. If it does, adjust the seatbelt
anchor to a lower position. Placing
the shoulder belt over the neck may
result in neck injury during sudden
braking or in a collision.
! Unfastening the seatbelt
Push the button on the buckle.
Before closing the door, make sure that
the belts are retracted properly to avoid
catching the belt webbing in the door.
Page 44 of 416
!Rear seatbelts (except rear center
seatbelt on 5-door models)
1. Sit well back in the seat.
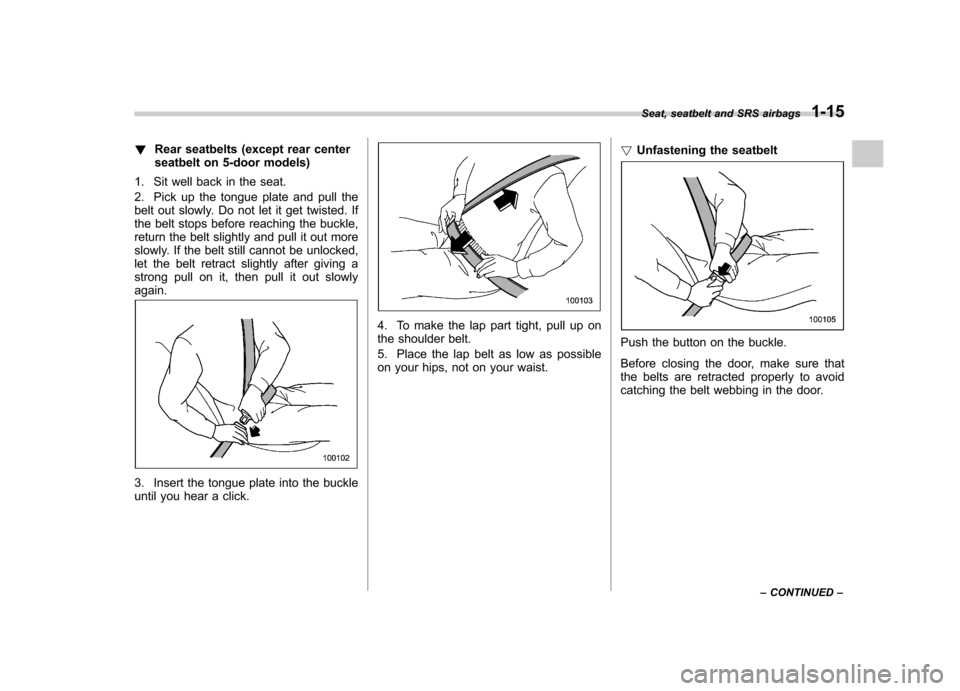
2. Pick up the tongue plate and pull the
belt out slowly. Do not let it get twisted. If
the belt stops before reaching the buckle,
return the belt slightly and pull it out more
slowly. If the belt still cannot be unlocked,
let the belt retract slightly after giving a
strong pull on it, then pull it out slowlyagain.
3. Insert the tongue plate into the buckle
until you hear a click.
4. To make the lap part tight, pull up on
the shoulder belt.
5. Place the lap belt as low as possible
on your hips, not on your waist. !
Unfastening the seatbelt
Push the button on the buckle.
Before closing the door, make sure that
the belts are retracted properly to avoid
catching the belt webbing in the door. Seat, seatbelt and SRS airbags
1-15
– CONTINUED –
Page 46 of 416
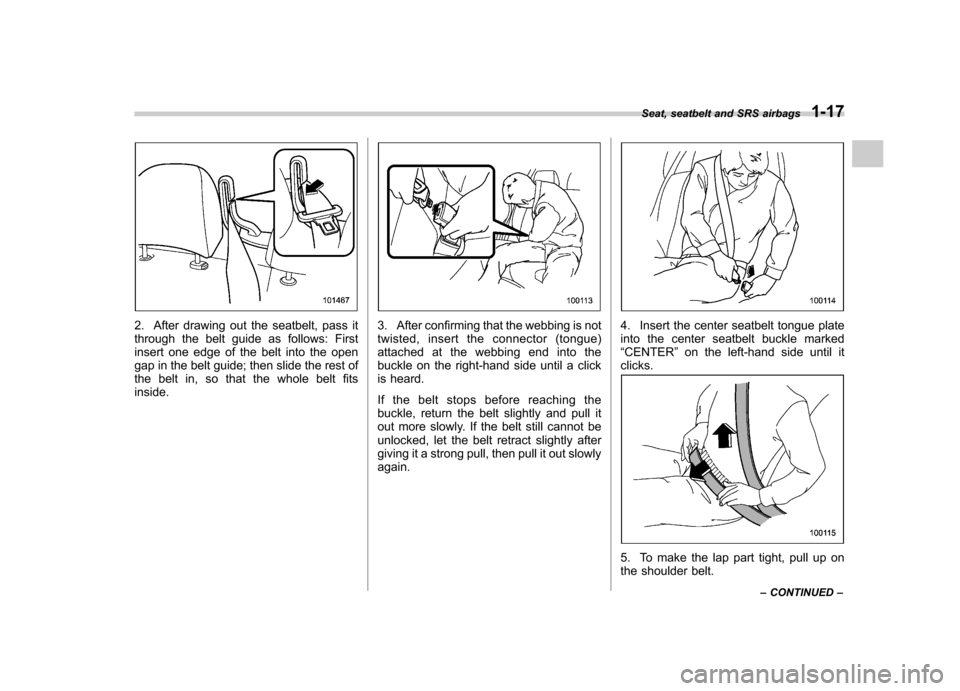
2. After drawing out the seatbelt, pass it
through the belt guide as follows: First
insert one edge of the belt into the open
gap in the belt guide; then slide the rest of
the belt in, so that the whole belt fitsinside.3. After confirming that the webbing is not
twisted, insert the connector (tongue)
attached at the webbing end into the
buckle on the right-hand side until a click
is heard.
If the belt stops before reaching the
buckle, return the belt slightly and pull it
out more slowly. If the belt still cannot be
unlocked, let the belt retract slightly after
giving it a strong pull, then pull it out slowlyagain.4. Insert the center seatbelt tongue plate
into the center seatbelt buckle marked“CENTER ”on the left-hand side until it
clicks.
5. To make the lap part tight, pull up on
the shoulder belt. Seat, seatbelt and SRS airbags
1-17
– CONTINUED –
Page 49 of 416
1-20Seat, seatbelt and SRS airbags
small amount of smoke will be released.
These occurrences are normal and not
harmful. This smoke does not indicate a
fire in the vehicle.
Once the seatbelt pretensioner has been
activated, the seatbelt retractor remains
locked. Consequently, the seatbelt can not
be pulled out and retracted and therefore
must be replaced. NOTE .Seatbelt pretensioners are not de-
signed to activate in minor frontal
impacts, in side or rear impacts or in
roll-over accidents.. The driver ’s seat and passenger ’s
seat pretensioners and frontal SRS
airbag operate simultaneously.. Pretensioners are designed to func-
tion on a one-time-only basis. In the
event that a pretensioner is activated,
both the driver ’s and front passenger ’s
seatbelt retractor assemblies must be
replaced only by an authorized
SUBARU dealer. When replacing seat-
belt retractor assemblies, use only
genuine SUBARU parts.. If either front seatbelt does not
retract or cannot be pulled out due to
a malfunction or activation of the
pretensioner, contact your SUBARU
dealer as soon as possible. .
If the front seatbelt retractor assem-
bly or surrounding area has been
damaged, contact your SUBARU dealer
as soon as possible.. When you sell your vehicle, we urge
you to explain to the buyer that it has
seatbelt pretensioners by alerting the
buyer to the contents of this section.
WARNING
. To obtain maximum protection,
the occupants should sit in an
upright position with their seat-
belts properly fastened. Refer to“ Seatbelts ”F 1-11.
. Do not modify, remove or strike
the front seatbelt retractor as-
semblies or surrounding area.
This could result in accidental
activation of the seatbelt preten-
sioners or could make the sys-
tem inoperative, possibly result-
ing in serious injury. Seatbelt
pretensioners have no user-ser-
viceable parts. For required ser-
vicing of front seatbelt retractors
equipped with seatbelt preten-
sioners, see your nearest
SUBARU dealer.
. When discarding front seatbelt
retractor assemblies or scrap- ping the entire vehicle due to
collision damage or for other
reasons, consult your SUBARU
dealer.
& System monitors
A diagnostic system continually monitors
the readiness of the seatbelt pretensioner
while the vehicle is being driven. The
seatbelt pretensioners share the control
module with the SRS airbag system.
Therefore, if any malfunction occurs in a
seatbelt pretensioner, the SRS airbag
system warning light will illuminate. For
details, refer to “SRS airbag system
monitors ”F 1-55.
& System servicing
WARNING
. When discarding a seatbelt re-
tractor assembly or scrapping
the entire vehicle damaged by a
collision, consult your SUBARU
dealer.
. Tampering with or disconnecting
the system ’s wiring could result
in accidental activation of the
seatbelt pretensioner and/or
SRS airbag or could make the
Page 52 of 416

A: Front passenger’s seat
You should not install a child restraint
system (including a booster seat) due to
the hazard to children posed by thepassenger ’s airbag.
B: Rear seat, window-side seatingpositions
Recommended positions for all types of
child restraint systems.
In these positions, Automatic/Emergency
Locking Retractor (A/ELR) seatbelts and
lower anchorages (bars) are provided for
installing a child restraint system.
Some types of child restraints might not be
able to be secured firmly due to projection
of the seat cushion.
In this seating position, you should use
only a child restraint system that has a
bottom base that fits snugly against the
contours of the seat cushion and can be
securely retained using the seatbelt.
C: Rear seat, center seating position
Installing a child restraint system is not
recommended, although the A/ELR seat-
belt and an upper anchorage (tether
anchorage) (except in Latin American
models) are provided in this position.
Some types of child restraints might not be
able to be secured firmly due to projection
of the seat cushion. In this seating position, you should use
only a child restraint system that has a
bottom base that fits snugly against the
contours of the seat cushion and can be
securely retained using the seatbelt.
If it is unavoidable to install a child
restraint system in the rear seat
’s center
seating position, lower the center head
restraint to the lowest position and install
the child restraint system by correctly
passing the rear center seatbelt through
the belt guide.
WARNING
Put children aged 12 and under in
the rear seat properly restrained at
all times. The SRS airbag deploys
with considerable speed and force
and can injure or even kill children,
especially if they are 12 years of age
and under and are not restrained or
improperly restrained. Because chil-
dren are lighter and weaker than
adults, their risk of being injured
from deployment is greater. For that reason, be sure to secure
ALL types of child restraint devices
(including forward facing child
seats) in the REAR seats at all times.
You should choose a restraint de-
vice which is appropriate for thechild
’s age, height and weight. Ac-
cording to accident statistics, chil-
dren are safer when properly re-
strained in the rear seating posi-
tions than in the front seating posi-tions.
WARNING
SINCE YOUR VEHICLE IS
EQUIPPED WITH A PASSENGER ’S
SRS AIRBAG, NEVER INSTALL A
REARWARD FACING CHILD Seat, seatbelt and SRS airbags
1-23
– CONTINUED –
Page 54 of 416
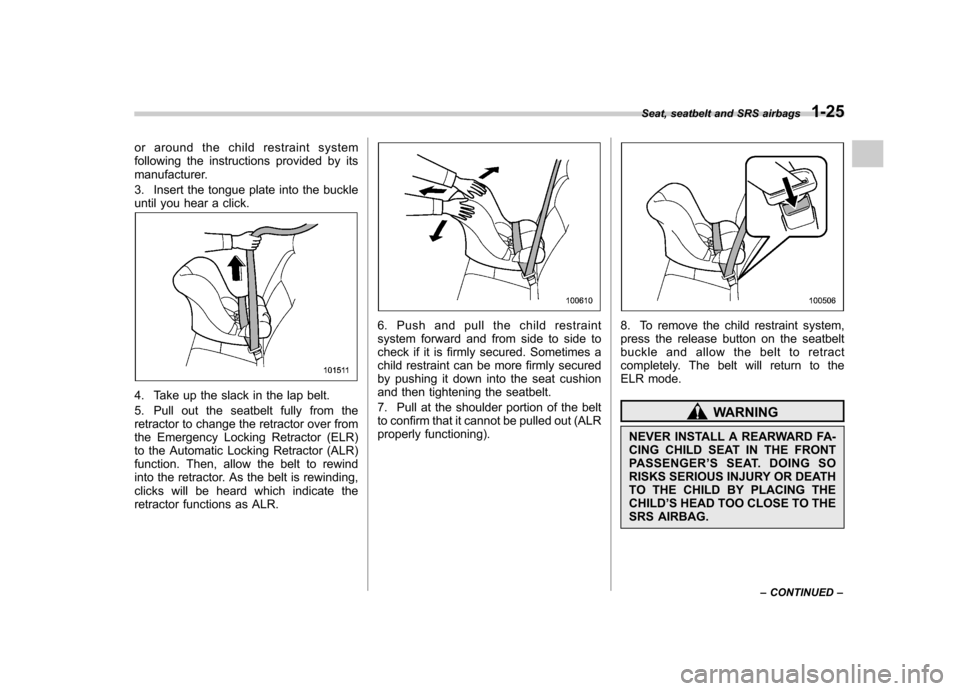
or around the child restraint system
following the instructions provided by its
manufacturer.
3. Insert the tongue plate into the buckle
until you hear a click.
4. Take up the slack in the lap belt.
5. Pull out the seatbelt fully from the
retractor to change the retractor over from
the Emergency Locking Retractor (ELR)
to the Automatic Locking Retractor (ALR)
function. Then, allow the belt to rewind
into the retractor. As the belt is rewinding,
clicks will be heard which indicate the
retractor functions as ALR.
6. Push and pull the child restraint
system forward and from side to side to
check if it is firmly secured. Sometimes a
child restraint can be more firmly secured
by pushing it down into the seat cushion
and then tightening the seatbelt.
7. Pull at the shoulder portion of the belt
to confirm that it cannot be pulled out (ALR
properly functioning).8. To remove the child restraint system,
press the release button on the seatbelt
buckle and allow the belt to retract
completely. The belt will return to the
ELR mode.
WARNING
NEVER INSTALL A REARWARD FA-
CING CHILD SEAT IN THE FRONT
PASSENGER ’SSEAT.DOINGSO
RISKS SERIOUS INJURY OR DEATH
TO THE CHILD BY PLACING THECHILD ’S HEAD TOO CLOSE TO THE
SRS AIRBAG. Seat, seatbelt and SRS airbags
1-25
– CONTINUED –
Page 55 of 416
1-26Seat, seatbelt and SRS airbags
NOTE
When the child restraint system is no
longer in use, remove it and restore the
ELR function of the retractor. That
function is restored by allowing the
seatbelt to retract fully. ! Installing forward facing child re- straint
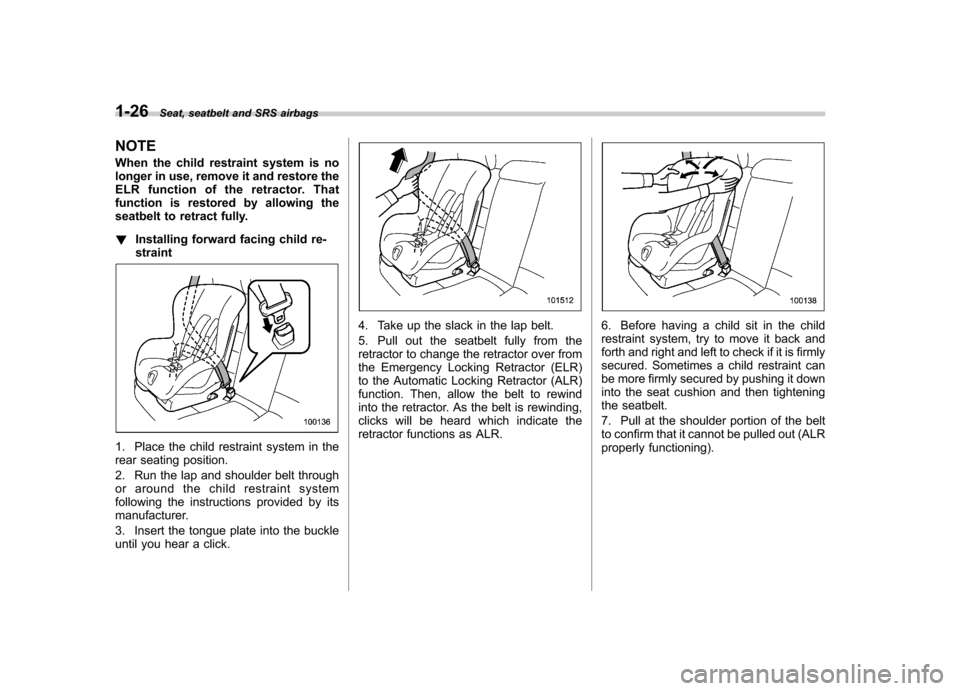
1. Place the child restraint system in the
rear seating position.
2. Run the lap and shoulder belt through
or around the child restraint system
following the instructions provided by its
manufacturer.
3. Insert the tongue plate into the buckle
until you hear a click.
4. Take up the slack in the lap belt.
5. Pull out the seatbelt fully from the
retractor to change the retractor over from
the Emergency Locking Retractor (ELR)
to the Automatic Locking Retractor (ALR)
function. Then, allow the belt to rewind
into the retractor. As the belt is rewinding,
clicks will be heard which indicate the
retractor functions as ALR.6. Before having a child sit in the child
restraint system, try to move it back and
forth and right and left to check if it is firmly
secured. Sometimes a child restraint can
be more firmly secured by pushing it down
into the seat cushion and then tightening
the seatbelt.
7. Pull at the shoulder portion of the belt
to confirm that it cannot be pulled out (ALR
properly functioning).