2012 SUBARU IMPREZA WRX reset
[x] Cancel search: resetPage 182 of 416

Antenna system.................................................. 5-3
Roof antenna ...................................................... 5-3
FM reception ....................................................... 5-3
Installation of accessories .................................. 5-4
Audio set ............................................................. 5-4
Type A audio set (if equipped) ............................. 5-5
Type B audio set (if equipped) ............................. 5-6
Power and sound controls ................................. 5-7
Power switch and volume control ........................ 5-7
Sound control ..................................................... 5-7
Adjustable level of each mode ............................. 5-9
FM/AM radio operation ...................................... 5-10
FM/AM selection ................................................. 5-10
Tuning ............................................................... 5-10
Displaying radio PS (Program Service Name) and RT (Radio Text) ................................................ 5-12
Station preset .................................................... 5-12
Satellite radio operation (if equipped) .............. 5-13
Sirius XM
TMSatellite Radio Activation (for U.S.A.
only) ................................................................ 5-13
Sirius satellite radio (for Canada only) ................ 5-13
Satellite radio reception ...................................... 5-13
Displaying satellite radio ID of tuner ................... 5-14
Band selection ................................................... 5-15
Channel and category selection .......................... 5-15
Channel preset ................................................... 5-16
Display selection ................................................ 5-16
CD player operation ........................................... 5-16
Play file. ............................................................. 5-17
How to insert a CD(s) (type A) ............................ 5-17
How to insert a CD (type B) ................................ 5-18 How to play back a CD
...................................... 5-18
To select a track from the beginning .................. 5-18
Fast-forwarding and rewinding . .......................... 5-19
Repeating .......................................................... 5-19
Random playback .............................................. 5-20
Scan ................................................................. 5-20
Display selection ............................................... 5-21
Folder selection ................................................. 5-21
How to eject CDs from the player (type A) ..... ..... 5-22
How to eject a CD from the player (type B) .... ..... 5-22
When the following messages are displayed. . ..... 5-22
Auxiliary input jack (if equipped). ..................... 5-23
Precautions to observe when handling a compact disc ................................................... 5-24
USB storage device / iPod
®operations
(type B audio) ................................................. 5-26
Play file ............................................................. 5-26
Connectable USB storage device ....................... 5-26
Connectable iPod
®models ................................. 5-27
Connecting USB storage device / iPod®............. 5-27
How to play back ............................................... 5-28
To select a track from the beginning .................. 5-29
To select a chapter from the beginning when connecting iPod
®............................................. 5-29
Fast-forwarding and rewinding . .......................... 5-29
Repeating .......................................................... 5-29
Random playback .............................................. 5-29
SCAN (only when connecting USB storage device) ............................................................ 5-30
Selecting category (only when connecting iPod
®) ............................................................. 5-30 Audio
5
Page 193 of 416
5-12Audio
seeks within that PTY group.
The control function returns to the normal
mode after approximately 10 seconds. &Displaying radio PS (Pro-
gram Service Name) and RT
(Radio Text)
Type A audio
Type B audio
If the PS (Program Service Name) and/or
RT (Radio Text) are available, pressingthe “TEXT ”button changes the display
among PS, RT and frequency. The initial
setting is “PS ”.
NOTE . The maximum number of characters
that can be displayed for PS is 8. . The maximum number of characters
that can be displayed for RT is 64. . If RT is 13 characters or longer,
press and hold the “TEXT ”button in
order to change the page. &
Station preset
! How to preset stations
1. Select the preferred reception mode.
2. Select the preferred station.
3. Press and hold one of the preset
buttons (from
to) to store the
frequency. If the button is pressed briefly,
the preceding selection will remain in the
memory.
NOTE . Up to six stations for each reception
mode may be preset. . If the connection between the radio
and battery is broken for any reason
such as vehicle maintenance or radio
removal, all stations stored in the
preset buttons are cleared. If this
occurs, it is necessary to reset the
preset buttons.. If a cell phone is placed near the
radio, it may cause the radio to emit
noise when a phone call is received.
This noise does not indicate a radiomalfunction. !
Selecting preset stations
1. Select the preferred reception mode.
2. Press the preferred preset button (from
to) briefly.
Page 197 of 416

5-16Audio
!Channel scan
Type A audio
Type B audio
Press the “SCAN ”button briefly to change
the radio to the SCAN mode. In this mode,
under the selected category, the radio
scans through the channel until a station
is found. The radio will stop at the station
for 5 seconds while displaying the channel
number, after which scanning will continue
until the entire channel has been scanned
from the low end to the high end.
Press the “SCAN ”button again to cancel
the SCAN mode and to stop on any
displayed channel.
& Channel preset
! How to preset channels
1. Press the “SAT ”button to select SAT1,
SAT2 and SAT3 reception.
2. Select the desired channel.
3. Press and hold one of the preset
buttons (from
to) to store the
channel. If the button is pressed briefly,
the preceding selection will remain in
memory. NOTE .
Up to six SAT1, SAT2 and SAT3
channels each may be preset. . If the connection between the radio
and battery is broken for any reason
such as vehicle maintenance or radio
removal, all channels stored in the
preset buttons are cleared. If this
occurs, it is necessary to reset the
preset buttons. ! Selecting preset channels
1. Press the “SAT ”button to select SAT1,
SAT2 or SAT3 reception.
2. Press the preferred preset button
briefly. & Display selection
Type A audio
Type B audio
Press the “TEXT ”button while receiving
the satellite radio to change the display as follows.
CD player operation NOTE . Make sure to always insert a disc
with the label side up. If a disc is
inserted with the label side down, the
player displays “CHECK DISC ”. Refer
to “When the following messages are
displayed ”F 5-22.
. If a disc is inserted during a radio
broadcast, the disc will interrupt thebroadcast.. After the last song finishes, the disc
will automatically return to track 1 (the
first track on the disc) and will auto-
matically play back. . The player is designed to be able to
play music CD-Rs and music CD-RWs,
but it may not be able to play certainones.. Mini CDs (i.e., 8 cm/3 inch CDs) are
not supported, and if inserted, they will
be immediately ejected.. CDs that can be played back are
accompanied by the following restric-tions.
–Maximum number of folders: 255
– Maximum number of files in a
folder: 255 – Maximum number of files on a
CD: 510
Page 209 of 416
5-28Audio
iPod
®cannot be operated using the
click wheel on the iPod®(except some
models). . When using an iPod
®by connecting
it to in-vehicle equipment, the order of
the list items displayed on the in-
vehicle equipment may be different
from that on the iPod
®. However, this
does not indicate a malfunction.. An iPod
®battery that is connected
to in-vehicle equipment will be charged
when the ignition switch is in the “ON ”
or “Acc ”position. However, activation
of the iPod
®may be delayed if the
battery charge of the iPod®is low.
. If an iPod®does not activate after
operation, disconnect the connection
cable from the iPod
®and reset it. For
the resetting procedure, see the User ’s
Guide of the iPod
®.
. If an iPod®and the connection cable
are connected improperly, the iPod®
cannot be powered on or will not be
recognized by in-vehicle equipment. In
this case, disconnect the connection
cable from the iPod
®, and then connect
it again.
Except STI
STI
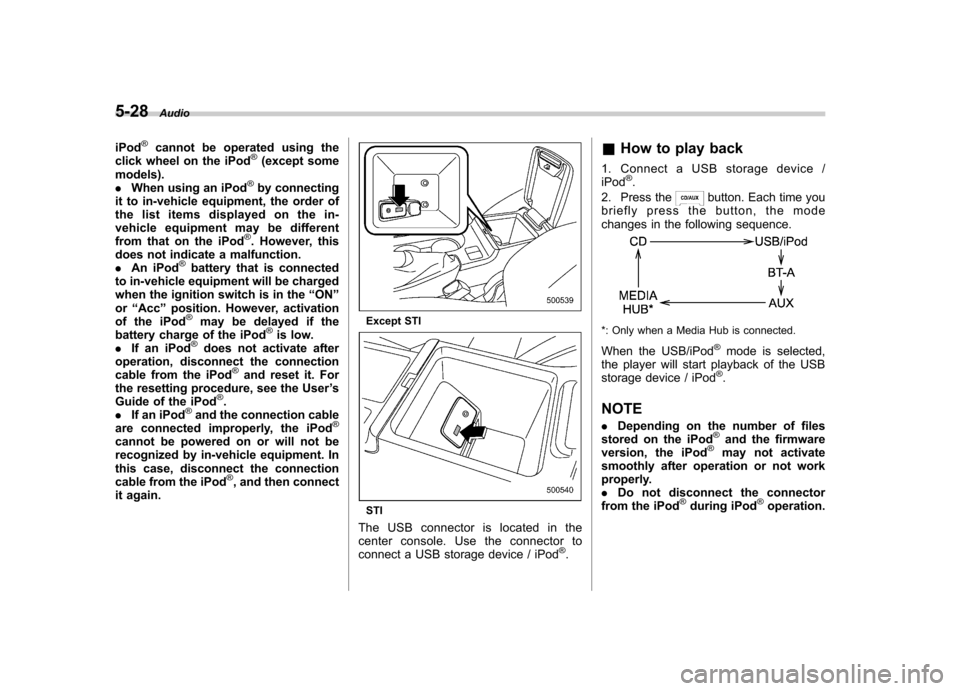
The USB connector is located in the
center console. Use the connector to
connect a USB storage device / iPod
®. &
How to play back
1. Connect a USB storage device /iPod
®.
2. Press the
button. Each time you
briefly press the button, the mode
changes in the following sequence.
*: Only when a Media Hub is connected.
When the USB/iPod
®mode is selected,
the player will start playback of the USB
storage device / iPod
®.
NOTE . Depending on the number of files
stored on the iPod
®and the firmware
version, the iPod®may not activate
smoothly after operation or not work
properly.. Do not disconnect the connector
from the iPod
®during iPod®operation.
Page 224 of 416
speed dial”F 5-43.
NOTE
While inputting the phone numbers, if “ GO BACK ”is chosen using the
“ TUNE/TRACK/CH ”dial, the character
that was input last is deleted. ! Registering from call history
1. Select the “CALL HISTORY ”menu.
2. Select “OUTGOING ”or “INCOMING ”
by operating the “TUNE/TRACK/CH ”dial.
3. Select the phone number by operating the “TUNE/TRACK/CH ”dial.
4. Perform either of the following proce-dures. –Select the “RECORD NAME ”menu
by operating the “TUNE/TRACK/CH ”
dial. – Press the talk switch
.
5. Say the name (voice tag) to be registered.
6. Select the “CONFIRM ”menu.
– Then “STORED ”is displayed and
the mode changes to the registering
speed dial mode. Refer to “Registering
speed dial ”F 5-43.
! Registering from redial
1. Select the “REDIAL ”menu. 2. Select the phone number by operatingthe
“TUNE/TRACK/CH ”dial.
3. Select the “STORE ”menu.
4. Select the “CONFIRM ”menu.
5. Perform either of the following proce-dures. –Select the “RECORD NAME ”menu
by operating the “TUNE/TRACK/CH ”
dial. – Press the talk switch
.
6. Say the name (voice tag) to be registered.
7. Select the “CONFIRM ”menu.
– Then “STORED ”is displayed and
the mode changes to the registering
speed dial mode. Refer to “Registering
speed dial ”F 5-43.
! Registering from call back
1. Select the “CALL BACK ”menu.
2. Select the phone number by operatingthe “TUNE/TRACK/CH ”dial.
3. Select the “STORE ”menu.
4. Select the “CONFIRM ”menu.
5. Perform either of the following proce-dures. –Select the “RECORD NAME ”menu
by operating the “TUNE/TRACK/CH ”
dial. – Press the talk switch
. 6. Say the name (voice tag) to be registered.
7. Select the
“CONFIRM ”menu.
– Then “STORED ”is displayed and
the mode changes to the registering
speed dial mode. Refer to “Registering
speed dial ”F 5-43.
! Registering speed dial
1. After registering phonebook data, se-
lect the “SPEED DIAL ”menu.
2. Press the preset button (from
to) to which you want to register the
phone number. NOTE
If the number to be used is already
registered in speed dial, “OVER-
WRITE? ”will be displayed.
! List names function
The voice tags registered in the phone-
book are spoken by using the list names
function. To use the list names function,
perform the following procedure.
1. Select the “LIST NAMES ”menu.
2. Select the registered data by perform-
ing either of the following procedures. –Press the talk switch
.
– Operate the “TUNE/TRACK/CH ”
Audio
5-43
– CONTINUED –
Page 225 of 416
5-44Audio
dial.
3. After “SELECTED ”is displayed, you
can select the following menus. . “DIAL ”to make a phone call
. “CHANGE NAME ”to change the name
(voice tag) . “SET SPD DIAL ”/“ SET SPEED DIAL ”
to set the speed dial. “DELETE ENTRY ”to delete the name
(voice tag) from the phonebook. “GO BACK ”to go back to the menu
mode
NOTE . After “LIST NAMES ”is selected, if
the OFF hook switch
is pushed, the
selected number is called. . After “LIST NAMES ”is selected, if
no operation is performed, the mem-
ories are displayed and voice tags arespoken. ! Changing voice tag
1. Select the “CHANGE NAME ”menu.
2. Select the phone number by perform-
ing either of the following procedures. –Operate the “TUNE/TRACK/CH ”
dial. – Press the talk switch
and say
the voice tag.
3. Select the “CONFIRM ”menu. –
Then the selected phone number/
name is displayed.
4. Press the talk switch
.
5. Say the new voice tag.
6. Select the “CONFIRM ”menu.
– Then “CHANGED ”is displayed.
! Set speed dial
1. Select “SET SPD DIAL ”by operating
the “TUNE/TRACK/CH ”dial or select
“ SET SPEED DIAL ”by using the voice
command system.
2. Select the phone number by perform-
ing either of the following procedures.
–Operate the “TUNE/TRACK/CH ”
dial. – Press the talk switch
and say
the voice tag.
3. Select the “CONFIRM ”menu.
4. Press the preset button (from
to) to which you want to register the
phone number. NOTE
If the number to be used is already
registered in speed dial, “OVER-
WRITE? ”will be displayed.
! Deleting the phonebook data
1. Select the “DELETE ENTRY ”menu. 2. Select the phone number by perform-
ing either of the following procedures.
–Operate the “TUNE/TRACK/CH ”
dial. – Press the talk switch
and say
the voice tag.
3. Select the “CONFIRM ”menu.
– Then “DELETED ”is displayed and
the selected phonebook data is de- leted.
! Deleting the speed dial
1. Select “DEL SPD DIAL ”by operating
the “TUNE/TRACK/CH ”dial or select
“ DELETE SPEED DIAL ”by using the
voice command system.
2. Press the preset button (from
to) to which you want to delete the
speed dial.
3. Select the “CONFIRM ”menu.
– Then “DELETED ”is displayed and
the selected speed dial is deleted.
! Deleting the redial data
1. Select the “REDIAL ”menu.
2. Select the phone number by operating the “TUNE/TRACK/CH ”dial.
3. Select the “DELETE ”menu.
4. Select the “CONFIRM ”menu.
– Then “DELETED ”is displayed and
the selected redial data is deleted.
Page 226 of 416

!Deleting the callback data
1. Select the “CALLBACK ”menu.
2. Select the phone number by operating the “TUNE/TRACK/CH ”dial.
3. Select the “DELETE ”menu.
4. Select the “CONFIRM ”menu.
– Then “DELETED ”is displayed and
the selected callback data is deleted.
! Making a phone call
! Making a phone call by saying name
1. Press the talk switch
.
2. Say “DIAL BY NAME ”.
3. Press the talk switch
again.
4. Say the desired name (voice tag) to be called.
5. Select the “DIAL ”menu or press the
OFF hook switch
.
! Making a phone call by saying number
1. Press the talk switch
.
2. Say “DIAL BY NUMBER ”.
3. Press the talk switch
again.
4. Say the desired phone number to be called.
5. Select the “DIAL ”menu or press the
OFF hook switch
. !
Making a phone call from speed dial
It is possible to select a phone number
from speed dial registered with the in-
vehicle equipment to make a phone call.
1. Press the preset button (from
to) to which the desired number is
registered.
2. Press the OFF hook switch
.
NOTE
When a preset button for which num-
bers are not registered is pressed, an
error message is indicated on the audioscreen. ! Redial
1. Select the “REDIAL ”menu.
2. Select the desired number by operat-
ing the “TUNE/TRACK/CH ”dial.
3. Select the “DIAL ”menu or press the
OFF hook switch
.
! Callback
1. Select the “CALL BACK ”menu.
2. Select the desired number by operat-
ing the “TUNE/TRACK/CH ”dial.
3. Select the “DIAL ”menu or press the
OFF hook switch
. !
Making a phone call from list name
It is possible to select a phone number
from the list name registered with the in-
vehicle equipment to make a phone call.
For details, refer to “List names function ”
F 5-43.
! Top redial
1. Press the OFF hook switch
and
load the outgoing call history.
2. Select the “DIAL ”menu or press the
OFF hook switch
.
! Taking a phone call and declining
an incoming call
To take a phone call: Press the OFF
hook switch
.
To put an incoming call on hold (only if
the cell phone has this function): Press the
ON hook switch
briefly.
To decline an incoming call (only if the
cell phone has this function): Press and
hold the ON hook switch
.
! Ending a call
Press the ON hook switch
.
Audio
5-45
– CONTINUED –
Page 251 of 416
7-8Starting and operating
.A vehiclefails the OBDII inspection if
the “CHECK ENGINE ”warning light is not
properly operating (light is illuminated or is
not working due to a burned out bulb) or
there is one or more diagnostic trouble
codes stored in the vehicle ’s computer.
. A state emission inspection may reject
(not pass or fail) a vehicle if the number of
OBDII system readiness monitors “NOT
READY ”is greater than one. If the
vehicle ’s battery has been recently re-
placed or disconnected, the OBDII system
inspection may indicate that the vehicle is
not ready for the emission test. Under this
condition, the vehicle driver should be
instructed to drive his/her vehicle for a few
days to reset the readiness monitors and
return for an emission re-inspection. . Owners of rejected or failing vehicles
should contact their SUBARU Dealer for service.
Some states still use dynamometers in
their emission inspection program. A
dynamometer is a treadmill or roller-like
testing device that allows your vehicle ’s
wheels to turn while the vehicle remains in
one place. Prior to your vehicle being put
on a dynamometer, tell your emission
inspector
not to place your SUBARU
AWD vehicle on a two-wheel dynam-
ometer. Otherwise, serious transmis-
sion damage will result. The U.S. Environmental Protection
Agency (EPA) and states using two-wheel
dynamometers in their emission testing
program have EXEMPTED SUBARU
AWD vehicles from the portion of the
testing program that involves a two-wheel
dynamometer. There are some states that
use four-wheel dynamometers in their
testing program. When properly used, this
equipment should not damage a SUBARU
AWD vehicle.
Under no circumstances should the rear
wheels be jacked off the ground, nor
should the driveshaft be disconnected for
state emission testing.
Preparing to drive
You should perform the following checks
and adjustments every day before you
start driving.
1. Check that all windows, mirrors, and
lights are clean and unobstructed.
2. Check the appearance and condition
of the tires. Also check tires for properinflation.
3. Look under the vehicle for any sign of leaks.
4. Check that the hood, trunk (4-door)
and rear gate (5-door) are fully closed.
5. Check the adjustment of the seat.
6. Check the adjustment of the inside
and outside mirrors.
7. Fasten your seatbelt. Check that your
passengers have fastened their seatbelts.
8. Check the operation of the warning
and indicator lights when the ignition
switch is turned to the
“ON ”position.
9. Check the gauges, indicator and warn-
ing lights after starting the engine.
NOTE
Engine oil, engine coolant, brake fluid,
washer fluid and other fluid levels
should be checked daily, weekly or at
fuel stops.