2012 SUBARU IMPREZA WRX lock
[x] Cancel search: lockPage 163 of 416
3-46Instruments and controls
window defogger. Some models are also
equipped with an outside mirror defogger
and/or windshield wiper deicer. The de-
fogger and deicer system is activated only
when the ignition switch is in the “ON ”
position.
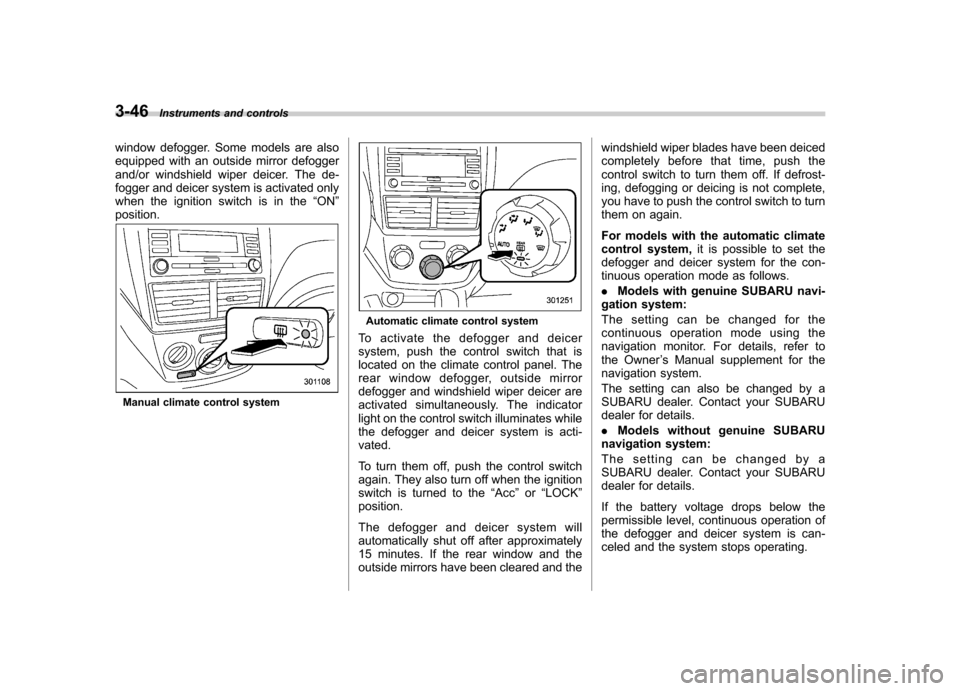
Manual climate control system
Automatic climate control system
To activate the defogger and deicer
system, push the control switch that is
located on the climate control panel. The
rear window defogger, outside mirror
defogger and windshield wiper deicer are
activated simultaneously. The indicator
light on the control switch illuminates while
the defogger and deicer system is acti-vated.
To turn them off, push the control switch
again. They also turn off when the ignition
switch is turned to the “Acc ”or “LOCK ”
position.
The defogger and deicer system will
automatically shut off after approximately
15 minutes. If the rear window and the
outside mirrors have been cleared and the windshield wiper blades have been deiced
completely before that time, push the
control switch to turn them off. If defrost-
ing, defogging or deicing is not complete,
you have to push the control switch to turn
them on again.
For models with the automatic climate
control system,
it is possible to set the
defogger and deicer system for the con-
tinuous operation mode as follows. . Models with genuine SUBARU navi-
gation system:
The setting can be changed for the
continuous operation mode using the
navigation monitor. For details, refer to
the Owner ’s Manual supplement for the
navigation system.
The setting can also be changed by a
SUBARU dealer. Contact your SUBARU
dealer for details. . Models without genuine SUBARU
navigation system:
The setting can be changed by a
SUBARU dealer. Contact your SUBARU
dealer for details.
If the battery voltage drops below the
permissible level, continuous operation of
the defogger and deicer system is can-
celed and the system stops operating.
Page 164 of 416
CAUTION
. To prevent the battery from being
discharged, do not operate the
defogger and deicer system con-
tinuously for any longer than
necessary.
. Do not use sharp instruments or
window cleaner containing abra-
sives to clean the inner surface
of the rear window. They may
damage the conductors printed
on the window.
NOTE . Turn on the defogger and deicer
system if the wipers are frozen to the windshield.. If the windshield is covered with
snow, remove the snow so that the
windshield wiper deicer works effec-
tively.. While the defogger and deicer sys-
tem is in the continuous operation
mode, if the vehicle speed remains at
9 mph (15 km/h) or less for 15 minutes,
the windshield wiper deicer automati-
cally stops operating, though the rear
window defogger and outside mirror
defogger maintain continuous opera-
tion in this condition. Tilt/telescopic steering wheel
WARNING
. Do not adjust the steering wheel
tilt/telescopic position while driv-
ing. This may cause loss of
vehicle control and result in
personal injury.
. If the lever cannot be raised to
the fixed position, adjust the
steering wheel again. It is dan-
gerous to drive without locking
the steering wheel. This may
cause loss of vehicle control
and result in personal injury.
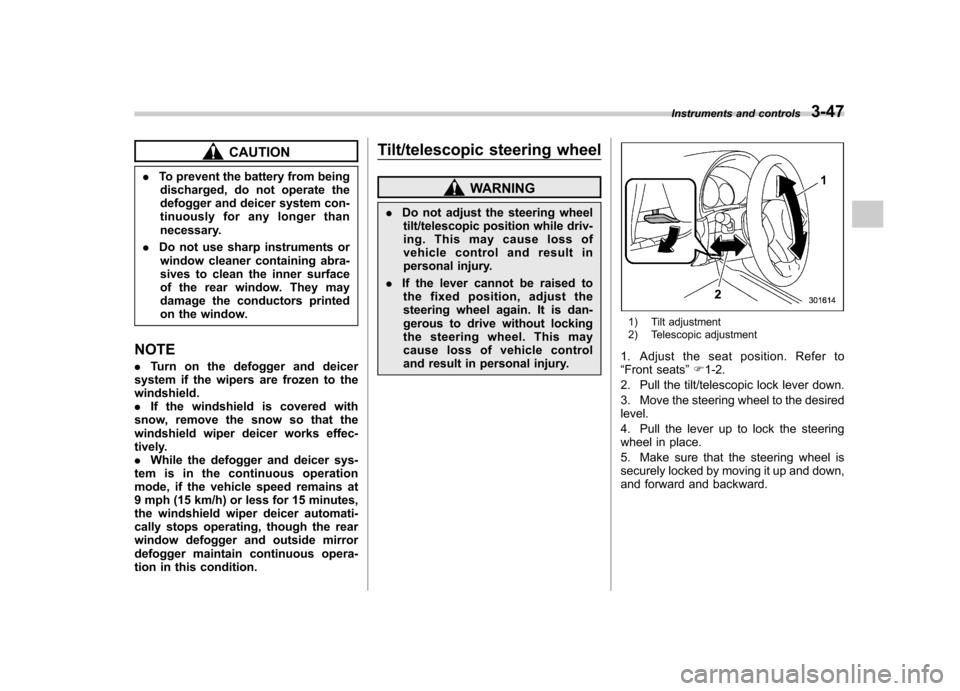
1) Tilt adjustment
2) Telescopic adjustment
1. Adjust the seat position. Refer to “ Front seats ”F 1-2.
2. Pull the tilt/telescopic lock lever down.
3. Move the steering wheel to the desired level.
4. Pull the lever up to lock the steering
wheel in place.
5. Make sure that the steering wheel is
securely locked by moving it up and down,
and forward and backward. Instruments and controls
3-47
Page 174 of 416
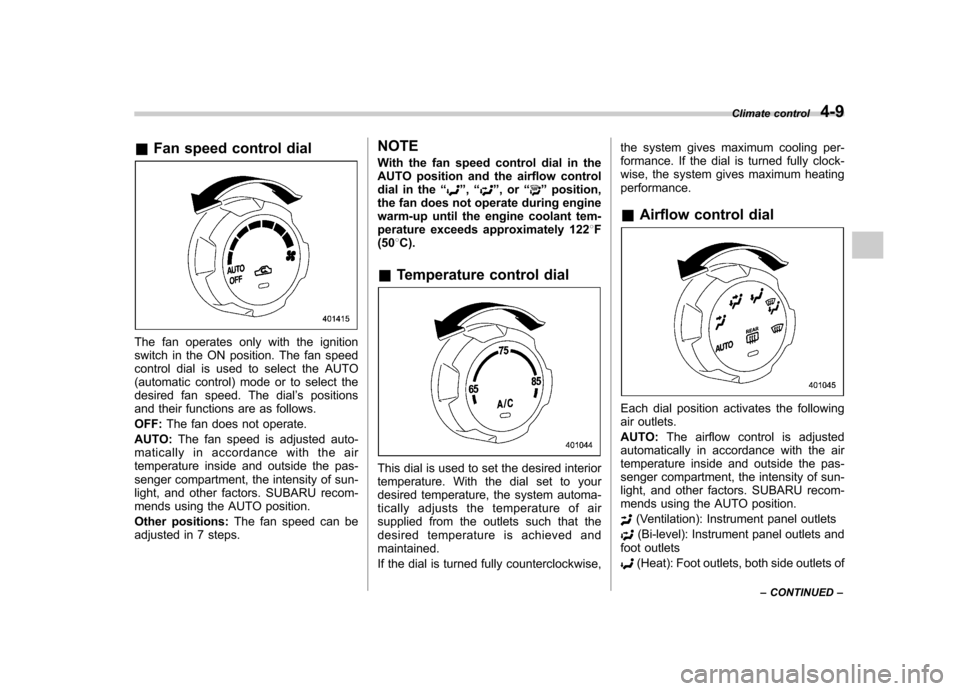
&Fan speed control dial
The fan operates only with the ignition
switch in the ON position. The fan speed
control dial is used to select the AUTO
(automatic control) mode or to select the
desired fan speed. The dial ’s positions
and their functions are as follows. OFF: The fan does not operate.
AUTO: The fan speed is adjusted auto-
maticallyinaccordancewiththeair
temperature inside and outside the pas-
senger compartment, the intensity of sun-
light, and other factors. SUBARU recom-
mends using the AUTO position.
Other positions: The fan speed can be
adjusted in 7 steps. NOTE
With the fan speed control dial in the
AUTO position and the airflow control
dial in the
“
”, “”,or “”position,
the fan does not operate during engine
warm-up until the engine coolant tem-
perature exceeds approximately 122 8F
(50 8C).
& Temperature control dial
This dial is used to set the desired interior
temperature. With the dial set to your
desired temperature, the system automa-
tically adjusts the temperature of air
supplied from the outlets such that the
desired temperature is achieved andmaintained.
If the dial is turned fully counterclockwise, the system gives maximum cooling per-
formance. If the dial is turned fully clock-
wise, the system gives maximum heatingperformance. &
Airflow control dial
Each dial position activates the following
air outlets. AUTO: The airflow control is adjusted
automatically in accordance with the air
temperature inside and outside the pas-
senger compartment, the intensity of sun-
light, and other factors. SUBARU recom-
mends using the AUTO position.
(Ventilation): Instrument panel outlets
(Bi-level): Instrument panel outlets and
foot outlets
(Heat): Foot outlets, both side outlets of Climate control
4-9
– CONTINUED –
Page 190 of 416
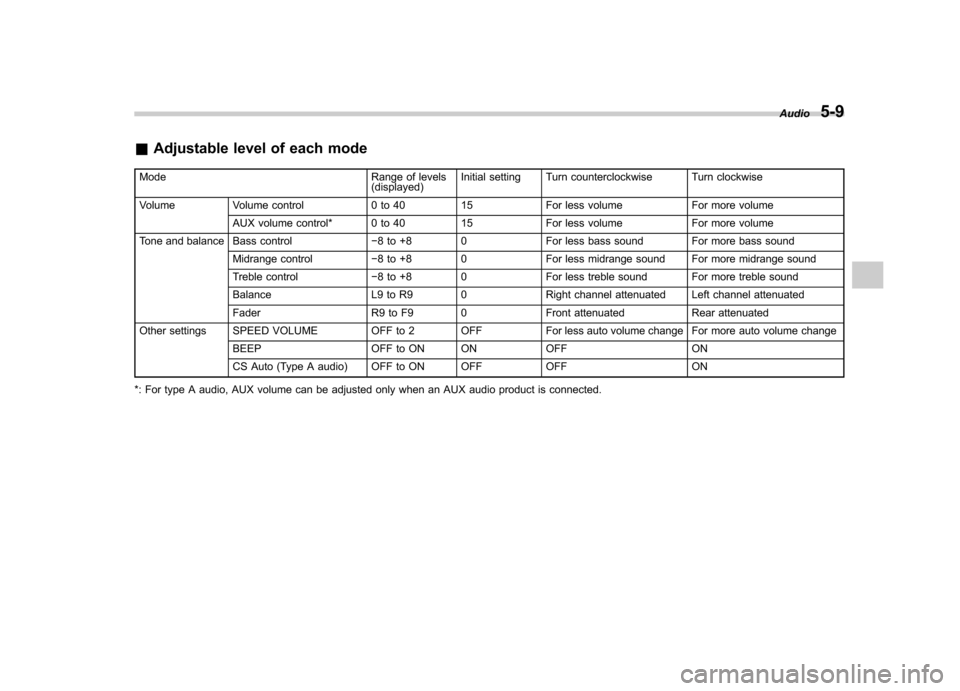
&Adjustable level of each mode
Mode Range of levels (displayed)Initial setting Turn counterclockwise Turn clockwise
Volume Volume control 0 to 40 15 For less volume For more volume AUX volume control* 0 to 40 15 For less volume For more volume
Tone and balance Bass control �8 to +8 0 For less bass sound For more bass sound
Midrange control �8 to +8 0 For less midrange sound For more midrange sound
Treble control �8 to +8 0 For less treble sound For more treble sound
Balance L9 to R9 0 Right channel attenuated Left channel attenuated
Fader R9 to F9 0 Front attenuated Rear attenuated
Other settings SPEED VOLUME OFF to 2 OFF For less auto volume change For more auto volume change
BEEP OFF to ON ON OFF ON
CS Auto (Type A audio) OFF to ON OFF OFF ON
*: For type A audio, AUX volume can be adjusted only when an AUX audio product is connected. Audio
5-9
Page 191 of 416
5-10Audio
FM/AM radio operation &FM/AM selection
Type A audio
Type B audio
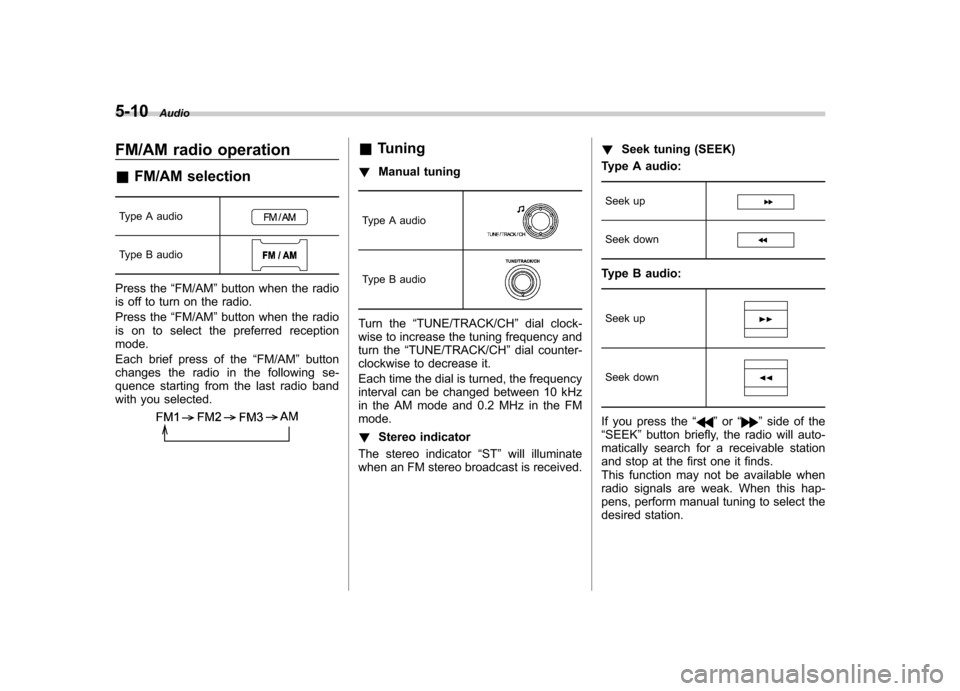
Press the “FM/AM ”button when the radio
is off to turn on the radio.
Press the “FM/AM ”button when the radio
is on to select the preferred reception mode.
Each brief press of the “FM/AM ”button
changes the radio in the following se-
quence starting from the last radio band
with you selected.
& Tuning
! Manual tuning
Type A audio
Type B audio
Turn the “TUNE/TRACK/CH ”dial clock-
wise to increase the tuning frequency and
turn the “TUNE/TRACK/CH ”dial counter-
clockwise to decrease it.
Each time the dial is turned, the frequency
interval can be changed between 10 kHz
in the AM mode and 0.2 MHz in the FMmode. ! Stereo indicator
The stereo indicator “ST ”will illuminate
when an FM stereo broadcast is received. !
Seek tuning (SEEK)
Type A audio:
Seek up
Seek down
Type B audio:
Seek up
Seek down
If you press the “”or “”side of the
“ SEEK ”button briefly, the radio will auto-
matically search for a receivable station
and stop at the first one it finds.
This function may not be available when
radio signals are weak. When this hap-
pens, perform manual tuning to select the
desired station.
Page 195 of 416
5-14Audio
line of sight signals can be blocked by
objects such as buildings, but the network
of repeater stations allows signal cover-
age within urban areas such as cities.
You may experience problems in receiving
Sirius XM
TMsatellite radio signals in the
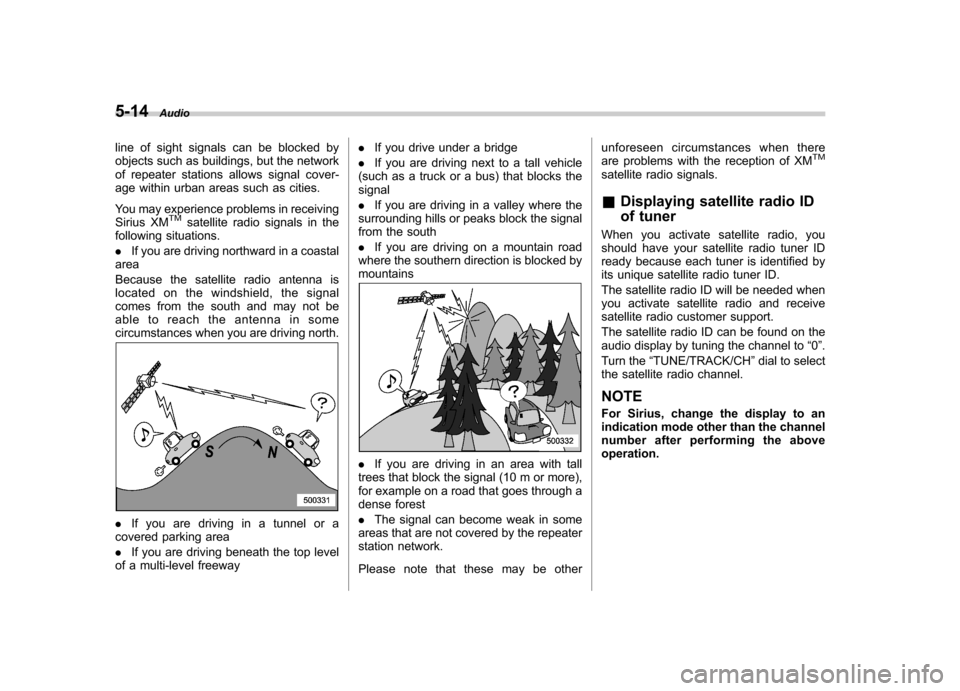
following situations. . If you are driving northward in a coastal
area
Because the satellite radio antenna is
located on the windshield, the signal
comes from the south and may not be
able to reach the antenna in some
circumstances when you are driving north.
. If you are driving in a tunnel or a
covered parking area . If you are driving beneath the top level
of a multi-level freeway .
If you drive under a bridge
. If you are driving next to a tall vehicle
(such as a truck or a bus) that blocks the signal . If you are driving in a valley where the
surrounding hills or peaks block the signal
from the south . If you are driving on a mountain road
where the southern direction is blocked by mountains
. If you are driving in an area with tall
trees that block the signal (10 m or more),
for example on a road that goes through a
dense forest . The signal can become weak in some
areas that are not covered by the repeater
station network.
Please note that these may be other unforeseen circumstances when there
are problems with the reception of XM
TM
satellite radio signals. &
Displaying satellite radio ID
of tuner
When you activate satellite radio, you
should have your satellite radio tuner ID
ready because each tuner is identified by
its unique satellite radio tuner ID.
The satellite radio ID will be needed when
you activate satellite radio and receive
satellite radio customer support.
The satellite radio ID can be found on the
audio display by tuning the channel to “0 ”.
Turn the “TUNE/TRACK/CH ”dial to select
the satellite radio channel.
NOTE
For Sirius, change the display to an
indication mode other than the channel
number after performing the aboveoperation.
Page 196 of 416
&Band selection
Type A audio
Type B audio
Push the “SAT ”button when the radio is
off to turn on the radio.
Push the “SAT ”button when the radio is
on to select SAT1, SAT2 or SAT3 recep- tion.
& Channel and category selec- tion
! Channel selection
Type A audio
Type B audio
Turn the “TUNE/TRACK/CH ”dial clock-
wise to select the next channel and turn the “TUNE/TRACK/CH ”dial counterclock-
wise to select the previous channel. !
Skip channel selection
When in the SAT mode, press and hold
the following buttons to change to the
channel selection mode.
Type A audio:
Channel up by 10 steps
Channel down by 10 steps
Type B audio:
Channel up by 10 steps
Channel down by 10 steps
! Category selection
Type A audio
Type B audio
To activate the category search mode,
press the “PTY/CAT ”button. To deactivate
the category search mode, press the“ PTY/CAT ”button again.
When in the category search mode, press
the following buttons to change the cate-
gory up or down.
Type A audio:
Category up by one step
Category down by
one step
Type B audio:
Category up by one step
Category down by
one step
When a category is selected, turning the “ TUNE/TRACK/CH ”dial selects channels
only within the selected category.
The control function returns to the normal
mode after approximately 10 seconds. Audio
5-15
– CONTINUED –
Page 199 of 416

5-18Audio
!Loading all the magazine (full disc
loading mode)
1. If you press and hold the
button,
the player will produce beep sound and
will enter the full disc loading mode.
2. When the disc number indicator
flashes and “ALL LOAD ”indicator illumi-
nates, insert a disc within 15 seconds. If a
disc is successfully loaded during this
period, the disc number indicator will stop
blinking and will steadily light.
3. When the loading of a disc is com-
plete, the next disc number indicator will
blink. Then repeat step 2.
4. When the magazine is filled with discs
by repeating steps 2 and 3, the player will
start playback of the discs, beginning with
the one inserted first.
If you fail to insert any disc during each 15
seconds interval, the full disc loading
mode will be canceled, and the player will
start playback of the disc inserted first.
& How to insert a CD (type B)
Hold the disc with a finger in the center
hole while gripping the edge of the disc,
then insert it into the slot (with the label
side up) and the player will automatically
pull the disc into position. NOTE
DO NOT INSERT TWO DISCS INTO THE
DISC INSERTION SLOT AT THE SAMETIME. &
How to play back a CD
! When there is no CD inserted
Properly insert a CD. Refer to “How to
insert a CD(s) (type A) ”F 5-17/ “How to
insert a CD (type B) ”F 5-18.
When a CD is loaded, the player will start
playback of the CD, beginning with the
first track. ! When there are CDs loaded (type A)
Press the preferred disc select button (from
to). If a disc is loaded
in any slot, the corresponding disc number
indicator will be constantly illuminated.
The player will then start playback of the
selected CD, beginning with the first track.
If a disc that the player cannot read has
been loaded, the player will display themessage “CHECK DISC ”.
! When CD is in the player (type B)
Each brief press of the
button
changes the modes in the following sequence.
When the CD mode is selected, the player
will start playback. & To select a track from the beginning
Type A audio
Type B audio
Turn the “TUNE/TRACK/CH ”dial clock-
wise to skip to the beginning of the next
track/file. Each time the dial is turned, the
indicated track/file number will increase.
Turn the “TUNE/TRACK/CH ”dial counter-
clockwise to skip to the beginning of the
current track/file. Each time the dial is
turned, the indicated track/file number will decrease.