2012 SUBARU FORESTER window
[x] Cancel search: windowPage 378 of 438

Replacement of wiper blades
Grease, wax, insects, or other material on
the windshield or the wiper blade results in
jerky wiper operation and streaking on the
glass. If you cannot remove the streaks
after operating the windshield washer or if
the wiper operation is jerky, clean the
outer surface of the windshield (or rear
window) and the wiper blades using a
sponge or soft cloth with a neutral
detergent or mild abrasive cleaner. After
cleaning, rinse the windshield and wiper
blades with clean water. The windshield is
clean if beads do not form when you rinse
the windshield with water.
CAUTION
. Do not clean the wiper blades
with gasoline or a solvent, such
as paint thinner or benzine. This
will cause deterioration of the
wiper blades.
. While removing the wiper blades
from the wiper arms, do not
return the wiper arms to the
original positions. Otherwise,
the windshield surface may bescratched.
. When returning the raised wiper
arms to the original positions, carefully return the wiper arms
on the windshield while support-
ing them with your hands. You
should not return the wiper arms
to the windshield only by the
return spring. Otherwise, the wi-
per arms may be deformed and/
or the windshield surface may bescratched.
If you cannot eliminate the streaking even
after following this method, replace the
wiper blades using the following proce-dures. &
Windshield wiper blade as- sembly
1. Raise the wiper arm off the windshield.1) Open the cover
2) Pull down the wiper blade
2. Remove the wiper blade assembly by
opening the cover and pulling it down in
the direction shown in the illustration.
3. Install the wiper blade assembly to the
wiper arm. Make sure that it locks in place.
4. Hold the wiper arm by hand and slowly
lower it in position. Maintenance and service
11-39
– CONTINUED –
Page 380 of 438

&Rear window wiper blade assembly
1. Raise the wiper arm off the rear
window.
2. Turn the wiper blade assembly coun- terclockwise.
3. Pull the wiper blade assembly toward
you to remove it from the wiper arm.
4. Install the wiper blade assembly to the
wiper arm. Make sure that it locks in place.
5. Hold the wiper arm by hand and slowly
lower it in position. &
Rear window wiper blade rubber
1. Pull out the end of the blade rubber
assembly to unlock it from the plasticsupport.
Maintenance and service 11-41
– CONTINUED –
Page 381 of 438

11-42Maintenance and service
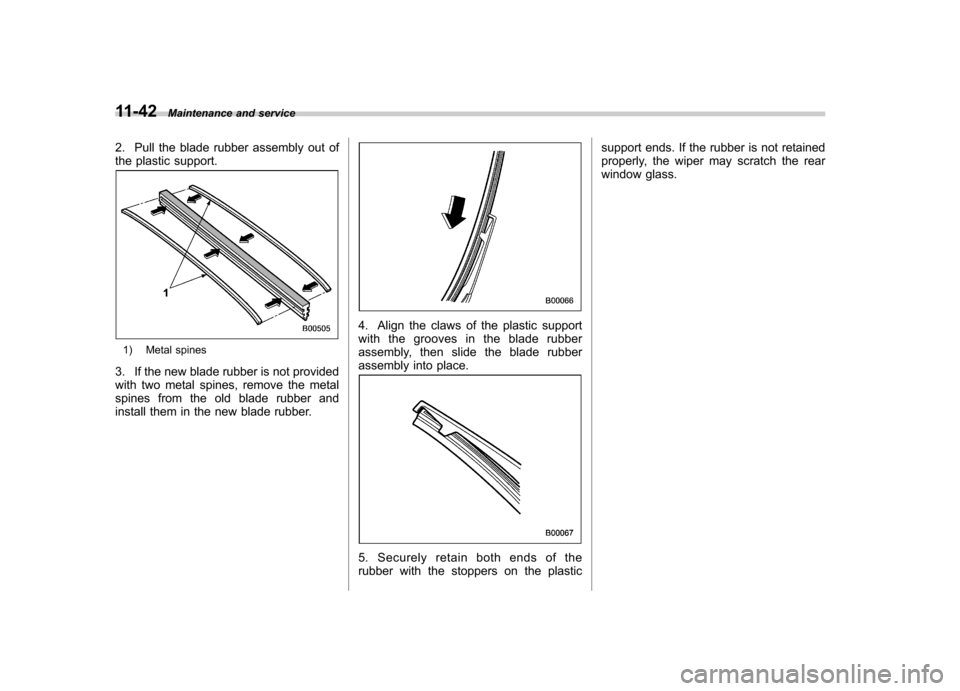
2. Pull the blade rubber assembly out of
the plastic support.
1) Metal spines
3. If the new blade rubber is not provided
with two metal spines, remove the metal
spines from the old blade rubber and
install them in the new blade rubber.
4. Align the claws of the plastic support
with the grooves in the blade rubber
assembly, then slide the blade rubber
assembly into place.
5. Securely retain both ends of the
rubber with the stoppers on the plastic support ends. If the rubber is not retained
properly, the wiper may scratch the rear
window glass.
Page 403 of 438

12-12Specifications
Fuse
panel Fuse
rating Circuit
16 10A .Illumination
17 15A .Seat heaters
18 10A .Back-up light
19 Empty
20 10A .Accessory power outlet
(instrument panel)
21 7.5A .Starter relay
22 15A .Air conditioner
. Rear window defogger
relay coil
23 15A .Rear wiper
. Rear window washer
24 15A .Audio unit
. Clock
25 15A .SRS airbag system
26 7.5A .Power window relay
. Radiator main fan relay
. Tail and illumination re-
lay
27 15A .Blower fan
28 15A .Blower fan
29 15A .Fog light
30 30A .Front wiper
31 7.5A .Auto air conditioner unit
. Integrated unit Fuse
panel Fuse
rating Circuit
32 Empty
33 7.5A .ABS/Vehicle Dynamics
Control unit
Page 404 of 438

&Fuse panel located in the engine compartment
A) Main fuse Fuse
panel Fuse
rating Circuit
1 30A .ABS unit
. Vehicle Dynamics Con-
trol unit
2 25A .Main fan (cooling fan)
3 10A .Secondary air combina-
tion valve (turbo models)
4 25A .Sub fan (cooling fan)
5 Empty
6 10A .Audio
7 30A .Headlight (low beam)
8 15A .Headlight (high beam)
9 20A .Back-up
10 15A .Horn
11 25A .Rear window defogger
. Mirror heater
12 15A .Fuel pump
13 10A .Automatic transmission
control unit
14 7.5A .Engine control unit
15 15A .Turn and hazard warn-
ing flasher
16 15A .Tail and illumination re-
lay
17 7.5A .Alternator
Specifications
12-13
– CONTINUED –
Page 414 of 438

crease in temperature could cause
tread separation, and failure of the
tire(s). Possible resulting loss of
vehicle control could lead to anaccident. !Measuring and adjusting air
pressure to achieve proper in-
flation
Check and, if necessary, adjust the
pressure of each tire (including the
spare) at least once a month and
before any long journey. Check the
tire pressures when the tires are
cold. Use a pressure gauge to
adjust the tire pressures to the
specific values. Driving even a
short distance warms up the tires
and increases the tire pressures.
Also, the tire pressures are affected
by the outside temperature. It is
best to check tire pressure out-
doors before driving the vehicle.
When a tire becomes warm, the air
inside it expands, causing the tire
pressure to increase. Be careful not
to mistakenly release air from a
warm tire to reduce its pressure. &
Glossary of tire terminology
. Accessory weight
The combined weight (in excess of
those standard items which may be
replaced) of automatic transmis-
sion, power steering, power brakes,
power windows, power seats, radio,
and heater, to the extent that these
items are available as factory-in-
stalled equipment (whether in-
stalled or not). . Bead
The part of the tire that is made of
steel wires, wrapped or reinforced
by ply cords and that is shaped to fit
the rim.. Bead separation
A breakdown of the bond between
components in the bead.. Bias ply tire
A pneumatic tire in which the ply
cords that extend to the beads are
laid at alternate angles substantially
less than 90 degrees to the center-
line of the tread. . Carcass
The tire structure, except tread and sidewall rubber which, when in-
flated, bears the load. .
Chunking
The breaking away of pieces of the
tread or sidewall.. Cold tire pressure
The pressure in a tire that has been
driven less than 1 mile or has been
standing for three hours or more.. Cord
The strands forming the plies in the tire. . Cord separation
The parting of cords from adjacent
rubber compounds.. Cracking
Any parting within the tread, side-
wall, or inner liner of the tire
extending to cord material. . Curb weight
The weight of a motor vehicle with
standard equipment including the
maximum capacity of fuel, oil and
coolant, and if so equipped, air
conditioning and additional weight
optional engine.
Consumer information and Reporting safety defects
13-5
– CONTINUED –
Page 433 of 438

14-8Index
R Rear Combination lights ................................................. 11-48
Differential gear oil ........................................ 11-22, 12-8
Gate ............................................................. 2-23, 9-18
Turn signal light .................................................... 11-48
Rear seat .................................................................... 1-7
Center table ............................................................ 6-7
Folding down ......................................................... 1-11
Reclining ............................................................... 1-10
Rear view camera ...................................................... 6-17
Rear window Defogger ............................................................... 3-45
Wiper and washer switch ........................................ 3-36
Wiper blades ........................................................ 11-41
Recommended
Automatic transmission fluid .................................... 12-9
Brake fluid. ............................................................ 12-9
Clutch fluid ............................................................ 12-9
Engine oil .............................................................. 12-5
Front differential gear oil ......................................... 12-8
Manual transmission oil .......................................... 12-8
Power steering fluid ................................................ 12-9
Rear differential gear oil .......................................... 12-8
Spark plugs ........................................................... 12-3
Refueling .................................................................... 7-3
Remote engine start system .......................................... 7-9
Remote keyless entry system ........................................ 2-7
Replacement
Brake pad and lining ............................................. 11-28
Wiper blades ........................................................ 11-39 Replacing
Air cleaner element ............................................... 11-15
Battery (remote engine start transmitter) .................... 7-12
Battery (remote keyless entry system) ....................... 2-10
Lost transmitters (remote keyless entry system) ......... 2-11
Replacing bulbs ....................................................... 11-45
Cargo area light ................................................... 11-50
Dome light ........................................................... 11-50
Door step light ..................................................... 11-50
Front turn signal light ............................................ 11-48
Headlight ............................................................. 11-45
License plate light ................................................. 11-49
Map light ............................................................. 11-50
Position light ........................................................ 11-48
Rear combination light .......................................... 11-48
Rocking the vehicle .................................................... 8-12
Roof molding and crossbar .......................................... 8-15
Roof rails ................................................................... 8-14
SSafety Precautions when driving ............................................. 5
Symbol ...................................................................... 2
Warnings ................................................................... 2
Screensaver .............................................................. 5-55
Seat Fabric ................................................................... 10-5
Front ...................................................................... 1-2
Heater .................................................................... 1-6
Height adjustment .................................................... 1-4
Power .................................................................... 1-4
Page 436 of 438

Warranties and maintenance....................................... 8-18
Washing ................................................................... 10-2
Waxing and polishing ................................................. 10-3
Wear indicators ......................................................... 11-34
Wheel Aluminum ............................................................. 11-37
Balance ............................................................... 11-33
Covers ................................................................. 11-36
Nut tightening torque ...................................... 9-6, 12-10
Replacement ........................................................ 11-36
Windows ................................................................... 2-20
Windshield Washer fluid ......................................................... 11-37
Wiper and washer switches ..................................... 3-34
Wiper blades ........................................................ 11-39
Wiper deicer .......................................................... 3-45
Winter Driving .................................................................... 8-8
Tires ............................................................ 8-11, 11-29
Wiper and washer ...................................................... 3-33
Wiper deicer .............................................................. 3-45 Index
14-11