2012 SUBARU FORESTER service
[x] Cancel search: servicePage 321 of 438

9-8In case of emergency
10. Insert the jack handle into the jack-
screw, and turn the handle until the tire
clears the ground. Do not raise the vehicle
higher than necessary.
11. Remove the wheel nuts and the flat tire.12. Before putting the spare tire on, clean
the mounting surface of the wheel and hub
with a cloth.
13. Put on the spare tire. Replace the
wheel nuts. Tighten them by hand.
WARNING
Do not use oil or grease on the
wheel studs or nuts when the spare
tire is installed. This could cause the
nuts to become loose and lead to anaccident.
14. Turn the jack handle counterclockwise
to lower the vehicle.
15. Use the wheel nut wrench to securely
tighten the wheel nuts to the specified
torque, following the tightening order in theillustration.
For the wheel nut tightening torque, refer to “Tires ”F 12-10. Never use your foot on
the wheel nut wrench or a pipe extension
on the wrench because you may exceed
the specified torque. Have the wheel nut
torque checked at the nearest automotive
service facility.
Page 327 of 438

9-14In case of emergency
Towing
If towing is necessary, it is best done by
your SUBARU dealer or a commercial
towing service. Observe the following
procedures for safety.
WARNING
Never tow AWD models (both AT and
MT) with either front or rear wheels
off the ground. This will cause the
vehicle to spin away due to the
operation or deterioration of the
center differential. &
Towing and tie-down hooks
The towing hooks should be used only in
an emergency (e.g., to free a stuck vehicle
from mud, sand or snow).
WARNING
. Do not use the towing hook
except when towing your vehicle.
. Be sure to remove the towing
hook after towing. In particular,
leaving the front towing hook
mounted on the vehicle could
interfere with proper operation
of the SRS airbag system in a
frontal collision.
CAUTION
. Use only the specified towing
hook and tie-down hook. Never
use suspension parts or other
parts of the body for towing or
tie-down purposes.
. To prevent deformation to the
front bumper and the towing
hook, do not apply excessive
lateral load to the towing hook. Front towing hook:
1. Take the towing hook out of the tool
bucket and take the screwdriver out of the
tool bag. Take the wheel nut wrench out of
the cargo area.2. Pry off the cover on the front bumper
using a flat-head screwdriver, and you will
find a threaded hole for attaching the
towing hook.
Page 340 of 438

Maintenance schedule....................................... 11-3
Maintenance precautions ................................... 11-3
Before checking or servicing in the engine compartment .................................................... 11-4
When checking or servicing in the engine compartment (non-turbo models) ...................... 11-4
When checking or servicing in the engine compartment while the engine is running .......... 11-5
Engine hood ....................................................... 11-5
Engine compartment overview .......................... 11-7
Non-turbo models .............................................. 11-7
Turbo models ..................................................... 11-8
Engine oil ............................................................ 11-9
Checking the oil level ......................................... 11-9
Changing the oil and oil filter ............................ 11-11
Recommended grade and viscosity .................. 11-13
Synthetic oil ..................................................... 11-13
Cooling system ................................................ 11-13
Cooling fan, hose and connections ................... 11-14
Engine coolant ................................................. 11-14
Air cleaner element .......................................... 11-15
Replacing the air cleaner element ..................... 11-15
Spark plugs ...................................................... 11-17
Drive belts ........................................................ 11-18
Turbo models ................................................... 11-18
Non-turbo models ............................................ 11-18
Manual transmission oil .................................. 11-19
Checking the oil level ....................................... 11-19
Recommended grade and viscosity .................. 11-19Automatic transmission fluid
.......................... 11-20
Checking the fluid level .................................... 11-20
Recommended fluid ......................................... 11-21
Front differential gear oil (AT models) ........... 11-21
Checking the oil level ...................................... 11-21
Recommended grade and viscosity .................. 11-22
Rear differential gear oil .................................. 11-22
Recommended grade and viscosity .................. 11-22
Power steering fluid ........................................ 11-22
Checking the fluid level .................................... 11-22
Recommended fluid ......................................... 11-23
Brake fluid ........................................................ 11-23
Checking the fluid level .................................... 11-23
Recommended brake fluid ............................... 11-24
Clutch fluid (MT models) ................................. 11-24
Checking the fluid level .................................... 11-24
Recommended clutch fluid ............................... 11-25
Brake booster .................................................. 11-25
Brake pedal ...................................................... 11-26
Checking the brake pedal free play .................. 11-26
Checking the brake pedal reserve distance....... 11-26
Clutch pedal (MT models) ............................... 11-27
Checking the clutch function ............................ 11-27
Checking the clutch pedal free play .................. 11-27
Hill start assist system (MT models) .............. 11-27
Replacement of brake pad and lining ............ 11-28
Breaking-in of new brake pads and linings ....... 11-28
Parking brake stroke ....................................... 11-29
Maintenance and service
11
Page 341 of 438

Maintenance and serviceTires and wheels .............................................. 11-29
Types of tires ................................................... 11-29
Tire pressure monitoring system (TPMS) (U.S.-spec. models) ........................................ 11-29
Tire inspection ................................................. 11-31
Tire pressures and wear ................................... 11-31
Wheel balance .................................................. 11-33
Wear indicators ................................................ 11-34
Tire rotation direction mark .............................. 11-34
Tire rotation ..................................................... 11-35
Tire replacement .............................................. 11-35
Wheel replacement ........................................... 11-36
Wheel covers (if equipped) ............................... 11-36
Aluminum wheels ............................................. 11-37
Windshield washer fluid .................................. 11-37
Replacement of wiper blades .......................... 11-39
Windshield wiper blade assembly ..................... 11-39Windshield wiper blade rubber
......................... 11-40
Rear window wiper blade assembly .................. 11-41
Rear window wiper blade rubber ... ................... 11-41
Battery .............................................................. 11-43
Fuses ................................................................ 11-44
Installation of accessories .............................. 11-45
Replacing bulbs ............................................... 11-45
Headlights (models with HID headlights) ........... 11-45
Headlights (models without HID headlights) ...... 11-46
Position light ................................................... 11-48
Front turn signal light ...................................... 11-48
Rear combination lights ................................... 11-48
License plate light ........................................... 11-49
Dome light, map light, cargo area light and door step light ............................................... 11-50
Other lights on the vehicle ............................... 11-51
Page 342 of 438

Maintenance schedule
The scheduled maintenance items re-
quired to be serviced at regular intervals
are shown in the“Warranty and Main-
tenance Booklet ”.
For details of your maintenance schedule,
read the separate “Warranty and Main-
tenance Booklet ”. Maintenance precautions
When maintenance and service are re-
quired, it is recommended that all work be
done by an authorized SUBARU dealer.
If you perform maintenance and service
by yourself, you should familiarize yourself
with the information provided in this
section on general maintenance and
service for your SUBARU.
Incorrect or incomplete service could
cause improper or unsafe vehicle opera-
tion. Any problems caused by improper
maintenance and service performed by
you are not eligible for warranty coverage.
WARNING
. Testing of an All-Wheel Drive
vehicle must NEVER be per-
formed on a single two-wheel
dynamometer or similar appara-
tus. Attempting to do so will
result in transmission damage
and in uncontrolled vehicle
movement and may cause an
accident or injuries to persons
nearby.
. Always select a safe area when
performing maintenance on yourvehicle. .
Always be very careful to avoid
injury when working on the vehi-
cle. Remember that some of the
materials in the vehicle may be
hazardous if improperly used or
handled, for example, batteryacid.
. Your vehicle should only be ser-
viced by persons fully competent
to do so. Serious personal injury
may result to persons not experi-
enced in servicing vehicles.
. Always use the proper tools and
make certain that they are wellmaintained.
. Never get under the vehicle sup-
ported only by a jack. Always use
safety stands to support thevehicle.
. Never keep the engine running in
a poorly ventilated area, such as
a garage or other closed areas.
. Do not smoke or allow open
flames around the fuel or battery.
This will cause a fire.
. Because the fuel system is under
pressure, replacement of the fuel
filter should be performed only
by your SUBARU dealer.
. Wear adequate eye protection to Maintenance and service
11-3
– CONTINUED –
Page 343 of 438

11-4Maintenance and service
guard against getting oil or fluids
in your eyes. If something does
get in your eyes, thoroughly
wash them out with clean water.
. Do not tamper with the wiring of
the SRS airbag system or seat-
belt pretensioner system, or at-
tempt to take its connectors
apart, as that may activate the
system or it can render it inop-
erative. NEVER use a circuit
tester for this wiring. If your
SRS airbag or seatbelt preten-
sioner needs service, consult
your nearest SUBARU dealer. &
Before checking or servicing
in the engine compartment
WARNING
. Always stop the engine and apply
the parking brake firmly to pre-
vent the vehicle from moving.
. Always let the engine cool down.
Engine parts become very hot
when the engine is running and
remain hot for some time after
the engine is stopped.
. Do not spill engine oil, engine
coolant, brake fluid or any other
fluid on hot engine components.
This may cause a fire.
. Always remove the key from the
ignition switch. When the ignition
switch is in the “ON ”position,
thecoolingfanmayoperate
suddenly even when the engine
is stopped.
. Before performing any servicing
on a vehicle equipped with a
remote engine start system (a
dealer option) temporarily place
that system in the service mode
to prevent it from unexpectedly
starting the engine. &
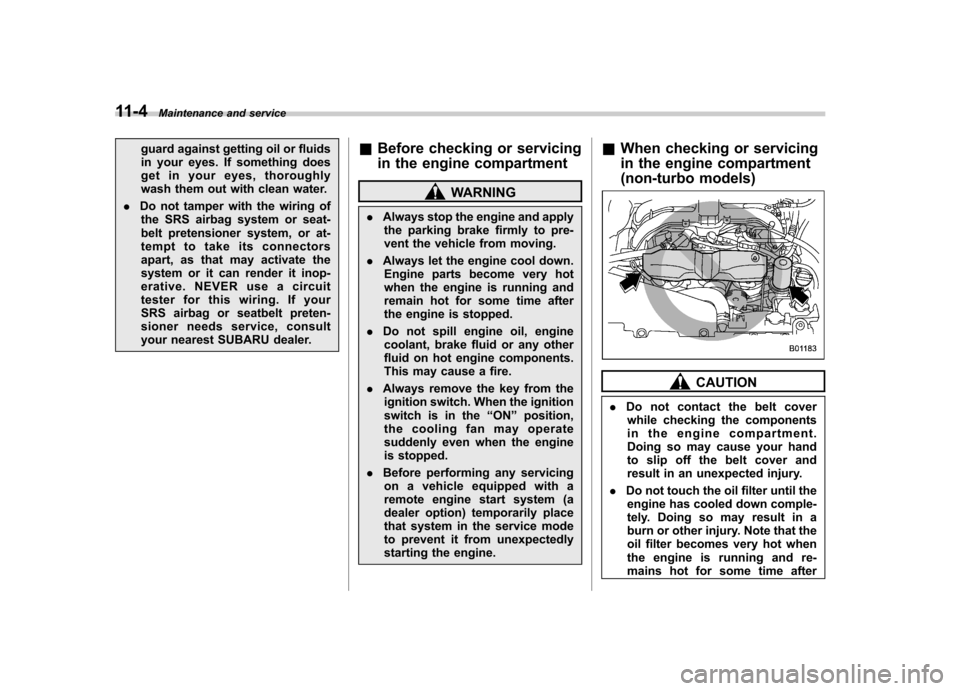
When checking or servicing
in the engine compartment
(non-turbo models)
CAUTION
. Do not contact the belt cover
while checking the components
in the engine compartment.
Doing so may cause your hand
to slip off the belt cover and
result in an unexpected injury.
. Do not touch the oil filter until the
engine has cooled down comple-
tely. Doing so may result in a
burn or other injury. Note that the
oil filter becomes very hot when
the engine is running and re-
mains hot for some time after
Page 344 of 438

the engine has stopped.
& When checking or servicing
in the engine compartment
while the engine is running
WARNING
A running engine can be dangerous.
Keep your fingers, hands, clothing,
hair and tools away from the cooling
fan, belts and any other moving
engine parts. Removing rings,
watches and ties is advisable. Engine hood
To open the hood:
1. If the wiper blades are lifted off the
windshield, return them to their originalposition.
2. Pull the hood release knob under the
instrument panel.
3. Release the secondary hood latch by
moving the lever between the front grille
and the hood toward the left.
4. Lift up the hood.
To close the hood:
1. Lower the hood to a height of approxi-
mately 5.9 in (15 cm) above its closed
position and then let it drop.
2. After closing the hood, be sure the
hood is securely locked.
If this does not close the hood, release it
from a slightly higher position. Do not push
thehoodforciblytocloseit.Itcould
deform the metal.Maintenance and service
11-5
– CONTINUED –
Page 345 of 438

11-6Maintenance and service
WARNING
Always check that the hood is
properly locked before you start
driving. If it is not, it might fly open
while the vehicle is moving and
block your view, which may cause
an accident and serious bodily in-
jury.