2012 SUBARU FORESTER Front light
[x] Cancel search: Front lightPage 105 of 438

2-20Keys and doors
Windows
WARNING
To avoid serious personal injury
caused by entrapment, always obey
the following instructions withoutexception. . When operating the power win-
dows, be extremely careful to
prevent anyone ’s fingers, arms,
neck or head from being caught
in the window.
. Always lock the passengers ’win-
dows using the lock switch when
children are riding in the vehicle.
. Before leaving the vehicle, al-
ways remove the key from the
ignition switch for safety and
never allow an unattended child
to remain in the vehicle. Failure
to follow this procedure could
result in injury to a child operat-
ing the power window.
The power windows operate only when
the ignition switch is in the “ON ”position. &
Power window operation by driver
! Driver ’s side power window
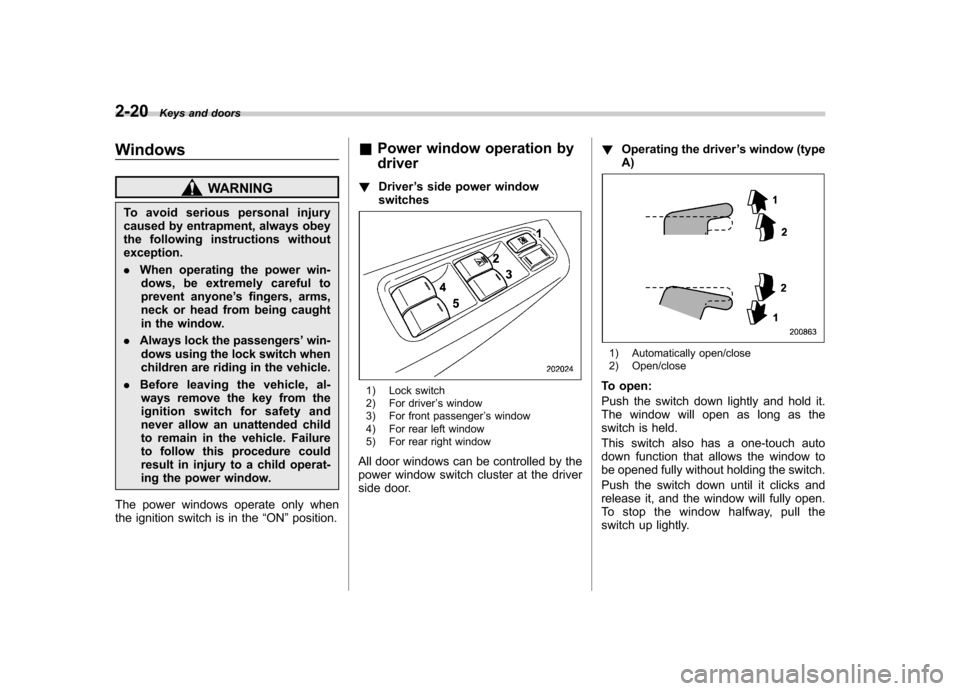
switches
1) Lock switch
2) For driver ’s window
3) For front passenger ’s window
4) For rear left window
5) For rear right window
All door windows can be controlled by the
power window switch cluster at the driver
side door. !
Operating the driver ’s window (type
A)
1) Automatically open/close
2) Open/close
To open:
Push the switch down lightly and hold it.
The window will open as long as the
switch is held.
This switch also has a one-touch auto
down function that allows the window to
be opened fully without holding the switch.
Push the switch down until it clicks and
release it, and the window will fully open.
To stop the window halfway, pull the
switch up lightly.
Page 112 of 438

Ignition switch..................................................... 3-3
LOCK .................................................................. 3-3
Acc..................................................................... 3-4
ON...................................................................... 3-4
START ................................................................ 3-4
Key reminder chime ............................................ 3-5
Ignition switch light ............................................. 3-5
Hazard warning flasher ....................................... 3-5
Meters and gauges. ............................................. 3-6
Combination meter illumination ........................... 3-6
Canceling the function for meter/gauge needle movement upon turning on the ignition switch ............................................................... 3-6
Meter needles/gauge illumination setting (models with type A combination meter) ......................... 3-7
Speedometer ....................................................... 3-8
Odometer/Trip meter ............................................ 3-8
Tachometer ........................................................ 3-10
Fuel gauge ......................................................... 3-10
Temperature gauge (models with type A combination meter) .......................................... 3-11
ECO gauge (models with type A combination meter) .............................................................. 3-12
Warning and indicator lights ............................. 3-12
Seatbelt warning light and chime ........................ 3-13
SRS airbag system warning light ........................ 3-15
Front passenger ’s frontal airbag ON and OFF
indicators ......................................................... 3-15
CHECK ENGINE warning light/Malfunction indicator light ................................................... 3-16 Coolant temperature low indicator light (if
equipped)/Coolant temperature high warning
light (if equipped). ............................................ 3-16
Charge warning light .......................................... 3-17
Oil pressure warning light .................................. 3-17
AT OIL TEMP warning light (AT models) .............. 3-18
Low tire pressure warning light (U.S.-spec. models) ........................................................... 3-18
ABS warning light .............................................. 3-19
Brake system warning light ................................ 3-20
Low fuel warning light ....................................... 3-21
Hill start assist warning light (MT models) ..... ..... 3-21
Door open warning light .................................... 3-21
All-Wheel Drive warning light (AT models) ..... ..... 3-21
Automatic headlight beam leveler warning light (models with HID headlights).. .......................... 3-22
Vehicle Dynamics Control warning light/Vehicle Dynamics Control operation indicator light .. ..... 3-22
Vehicle Dynamics Control OFF indicator light ..... 3-23
Security indicator light ....................................... 3-23
SPORT mode indicator light (AT models) ............ 3-24
Select lever and gear position indicator (AT models) ........................................................... 3-24
Turn signal indicator lights ................................. 3-24
High beam indicator light ................................... 3-25
Cruise control indicator light .............................. 3-25
Cruise control set indicator light ........................ 3-25
Front fog light indicator light (if equipped) ..... ..... 3-25
Headlight indicator light ..................................... 3-25
Clock .................................................................. 3-25Instruments and controls
3
Page 113 of 438

Instruments and controlsInformation display ............................................ 3-26
Outside temperature indicator ............................ 3-27
Current fuel consumption (if equipped) ............... 3-28
Average fuel consumption .................................. 3-28
To turn off fuel consumption indicator display ............................................................. 3-28
Light control switch ........................................... 3-29
Headlights. ......................................................... 3-30
High/low beam change (dimmer) ......................... 3-30
Headlight flasher ................................................ 3-30
Daytime running light system (if equipped) ... ...... 3-31
Automatic headlight beam leveler (models with HID headlights) ................................................ 3-31
Turn signal lever ................................................ 3-31 Illumination brightness control
......................... 3-32
Front fog light switch (if equipped) .................. 3-32
Wiper and washer .............................................. 3-33
Windshield wiper and washer switches .............. 3-34
Rear window wiper and washer switch ............... 3-36
Mirrors ................................................................ 3-36
Inside mirror ...................................................... 3-36
Auto-dimming mirror/compass (if equipped) ....... 3-37
Auto-dimming mirror/compass with HomeLink
®(if equipped) .................................................... 3-38
Outside mirrors ................................................. 3-44
Defogger and deicer .......................................... 3-45
Tilt/telescopic steering wheel ........................... 3-47
Horn .................................................................... 3-47
Page 123 of 438

3-12Instruments and controls
&ECO gauge (models with type
A combination meter)
The unit displayed varies depending on
the model.
The ECO gauge shows the difference
between the average rate of fuel con-
sumption since the trip meter was last
reset and the current rate of fuel con-sumption.
The ECO gauge indicates the current fuel
efficiency as shown in the following chart.
Displayed unit Needle pointing
“ + ” side “-” side
MPG Better Poorer
l/100km Poorer BetterNOTE .
The ECO gauge shows only an
approximate indication of fuel effi-
ciency.. After resetting the trip meter, the
average rate of fuel consumption is not
shown until driving 0.6 mile (1 km).
Until that time, the ECO gauge does notoperate. Warning and indicator lights
Several of the warning and indicator lights
illuminate when the ignition switch is
initially turned to the
“ON ”position. This
permits checking the operation of thebulbs.
Apply the parking brake and turn the
ignition switch to the “ON ”position. For
the system check, the following lights
illuminate and turn off after several sec-
onds or after the engine has started.
: Seatbelt warning light (The seatbelt warning light turns off
only when the driver fastens theseatbelt.)
: Front passenger ’s seatbelt warning
light
(The seatbelt warning light turns off
only when the front seat passenger
fastens the seatbelt.)
: SRS airbag system warning light
ON /
: Front passenger ’s frontal airbag
ON indicator light
/: Front passenger ’s frontal airbag
OFF indicator light
: CHECK ENGINE warning light/Mal- function indicator light
Page 124 of 438

: Coolant temperature high warning light(if equipped)
: Charge warning light
: Oil pressure warning light
: AT OIL TEMP warning light (AT models)
: Low tire pressure warning light(U.S.- spec. models)
/: ABS warning light
/: Brake system warning light
: Low fuel warning light
: Hill start assist warning light(MT models)
: Door open warning light
: AWD warning light (AT models)
: Automatic headlight beam leveler warning light (models with HID head- lights)
: Vehicle Dynamics Control warninglight/Vehicle Dynamics Control opera-
tion indicator light
: Vehicle Dynamics Control OFF indica-tor light
: SPORT mode indicator light(AT models)
: Cruise control indicator light
SET/
: Cruise control set indicator light
If any lights fail to illuminate, it indicates a
burned-out bulb or a malfunction of the
corresponding system.
Consult your SUBARU dealer for repair. & Seatbelt warning light
and chime
Your vehicle is equipped with a seatbelt
warning device at the driver ’s and front
passenger ’s seat, as required by current
safety standards.
With the ignition switch turned to the “ON ”
position, this device reminds the driver
and front passenger to fasten their seat-
belts by illuminating the warning lights in
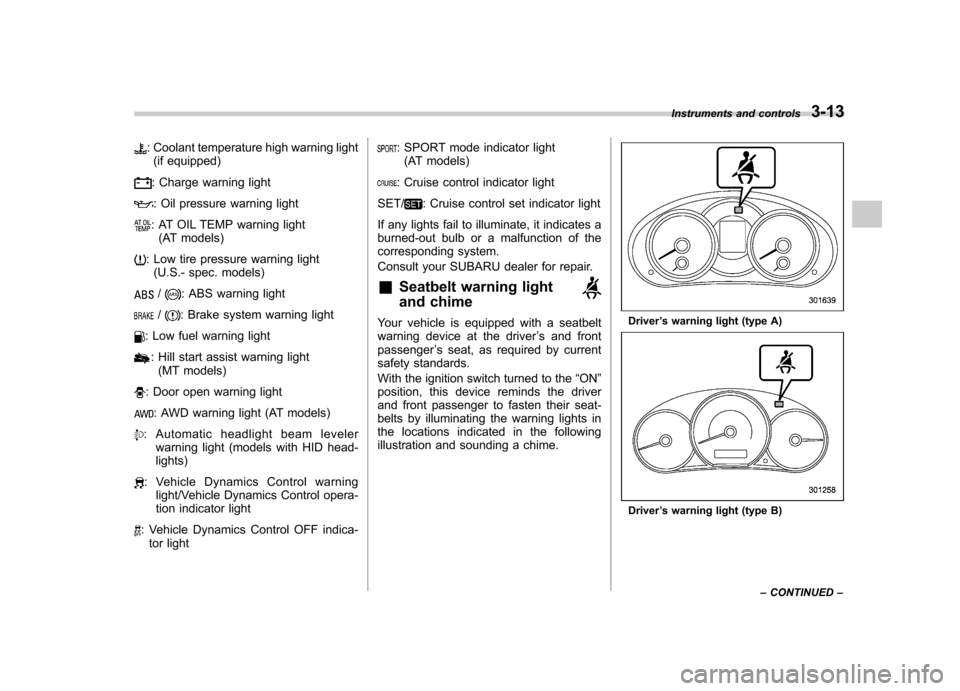
the locations indicated in the following
illustration and sounding a chime.Driver ’s warning light (type A)
Driver ’s warning light (type B) Instruments and controls
3-13
– CONTINUED –
Page 125 of 438

3-14Instruments and controls
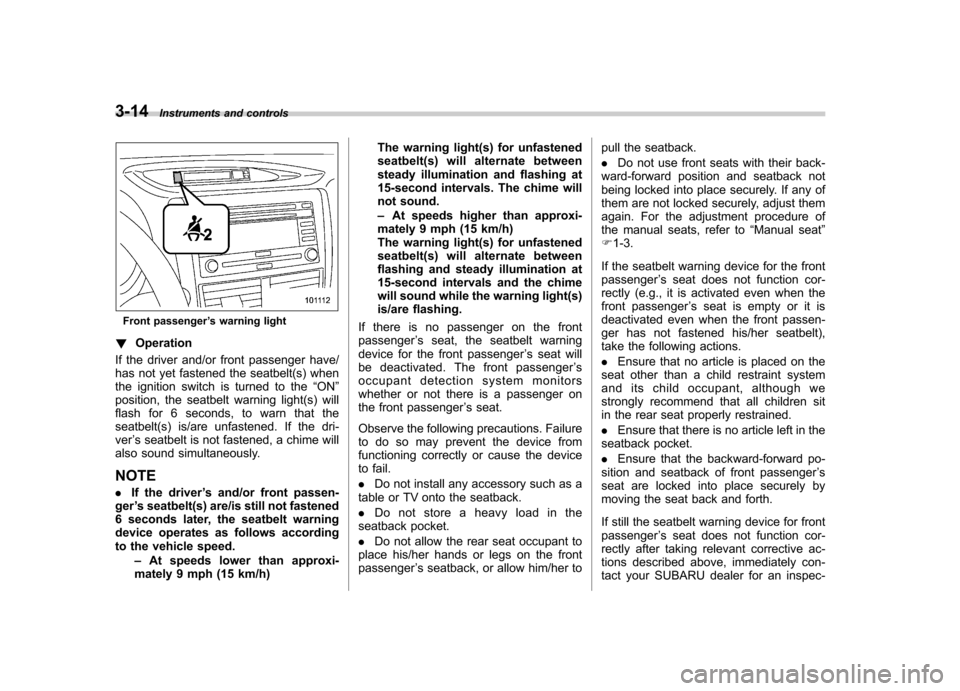
Front passenger ’s warning light
! Operation
If the driver and/or front passenger have/
has not yet fastened the seatbelt(s) when
the ignition switch is turned to the “ON ”
position, the seatbelt warning light(s) will
flash for 6 seconds, to warn that the
seatbelt(s) is/are unfastened. If the dri-ver ’s seatbelt is not fastened, a chime will
also sound simultaneously.
NOTE . If the driver ’s and/or front passen-
ger ’s seatbelt(s) are/is still not fastened
6 seconds later, the seatbelt warning
device operates as follows according
to the vehicle speed.
–At speeds lower than approxi-
mately 9 mph (15 km/h) The warning light(s) for unfastened
seatbelt(s) will alternate between
steady illumination and flashing at
15-second intervals. The chime will
not sound. –
At speeds higher than approxi-
mately 9 mph (15 km/h)
The warning light(s) for unfastened
seatbelt(s) will alternate between
flashing and steady illumination at
15-second intervals and the chime
will sound while the warning light(s)
is/are flashing.
If there is no passenger on the frontpassenger ’s seat, the seatbelt warning
device for the front passenger ’s seat will
be deactivated. The front passenger ’s
occupant detection system monitors
whether or not there is a passenger on
the front passenger ’s seat.
Observe the following precautions. Failure
to do so may prevent the device from
functioning correctly or cause the device
to fail. . Do not install any accessory such as a
table or TV onto the seatback.. Do not store a heavy load in the
seatback pocket.. Do not allow the rear seat occupant to
place his/her hands or legs on the front passenger ’s seatback, or allow him/her to pull the seatback. .
Do not use front seats with their back-
ward-forward position and seatback not
being locked into place securely. If any of
them are not locked securely, adjust them
again. For the adjustment procedure of
the manual seats, refer to “Manual seat ”
F 1-3.
If the seatbelt warning device for the frontpassenger ’s seat does not function cor-
rectly (e.g., it is activated even when the
front passenger ’s seat is empty or it is
deactivated even when the front passen-
ger has not fastened his/her seatbelt),
take the following actions. . Ensure that no article is placed on the
seat other than a child restraint system
and its child occupant, although we
strongly recommend that all children sit
in the rear seat properly restrained. . Ensure that there is no article left in the
seatback pocket.. Ensure that the backward-forward po-
sition and seatback of front passenger ’s
seat are locked into place securely by
moving the seat back and forth.
If still the seatbelt warning device for front passenger ’s seat does not function cor-
rectly after taking relevant corrective ac-
tions described above, immediately con-
tact your SUBARU dealer for an inspec-
Page 126 of 438

tion. &SRS airbag system
warning light
WARNING
If the warning light exhibits any of
the following conditions, there may
be a malfunction in the seatbelt
pretensioners and/or SRS airbag
system. Immediately take your vehi-
cle to your nearest SUBARU dealer
to have the system checked. Unless
checked and properly repaired, the
seatbelt pretensioners and/or SRS
airbag will not operate properly in
the event of a collision, which may
increase the risk of injury. . Flashing or flickering of the warn-
ing light
. No illumination of the warning
light when the ignition switch is
first turned to the “ON ”position
. Continuous illumination of the
warning light
. Illumination of the warning light
while driving &
Front passenger ’s frontal
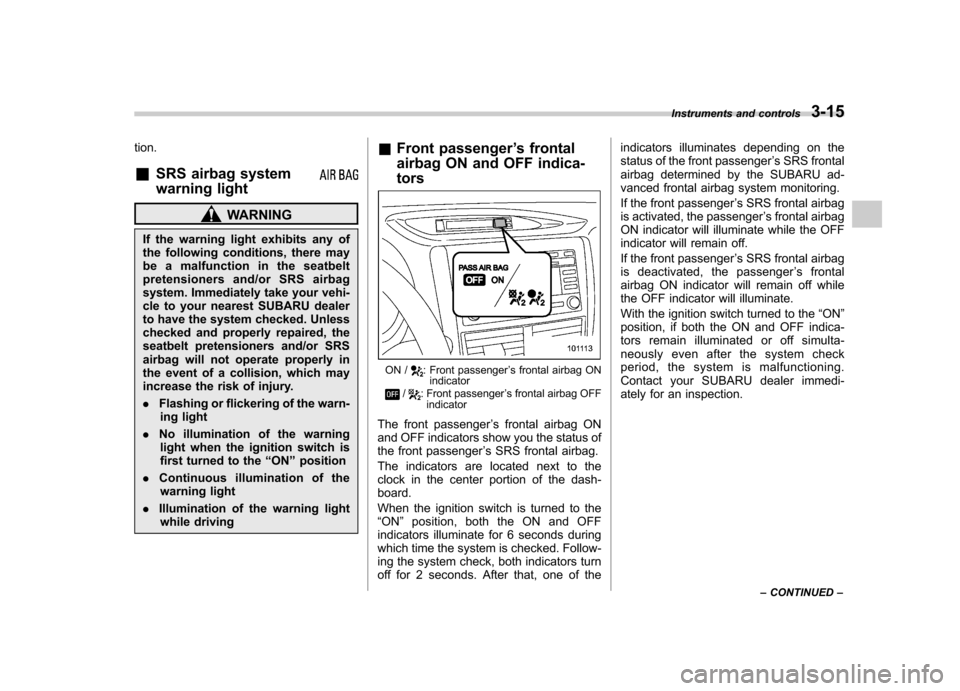
airbag ON and OFF indica- tors
ON /: Front passenger ’s frontal airbag ON
indicator
/: Front passenger ’s frontal airbag OFF
indicator
The front passenger ’s frontal airbag ON
and OFF indicators show you the status of
the front passenger ’s SRS frontal airbag.
The indicators are located next to the
clock in the center portion of the dash-board.
When the ignition switch is turned to the “ ON ”position, both the ON and OFF
indicators illuminate for 6 seconds during
which time the system is checked. Follow-
ing the system check, both indicators turn
off for 2 seconds. After that, one of the indicators illuminates depending on the
status of the front passenger
’s SRS frontal
airbag determined by the SUBARU ad-
vanced frontal airbag system monitoring.
If the front passenger ’s SRS frontal airbag
is activated, the passenger ’s frontal airbag
ON indicator will illuminate while the OFF
indicator will remain off.
If the front passenger ’s SRS frontal airbag
is deactivated, the passenger ’s frontal
airbag ON indicator will remain off while
the OFF indicator will illuminate.
With the ignition switch turned to the “ON ”
position, if both the ON and OFF indica-
tors remain illuminated or off simulta-
neously even after the system check
period, the system is malfunctioning.
Contact your SUBARU dealer immedi-
ately for an inspection. Instruments and controls
3-15
– CONTINUED –
Page 130 of 438

one or more tires or wheels on your
vehicle to ensure that the replacement or
alternate tires and wheels allow the TPMS
to continue to function properly.
Should the warning light illuminate stea-
dily after blinking for approximately one
minute, have the system inspected by
your nearest SUBARU dealer as soon aspossible.
WARNING
. If this light does not illuminate
briefly after the ignition switch is
turned ON or the light illuminates
steadily after blinking for ap-
proximately one minute, you
should have your Tire Pressure
Monitoring System checked at a
SUBARU dealer as soon as pos-sible.
. If this light illuminates while driv-
ing, never brake suddenly and
keep driving straight ahead while
gradually reducing speed. Then
slowly pull off the road to a safe
place. Otherwise an accident in-
volving serious vehicle damage
and serious personal injury
could occur.
. If this light still illuminates while
driving after adjusting the tire pressure, a tire may have signifi-
cant damage and a fast leak that
causes the tire to lose air rapidly.
If you have a flat tire, replace it
with a spare tire as soon aspossible.
. When a spare tire is mounted or a
wheel rim is replaced without the
original pressure sensor/trans-
mitter being transferred, the low
tire pressure warning light will
illuminate steadily after blinking
for approximately one minute.
This indicates the TPMS is un-
able to monitor all four road
wheels. Contact your SUBARU
dealer as soon as possible for
tire and sensor replacement and/
or system resetting.
CAUTION
. The tire pressure monitoring sys-
tem is NOT a substitute for
manually checking tire pressure.
The tire pressure should be
checked periodically (at least
monthly) using a tire gauge.
. After any change to tire pressure
(s), the tire pressure monitoring
system will not re-check tire inflation pressures until the vehi-
cle is first driven more than 20
mph (32 km/h). After adjusting
the tire pressures, increase the
vehicle speed to at least 20 mph
(32 km/h) to start the TPMS re-
checking of the tire inflation
pressures. If the tire pressures
are now above the severe low
pressure threshold, the low tire
pressure warning light should
turn off a few minutes later.
Therefore, be sure to install the
specified size for the front and
rear tires.
& ABS warning light
CAUTION
. If any of the following conditions
occur, we recommend that you
have the ABS system repaired at
the first available opportunity by
your SUBARU dealer. – The warning light does not
illuminate when the ignition
switch is turned to the “ON ”
position.
– The warning light illuminates
when the ignition switch is Instruments and controls
3-19
– CONTINUED –