2012 SMART FORTWO COUPE parking brake
[x] Cancel search: parking brakePage 121 of 228
When checking the engine oil level
R
the vehicle must be parked on level
ground
R the
vehicle must have been stationary for
at least five minutes with the engine
turned off
X Turn off the engine.
X Engage the parking brake.
X Open the tailgate.
X Open the engine compartment cover
(Y page 117).
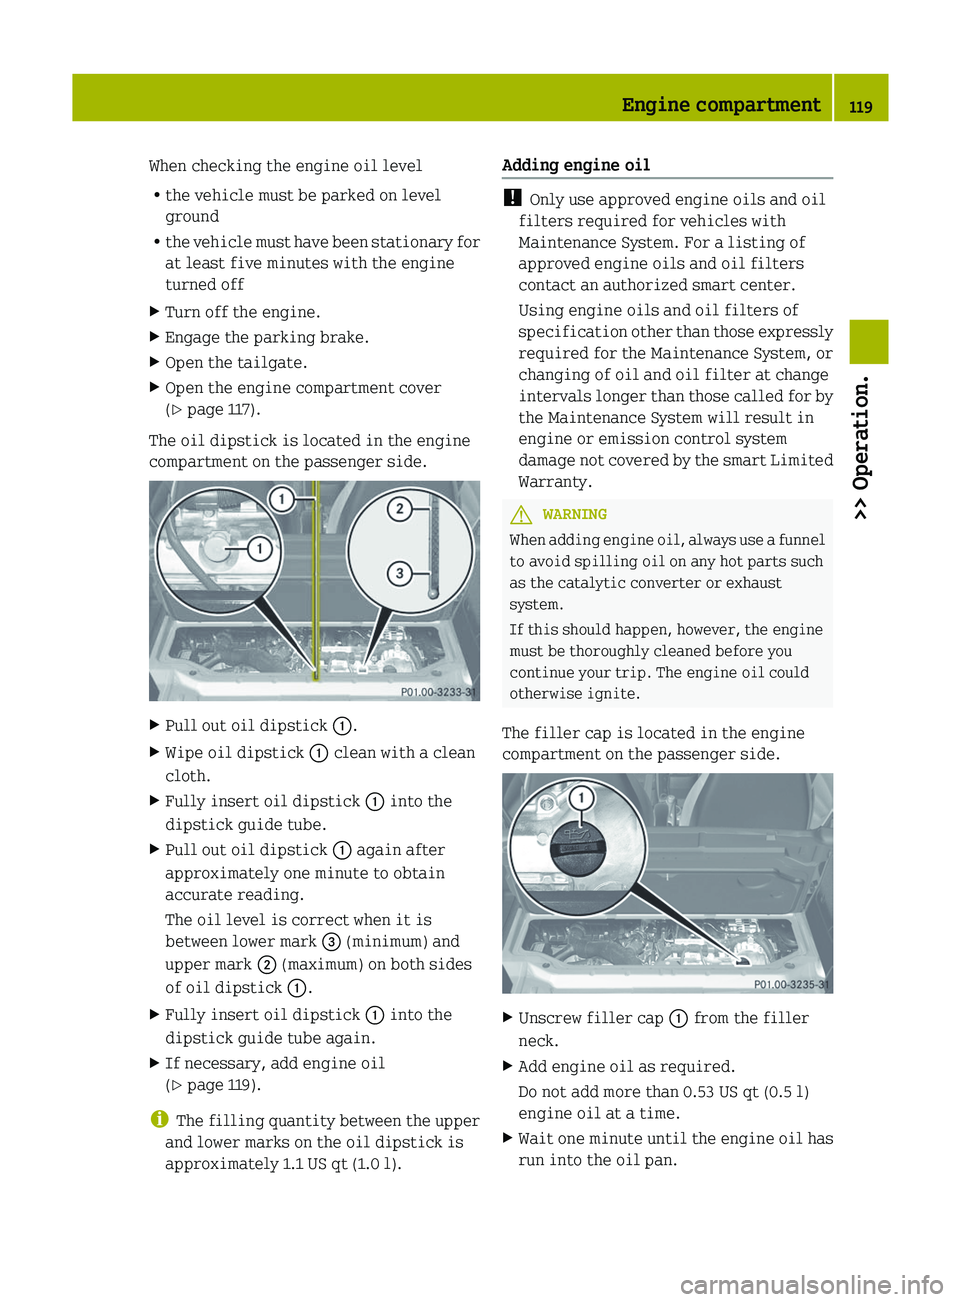
The oil dipstick is located in the engine
compartment on the passenger side. X
Pull out oil dipstick :.
X Wipe oil dipstick : clean with a clean
cloth.
X Fully insert oil dipstick : into the
dipstick guide tube.
X Pull out oil dipstick : again after
approximately one minute to obtain
accurate reading.
The oil level is correct when it is
between lower mark = (minimum) and
upper mark ; (maximum) on both sides
of oil dipstick :.
X Fully insert oil dipstick : into the
dipstick guide tube again.
X If necessary, add engine oil
(Y page 119).
i The
filling quantity between the upper
and lower marks on the oil dipstick is
approximately 1.1 US qt (1.0 l). Adding engine oil !
Only use approved engine oils and oil
filters required for vehicles with
Maintenance System. For a listing of
approved engine oils and oil filters
contact an authorized smart center.
Using engine oils and oil filters of
specification
other than those expressly
required for the Maintenance System, or
changing of oil and oil filter at change
intervals longer than those called for by
the Maintenance System will result in
engine or emission control system
damage not covered by the smart Limited
Warranty. G
WARNING
When adding engine oil, always use a funnel
to avoid spilling oil on any hot parts such
as the catalytic converter or exhaust
system.
If this should happen, however, the engine
must be thoroughly cleaned before you
continue your trip. The engine oil could
otherwise ignite.
The filler cap is located in the engine
compartment on the passenger side. X
Unscrew filler cap : from the filler
neck.
X Add engine oil as required.
Do not add more than 0.53 US qt (0.5 l)
engine oil at a time.
X Wait one minute until the engine oil has
run into the oil pan. Engine compartment
119
>> Operation. Z
Page 122 of 228

X
Check the engine oil level once more.
X Add engine oil once more if necessary.
Be careful not to spill any oil when adding
to avoid environmental damage caused by
oil entering the ground and water.
! Excess engine oil must be siphoned or
drained
off. It could cause damage to the
engine or emission control system not
covered by the smart Limited Warranty.
X Screw filler cap : back on the filler
neck.
X Close the engine compartment cover
(Y page 117). Front compartment
Service flap
Remove the service flap to check the
coolant
level, windshield washer reservoir
level, and brake fluid level.
Insert the service flap on the front of the
vehicle so that it does not get damaged or
dirty.
i The service flap has a strap on the rear
side that ties it to the vehicle body. G
WARNING
Always turn the key to starter switch
position 0 and remove the key from the
starter switch before opening the service
flap.
If the windshield wipers should
inadvertently be switched on, you could be
seriously injured by the wiper washer
drive, which is located just below the
service flap. G
WARNING
Make sure the service flap is locked while
driving. Otherwise, the service flap could
become detached and pose a hazard to you
or others. G
WARNING
To help prevent personal injury, stay clear
of moving parts when the service flap is
open.
The radiator fan may continue to run for
approximately 30 seconds or may even
restart after the engine has been turned
off. Stay clear of fan blades.
! Check the fill levels at regular
intervals.
! Carefully remove ice, snow, and any
other deposits from the air intake
grilles above the service flap to ensure
air intake at all times.
X Park the vehicle on level ground.
X Turn off the engine.
X Engage the parking brake.
Removing X
Fold both levers ;
outward in direction
of the arrows = as far as they will go.
X Lift the front end of service flap :.
X Pull service flap :
forward slightly and
remove it upwards as indicated by
arrow ?. 120
Front compartment
>> Operation.
Page 125 of 228

G
WARNING
Windshield washer concentrate is highly
flammable. Fire, naked flames and smoking
are prohibited when windshield washer
concentrate is being handled.
X Use a windshield washer concentrate
labeled for summer and water for
temperatures above freezing point.
X Use a windshield washer concentrate
labeled for winter and water for
temperatures below freezing point.
! Always use a windshield washer
concentrate labeled for winter where
temperatures may fall below freezing
point. Failure to do so could result in
damage to the washer system/reservoir.
X Premix the windshield washer fluid in a
suitable container.
Observe mixing ratios depending on the
outside temperature
(Y page 222).
X Use the tab to pull cap : upwards.
X Refill the windshield washer reservoir.
X Push cap : onto the windshield washer
reservoir.
X Remount the service flap and close it
(Y page 120). Brake fluid
G
WARNING
During vehicle operation, the boiling
point of the brake fluid is continuously reduced through the absorption of moisture
from the atmosphere. Under extremely
strenuous operating conditions, this
moisture content can lead to the formation
of
bubbles in the system, thus reducing the
system’s efficiency.
Therefore, the brake fluid must be replaced
regularly. Refer to your vehicle’s
Maintenance Booklet for replacement
interval.
The brake fluid level in the brake fluid
reservoir may be too low if the brake
warning lamp in the instrument cluster
comes on (Y page 22) although the parking
brake is released.
! If you find that the brake fluid in the
brake fluid reservoir has fallen to the
minimum mark or below, have the brake
system checked for brake pad thickness
and leaks immediately. Contact an
authorized smart center immediately. Do
not add brake fluid as this will not solve
the problem.
X Remove the service flap and insert it on
the front of the vehicle ( Y page 120).
The brake fluid reservoir is located in the
front compartment on the passenger side. Checking brake fluid level
X
Perform a visual check of the brake fluid
reservoir :. Front compartment
123
>> Operation. Z
Page 145 of 228

For safety reasons, smart recommends
that you only use snow chains that have
been approved by smart.
Information
on this is available from any
smart center.
Please refer to the separate operating
instructions for detailed information on
mounting the snow chains.
Snow chains should only be driven on
snow-covered roads at speeds not to
exceed 30 mph (50 km/h). Remove chains
as soon as possible when driving on roads
without snow.
Please observe the following guidelines
when using snow chains:
R Using snow chains is not permissible
with all wheel/tire combinations
(Y page 217).
R Use snow chains in pairs and on rear
wheels only. Follow the manufacturer’s
mounting instructions.
R Use of snow chains may be prohibited
depending on location. Always check
local and state laws before mounting
snow chains. G
WARNING
When mounting or removing snow chains,
always park your vehicle on level ground,
engage the parking brake, and turn off the
engine. The vehicle could otherwise move
and injure yourself or other road users. G
WARNING
When mounting and removing snow chains,
ensure that you and your vehicle are at a
safe distance from moving traffic. Not
doing
so could endanger other road users or
even lead to you being injured by the
vehicles behind you. G
WARNING
The vehicle’s handling changes when
driving with snow chains on any kind of
road surface. This means that you should always adapt your driving style to suit the
current road and weather conditions.
! If snow chains that do not meet
requirements are mounted, they may
scrape against the body or axle
components when the vehicle is in
motion. This could result in damage to
the rim/tire or vehicle. Driving instructions
Drinking and driving
G
WARNING
Do not drink alcohol or take drugs and drive
or allow anyone to drive who has been
drinking alcohol or taking drugs. Even a
small
amount of alcohol or drugs can affect
your reflexes, perceptions and judgment.
The possibility of a serious or even fatal
accident are greatly increased when you
drink or take drugs and drive. Pedals
G
WARNING
Make sure absolutely no objects are
obstructing the pedals’ range of motion.
Keep the driver’s footwell clear of all
obstacles. If there are any floormats*
or
carpets in the footwell, make sure the
pedals still have sufficient clearance.
During sudden acceleration or braking
maneuvers, the objects could get caught
between or beneath the pedals and restrict
your ability to brake or accelerate. This
could lead to accidents and/or injury. Power assistance
G
WARNING
With the engine not running, there is no
power assistance for the brake and
steering* systems. In this case, it is Driving instructions
143
>> Operation.
* optional Z
Page 146 of 228

important to keep in mind that a
considerably higher degree of effort is
necessary to brake and steer the vehicle.
Adapt your driving accordingly.
Brakes
G
WARNING
Make sure not to endanger any other road
users when carrying out braking
maneuvers.
Refer to the description of the hydraulic
brake assistant
(Y page 48).
! Because the ESP ®
operates
automatically, the engine must be turned
off (ignition switched off) when the
parking brake is being tested on a brake
test dynamometer. Active braking action
through the ESP ®
may otherwise seriously
damage the brake system which is not
covered by the smart Limited Warranty.
Brake pad wear or a leak in the brake system
may be the reason for low brake fluid level
in the brake fluid reservoir.
The brake fluid level in the brake fluid
reservoir may be too low if the brake
warning lamp in the instrument cluster
comes on (Y page 22) although the parking
brake is released.
Have the brake system inspected
immediately. Contact an authorized smart
center.
All checks and service work on the brake
system should be carried out by qualified
technicians only. Contact an authorized
smart center.
Only install brake pads and use brake fluid
recommended by smart.
Inclines !
When driving down long and steep
grades,
relieve the load on the brakes by
shifting into a lower gear to use the engine’s braking power. This helps
prevent overheating of the brakes and
reduces brake pad wear.
When
using the engine’s braking power, a
drive wheel may not spin for an extended
period of time, e.g. on slippery road
surfaces. This may cause serious damage
to the drive- train which is not covered
by the smart Limited Warranty.
High and low stresses G
WARNING
Resting your foot on the brake pedal will
cause excessive and premature wear of the
brake pads.
It can also result in the brakes
overheating, thereby significantly
reducing their effectiveness and your
ability to stop the vehicle in sufficient
time to avoid an accident.
After
hard braking, it is advisable to drive
on for some time, rather than immediately
park, so that the air stream will cool down
the brakes faster.
If your brake system is normally only
subjected to moderate loads, you should
occasionally test the effectiveness of the
brakes by applying above-normal braking
pressure at higher speeds. This will also
enhance the grip of the brake pads. G
WARNING
Make sure not to endanger any other road
users when carrying out these braking
maneuvers.
Wet road surface G
WARNING
After driving in heavy rain for some time
without applying the brakes or through
water
deep enough to wet brake components,
the first braking action may be somewhat
reduced and increased pedal pressure may
be necessary to obtain expected braking 144
Driving instructions
>> Operation.
Page 147 of 228

effect. Maintain a safe distance from
vehicles in front.
To
help prevent brake disc corrosion after
driving on wet road surfaces (particularly
salted roads), it is advisable to brake the
vehicle with considerable force prior to
parking. The heat generated serves to dry
the brakes. G
WARNING
Make sure not to endanger any other road
users when carrying out these braking
maneuvers.
Limited braking effect on salted roads Remember that the effect of the brakes can
be
limited on salted road surfaces. A layer
of salt can form on brake discs and brake
pads, considerably reducing the friction
between the brake disc and the brake pad.
The effect is most noticeable after long
trips without braking, e.g. on the highway,
and after the vehicle has been parked for
several hours. G
WARNING
The accumulation of salt on brake discs and
brake pads reduces braking effectiveness
and increases the distance necessary to
come to a complete standstill. This could
potentially cause an accident and/or
personal injury.
To avoid this risk, you should
R brake carefully every now and then on
salted
roads in order to remove any layer
of salt on the brake disc and brake pad,
but do so without endangering any other
road users
R keep a good safe distance from the
vehicle in front and drive carefully
R press the brake carefully at the end of the
trip and again when beginning the next
trip in order to remove any salt residues
from the brake disc New brake pads Only install brake pads recommended by
smart.
G
WARNING
If other than recommended brake pads are
installed,
or other than recommended brake
fluid is used, the braking properties of the
vehicle can be degraded to an extent that
safe braking is substantially impaired.
This could result in an accident. G
WARNING
New brake pads will not achieve their
optimal braking effect until after several
hundred miles (kilometers). This means
that you must compensate for the reduced
braking effect by pressing harder on the
brake pedal and adapt your driving style
accordingly. The same applies after brake
pads or brake discs have been changed. Drive sensibly - save fuel
Fuel consumption, to a great extent,
depends on driving habits and operating
conditions.
To save fuel you should:
R Shift gears in a timely manner.
R Avoid frequent acceleration and
deceleration.
R Keep
tires at the recommended inflation
pressures.
R Remove carriers* when not in use.
R Remove unnecessary loads.
R Allow engine to warm up under low load
use.
R Have all maintenance work performed at
the intervals specified in the
Maintenance Booklet and as required by
the Maintenance System. Contact an
authorized smart center.
Fuel consumption is also increased by
driving in cold weather, in stop-and-go
traffic, on short trips, and in hilly areas. Driving instructions
145
>> Operation.
* optional Z
Page 161 of 228

Vehicles without control system
Display messages Possible causes/consequences and
M Solutions The electronic immobilizer is not working.
X
Have the system checked at an authorized smart center. There is a malfunction in the shifting system.
X
Have the system checked at an authorized smart center. The transmission is taught-in (
Y page 86).
X Have the system checked at an authorized smart center. Vehicles with control system*
Display messages Possible causes/consequences and
M Solutions?
Switch Engine Off The coolant is too hot.
X
Stop the vehicle immediately as soon as it is safe to do so.
X Turn off the engine immediately.
X Engage the parking brake.
X Make sure the air supply for the radiator is uninterrupted.
X Only start the engine again after the display message
disappears. You could otherwise damage the engine. G
WARNING
Driving when your engine is overheated can cause some fluids which may have leaked into
the engine compartment to catch fire. You could be seriously burned.
Steam from an overheated engine can cause serious burns which can occur just by opening
the engine hood. Stay away from the engine if you see or hear steam coming from it.
Stop the vehicle in a safe location away from other traffic. Turn off the engine, get out of
the vehicle and do not stand near the vehicle until the engine has cooled down.
! Among other possible causes, the poly-V-belt could be broken. Do not continue to
drive.
Otherwise, the engine will overheat due to an inoperative water pump which may
result in damage to the engine. Display messages
159
>> Practical hints.
* optional Z
Page 162 of 228

Display messages Possible causes/consequences and
M Solutions4
Switch Engine Off The engine oil level is too low. The engine could be damaged.
X
Stop the vehicle as soon as it is safe to do so.
X Turn off the engine.
X Engage the parking brake.
X Check the engine oil level (Y page 118) and add engine oil as
required (Y page 119). J
Release Parking
Brake You are driving with the parking brake engaged.
X
Release the parking brake. 5
Shift
to N or P to
Start You have attempted to start the engine while the automatic
transmission was in reverse gear
R or drive position D.
Shift the automatic transmission into park position P or
neutral position N.5
Apply Brakes to
Start You have attempted to start the engine without depressing the
brake pedal.
Depress the brake pedal to start the engine.
Display messages Possible causes/consequences and
M Solutions#
Charge Battery The battery is not being charged.
Possible causes:
R
alternator malfunctioning
R broken poly-V-belt
X Stop the vehicle immediately as soon as it is safe to do so.
X Turn off the engine immediately.
X Engage the parking brake.
X Check the poly-V-belt.
X If poly-V-belt is broken: Do not continue to drive. Contact
an authorized smart center.
X If poly-V-belt is intact: Have the vehicle checked at an
authorized smart center immediately. !
Among other possible causes, the poly-V-belt could be broken. Do not continue to
drive.
Otherwise, the engine will overheat due to an inoperative water pump which may
result in damage to the engine. 160
Display messages
>> Practical hints.