2012 SKODA YETI radio
[x] Cancel search: radioPage 11 of 44
SETUP mode
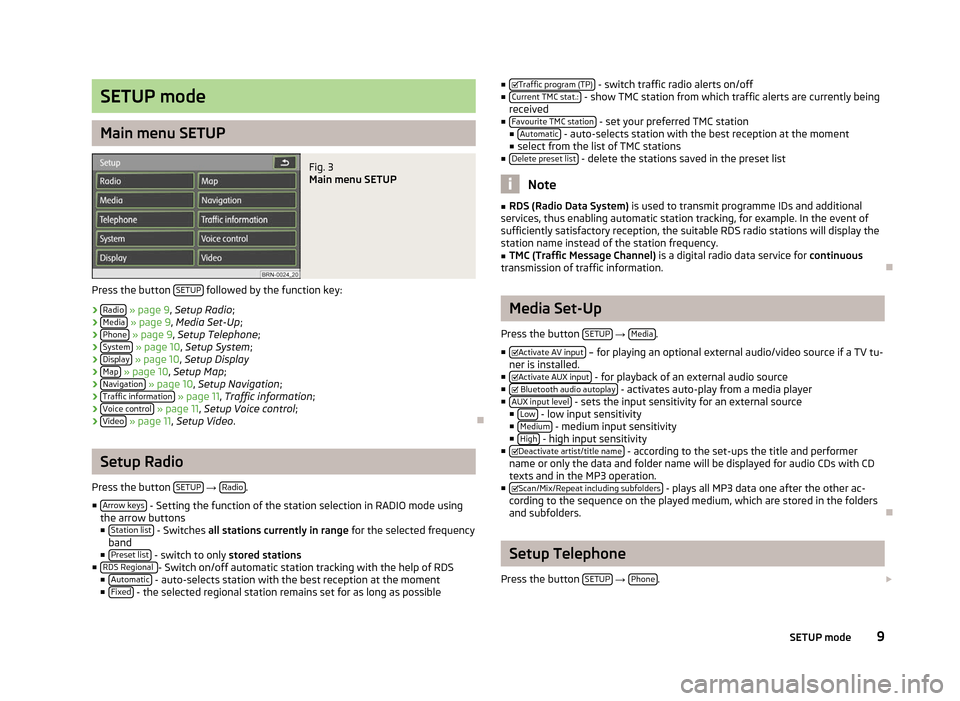
Main menu SETUP
Fig. 3
Main menu SETUP
Press the button SETUP followed by the function key:
› Radio » page 9, Setup Radio;
› Media » page 9, Media Set-Up;
› Phone » page 9
, Setup Telephone ;
› System » page 10, Setup System
;
› Display » page 10, Setup Display
› Map » page 10,
Setup Map;
› Navigation » page 10, Setup Navigation
;
› Traffic information » page 11, Traffic information
;
› Voice control » page 11,
Setup Voice control ;
› Video » page 11,
Setup Video . ÐSetup Radio
Press the button SETUP →
Radio .
■ Arrow keys - Setting the function of the station selection in RADIO mode using
the arrow buttons
■ Station list - Switches
all stations currently in range for the selected frequency
band
■ Preset list - switch to only
stored stations
■ RDS Regional - Switch on/off automatic station tracking with the help of RDS
■ Automatic - auto-selects station with the best reception at the moment
■ Fixed - the selected regional station remains set for as long as possible ■
Traffic program (TP) - switch traffic radio alerts on/off
■ Current TMC stat.: - show TMC station from which traffic alerts are currently being
received
■ Favourite TMC station - set your preferred TMC station
■ Automatic - auto-selects station with the best reception at the moment
■ select from the list of TMC stations
■ Delete preset list - delete the stations saved in the preset list
Note
■ RDS (Radio Data System) is used to transmit programme IDs and additional
services, thus enabling automatic station tracking, for example. In the event of
sufficiently satisfactory reception, the suitable RDS radio stations will display the
station name instead of the station frequency. ■ TMC (Traffic Message Channel) is a digital radio data service for continuous
transmission of traffic information. Ð Media Set-Up
Press the button SETUP →
Media .
■ Activate AV input – for playing an optional external audio/video source if a TV tu-
ner is installed.
■ Activate AUX input - for playback of an external audio source
■ Bluetooth audio autoplay - activates auto-play from a media player
■ AUX input level - sets the input sensitivity for an external source
■ Low - low input sensitivity
■ Medium - medium input sensitivity
■ High - high input sensitivity
■ Deactivate artist/title name - according to the set-ups the title and performer
name or only the data and folder name will be displayed for audio CDs with CD
texts and in the MP3 operation.
■ Scan/Mix/Repeat including subfolders - plays all MP3 data one after the other ac-
cording to the sequence on the played medium, which are stored in the folders
and subfolders. Ð Setup Telephone
Press the button SETUP →
Phone .
9
SETUP mode
Page 12 of 44
■
Update telephone book - loads the phonebook from the mobile phone to the mem-
ory of the radio navigation system. This procedure can take a few minutes.
■ Delete call lists - deletes saved call lists
■ Delete text message - deletes text messages (SMS)
■ Speed dial - edits speed dial keys
■ Deactivate telephone - deactivates the phone
■ Restore factory settings - resets device to factory settings- deletes user profiles
■ Change order of call lists - changes the order in the call list from the oldest to the
most recent calls ÐSetup System
Press the button SETUP →
System .
■ Language - Menu language for the displays and the language messages
■ Automatic - auto-detection of menu language, depends on the setting in the
information display
■ or direct selection of the required language from a list
■ Date format - sets up the date format
■ Time display - displays current time on the touch screen in the operating modes
RADIO, MEDIA and MAP ■ Off - switches off
■ On - switches on
■ Date - Sets up date
■ Factory settings - restores factory settings
■ Select setting to be restored
■ Reset - resets device to factory settings- deletes user profiles
ÐSetup Display
Press the button SETUP →
Display .
■ Brightness - adjust the screen brightness
■ Brightest - brightest level
■ Brighter - brighter level
■ Medium - medium level
■ Darker - darker level
■ Darkest - darkest level ■
Day/Night - switches between the day/night and auto map display modes.
■ Automatic - controlled using the available vehicle sensors
■ Day - Setting for daytime running
■ Night - Setting for nightime running
■ Acoustic feedback - switches acoustic feedback on/off by pressing a button on the
touch-screen
■ On - switches on
■ Off - switches off
■ Switch off display - it is possible to switch the display to energy saving mode; the
current information about the audio source is shown in the bottom row. The
display can be switched on again by touching the screen or any key other than
the operating knob. Ð Setup Map
Press the button SETUP →
Map .
■ Split-screen - Position of the split-screen in the map view
■ Left - left
■ Right - right
■ Dest. guidan. symbol - displays the navigation instructions and compass in the
split-screen in the 2D and 3D view
■ Destination display - displays information about the destination » page 26, Func-
tion keys and symbols during route guidance
■ Destination - destination
■ Next stopover destination - next stopover
■ POI selection - selects points of interest displayed on the map using symbols
■ Show VIP destination symbols - displays destinations saved as favourites in the
map with the symbol from the selected favourite category
■
Show speed limitation - the current speed limitation for the current road section
is displayed in the screen Ð Setup Navigation
Press the button SETUP →
Navigation .
10 SETUP mode
Page 13 of 44
■
Suggest 3 alternative routes - suggests 3 alternative routes for the destina-
tion » page 31, Function key
“Options”
■ Nav. announcements - sets up navigation announcements
■ Off - switches off
■ Dynamic - spoken driving recommendations are only provided when you have
left the calculated route, for example, on the basis of announced traffic dis-
ruptions.
■ On - switches on
■ Time display - setup the time display in the lower part of the map
■ Time of arrival - display time of arrival at the destination
■ Remaining time - displays remaining driving time
■ My points of interest - import your own points of interest from the memory card
■ Define home address - edit “Home address” » page 32
, Function key
“ Home ad-
dress”
■ Destination entry - show screen to enter the destination
» page 32, Function
key “ Address”
■ Current position - saves the current position as a home address
■ Delete - Delete numbers
■ Edit - edits home address
■ Set current position - saves the current position as a home address
■ Advanced navigation settings - advanced navigation settings
■ Demo mode - start a virtual route guidance
■ Enter start location - enter start location for the demo mode
■ Av. speed for time calc. - the time of arrival or the journey time is calculated in the
demo mode based on the configured average speed ■ Fast - high speed
■ Medium - medium speed
■ Low - low speed
ÐTraffic information
Press the button SETUP →
Traffic information .
■ Favourite TMC station - set your preferred TMC station
■ Automatic - automatic TMC station finding
■ select favourite TMC station from a list
■ TMC filter - setup display of the traffic reports
■ All - displays all current traffic reports
■ On Route - only display traffic annoncements which relate to the route being
driven
■ Traffic programme (TP) - switches traffic programme on/off
» page 13, Traffic
Programme TP Ð Setup Voice control
Press the button SETUP →
Voice control .
■ Dialogue style - sets up dialogue style
■ Long - the system outputs the complete message without shortening it
■ Short - the system shortens some message or substitutes them with an
acoustic signal (gong); this accelerated the control
■ Visual voice command help - visual voice command help displays an overview of the
major commands in a pop-up window. The “visual voice command help
” can be
set separately for each operating mode in the system (this means, if you only
set the help display for the operating mode MAP, it is only displayed in this op-
erating mode).
■ Delete voice tags - deletes your voice entries
■ All - deletes all stored entries
■ Telephone book - Phonebook
■ Radio memory - radio memory
■ Navigation memory - navigation memory
Ð Setup Video
Press the button SETUP →
Video .
■ Audio language - sets up the language of the voice output
■ Menu language - sets the language for the DVD menu
■ Subtitles - subtitles
■ DVD format - sets DVD format
■ 4:3 - Format 4:3
■ 16:9 - Format 16:9
Ð Setup TV
Press the button SETUP →
Video .
■ TV search mode - searches for TV stations
■ Station list - select TV station from the list of all TV stations which are currently
available
■ Preset list - displays TV stations saved in the station memory
■ TV Norm - edits TV Norm
11
SETUP mode
Page 15 of 44
RADIO mode
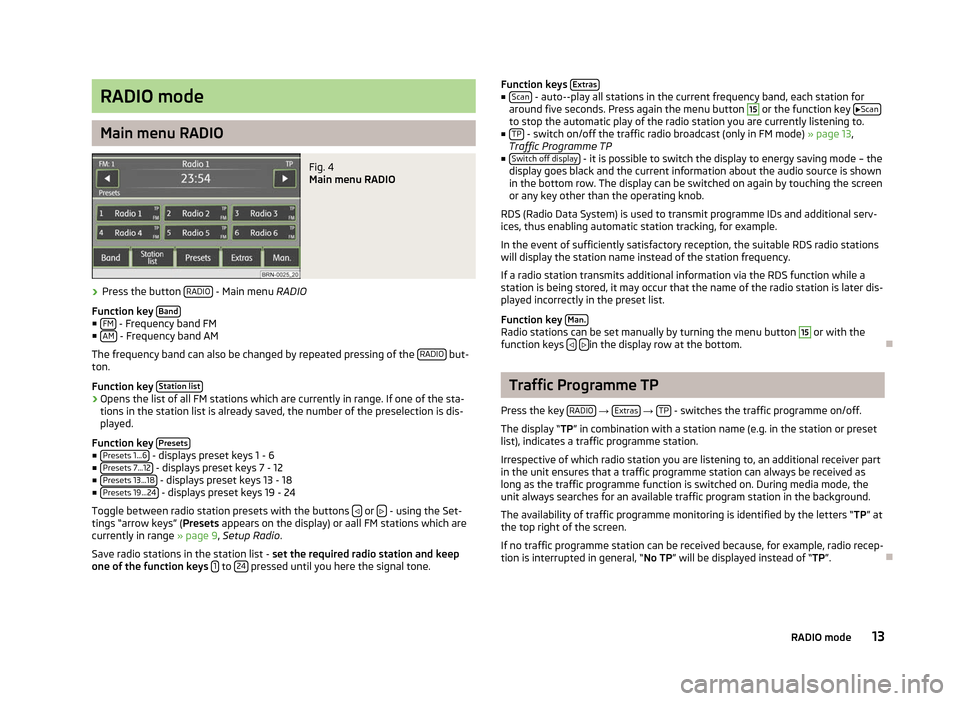
Main menu RADIO
Fig. 4
Main menu RADIO
› Press the button
RADIO - Main menu RADIO
Function key Band■
FM - Frequency band FM
■ AM - Frequency band AM
The frequency band can also be changed by repeated pressing of the RADIO but-
ton.
Function key Station list›
Opens the list of all FM stations which are currently in range. If one of the sta-
tions in the station list is already saved, the number of the preselection is dis-
played.
Function key Presets■
Presets 1...6 - displays preset keys 1 - 6
■ Presets 7...12 - displays preset keys 7 - 12
■ Presets 13...18 - displays preset keys 13 - 18
■ Presets 19...24 - displays preset keys 19 - 24
Toggle between radio station presets with the buttons or
- using the Set-
tings
“arrow keys” (Presets appears on the display) or aall FM stations which are
currently in range » page 9, Setup Radio.
Save radio stations in the station list - set the required radio station and keep
one of the function keys 1 to
24 pressed until you here the signal tone. Function keys
Extras ■
Scan - auto--play all stations in the current frequency band, each station for
around five seconds. Press again the menu button 15
or the function key
Scan to stop the automatic play of the radio station you are currently listening to.
■ TP - switch on/off the traffic radio broadcast (only in FM mode)
» page 13,
Traffic Programme TP
■ Switch off display - it is possible to switch the display to energy saving mode – the
display goes black and the current information about the audio source is shown
in the bottom row. The display can be switched on again by touching the screen
or any key other than the operating knob.
RDS (Radio Data System) is used to transmit programme IDs and additional serv-
ices, thus enabling automatic station tracking, for example.
In the event of sufficiently satisfactory reception, the suitable RDS radio stations
will display the station name instead of the station frequency.
If a radio station transmits additional information via the RDS function while a
station is being stored, it may occur that the name of the radio station is later dis-
played incorrectly in the preset list.
Function key Man. Radio stations can be set manually by turning the menu button 15
or with the
function keys
in the display row at the bottom.
Ð Traffic Programme TP
Press the key RADIO →
Extras →
TP - switches the traffic programme on/off.
The display “TP” in combination with a station name (e.g. in the station or preset
list), indicates a traffic programme station.
Irrespective of which radio station you are listening to, an additional receiver part
in the unit ensures that a traffic programme station can always be received as
long as the traffic programme function is switched on. During media mode, the
unit always searches for an available traffic program station in the background.
The availability of traffic programme monitoring is identified by the letters
“TP” at
the top right of the screen.
If no traffic programme station can be received because, for example, radio recep-
tion is interrupted in general, “No TP” will be displayed instead of “TP”. Ð 13
RADIO mode
Page 19 of 44
External sources
AUX and MDI input
AUX input
Press the button MEDIA →
AUX .
External audio sources connected to the AUX socket cannot be operated via the
radio navigation system. Only the volume can be controlled from the radio naviga-
tion system.
Use the standard jack plug 3.5
mm for the AUX jack. If the external audio source
does not have this jack plug, you must use an adapter .
MDI input- multimedia socket
Press the button MEDIA →
MDI .
Audio files in MP3, WMA, OGG Vorbis and AAC format from the external data stick-
ers, connected to the multimedia socket, can be played via the radio navigation
system.
External audio sources connected to the MDI socket can
be operated via the radio
navigation system.
You can select another audio source on the radio at any time. As long as the ex-
ternal audio source is not switched off, it remains always active in the back-
ground.
See the owner's manual of the specific manufacturer for operating the external
audio source.
To connect external audio sources via the MDI input, a special adapter is to be
used.
iPod
If an iPod is connected to the MDI input, a menu opens in which you can select
the folders of the iPod (playlists, artists, albums, titles, etc.).
Adjust the play volume of the external audio source
The play volume of the external audio source can be adjusted via the volume con-
trol on the radio navigation system 1
.
Depending on the connected audio source, the output volume on the external au-
dio source can be changed. You can also change the input sensitivity of the external audio source, in order to
adapt the play volume of the external audio source to that of the other audio
sources or to avoid distortions
» page 9, Media Set-Up.
Conditions for proper connection › Only USB devices with the specification 2.0 can be connected.
› The version of the file allocation table FAT (File Allocation Table) of the connec-
ted device must be FAT16 ( <2
GB) or FAT32 (> 2 GB).
› In order to replay from a unit with a hard disk (HDD) which includes a large data
volume, it can lead to a time delay when reading in the overview of the music
data.
› In order to replay from a unit, which includes a complicated folder structure, it
can lead to a time delay when scanning the audio files.
› The folder structure in the connected unit must not exceed a depth of 8 levels.
One folder must not contain more than 1000°data.
› A USB extension cable or USB distributor (HUB) must not be used to connect
the unit. WARNING
■ On no account place an external audio source on the dash panel. It could be
thrown into the passenger compartment during sudden driving manoeuvres,
injuring the occupants.
■ On no account place an external audio source close to the airbags. It could
be thrown into the passenger compartment when the airbags are deployed,
injuring the occupants.
■ Never hold the external audio source in your hand or on your knees while
driving. You could make sudden manoeuvres in the passenger compartment
and injure the occupants.
■ Always route the connection cable of the external audio source such that is
does not restrict you when driving. CAUTION
The AUX socket must only be used for audio sources! Note
■ The external audio source, which is connected via AUX-IN, can only be used if
no other unit is connected via MDI at the same time. ■ If an external audio source is connected via AUX, which is equipped with an
adapter for external power supply, it can occur that the audio signal is interrup-
ted. This depends on the quality of the adapter which is used. Ð
17
MEDIA mode
Page 22 of 44
TV mode
Main menu TV
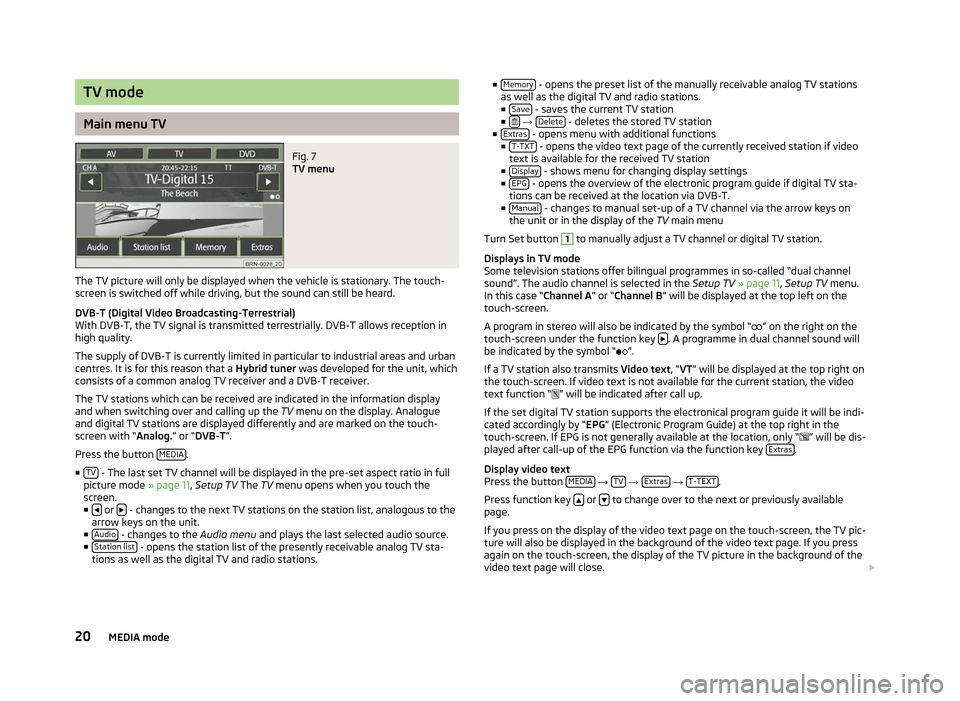
Fig. 7
TV menu
The TV picture will only be displayed when the vehicle is stationary. The touch-
screen is switched off while driving, but the sound can still be heard.
DVB-T (Digital Video Broadcasting-Terrestrial)
With DVB-T, the TV signal is transmitted terrestrially. DVB-T allows reception in
high quality.
The supply of DVB-T is currently limited in particular to industrial areas and urban
centres. It is for this reason that a Hybrid tuner was developed for the unit, which
consists of a common analog TV receiver and a DVB-T receiver.
The TV stations which can be received are indicated in the information display
and when switching over and calling up the TV menu on the display. Analogue
and digital TV stations are displayed differently and are marked on the touch-
screen with
“Analog.” or “DVB-T ”.
Press the button MEDIA .
■ TV - The last set TV channel will be displayed in the pre-set aspect ratio in full
picture mode » page 11, Setup TV The TV
menu opens when you touch the
screen.
■ or
- changes to the next TV stations on the station list, analogous to the
arrow keys on the unit.
■ Audio - changes to the
Audio menu and plays the last selected audio source.
■ Station list - opens the station list of the presently receivable analog TV sta-
tions as well as the digital TV and radio stations. ■
Memory - opens the preset list of the manually receivable analog TV stations
as well as the digital TV and radio stations.
■ Save - saves the current TV station
■ →
Delete - deletes the stored TV station
■ Extras - opens menu with additional functions
■ T-TXT - opens the video text page of the currently received station if video
text is available for the received TV station
■ Display - shows menu for changing display settings
■ EPG - opens the overview of the electronic program guide if digital TV sta-
tions can be received at the location via DVB-T.
■ Manual - changes to manual set-up of a TV channel via the arrow keys on
the unit or in the display of the TV main menu
Turn Set button 1
to manually adjust a TV channel or digital TV station.
Displays in TV mode
Some television stations offer bilingual programmes in so-called
“dual channel
sound”. The audio channel is selected in the Setup TV » page 11, Setup TV menu.
In this case “ Channel A” or “Channel B ” will be displayed at the top left on the
touch-screen.
A program in stereo will also be indicated by the symbol “ ” on the right on the
touch-screen under the function key . A programme in dual channel sound will
be indicated by the symbol
“ ”.
If a TV station also transmits Video text , “VT” will be displayed at the top right on
the touch-screen. If video text is not available for the current station, the video
text function “ ” will be indicated after call up.
If the set digital TV station supports the electronical program guide it will be indi-
cated accordingly by “EPG” (Electronic Program Guide) at the top right in the
touch-screen. If EPG is not generally available at the location, only “ ” will be dis-
played after call-up of the EPG function via the function key Extras .
Display video text
Press the button MEDIA →
TV →
Extras →
T-TEXT .
Press function key or
to change over to the next or previously available
page.
If you press on the display of the video text page on the touch-screen, the TV pic-
ture will also be displayed in the background of the video text page. If you press
again on the touch-screen, the display of the TV picture in the background of the
video text page will close.
20 MEDIA mode
Page 24 of 44
PHONE mode
Main menu TELEPHONE
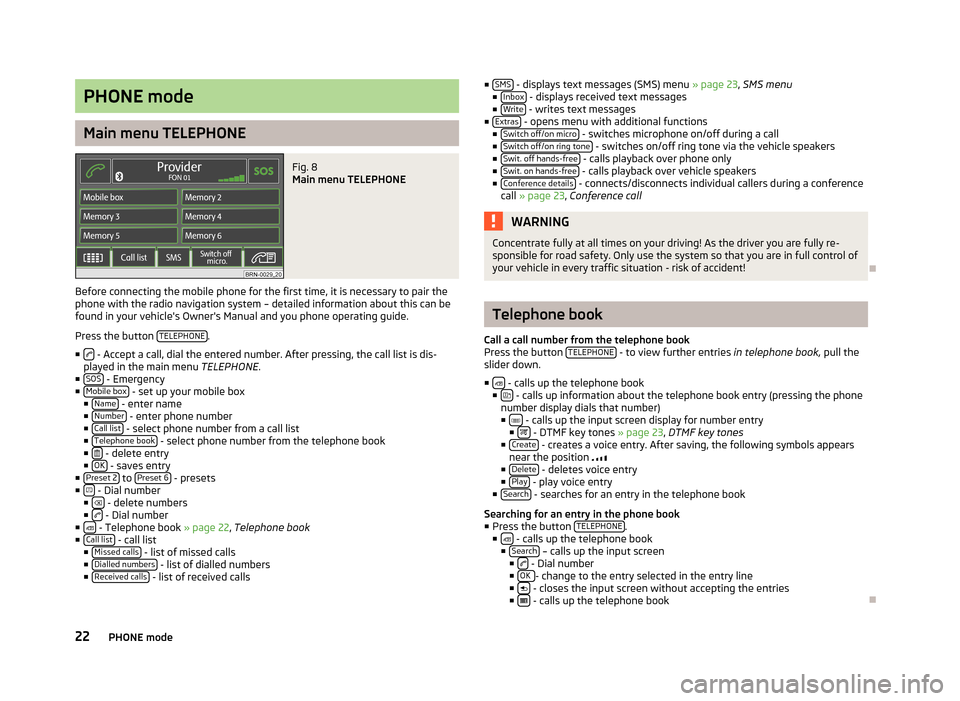
Fig. 8
Main menu TELEPHONE
Before connecting the mobile phone for the first time, it is necessary to pair the
phone with the radio navigation system – detailed information about this can be
found in your vehicle's Owner's Manual and you phone operating guide.
Press the button TELEPHONE .
■ - Accept a call, dial the entered number. After pressing, the call list is dis-
played in the main menu TELEPHONE.
■ SOS - Emergency
■ Mobile box - set up your mobile box
■ Name - enter name
■ Number - enter phone number
■ Call list - select phone number from a call list
■ Telephone book - select phone number from the telephone book
■ - delete entry
■ OK - saves entry
■ Preset 2 to
Preset 6 - presets
■ - Dial number
■ - delete numbers
■ - Dial number
■ - Telephone book » page 22, Telephone book
■ Call list - call list
■ Missed calls - list of missed calls
■ Dialled numbers - list of dialled numbers
■ Received calls - list of received calls ■
SMS - displays text messages (SMS) menu
» page 23, SMS menu
■ Inbox - displays received text messages
■ Write - writes text messages
■ Extras - opens menu with additional functions
■ Switch off/on micro - switches microphone on/off during a call
■ Switch off/on ring tone - switches on/off ring tone via the vehicle speakers
■ Swit. off hands-free - calls playback over phone only
■ Swit. on hands-free - calls playback over vehicle speakers
■ Conference details - connects/disconnects individual callers during a conference
call » page 23, Conference call WARNING
Concentrate fully at all times on your driving! As the driver you are fully re-
sponsible for road safety. Only use the system so that you are in full control of
your vehicle in every traffic situation - risk of accident! Ð Telephone book
Call a call number from the telephone book
Press the button TELEPHONE - to view further entries
in telephone book,
pull the
slider down.
■ - calls up the telephone book
■ - calls up information about the telephone book entry (pressing the phone
number display dials that number)
■ - calls up the input screen display for number entry
■ - DTMF key tones » page 23
, DTMF key tones
■ Create - creates a voice entry. After saving, the following symbols appears
near the position
■ Delete - deletes voice entry
■ Play - play voice entry
■ Search - searches for an entry in the telephone book
Searching for an entry in the phone book
■ Press the button TELEPHONE .
■ - calls up the telephone book
■ Search – calls up the input screen
■ - Dial number
■ OK - change to the entry selected in the entry line
■ - closes the input screen without accepting the entries
■ - calls up the telephone book
Ð
22 PHONE mode
Page 25 of 44
Telephone calls and functions during a call
Calls can be received even if the radio navigation system is switched off.
If you have started the process of connecting to a call number or accepted a call,
the main menu TELEPHONE will change to the Phone conversation display.
Incoming phone conversation
■ - accept call
■ - reject call
During the phone conversation
› Press the function key
during a phone conversation to switch the current
conversation to
“mute” (Display: “ Call being held”). This means that the connec-
tion remains intact, however the conversation is not transmitted.
› Press again the function key
to continue the conversation.
› If you press the function key
during a phone conversation, the connection to
the current call number will be terminated and the unit will change to the main
menu TELEPHONE .
Dial other phone numbers during a phone conversation › Press the function key
during a phone conversation to put the current con-
versation on “
Hold”, as described above.
› Select another phone number or a stored phone number.
› If you established an additional phone call, you can “toggle” between the two
calls, as described below.
“Call waiting” and toggling between two calls
› If you are called while holding a conversation, the number and the name of the
caller will appear below the current conversation on the display (Function: “Call
waiting”).
› Press the function key
in the line “Incoming call
”
to reject the second call.
› Press the function key
in the line “
Incoming call ” to accept the second call.
The connection to the first party will be interrupted but not broken (Display:
“ Call being held ”).
› If you press the function key
in the line “Call being held
”, the conversation
with this caller will continue and the other caller will be put
“on hold”. You can
toggle between the two calls.
› Press the function key
to break the connection to the call number displayed
in this line. Conference call
A conference call allows all callers to communication together in dialled and re-
ceived phone conversations. All participants in the conference call can hear and
talk to all other participants.
+ - the caller, person called takes part in the conference call
- - the caller, person called is removed from the conference call
DTMF key tones
Each key of a telephone is assigned a particular DTMF key tone. DTMF key tones
are used, for example, for the input of a password via the phone or for choosing a
colleague in a
“Call center”.
If a DTMF key tone has to be entered during a conversation, open the keypad
field by pressing the function key at the bottom left and follow the instructions
(for example: “For a private conversation with one of our co-workers, please press 3 ”).
You can store a longer DTMF key tone on your mobile phone. If, during a conver-
sation, this DTMF key tone has to be entered, call up the corresponding entry
from the telephone book as described.
If you press the function key DTMF on the input screen, the character string dis-
played in the entry line will be played as a DTMF key tone sequence.
Please note that in a DTMF key tone sequence, the character
“+” must not appear,
as it interrupts the playing of a DTMF key tone. Ð SMS menu
The SMS menu can only be used when your vehicle has been equipped with the
GSM III telephone preinstallation and the mobile phone is paired with the radio
navigation system via the rSAP profile – refer to the Owner's Manual of your vehi-
cle.
Inbox
In the main menu TELEPHONE, press the function key SMS followed by the menu
item Inbox to call up a list of received text messages. Read text messages are la-
belled with the symbol ; unread text messages with the symbol .
To open a received text message, press the field containing the particular mes-
sage. The following options are displayed as well as the message text:
23
PHONE mode