2012 SKODA CITIGO gearbox
[x] Cancel search: gearboxPage 131 of 157

›
Let all of the occupants get out.
While changing a tyre, the occupants of the
vehicle should not stand on the road (instead they should remain behind a crash
barrier).
› Switch off the engine and move the gearshift lever into
Neutral or move the
selector lever for the automatic gearbox into position N.
› Firmly apply the
handbrake.
› Remove the vehicle tool kit
» page 127 and the spare wheel » page 122, Spare
wheel from the luggage compartment. ÐChanging a wheel
First read and observe the introductory information and safety warn-
ings on page 128.
Always change a wheel on a level surface as far as possible.
›
Remove the full wheel trim
» page 122 or caps »
page 123.
› First of all slacken the anti-theft wheel bolt and then the other wheel
bolts » page 130.
› Jack up the vehicle until the wheel that needs changing is clear of the
ground » page 131 .
› Unscrew the wheel bolts and place them on a clean surface (cloth, paper, etc.).
› Remove the wheel.
› Attach the spare wheel and slightly screw on the wheel bolts.
› Lower the vehicle.
› Alternately tighten the wheel bolts opposite each other using the wheel
wrench (crosswise) and then tighten the anti-theft wheel bolt » page 130.
› Reinstall the wheel trim/wheel trim cap or the caps. Note
■ All bolts must be clean and must turn easily.
■ Under no circumstances grease or oil the wheel bolts!
■ When fitting unidirectional tyres, ensure that the direction of rotation is cor-
rect »
page 121, Unidirectional tyres . ÐSubsequent steps
First read and observe the introductory information and safety warn-
ings on page 128.
The following steps must also be performed after changing the wheel.ä
ä ›
Stow and attach the replaced wheel in the spare wheel well using a special
screw » page 122, Spare wheel.
› Stow the vehicle tool kit in the space provided.
› Check
the tyre pressure
on the installed spare wheel as soon as possible.
› Have the
tightening torque of the wheel bolts checked with a torque wrench
as soon as possible.
› Change the damaged wheel or consult a ŠKODA specialist garage about repair
possibilities. Note
■ If it is determined that the wheel bolts are corroded and difficult to turn when
changing the wheel, the bolts must be replaced before checking the tightening
torque. ■ Drive cautiously and only at a moderate speed until the tightening torque has
been checked. Ð
129
Do-it-yourself
Page 135 of 157

Components of the breakdown kit
Fig. 115
Components of the breakdown kit
First read and observe the introductory information and safety warn-
ings on page 132.
The breakdown kit contains the following parts:
Valve remover
Sticker with speed designation
“max. 80 km/h”/“max. 50 mph”
Inflation hose with plug
Air compressor
Tyre inflation hose
Tyre inflation pressure indicator
Air release valve
ON and OFF switch
12 volt cable connector
Tyre inflator bottle with sealing agent
Replacement valve core
The valve remover 1
has a slot at its lower end which fits into the valve core.
This is the only way in which you can remove and re-install the valve core from
the tyre valve. The same also applies to the replacement valve core 11
.
Ð
ä 1
2
3
4
5
6
7
8
9
10
11 Preparing to use the breakdown kit
First read and observe the introductory information and safety warn-
ings on page 132.
The following preparatory work must be carried out before using the breakdown
kit.
›
In the event of a puncture, park the vehicle as far away as possible from the
flow of traffic. Park on as flat and firm a surface as possible.
› Let all of the occupants get out.
While changing a tyre, the occupants of the
vehicle should not stand on the road (instead they should remain behind a crash
barrier).
› Switch off the engine and move the gearshift lever into
Neutral or move the
selector lever
for the automatic gearbox into position N.
› Firmly apply the
handbrake.
› Check that you can carry out the repairs with the breakdown kit
» page 132,
Breakdown kit .
› Remove the breakdown kit
from the luggage compartment.
› Stick the sticker 2
»
Fig. 115
on page 133 on the dash panel in view of the driv-
er.
› Do not remove the foreign body, e.g. screw or nail, from the tyre.
› Unscrew the valve cap.
› Use the valve remover 1
to unscrew the valve core and place it on a clean sur-
face (rag, paper, etc.). Ð Sealing and inflating tyres
First read and observe the introductory information and safety warn-
ings on page 132.
Sealing
›
Forcefully shake the tyre inflator bottle 10
» Fig. 115 on page 133
several times.
› Firmly screw the inflation hose 3
onto the tyre inflator bottle 10
clockwise.
The film on the cap is pierced automatically.
› Remove the plug from the inflation hose 3
and plug the open end fully onto
the tyre valve.
› Hold the bottle 10
with the bottom facing upwards and fill all of the sealing
agent from the tyre inflator bottle into the tyre.
› Remove the empty tyre inflator bottle from the valve.
› Screw the valve core back into the tyre valve using the valve remover 1
.
£
ä
ä
133
Do-it-yourself
Page 138 of 157

Jump-starting in vehicles with the START-STOP system
Fig. 117
Engine compartment: Engine
earth
First read and observe the introductory information and safety warn-
ings on page 134.
On vehicles with the START-STOP system, the jump-start cable of the charger
must never be connected directly to the negative pole of the vehicle battery, but
only to the engine earth
» Fig. 117. ÐTowing the vehicle
ä
Introduction
This chapter contains information on the following subjects:
Front towing eye 137
Vehicles with manual transmission can be towed in with a tow bar or a tow rope
or with the front or rear wheels raised.
Vehicles with automated transmission can be towed with a tow bar or a tow rope
or with the front wheels raised. If the vehicle is raised at rear, the automatic gear-
box is damaged!
A tow bar is the safest way of towing a vehicle and also minimises any shocks.
Only use a tow rope if a suitable tow bar is not available.
When towing, the following guidelines must be observed.
Driver of the tow vehicle
› Release the clutch particularly gently when starting off or depress the accelera-
tor particularly gently if the vehicle is fitted with an automated transmission.
ä
›
On vehicles with a manual transmission, only push down on the accelerator
pedal once the rope is taught.
The maximum towing speed is 50 km/h.
Driver of the towed vehicle
› Switch on the ignition so that the steering wheel is not blocked and so that the
turn signal lights, horn, windscreen wipers and windscreen washer system can
be switched on.
› Take the vehicle out of gear or move the selector lever into position
N if the
vehicle is fitted with an automated transmission.
Please note that the brake servo unit and power steering only operate if the en-
gine is running. If the engine is not running, significantly more physical force is re-
quired to depress the brake pedal and steer the vehicle.
If using a tow rope, ensure that it is always kept taught. CAUTION
■ Do not tow start the engine - danger of damaging the engine! On vehicles with
a catalytic converter, unburnt fuel may get into the catalytic converter where it
may ignite. This in turn may damage or destroy the catalytic converter. The bat-
tery from another vehicle can be used as a jump-start aid » page 134, Jump-start-
ing .
■ If the gearbox of your vehicle no longer contains any oil because of a defect,
your vehicle must only be towed in with the driven wheels raised clear of the
ground, or on a special vehicle transporter or trailer.
■ The vehicle must be transported on a special vehicle or trailer if it is not possible
to tow in the vehicle in the way described or if the towing distance is greater than
50 km. ■ To protect both vehicles when tow-starting or towing, the tow rope should be
elastic. Thus one should only use plastic fibre rope or a rope made out of a simi-
larly elastic material.
■ One should be constantly vigilant not to allow impermissibly high towing forces
or jerky loadings. There is always a risk of excessive stresses and damage result-
ing at the points to which you attach the tow rope or tow bar when you attempt
to tow a vehicle which is not standing on a paved road.
■ Attach the tow rope or the tow bar only to the towing eye » page 137. £
136 Do-it-yourself
Page 147 of 157
Technical data
Technical data
Introductory information
The details given in the vehicle's technical documentation always take prece-
dence over the details in the Owner's Manual. Please refer to the official vehicle
registration documents or consult a
ŠKODA Service Partner to determine which
engine your vehicle is equipped with.
The listed performance values were determined without performance-reducing
equipment, e.g. air conditioning system.
Vehicle identification number (VIN)
The vehicle identification number - VIN (vehicle body number) is stamped into the
engine compartment on the right hand suspension strut dome. This number is al-
so located on a sign on the lower left hand edge below the windscreen (together
with a VIN bar code).
Engine number
The engine number is stamped into the engine block. ÐData on the vehicle sticker and the type plate
Fig. 128
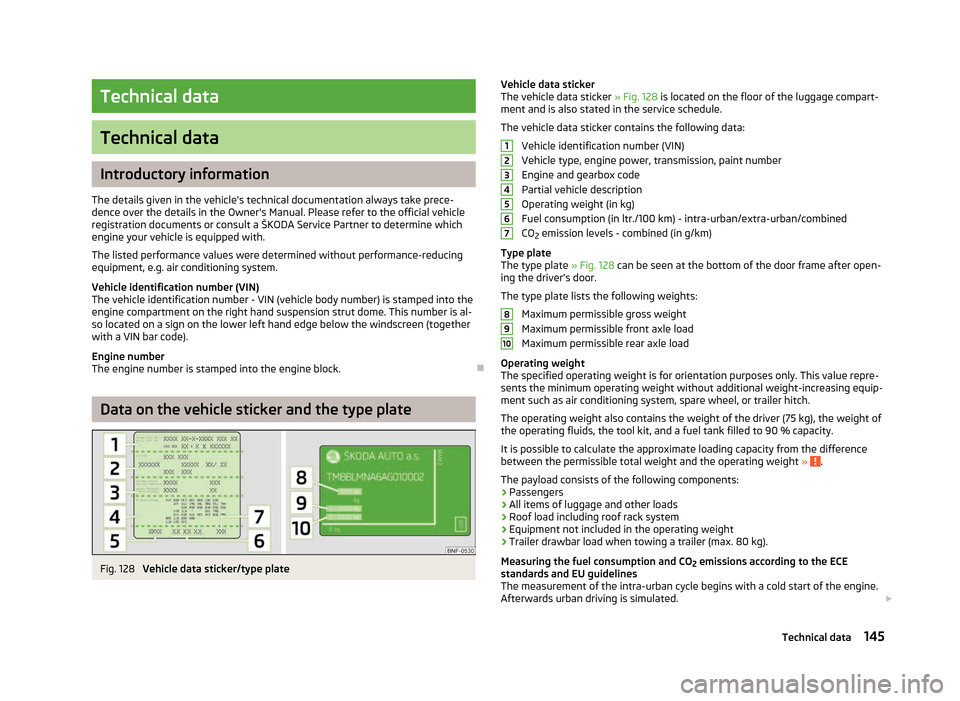
Vehicle data sticker/type plate Vehicle data sticker
The vehicle data sticker » Fig. 128 is located on the floor of the luggage compart-
ment and is also stated in the service schedule.
The vehicle data sticker contains the following data: Vehicle identification number (VIN)
Vehicle type, engine power, transmission, paint number
Engine and gearbox code
Partial vehicle description
Operating weight (in
kg)
Fuel consumption (in ltr./100 km) - intra-urban/extra-urban/combined
CO 2 emission levels - combined (in g/km)
Type plate
The type plate » Fig. 128 can be seen at the bottom of the door frame after open-
ing the driver's door.
The type plate lists the following weights:
Maximum permissible gross weight
Maximum permissible front axle load
Maximum permissible rear axle load
Operating weight
The specified operating weight is for orientation purposes only. This value repre-
sents the minimum operating weight without additional weight-increasing equip-
ment such as air conditioning system, spare wheel, or trailer hitch.
The operating weight also contains the weight of the driver (75 kg), the weight of
the operating fluids, the tool kit, and a fuel tank filled to 90 % capacity.
It is possible to calculate the approximate loading capacity from the difference
between the permissible total weight and the operating weight » .
The payload consists of the following components:
› Passengers
› All items of luggage and other loads
› Roof load including roof rack system
› Equipment not included in the operating weight
› Trailer drawbar load when towing a trailer (max. 80 kg).
Measuring the fuel consumption and CO 2 emissions according to the ECE
standards and EU guidelines
The measurement of the intra-urban cycle begins with a cold start of the engine.
Afterwards urban driving is simulated. £ 1
2
3
4
5
6
7
8
9
10
145
Technical data
Page 150 of 157

Index
A
ABS 61
Warning light 17
Accessories 125
Adjusting Exterior mirror 36
Interior mirror 35
Adjusting seats 75
Adjustment Seat 38
Aerial 98
Airbag Deployment 82
Front airbag 83
Side airbag Head-Thorax 84
Switching off 85
System description 82
Air conditioning system 53
Recirculated air mode 55
Antilock brake system 61
Ash tray 45
Assistance systems ESC 60
Assist systems ABS 17, 61
City Safe Drive 66
Cruise control systems (CCS) 63
EDL 61
ESC 17
Parking aid 62
START/STOP 65
TCS 61
Traction Control System (TCS) 17
Visual parking system 63Automatic gearbox 69
Dynamic shift programme 71
Information for driving 69
Kickdown 71
Operational faults 71
Parking 69
Selector lever positions 70
Starting off 69
Stopping 69
Tiptronic 70
Automatic load deactivation 118
Avoiding damage to your vehicle 95
B
Before setting off 74
Belts 78
Belt tensioners 80
Bonnet Closing 110
Opening 110
Brake assist 60
Brake booster 60
Brake fluid Checking 113
Brakes Handbrake 60
Running in 91
Warning light 15
Braking Brake fluid 113
Breakdown kit 132
Bulbs Replacing 141
Button in the driver's door Electrical power windows 26
C
Car computer see Multifunction display 11Car jack 127
Carrier 44
Catalytic converter 91
Central locking button 23
Central locking system 21
lock 22
unlock 22
Changes 125
Changing Engine oil 112
Wheel 128
Charging a vehicle battery 117
Checking Battery electrolyte level 116
Brake fluid 113
Coolant level 112
Engine oil 111
Oil level 111
Windscreen washer fluid 114
Children and safety 87
Child safety Side airbag 88
Child safety lock 21
Child seat Classification 88
ISOFIX 89
on the front passenger seat 87
Suitability 89
TOP TETHER 90
Chrome parts refer to Taking care of your vehicle 99
Cigarette lighter 46
City Safe Drive 66
Warning light 19
Cleaning 97
Artificial leather 101
Headlight lenses 100
Material coverings 102
Materials 101
Natural leather 102
148 Index
Page 153 of 157

Rear windows
closing 27
opening 27
Recirculated air mode 55
Recommended gear 10
Refuelling 104
Fuel 104
Regulation Headlight beam 30
Remote control 23
Synchronisation process 24
Remote control key Replacing the battery 20
Replacement of parts 125
Replacing bulbs 141
Fuses 138
Vehicle battery 117
Windscreen wiper blade 35
Replenishing Coolant 113
Engine oil 111
Windscreen washer fluid 114
Rof rack system Attachment points 44
Roof rack system Roof load 45
Running in Brake pads 91
Engine 91
The first 1 500 km 91
Tyres 91
S
Safe securing system 22
Safety 74
Airbags 82
Child safety 87
Child safety seats 87
Head restraints 40ISOFIX 89
TOP TETHER 90
Save electrical energy 92
Seat Adjusting 38
Seat belt Warning light 19
Seat belts 78
Belt tensioners 80
Cleaning 103
fastening and unfastening 80
Warning light 15
Seats Folding forwards 40
Head restraints 40
Heating 39
Selector lever see selector lever positions 70
Selector lever positions 70
Service display 10
Setting Air conditioning system 55
Heating 53
Steering wheel 57
Setting the clock Clock 12
Shifting Diving economically 92
Gearshift lever 61
Side airbag 84
Sliding/tilting roof Closing 27
Opening and tilting 27
Operating 27
Snow chains 123
Spare wheel 122
Speedometer 9
START/STOP Function 65
Starting and stopping the engine 56Starting engine
Jump-starting 134
START STOP Jump-starting 136
Warning light 19
Steering force assistance 57
Steering wheel 57
Storage 47
Storage compartments 47
Sun visors 33
Switching lights on and off 29
Switching off the front seat passenger 85
T
Taking care of the vehicle Artificial leather 101
Material coverings 102
Materials 101
Natural leather 102
Seat belts 103
Taking care of your vehicle 97
Automatic car wash system 98
Chrome parts 99
Cleaning the wheels 101
Door lock cylinders 100
Headlight lenses 100
High-pressure cleaner 98
Plastic parts 99
Polishing the paintwork 99
Preservation 99
Rubber seals 100
Washing 98
Washing by hand 98
Wash system 98
TCS 61
Technical data 145
Tiptronic 69
see automatic gearbox 70
Tool 127
TOP TETHER 90
151
Index