2012 SKODA CITIGO weight
[x] Cancel search: weightPage 43 of 157

CAUTION
Ensure that the seat belts are not damaged when operating the seat backrests.
Under no circumstances must the rear seat belts be jammed by the folded back
seat backrests. ÐLuggage compartment
ä
Introduction
This chapter contains information on the following subjects:
Lashing eyes 42
Bag hooks 42
Fixing nets 43
Luggage compartment cover 43
Please observe the following for the purpose of maintaining good handling char-
acteristics of your vehicle:
› Distribute loads as evenly as possible.
› Place heavy objects as far forward as possible.
› Attach the items of luggage to the lashing eyes or using the fixing
net » page 42 .
In the event of an accident, there is such a high kinetic energy which is produced
by small and light objects that they can cause severe injuries. The magnitude of
the kinetic energy is dependent on the speed at which the vehicle is travelling
and the weight of the object. The speed at which the vehicle is travelling is in this
case the more significant factor.
Example: In the event of a frontal collision at a speed of 50 km/h, an unsecured
object with a weight of 4.5 kg produces an energy, which corresponds to 20 times
its own weight. This means that it results in a weight of approx. 90 kg “ ”. You can
imagine the injuries that can occur, if this “object” flies through the interior com-
partment and hits an occupant. WARNING
■ Store the objects in the luggage compartment and attach them to the lash-
ing eyes.
■ Loose objects in the passenger compartment can be thrown forward during
a sudden manoeuvre or in case of an accident and can injure the occupants or
other oncoming traffic. This risk is still increased, if the objects which are fly-
ing around are hit by a deployed airbag. In this case, the objects which are
thrown back can injure the occupants – hazard.
■ Please note that the handling properties of the vehicle may be affected
when transporting heavy objects as the centre of gravity can be displaced –
risk of accident! The speed and style of driving must be adjusted accordingly. ■ If the items of luggage or objects are attached to the lashing eyes with un-
suitable or damaged lashing straps, injuries can occur in the event of braking
manoeuvres or accidents. To prevent items of luggage from being thrown for-
ward, always use suitable lashing straps which must be firmly attached to the
lashing eyes. ■ The items carried in the luggage compartment must be stored in such a way
that no objects are able to slip forward if any sudden driving or braking ma-
noeuvres are undertaken – risk of injury!
■ When transporting fastened objects which are sharp and dangerous in the
luggage compartment that has been enlarged by folding the rear seats for-
ward, ensure the safety of the passengers transported on the other rear
seats »
page 76, Correct seated position for the occupants on the rear seats .
■ If the rear seat next to the folded forward seat is occupied, ensure maxi-
mum safety, e.g. by placing the goods to be transported in such a way that the
seat is prevented from folding back in case of a rear collision.
■ Never drive with the luggage compartment lid fully opened or slightly ajar
otherwise exhaust gases may get into the interior of the vehicle – risk of poi-
soning! ■ Under no circumstances, should the permissible axle loads and permissible
gross weight of the vehicle be exceeded – risk of accident! ■ Never transport people in the luggage compartment! CAUTION
Please ensure that the heating elements for the rear window heater are not dam-
aged as a result of abrasive objects. Note
The tyre pressure must be adjusted to the load . Ð
41
Seats and Stowage
Page 46 of 157
CAUTION
Make sure that the luggage compartment cover is latched correctly into the side
holders 2
» Fig. 43 - risk of damaging the luggage compartment cover/luggage
compartment. ÐRoof rack system
ä
Introduction
This chapter contains information on the following subjects:
Attachment points for roof bars 44
Roof load 45
WARNING
■ The items which you transport on the roof bar system must be reliably at-
tached – risk of accident!
■ Always secure the load with appropriate and undamaged lashing straps or
tensioning straps.
■ Distribute the load evenly over the roof rack system.
■ The handling properties of your vehicle change when you transport heavy or
bulky items on the roof bar system as a result of the displacement of the cen-
tre of gravity and the increased wind attack area – risk of accident! The style
of driving and speed must therefore be adapted to the current circumstances. ■ Avoid abrupt and sudden driving/braking manoeuvres.
■ Adjust the speed and driving style to the visibility, weather, road and traffic
conditions. ■ The permissible roof load, permissible axle loads and gross permissible
weight of your vehicle must not be exceeded under any circumstances – risk
of accident! CAUTION
■ Only use roof rack systems approved by ŠKODA.
■ If other roof rack systems are used or if the roof bars are not fitted correctly,
any resulting damage to the vehicle is not covered by the warranty. It is therefore
essential that the supplied fitting instructions for the roof rack system are ob-
served. ■
On vehicles with a panoramic sliding roof, make sure that the tilted panoramic
sliding roof not strike any items which are transported. ■ Ensure that the luggage compartment lid does not hit the roof load when
opened.
■ The height of the vehicle changes after mounting a roof luggage rack system
and the load that is secured to it. Compare the vehicle height with available clear-
ances, such as underpasses and garage doors.
■ Always remove the roof luggage rack system before entering an automated car
wash. ■ Ensure the roof aerial is not impaired by the secured load. For the sake of the environment
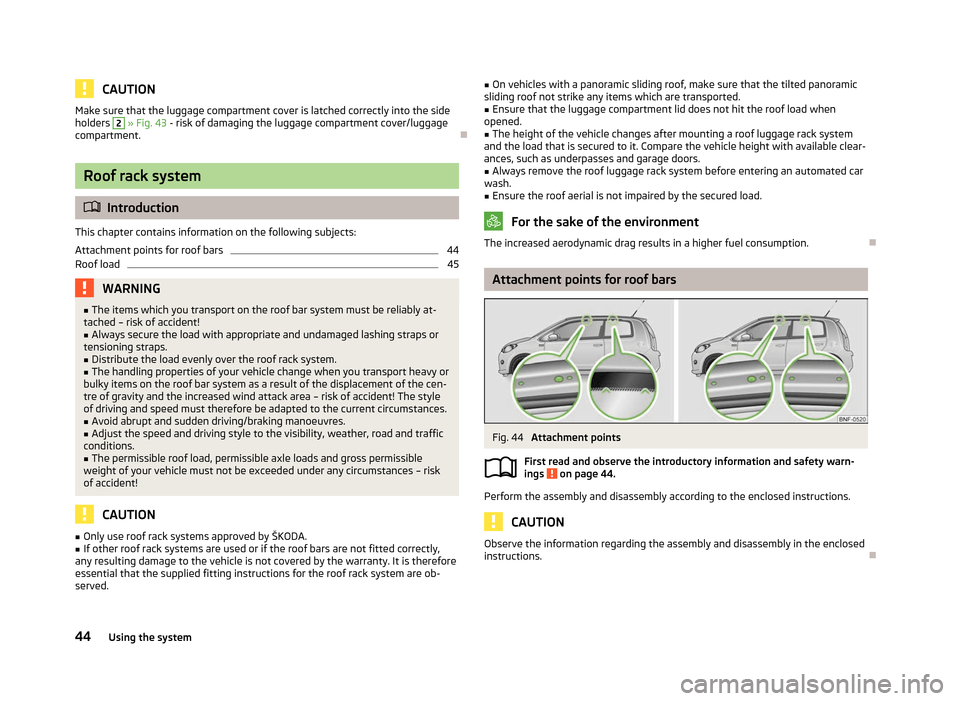
The increased aerodynamic drag results in a higher fuel consumption. Ð Attachment points for roof bars
Fig. 44
Attachment points
First read and observe the introductory information and safety warn-
ings on page 44.
Perform the assembly and disassembly according to the enclosed instructions.
CAUTION
Observe the information regarding the assembly and disassembly in the enclosed
instructions. Ð
ä
44 Using the system
Page 47 of 157
Roof load
First read and observe the introductory information and safety warn-
ings on page 44.
The maximum permissible roof load (including roof rack system) of
50 kg and the
maximum permissible total weight of the vehicle should not be exceeded.
The full permissible roof load cannot be used if a roof rack system with a lower
load carrying capacity is used. In this case, the roof rack system must only be loa-
ded up to the maximum weight limit specified in the fitting instructions. ÐCup holder
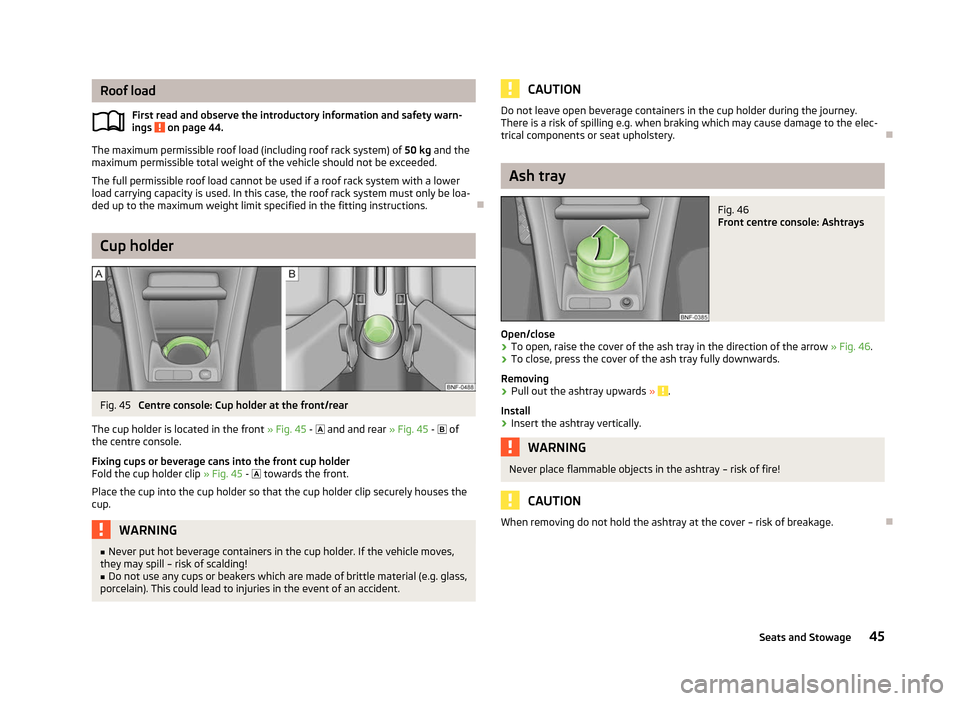
Fig. 45
Centre console: Cup holder at the front/rear
The cup holder is located in the front » Fig. 45 - and and rear » Fig. 45 - of
the centre console.
Fixing cups or beverage cans into the front cup holder
Fold the cup holder clip » Fig. 45 - towards the front.
Place the cup into the cup holder so that the cup holder clip securely houses the
cup. WARNING
■ Never put hot beverage containers in the cup holder. If the vehicle moves,
they may spill – risk of scalding! ■ Do not use any cups or beakers which are made of brittle material (e.g. glass,
porcelain). This could lead to injuries in the event of an accident.
ä CAUTION
Do not leave open beverage containers in the cup holder during the journey.
There is a risk of spilling e.g. when braking which may cause damage to the elec-
trical components or seat upholstery. Ð Ash tray
Fig. 46
Front centre console: Ashtrays
Open/close
› To open, raise the cover of the ash tray in the direction of the arrow
» Fig. 46.
› To close, press the cover of the ash tray fully downwards.
Removing
› Pull out the ashtray upwards
» .
Install
› Insert the ashtray vertically. WARNING
Never place flammable objects in the ashtray – risk of fire! CAUTION
When removing do not hold the ashtray at the cover – risk of breakage. Ð
45
Seats and Stowage
Page 51 of 157
Stowage compartment in front centre console
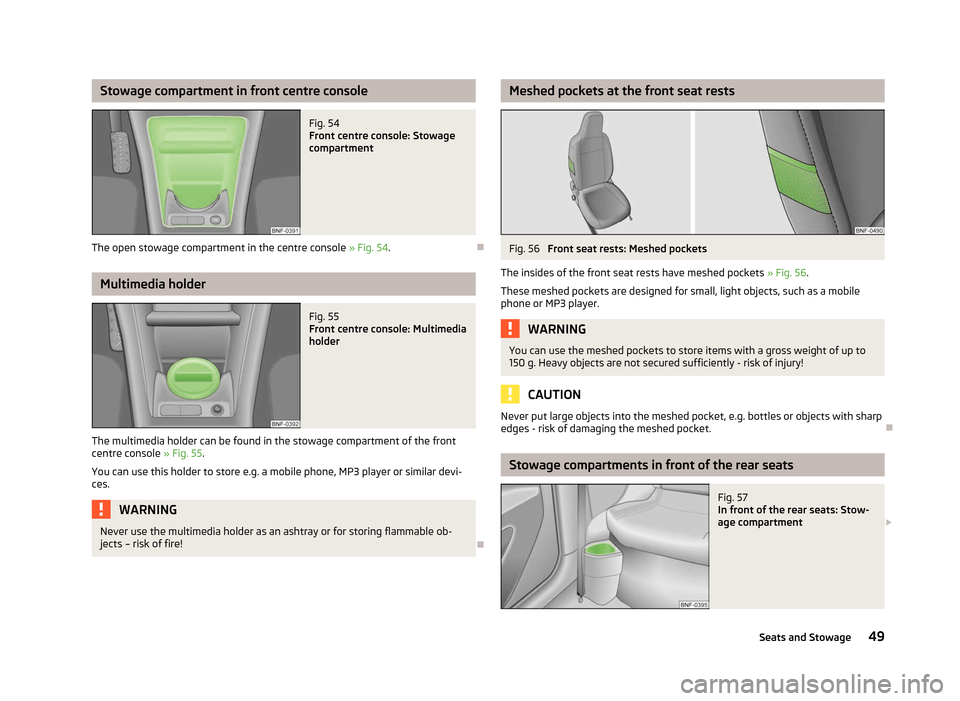
Fig. 54
Front centre console: Stowage
compartment
The open stowage compartment in the centre console » Fig. 54. ÐMultimedia holder
Fig. 55
Front centre console: Multimedia
holder
The multimedia holder can be found in the stowage compartment of the front
centre console » Fig. 55.
You can use this holder to store e.g. a mobile phone, MP3 player or similar devi-
ces. WARNING
Never use the multimedia holder as an ashtray or for storing flammable ob-
jects – risk of fire! Ð Meshed pockets at the front seat rests
Fig. 56
Front seat rests: Meshed pockets
The insides of the front seat rests have meshed pockets » Fig. 56.
These meshed pockets are designed for small, light objects, such as a mobile
phone or MP3 player. WARNING
You can use the meshed pockets to store items with a gross weight of up to
150 g. Heavy objects are not secured sufficiently - risk of injury! CAUTION
Never put large objects into the meshed pocket, e.g. bottles or objects with sharp
edges - risk of damaging the meshed pocket. Ð Stowage compartments in front of the rear seats
Fig. 57
In front of the rear seats: Stow-
age compartment £
49
Seats and Stowage
Page 66 of 157
CAUTION
■ Always depress the clutch pedal if switching to the neutral position (vehicle
with a manual gearbox) when the cruise control system is switched on! Otherwise
the engine can rev up unintentionally.
■ The cruise control system is not able to maintain a constant speed when driving
in areas with steeper gradients. The weight of the vehicle increases the speed at
which it travels. Therefore, shift to a lower gear in good time or slow the vehicle
down by applying the foot brake. Note
It is not possible on vehicles fitted with an automatic gearbox to switch on the
cruise control system if the selector lever is in the position N or R.ÐStoring a speed
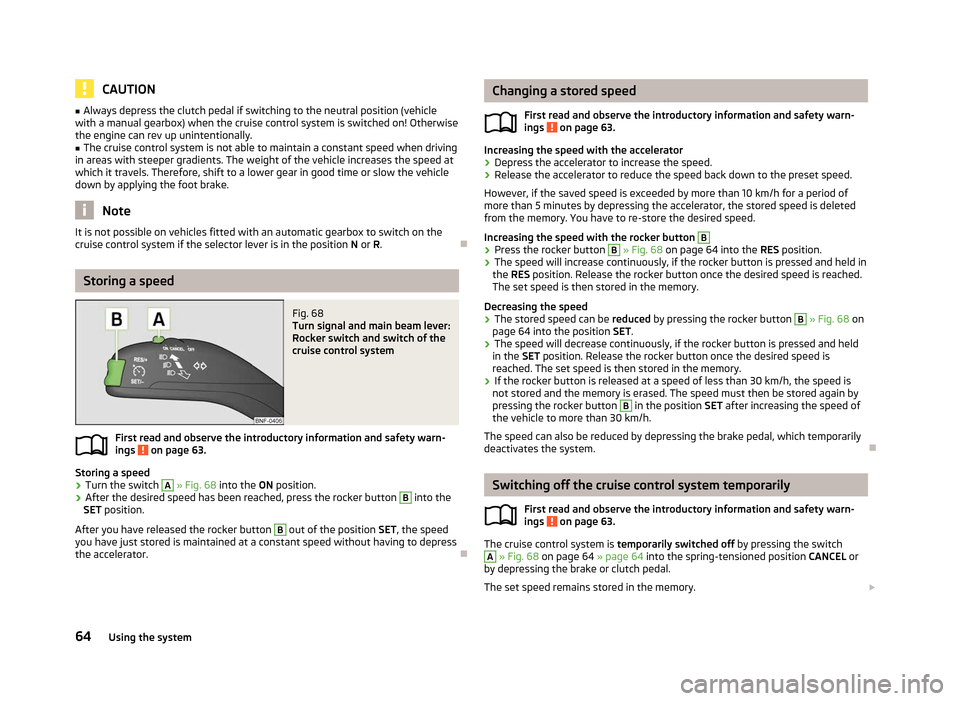
Fig. 68
Turn signal and main beam lever:
Rocker switch and switch of the
cruise control system
First read and observe the introductory information and safety warn-
ings on page 63.
Storing a speed
› Turn the switch A
» Fig. 68
into the ON position.
› After the desired speed has been reached, press the rocker button B
into the
SET position.
After you have released the rocker button B
out of the position SET
, the speed
you have just stored is maintained at a constant speed without having to depress
the accelerator. Ð
ä Changing a stored speed
First read and observe the introductory information and safety warn-
ings on page 63.
Increasing the speed with the accelerator
› Depress the accelerator to increase the speed.
› Release the accelerator to reduce the speed back down to the preset speed.
However, if the saved speed is exceeded by more than 10
km/h for a period of
more than 5 minutes by depressing the accelerator, the stored speed is deleted
from the memory. You have to re-store the desired speed.
Increasing the speed with the rocker button B
›
Press the rocker button B
» Fig. 68
on page 64 into the RES position.
› The speed will increase continuously, if the rocker button is pressed and held in
the RES position. Release the rocker button once the desired speed is reached.
The set speed is then stored in the memory.
Decreasing the speed
› The stored speed can be
reduced by pressing the rocker button B
» Fig. 68 on
page 64
into the position SET.
› The speed will decrease continuously, if the rocker button is pressed and held
in the SET position. Release the rocker button once the desired speed is
reached. The set speed is then stored in the memory.
› If the rocker button is released at a speed of less than 30 km/h, the speed is
not stored and the memory is erased. The speed must then be stored again by
pressing the rocker button B
in the position SET after increasing the speed of
the vehicle to more than 30
km/h.
The speed can also be reduced by depressing the brake pedal, which temporarily
deactivates the system. Ð Switching off the cruise control system temporarily
First read and observe the introductory information and safety warn-
ings on page 63.
The cruise control system is
temporarily switched off
by pressing the switch A
» Fig. 68
on page 64 » page 64 into the spring-tensioned position CANCEL or
by depressing the brake or clutch pedal.
The set speed remains stored in the memory. £
ä
ä
64 Using the system
Page 81 of 157
WARNING (Continued)
■ Check the condition of all the seat belts on a regular basis. If any damage to
the seat belts, seat belt connections, inertia reel or the lock is detected, the
relevant seat belt must be replaced by a specialist garage.
■ Damaged seat belts which have been subjected to stress in an accident and
were therefore stretched, must be replaced – this is best done by a specialist
garage. The anchorage points of the belts must also be inspected. The an-
chorage points for the belts should also be checked. Note
The national legal requirements must be observed when using seat belts. ÐThe physical principle of a frontal collision
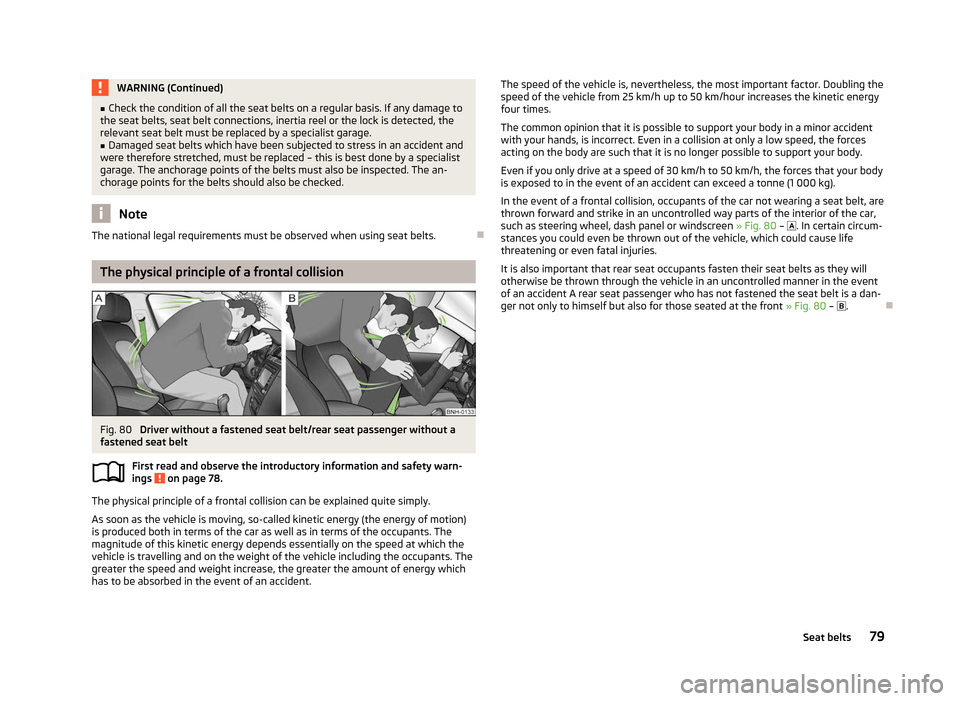
Fig. 80
Driver without a fastened seat belt/rear seat passenger without a
fastened seat belt
First read and observe the introductory information and safety warn-
ings on page 78.
The physical principle of a frontal collision can be explained quite simply.
As soon as the vehicle is moving, so-called kinetic energy (the energy of motion)
is produced both in terms of the car as well as in terms of the occupants. The
magnitude of this kinetic energy depends essentially on the speed at which the
vehicle is travelling and on the weight of the vehicle including the occupants. The
greater the speed and weight increase, the greater the amount of energy which
has to be absorbed in the event of an accident. ä The speed of the vehicle is, nevertheless, the most important factor. Doubling the
speed of the vehicle from 25 km/h up to 50 km/hour increases the kinetic energy
four times.
The common opinion that it is possible to support your body in a minor accident
with your hands, is incorrect. Even in a collision at only a low speed, the forces
acting on the body are such that it is no longer possible to support your body.
Even if you only drive at a speed of 30 km/h to 50 km/h, the forces that your body
is exposed to in the event of an accident can exceed a tonne (1 000 kg).
In the event of a frontal collision, occupants of the car not wearing a seat belt, are
thrown forward and strike in an uncontrolled way parts of the interior of the car,
such as steering wheel, dash panel or windscreen » Fig. 80 – . In certain circum-
stances you could even be thrown out of the vehicle, which could cause life
threatening or even fatal injuries.
It is also important that rear seat occupants fasten their seat belts as they will
otherwise be thrown through the vehicle in an uncontrolled manner in the event
of an accident A rear seat passenger who has not fastened the seat belt is a dan-
ger not only to himself but also for those seated at the front » Fig. 80 – . Ð
79
Seat belts
Page 90 of 157
The following guidelines must be observed when using a child safety seat in
which the child is seated with its back facing the direction of travel on the front
passenger seat.
›
Switch off the front passenger airbag
» page 85, Switching off the airbags.
› Slide the front passenger seat all the way back.
› Move the front passenger seat backrest into the vertical position.
› Set the height-adjustable front passenger seat as high up as possible.
› Place and fasten the child seat on the seat and the child in the child seat ac-
cording to the specifications in the manufacturer's user manual of the child
seat . WARNING
■ It is essential to always switch off the front passenger airbag when attach-
ing a child safety seat to the front passenger seat where the child is seated
with its back facing in direction of travel » page 85, Switching off the airbags .
■ Never use a child safety seat in which the child is seated with its back facing
the direction of travel on the front passenger seat if the airbag is switched on.
This child safety seat is positioned in the deployment area of the front pas-
senger airbag. The airbag may cause the child severe, or even fatal injuries, in
the event of it being deployed. ■ This is also clearly stated on the sticker which is located on the B column on
the front passenger side » Fig. 87. The sticker is visible upon opening the
front passenger door. For some countries, the sticker is also affixed to the sun
visor of the front passenger. ■ If a child safety seat in which the child faces in the direction of travel is used
on the front passenger seat, the front passenger seat must be moved back
and to the top fully. Move the backrest into the vertical position. ■ The front passenger airbag must be reactivated as soon as you no longer
use a child seat on the front passenger seat. Ð Child safety and side airbag
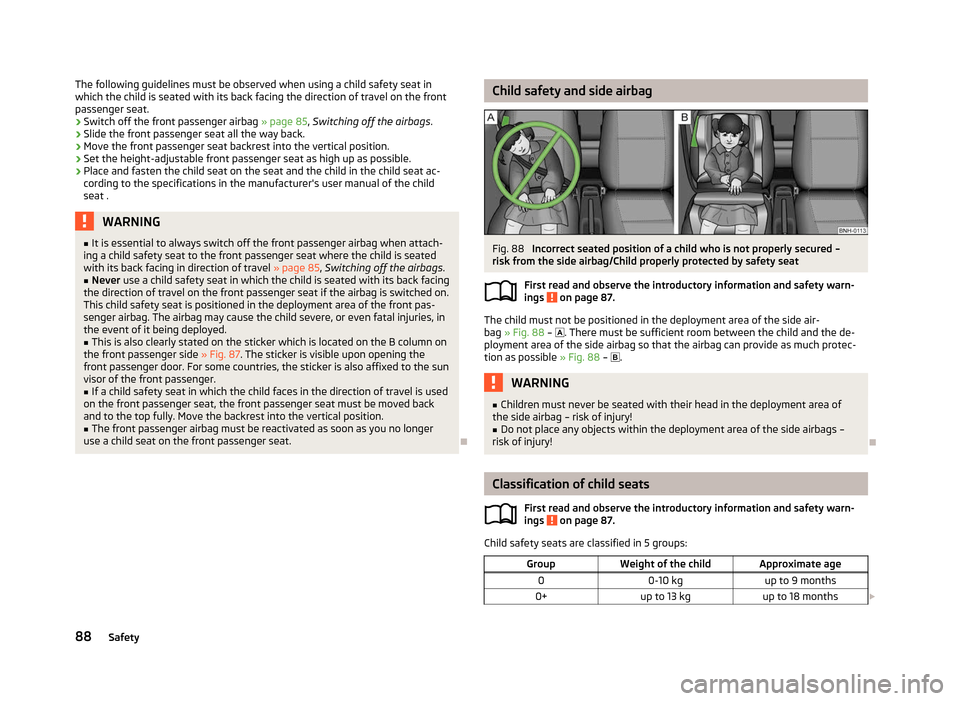
Fig. 88
Incorrect seated position of a child who is not properly secured –
risk from the side airbag/Child properly protected by safety seat
First read and observe the introductory information and safety warn-
ings on page 87.
The child must not be positioned in the deployment area of the side air-
bag » Fig. 88 – . There must be sufficient room between the child and the de-
ployment area of the side airbag so that the airbag can provide as much protec-
tion as possible » Fig. 88
– . WARNING
■ Children must never be seated with their head in the deployment area of
the side airbag – risk of injury!
■ Do not place any objects within the deployment area of the side airbags –
risk of injury! Ð Classification of child seats
First read and observe the introductory information and safety warn-
ings on page 87.
Child safety seats are classified in 5 groups:
Group Weight of the child Approximate age
0 0-10 kg up to 9 months
0+ up to 13 kg up to 18 months£ ä
ä
88 Safety
Page 91 of 157
Group
Weight of the child Approximate age
1 9-18 kg up to 4 years
2 15-25 kg up to 7 years
3 22-36 kg over 7 years Ð
Suitability of child seats
First read and observe the introductory information and safety warn-
ings on page 87.
Overview of the suitability of child seats according to the standard ECE-R
44
Seat Child seat
type
Front passenger seat U
Car seat U
+
T
Universal category – a child seat with the word UNIVERSAL, which is de-
signed for fastening on the seat with the seat belt.
ISOFIX
– a child seat which is designed for fastening on the seat with eyelets
for the ISOFIX system is provided » page 89, Child seats with the ISOFIX
system.
TOP TETHER – a child seat which is designed for fastening on the seat with
an eyelet for the TOP TETHER system is provided » page 90, Child seat with
the TOP TETHER system. Ð
ä U
+
T Child seats with the ISOFIX system
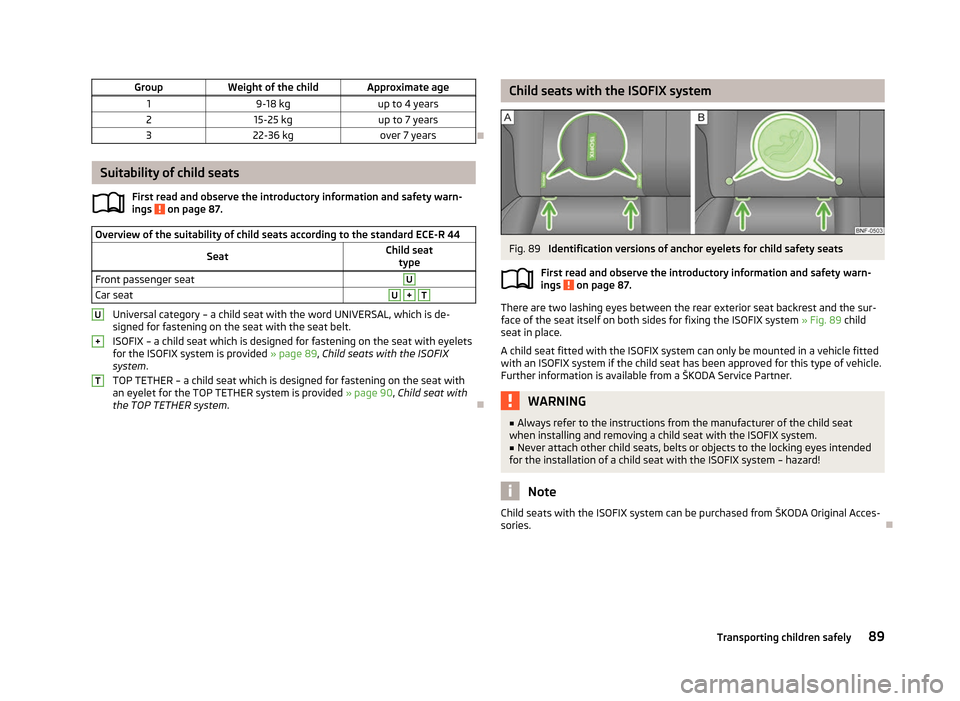
Fig. 89
Identification versions of anchor eyelets for child safety seats
First read and observe the introductory information and safety warn-
ings on page 87.
There are two lashing eyes between the rear exterior seat backrest and the sur-
face of the seat itself on both sides for fixing the ISOFIX system » Fig. 89 child
seat in place.
A child seat fitted with the ISOFIX system can only be mounted in a vehicle fitted
with an ISOFIX system if the child seat has been approved for this type of vehicle.
Further information is available from a ŠKODA Service Partner. WARNING
■ Always refer to the instructions from the manufacturer of the child seat
when installing and removing a child seat with the
ISOFIX system.
■ Never attach other child seats, belts or objects to the locking eyes intended
for the installation of a child seat with the
ISOFIX system – hazard! Note
Child seats with the ISOFIX system can be purchased from ŠKODA Original Acces-
sories. Ð
ä
89
Transporting children safely