2012 Seat Leon 5D warning
[x] Cancel search: warningPage 76 of 289
75
Driver information system
Button for the driving assistance systems
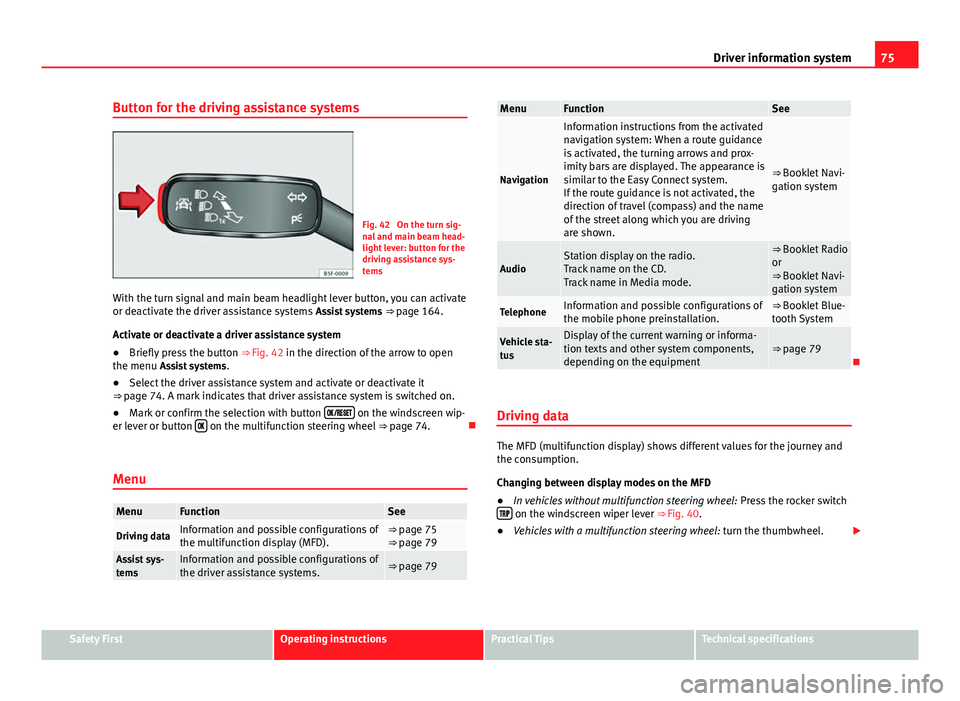
Fig. 42 On the turn sig-
nal and main beam head-
light lever: button for the
driving assistance sys-
tems
With the turn signal and main beam headlight lever button, you can activate
or deactivate the driver assistance systems Assist systems ⇒ page 164.
Activate or deactivate a driver assistance system
● Briefly press the button ⇒ Fig. 42 in the direction of the arrow to open
the menu Assist systems .
● Select the driver assistance system and activate or deactivate it
⇒ page 74. A mark indicates that driver assistance system is switched on.
● Mark or confirm the selection with button
on the windscreen wip-
er lever or button on the multifunction steering wheel
⇒ page 74.
Menu
MenuFunctionSee
Driving dataInformation and possible configurations of
the multifunction display (MFD).⇒ page 75
⇒ page 79
Assist sys-
temsInformation and possible configurations of
the driver assistance systems.⇒ page 79
MenuFunctionSee
Navigation
Information instructions from the activated
navigation system: When a route guidance
is activated, the turning arrows and prox-
imity bars are displayed. The appearance is
similar to the Easy Connect system.
If the route guidance is not activated, the
direction of travel (compass) and the name
of the street along which you are driving
are shown.
⇒ Booklet Navi-
gation system
AudioStation display on the radio.
Track name on the CD.
Track name in Media mode.⇒ Booklet Radio
or
⇒ Booklet Navi-
gation system
TelephoneInformation and possible configurations of
the mobile phone preinstallation.⇒ Booklet Blue-
tooth System
Vehicle sta-
tusDisplay of the current warning or informa-
tion texts and other system components,
depending on the equipment⇒ page 79
Driving data
The MFD (multifunction display) shows different values for the journey and
the consumption.
Changing between display modes on the MFD
● In vehicles without multifunction steering wheel: Press the rocker switch
on the windscreen wiper lever ⇒ Fig. 40.
● Vehicles with a multifunction steering wheel: turn the thumbwheel.
Safety FirstOperating instructionsPractical TipsTechnical specifications
Page 77 of 289
76Driver information system
Multifunction display memory
The multifunction display is equipped with three memories that work auto-
matically: MFD from departure, MFD from refuelling, MFD total calculation.
On the screen display, you can read which memory is currently displayed.
To change between memories with the ignition on and the memory shown,
press the button
on the windscreen wiper lever or you can also
change between memories using the button on the multifunction steer-
ing wheel.
MenuFunction
MFD from de-
parture
Display and storage of the values for the journey and the
consumption from when the ignition is switched on to
when it is switched off.
If the journey is continued in less than 2 hours after the ig-
nition is switched off, the new data is added to the data al-
ready stored in the memory. The memory will automatically
be deleted if the journey is interrupted for more than two
hours.
MFD from re-
fuellingDisplay and storage of the values for the journey and the
consumption. By refuelling, the memory will be erased au-
tomatically.
MFD total cal-
culation
The memory records the values for a specific number of
partial trips, up to a total of 19 hours and 59 minutes or 99
hours and 59 minutes, or 1999.9 km (or miles) or 9999 km
(or miles), depending on the model of instrument panel.
On reaching either of these limits a)
, the memory is auto-
matically erased and starts to count from 0 again.
a) It varies according to the type of instrument panel fitted.
Erasing a memory manually
● Select the memory that you wish to erase.
● Press and hold the button
on the windscreen wiper lever or the
button on the multifunction steering wheel for about 2 seconds. Personalising the displays
In the Easy Connect system you can adjust which of the possible displays of
the MFD can be shown on the instrument panel display with the button
and the function button Setup ⇒ page 79.
DisplaysMenuFunction
Current fuel con-
sumptionThe current fuel consumption display operates through-
out the journey, in litres/100 km; and with the engine
running and the vehicle stopped, in litres/hour.
Average fuel con-
sumption
After turning on the ignition, average fuel consumption
in litres/100 km will be shown after travelling approxi-
mately 100 metres. Otherwise horizontal lines are dis-
played. The value shown is updated approximately ev-
ery 5 seconds.
Operating range
Approximate distance in km that can still be travelled
with the fuel remaining in the tank, assuming the same
style of driving is maintained. This is calculated using
the current fuel consumption.
Journey durationThis indicates the hours (h) and minutes (min) since
the ignition was switched on.
Distance coveredDistance covered in km (m) after switching on the igni-
tion.
Average speed
The average speed will be shown after a distance of ap-
proximately 100 metres has been travelled. Otherwise
horizontal lines are displayed. The value shown is up-
dated approximately every 5 seconds.
Digital display of
speedCurrent speed displayed in digital format.
Speed warning at
--- km/h or Speed
warning at --- mphIf the stored speed is exceeded (between 30 - 250 km/
h, or 1 - 155 mph), an audible warning is given togeth-
er with a visual warning.
Page 78 of 289
77
Driver information system
DisplaysMenuFunctionOil temperatureUpdated engine oil temperature digital displayCoolant tempera-
ture gaugeDigital display of the current temperature of the liquid
coolant.
Storing a speed for the speed warning
● Select the display Speed warning at --- km/h (--- mph)
● Press the button
on the windscreen wiper lever or the button on the multifunction steering wheel to store the current speed and activate
the warning.
●
If necessary, adjust the desired speed within 5 seconds using the rocker
switch
on the windscreen wiper lever or by turning the thumbwheel on
the multifunction steering wheel. Next, press the button or again
or wait several seconds. The speed is stored and the warning activated.
● To deactivate it press the button
or the button . The stored
speed is deleted.
Assist systems submenu
Assist systems
menuFunction
Lane Assist*Switching the Lane Assist system on or off ⇒ page 170.Tiredness detec-
tion*Switching the tiredness detection on or off (pause recom-
mendation) ⇒ page 173.
Personal convenience settings
When two people use a vehicle, SEAT recommends that each person always
uses their own remote control key. When the ignition is switched off, or the vehicle is locked, the convenience settings are stored and allocated to the
vehicle key
⇒ page 73.
The values of the personalised convenience settings are allocated to the ve-
hicle key in the Easy Connect system via the button
and the function
button Setup ⇒ page 79:
Vehicle settings menu
■ Time
■ Language
■ Units
Convenience settings menu ■ Door unlock (individual opening, Auto Lock)
■ Convenience handling of windows
■ Rear vision mirror adjustment
Light settings menu
■ Coming home and leaving home
■ Footwell light
■ Convenience turn signals
The stored settings are automatically activated, at the latest when the igni-
tion is switched on.
Engine oil temperature display
Vehicles without multifunction steering wheel
– To display the temperature of the engine oil, press the rocker
switch ⇒ Fig. 40 2
until the main menu appears. Enter into
Journey data . With the button 2 move to the oil temperature
gauge.
Safety FirstOperating instructionsPractical TipsTechnical specifications
Page 79 of 289
78Driver information system
Vehicles with multifunction steering wheel
–To display the engine oil temperature, enter the submenu Jour-
ney data and turn the thumbwheel until the oil temperature dis-
play appears.
The engine reaches its operating temperature when in normal driving condi-
tions, the oil temperature is between 80 °C (180 °F) and 120 °C (250 °F). If
the engine is required to work hard and the outside temperature is high, the
engine oil temperature can increase. This does not present any problem as
long as the warning lamps ⇒ page 69 or ⇒ page 70 do not appear on
the display.
Additional electrical appliances
– Operation with the windscreen wiper lever*: Press the rocker
switch ⇒ Fig. 40 2 until the main menu appears. Enter into the
section Journey data . With the rocker switch, move to the display
Convenience appliances.
– Operation with the multifunction steering wheel*: Move with
the buttons 1
or 2 to Journey data
and enter with OK. Turn the
thumbwheel to the right until the Convenience appliances dis-
play appears.
In addition, a scale will inform you of the current sum of all the additional
appliances.
Saving tips
Tips on how to save fuel will be displayed in certain conditions that
contribute to increased consumption. Following these tips could reduce the fuel consumption of your vehicle. The displays appear
automatically and will only be shown with the efficiency pro-
gramme. After a time, the saving tips will disappear automatically.
–
If you wish to hide a saving tip immediately after it appears,
press any button on the windscreen wiper lever*/multifunction
steering wheel*.
Note
● If you hide a saving tip, it will reappear after you switch the ignition on
again.
● The saving tips do not appear in all situations, but rather with a large
separation of time.
Page 80 of 289
79
Introduction to the Easy Connect system*
Introduction to the Easy Connect system* System settings (CAR)*Introduction
To select the settings menus, press the Easy Connect button and the
Setup function button.
The actual number of menus available and the name of the various options
in these menus will depend on the vehicle’s electronics and equipment.
Additional information and warnings:
● Driver assistance systems ⇒ page 164
WARNING
Any distraction may lead to an accident, with the risk of injury. Operating
the Easy Connect system while driving could distract you from traffic.
CAR menu (Setup) settings
– Switch the ignition on.
– Switch on the Easy Connect system.
– Press the Easy Connect button
.
– Press the Setup
function button to open the main Vehicle set-
tings menu . Pressing the menu button will always take you to the last menu
used.
Function buttons in the
vehicle’s settings menuPageESC system⇒ page 79Tyres⇒ page 80Driver assistance⇒ page 80Parking and manoeuvring⇒ page 81Vehicle lights⇒ page 81Rear vision mirrors and windscreen wipers⇒ page 82Opening and closing⇒ page 82Multifunction display⇒ page 83Date and time⇒ page 84Units⇒ page 84Service⇒ page 85Factory settings⇒ page 85
Any changes made using the settings menus are automatically saved on
closing those menus.
WARNING
Any distraction may lead to an accident, with the risk of injury. Operating
the Easy Connect system while driving could distract you from traffic.
ESC System menu
–Switch the ignition on.
Safety FirstOperating instructionsPractical TipsTechnical specifications
Page 81 of 289

80Introduction to the Easy Connect system*
–Switch on the Easy Connect system.
– Press the Easy Connect button
.
– Press the Setup
function button.
– Press the ESC System
function button to make changes to the
Electronic Stability Programme (ESC).
When the menu appears, choose the desired option.
Pressing the menu button
will always take you to the last menu used.
MenuSubmenuPossible settingDescription
Vehicle settings–Activation of the
Electronic Stability
Programme (ESC)⇒ page 183
Any changes made using the settings menus are automatically saved on
closing those menus.
WARNING
Any distraction may lead to an accident, with the risk of injury. Operating
the Easy Connect system while driving could distract you from traffic.
Tyre Settings menu
–Switch the ignition on.
– Switch on the Easy Connect system.
– Press the Easy Connect button
.
– Press the Setup
function button. –
Press the Tyre
button to open the Tyre settings menu.
When the function button check box is activated , the function is active.
Pressing the menu button
will always take you to the last menu used.
MenuSubmenuPossible settingDescription
Tyre settings
Tyre pressure
monitoringTyre pressure storing
(Calibration)⇒ page 175
Winter tyres
Speed warning acti-
vation and deactiva-
tion
Change the speed
warning value
⇒ page 149
Any changes made using the settings menus are automatically saved on
closing those menus.
WARNING
Any distraction may lead to an accident, with the risk of injury. Operating
the Easy Connect system while driving could distract you from traffic.
Driver Assistance settings menu
– Switch the ignition on.
– Switch on the Easy Connect system.
– Press the Easy Connect button
.
– Press the Setup
function button.
Page 82 of 289

81
Introduction to the Easy Connect system*
– Press the Driver assistance
function button to open the Driver as-
sistance settings menu.
When the function button check box is activated , the function is active.
Pressing the menu button
will always take you to the last menu used.
MenuSubmenuPossible settingDescription
Driver Assis-
tance settings
Lane Assist (sys-
tem warning you if
you leave the lane)Lane Centring Assist⇒ page 168
Tiredness detec-
tionActivation⇒ page 173
Any changes made using the settings menus are automatically saved on
closing those menus.
WARNING
Any distraction may lead to an accident, with the risk of injury. Operating
the Easy Connect system while driving could distract you from traffic.
Parking and Manoeuvring Settings menu
–Switch the ignition on.
– Switch on the Easy Connect system.
– Press the Easy Connect button
.
– Press the Setup
function button.
– Press the Parking and manoeuvring
button to open the Parking and
manoeuvring settings menu. When the function button check box is activated
, the function is active.
Pressing the menu button
will always take you to the last menu used.
MenuSubmenuPossible settingDescription
Parking and Ma-
noeuvring set-
tingsParkPilot
Automatically acti-
vate, front volume,
front sound settings,
rear volume, rear
sound settings, ad-
just volume.
⇒ page 178
Any changes made using the settings menus are automatically saved on
closing those menus.
WARNING
Any distraction may lead to an accident, with the risk of injury. Operating
the Easy Connect system while driving could distract you from traffic.
Light Settings menu
–Switch the ignition on.
– Switch on the Easy Connect system.
– Press the Easy Connect button
.
– Press the Setup
function button.
– Press the Lights
function button to open the Light settings
menu.
When the function button check box is activated , the function is active.
Safety FirstOperating instructionsPractical TipsTechnical specifications
Page 83 of 289

82Introduction to the Easy Connect system*
Pressing the menu button
will always take you to the last menu used.
MenuSubmenuPossible settingDescription
Light settings
Light Assist
Light Assist, sensitivity,
automatic light when
raining, daytime driving
lights, convenience turn
signals.
⇒ page
111
Vehicle interior
lightingInstrument and control
lighting, ambient door
lighting, footwell light-
ing.⇒ page
114
"Coming
home"/"Leaving
home" functionStart time for “Coming
home” function, start
time for “Leaving
home” function.⇒ page
113
Any changes made using the settings menus are automatically saved on
closing those menus.
WARNING
Any distraction may lead to an accident, with the risk of injury. Operating
the Easy Connect system while driving could distract you from traffic.
Rear Vision Mirror and Windscreen Wipers Settings menu
–Switch the ignition on.
– Switch on the Easy Connect system.
– Press the Easy Connect button
.
– Press the Setup
function button. –
Press the Visibility
function button to open the Visibility settings
menu.
When the function button check box is activated , the function is active.
Pressing the menu button
will always take you to the last menu used.
MenuSubmenuPossible settingDescription
Visibility settings
Rear vision mir-
rorsSynchronised regu-
lation, lower when
reversing, fold in af-
ter parking.
⇒ page 122
Windscreen wip-
ersAutomatic wind-
screen wipers, wipe
when reversing.⇒ page 116
Any changes made using the settings menus are automatically saved on
closing those menus.
WARNING
Any distraction may lead to an accident, with the risk of injury. Operating
the Easy Connect system while driving could distract you from traffic.
Opening and Closing Settings menu
–Switch the ignition on.
– Switch on the Easy Connect system.
– Press the Easy Connect button
.
– Press the Setup
function button.