2012 Seat Exeo lock
[x] Cancel search: lockPage 73 of 317

71
Cockpit
When the engine is warm, or at outside temperatures above +8 °C, the
warning lamp will only light up very briefly.
Note
● If the glow plug indicator lamp should start flashing while the vehicle is
moving, this indicates a fault in the engine management system. The en-
gine should be serviced without delay.
● If the indicator lamp fails to light up when the ignition is switched on,
this can mean that the glow plug system is defective. The engine should be
serviced.
Brake system
The warning lamp flashes when the handbrake is applied, or
if the brake fluid level is too low or if there is a fault in the
ABS system. If the warning lamp flashes (and the handbrake is not applied), stop the
vehicle and check the brake fluid level ⇒
⇒ page 236.
If a failure should occur in the ABS, the ABS warning lamp will light up
together with the brake warning lamp ⇒
.
Handbrake on
The warning lamp also lights up when the handbrake is applied. In addi-
tion to this, the handbrake warning ⇒ page 77 switches on after driving
for 3 seconds at a speed above 5 km/h.
WARNING
● Before opening the bonnet and checking the brake fluid level, ob-
serve the warning information in ⇒ page 227, Work in the engine com-
partment.
● If the brake warning lamp does not go out, or if it lights up when driv-
ing, the brake fluid level in the reservoir is too low and this may cause an
increased accident risk. Stop the vehicle and do not drive on. Obtain
technical assistance.
● If the brake warning lamp lights up together with the ABS warning
lamp, this can mean that there is a fault in the ABS control function. As a
result, the rear wheels can lock relatively easily when braking. Under cer-
tain circumstances, the rear of the vehicle could suddenly sway from side
to side, with the subsequent danger of skidding. Drive carefully to the
nearest specialised workshop and have the fault repaired.
Safety FirstOperating InstructionsPractical TipsTechnical Specifications
Page 81 of 317

79
Cockpit
WARNING
● Before opening the bonnet and checking the brake fluid level, ob-
serve the warning information in ⇒ page 227, Work in the engine com-
partment.
● If the brake fluid level in the reservoir is too low, this could result in
an accident. Do not drive on! Obtain technical assistance.
● If the brake warning lamp lights up together with the ABS warning
lamp, this can mean that there is a fault in the ABS control function. As a
result, the rear wheels can lock relatively easily when braking. Under cer-
tain circumstances, the rear of the vehicle could suddenly sway from side
to side, with the subsequent danger of skidding. Drive carefully to the
nearest specialised workshop and have the fault repaired.
Fault in the cooling system
Faults in the cooling system must be repaired immediately.
If the symbol flashes in the display, this means that either the
coolant temperature is too high or the coolant level is too low. The
following message will appear in the display together with the
symbol:
Switch off engine and check coolant level
– Stop the vehicle.
– Switch the engine off.
– Check the coolant level ⇒ page 232.
– Add more coolant if necessary ⇒ page 233.
– Wait for the symbol to go out before driving on. –
Obtain professional assistance if necessary.
If the coolant level is correct, the overheating may be caused by a malfunc-
tion of the radiator fan.
If the alternator warning lamp lights up as well ⇒ page 70, it is possible that
the drive belt has broken.
CAUTION
Do not drive on if the symbol has come on to indicate a fault in the cool-
ing system, otherwise there is a risk of engine damage.
Engine oil pressure too low
If the engine oil pressure is too low the fault must be re-
paired immediately.
If the symbol flashes in the display, the oil pressure is too low.
The following message will appear in the display together with the
symbol:
Switch off engine, check oil level
– Stop the vehicle.
– Switch the engine off.
– Check the engine oil level ⇒ page 230.
– Obtain professional assistance if necessary.
Engine oil level too low
If the engine oil level is too low, add more oil ⇒ page 231.
Safety FirstOperating InstructionsPractical TipsTechnical Specifications
Page 87 of 317

85
Cockpit
– Press the CHECK button for at least two seconds.
The speed warning symbol lights up briefly in the display when the but-
ton is released to confirm that the selected speed has been stored. The
speed limit that has been selected remains stored until another speed is se-
lected with a brief push of the button, or until the memory is cleared with a
long push of the button.
Setting speed limit warning 2
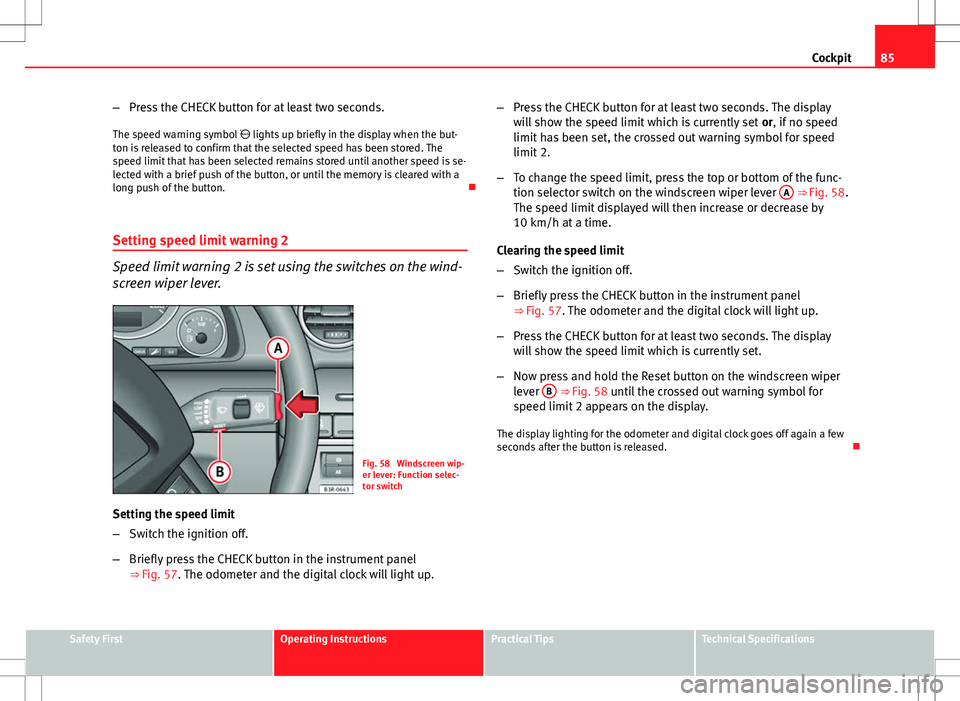
Speed limit warning 2 is set using the switches on the wind-
screen wiper lever.
Fig. 58 Windscreen wip-
er lever: Function selec-
tor switch
Setting the speed limit
– Switch the ignition off.
– Briefly press the CHECK button in the instrument panel
⇒ Fig. 57. The odometer and the digital clock will light up. –
Press the CHECK button for at least two seconds. The display
will show the speed limit which is currently set or, if no speed
limit has been set, the crossed out warning symbol for speed
limit 2.
– To change the speed limit, press the top or bottom of the func-
tion selector switch on the windscreen wiper lever A
⇒ Fig. 58.
The speed limit displayed will then increase or decrease by
10 km/h at a time.
Clearing the speed limit
– Switch the ignition off.
– Briefly press the CHECK button in the instrument panel
⇒ Fig. 57. The odometer and the digital clock will light up.
– Press the CHECK button for at least two seconds. The display
will show the speed limit which is currently set.
– Now press and hold the Reset button on the windscreen wiper
lever B
⇒ Fig. 58 until the crossed out warning symbol for
speed limit 2 appears on the display.
The display lighting for the odometer and digital clock goes off again a few
seconds after the button is released.
Safety FirstOperating InstructionsPractical TipsTechnical Specifications
Page 89 of 317

87
Cockpit
Driving time warning
After 2 hours of continuous driving, the display automatically switches over
to the driving time display of 2:00. At the same time the driving time display
starts flashing. This is to remind the driver to take a break.
The driving time warning can be switched off by briefly pressing the func-
tion selector switch or the Reset
button ⇒ Fig. 60.
If you continue driving or take a break for less than 10 minutes, the driving
time warning will switch on once again when the total driving time is 4:00
hours, 6:00 hours, etc. However, if you take a break for more than 10 mi-
nutes, the driving time warning clock will be erased.
Distance covered
This display shows the distance you have covered since the memory was
last cancelled. The longest possible distance which can be recorded is
9999.9 km.
Note
● The displays for fuel consumption (average and instantaneous), dis-
tance to empty and speed are shown in metric units.
● The information in the memory is lost if the battery is disconnected. Operation
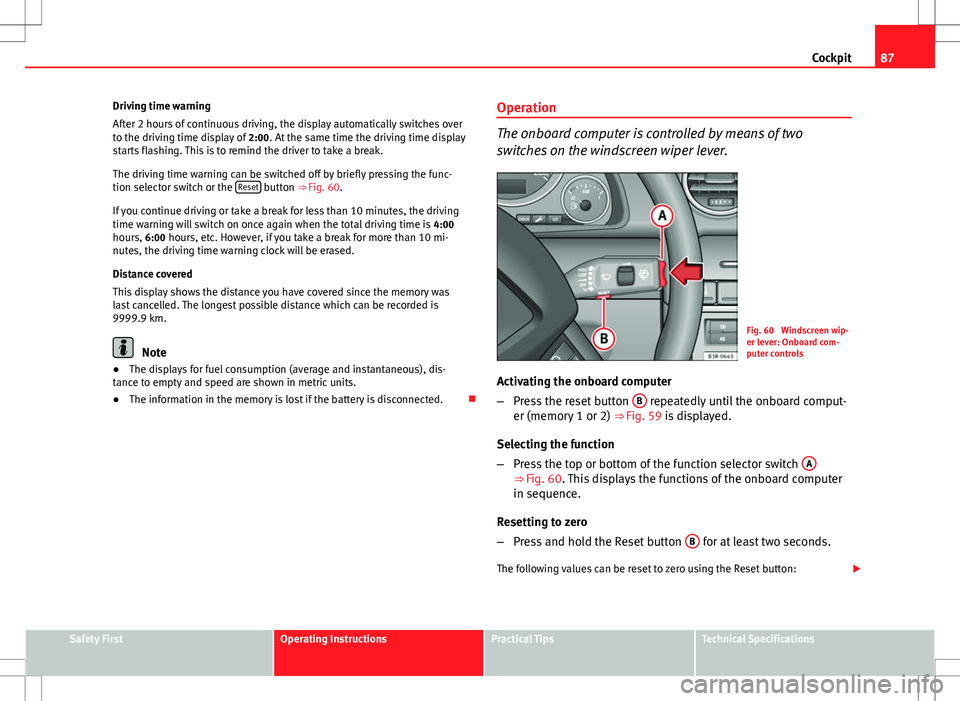
The onboard computer is controlled by means of two
switches on the windscreen wiper lever.
Fig. 60 Windscreen wip-
er lever: Onboard com-
puter controls
Activating the onboard computer
– Press the reset button B
repeatedly until the onboard comput-
er (memory 1 or 2) ⇒ Fig. 59 is displayed.
Selecting the function
– Press the top or bottom of the function selector switch A
⇒ Fig. 60. This displays the functions of the onboard computer
in sequence.
Resetting to zero
– Press and hold the Reset button B
for at least two seconds.
The following values can be reset to zero using the Reset button:
Safety FirstOperating InstructionsPractical TipsTechnical Specifications
Page 91 of 317

89
Cockpit
Menu display
Introduction
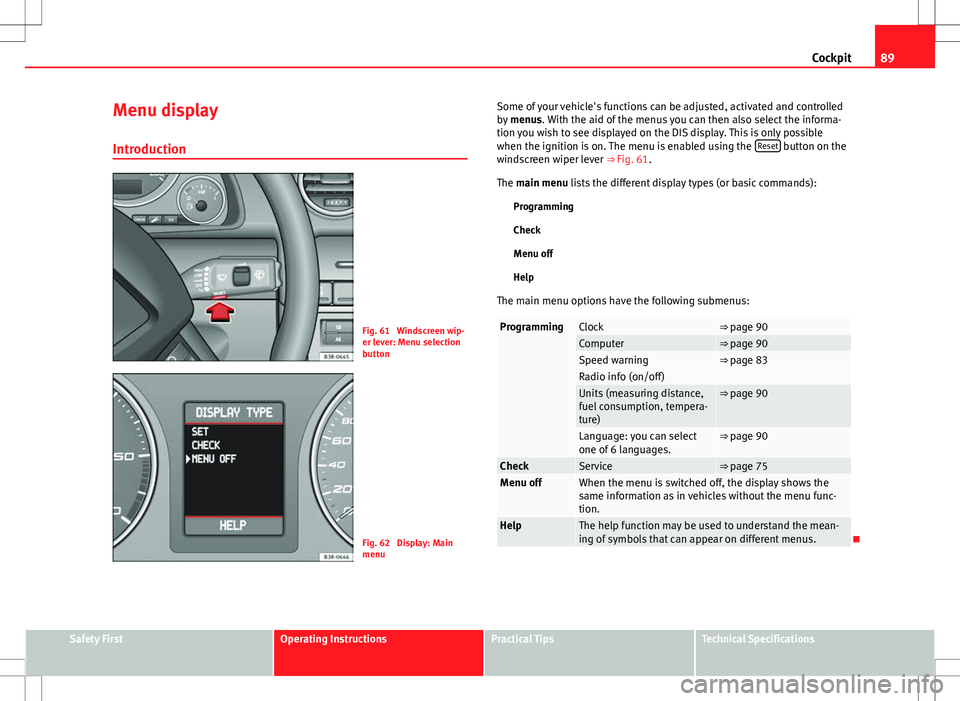
Fig. 61 Windscreen wip-
er lever: Menu selection
button
Fig. 62 Display: Main
menu Some of your vehicle's functions can be adjusted, activated and controlled
by
menus. With the aid of the menus you can then also select the informa-
tion you wish to see displayed on the DIS display. This is only possible
when the ignition is on. The menu is enabled using the Reset
button on the
windscreen wiper lever ⇒ Fig. 61.
The main menu lists the different display types (or basic commands):
Programming
Check
Menu off
Help
The main menu options have the following submenus:
ProgrammingClock⇒ page 90Computer⇒ page 90Speed warning⇒ page 83Radio info (on/off) Units (measuring distance,
fuel consumption, tempera-
ture)⇒ page 90
Language: you can select
one of 6 languages.⇒ page 90
CheckService⇒ page 75Menu offWhen the menu is switched off, the display shows the
same information as in vehicles without the menu func-
tion.
HelpThe help function may be used to understand the mean-
ing of symbols that can appear on different menus.
Safety FirstOperating InstructionsPractical TipsTechnical Specifications
Page 95 of 317

93
Steering wheel controls
Steering wheel audio version controls
AB(Mode)C(PTT)D+-Press+-Press
Radio modeStation search.
Increase frequen- cyStation search.Decrease fre- quencyPress once: starts the search.
Press twice: can- cels the searchLong press:
block the steering wheel controls
Short press:
activates the steering wheel controls (if
they are blocked /
without specific func- tion (if they are not blocked)
No functionspecified
Volume upVolume downMUTE
CD/
iPod-USB ModeCD mode: next track.
iPod/USB Mode: next trackCD mode: previ-ous track.
iPod/USB Mode: previous trackCD mode: fast for- ward.
iPod/USB Mode: fast forward
Volume upVolume downMUTE
MP3
modeNext trackPrevious trackFast forwardVolume upVolume downMUTE
Safety FirstOperating InstructionsPractical TipsTechnical Specifications
Page 99 of 317

97
Unlocking and locking
Unlocking and locking
Remote control keys Set of keys
Fig. 66 Set of keys sup-
plied with the vehicle
Fig. 67 Remote control
key: Release button
The set of keys belonging to your vehicle consists of the following items: one remote control key.
one key without remote control.
a plastic key tab*.
Remote control key
The remote control key will lock and unlock the vehicle and start the engine.
Press the release button ⇒ Fig. 67 (arrow) to make the key spring out of the
handle and to fold it back in.
Replacing a key
If you lose a key, please contact the Technical Service. Have the remote con-
trol coding for that key disabled. You should therefore bring the plastic key
tab* and all available keys with you. It is also important to notify your insur-
ance company if a key or the plastic key tab has been lost.
A
BC
Safety FirstOperating InstructionsPractical TipsTechnical Specifications
Page 100 of 317

98Unlocking and locking
2 remote control keys
In certain European markets, vehicles with alarm are equipped with 2 re-
mote control keys.
WARNING
● Always take the key with you when leaving the vehicle, even if you
only intend to be gone for a short time. This is particularly important if
there are children in the vehicle, as they might otherwise be able to start
the engine or use power-operated equipment (e.g. the electric windows),
which could cause injuries.
● Wait for the vehicle to come to a standstill before removing the igni-
tion key from the lock! Otherwise, the steering lock could engage sud-
denly, causing an accident.
Indicator light on the remote control key
The condition of the battery in the remote control key is
monitored by the indicator light.
Fig. 68 LED on the re-
mote control key Condition of the key battery
The indicator light
⇒ Fig. 68 (arrow) flashes when one of the buttons is
pressed. If the indicator light does not light up or flash, this means that the
battery is exhausted and must be replaced.
Replacing the batteries ⇒ page 98.
Replacing the key battery
Fig. 69 Master key:
Opening the cover
We recommend you have the batteries changed in a specialised
workshop. If you decide to change the used battery yourself, follow
the steps below:
– Carefully prise apart the key ⇒ Fig. 69 A
and the cover B us-
ing a coin.
– Remove the cover in the direction of the arrow.
– Remove the used battery from the cover.