2012 RENAULT WIND ROADSTER wheel
[x] Cancel search: wheelPage 127 of 185

5.1
ENG_UD29999_7
Sommaire 5 (E33 - X33 - Renault)
ENG_NU_865-6_E33_Renault_5
Section 5: Practical advice
Puncture . . . . . . . . . . . . . . . . . . . . . . . . . . . . . . . . . . . . . . . . . . . . . . . . . . . . . . . . . . . . . . . . . . . . . . 5.2
Emergency spare wheel . . . . . . . . . . . . . . . . . . . . . . . . . . . . . . . . . . . . . . . . . . . . . . . . . . . . . . . . . . 5.2
Tyre inflation kit . . . . . . . . . . . . . . . . . . . . . . . . . . . . . . . . . . . . . . . . . . . . . . . . . . . . . . . . . . . . . . . . . 5.3
Tool kit (jack, wheelbrace, etc.) . . . . . . . . . . . . . . . . . . . . . . . . . . . . . . . . . . . . . . . . . . . . . . . . . . . . . 5.6
Wheel trim . . . . . . . . . . . . . . . . . . . . . . . . . . . . . . . . . . . . . . . . . . . . . . . . . . . . . . . . . . . . . . . . . . . . . 5.6
Changing a wheel . . . . . . . . . . . . . . . . . . . . . . . . . . . . . . . . . . . . . . . . . . . . . . . . . . . . . . . . . . . . . . . 5.7
Tyres (tyre and wheel safety, use in winter) . . . . . . . . . . . . . . . . . . . . . . . . . . . . . . . . . . . . . . . . . . . 5.9
Rear lights (changing bulbs) . . . . . . . . . . . . . . . . . . . . . . . . . . . . . . . . . . . . . . . . . . . . . . . . . . . . . . . 5.14
Indicator lights (changing bulbs) . . . . . . . . . . . . . . . . . . . . . . . . . . . . . . . . . . . . . . . . . . . . . . . . . . . . 5.15
Interior lights (changing bulbs) . . . . . . . . . . . . . . . . . . . . . . . . . . . . . . . . . . . . . . . . . . . . . . . . . . . . . 5.17
Fuses . . . . . . . . . . . . . . . . . . . . . . . . . . . . . . . . . . . . . . . . . . . . . . . . . . . . . . . . . . . . . . . . . . . . . . . . . 5.19
Battery . . . . . . . . . . . . . . . . . . . . . . . . . . . . . . . . . . . . . . . . . . . . . . . . . . . . . . . . . . . . . . . . . . . . . . . . 5.22
Key, radio frequency remote control: battery . . . . . . . . . . . . . . . . . . . . . . . . . . . . . . . . . . . . . . . . . . . 5.24
Accessories . . . . . . . . . . . . . . . . . . . . . . . . . . . . . . . . . . . . . . . . . . . . . . . . . . . . . . . . . . . . . . . . . . . . 5.25
Wipers (replacing blades) . . . . . . . . . . . . . . . . . . . . . . . . . . . . . . . . . . . . . . . . . . . . . . . . . . . . . . . . . 5.26
Towing . . . . . . . . . . . . . . . . . . . . . . . . . . . . . . . . . . . . . . . . . . . . . . . . . . . . . . . . . . . . . . . . . . . . . . . . 5.27
Operating faults . . . . . . . . . . . . . . . . . . . . . . . . . . . . . . . . . . . . . . . . . . . . . . . . . . . . . . . . . . . . . . . . . 5.28
Page 128 of 185

emergency spare wheel ....................... (up to the end of the DU)
puncture ................................................ (up to the end of the DU)
5.2
ENG_UD24632_3
Roue de secours (E33 - X33 - Renault)
ENG_NU_865-6_E33_Renault_5
Puncture
Emergency spare wheel
Puncture, emergency sP are WHeeL
In the event of a puncture,
depending on the vehicle,
you will have:
An emergency spare wheel or tyre in -
flation kit (refer to the information on the
following pages).
emergency spare wheel
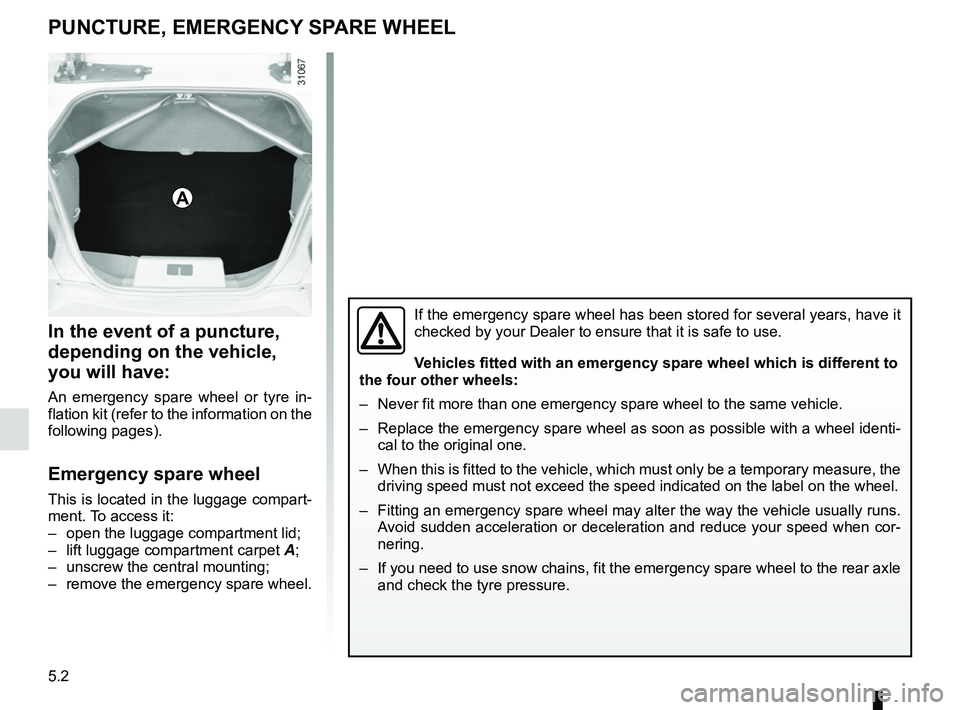
This is located in the luggage compart-
ment. To access it:
– open the luggage compartment lid;
– lift luggage compartment carpet A;
– unscrew the central mounting;
– remove the emergency spare wheel.
If the emergency spare wheel has been stored for several years, have it
checked by your Dealer to ensure that it is safe to use.
Vehicles fitted with an emergency spare wheel which is different to
the four other wheels:
– Never fit more than one emergency spare wheel to the same vehicle.
– Replace the emergency spare wheel as soon as possible with a wheel identi -
cal to the original one.
– When this is fitted to the vehicle, which must only be a temporary measure, the
driving speed must not exceed the speed indicated on the label on the wh\
eel.
– Fitting an emergency spare wheel may alter the way the vehicle usually runs.
Avoid sudden acceleration or deceleration and reduce your speed when cor-
nering.
– If you need to use snow chains, fit the emergency spare wheel to the rear axle
and check the tyre pressure.
a
Page 129 of 185

tyre inflation kit...................................... (up to the end of the DU)
5.3
ENG_UD28665_3
Kit de gonflage des pneumatiques (X77 - X85 - B85 - C85 - S85 - X77 ph2\
- K85 - X95 - E95 - X67 - X92 - X10 - X98 - X52 - Renault)
ENG_NU_865-6_E33_Renault_5
Tyre inflation kit
tyre Pressure KIt (1/3)
The kit is only approved for
inflating the tyres of the ve-
hicle originally equipped
with the kit.
It must never be used to inflate
the tyres of another vehicle, or any
other inflatable object (rubber ring,
rubber boat, etc.).
Avoid spillage on skin when han -
dling the repair liquid bottle. If drop-
lets do leak out, rinse them off with
plenty of water.
Keep the repair kit away from chil -
dren.
Do not dispose of the empty bottle
in the countryside. Return it to your
approved dealer or to a recycling or-
ganisation.
The bottle has a limited service
life which is indicated on its label.
Check the expiry date.
Contact an approved dealer to re -
place the inflation tube and repair
product bottle.
a
B
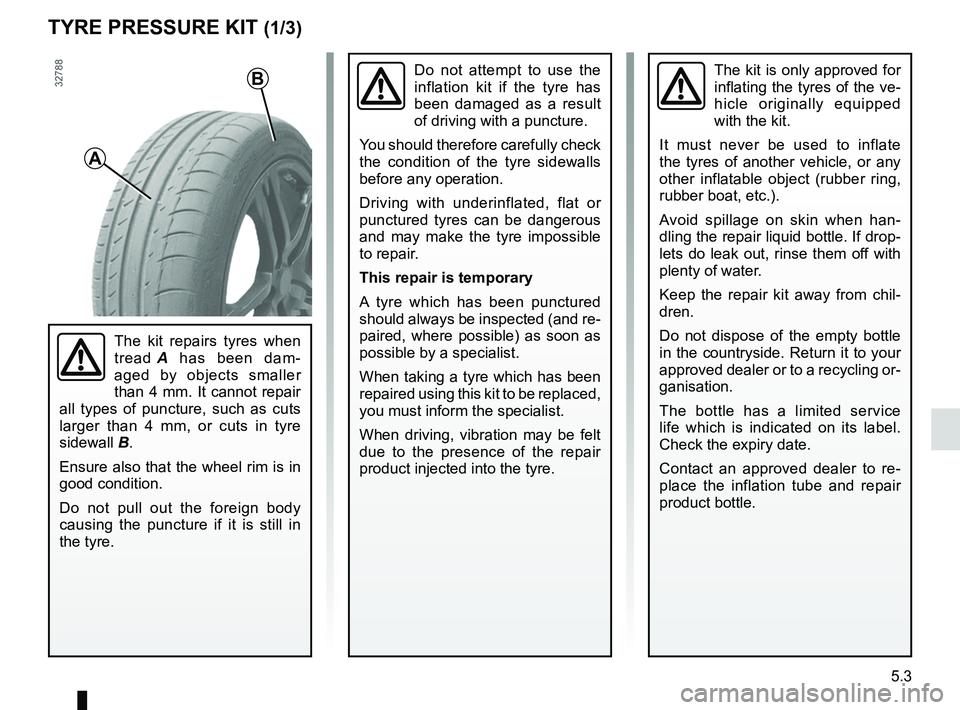
The kit repairs tyres when
tread A has been dam -
aged by objects smaller
than 4 mm. It cannot repair
all types of puncture, such as cuts
larger than 4 mm, or cuts in tyre
sidewall B.
Ensure also that the wheel rim is in
good condition.
Do not pull out the foreign body
causing the puncture if it is still in
the tyre.
Do not attempt to use the
inflation kit if the tyre has
been damaged as a result
of driving with a puncture.
You should therefore carefully check
the condition of the tyre sidewalls
before any operation.
Driving with underinflated, flat or
punctured tyres can be dangerous
and may make the tyre impossible
to repair.
this repair is temporary
A tyre which has been punctured
should always be inspected (and re-
paired, where possible) as soon as
possible by a specialist.
When taking a tyre which has been
repaired using this kit to be replaced,
you must inform the specialist.
When driving, vibration may be felt
due to the presence of the repair
product injected into the tyre.
Page 130 of 185

5.4
ENG_UD28665_3
Kit de gonflage des pneumatiques (X77 - X85 - B85 - C85 - S85 - X77 ph2\
- K85 - X95 - E95 - X67 - X92 - X10 - X98 - X52 - Renault)
ENG_NU_865-6_E33_Renault_5
Jaune NoirNoir texte
tyre Pressure KIt (2/3)
Depending on the vehicle, in the event
of a puncture, use the kit located in the
boot or underneath the luggage com -
partment carpet.
With the engine running and the
parking brake applied,
– unroll the hose from the container;
– connect the compressor hose 3 to
the container’s inlet 8;
– depending on the vehicle, connect
the container 8 to the compressor
from the container recess 7;
– unscrew the valve cap on the rel -
evant wheel and screw on the con -
tainer’s inflation adapter 1;
– adapter 2 must be connected to the
vehicle accessories socket;
– press switch 4 to inflate the tyre to
the recommended pressure (please
refer to the information in the section
on “Tyre pressure”);
45
1
Before using this kit, park
the vehicle at a sufficient
distance from traffic, switch
on the hazard warning
lights, apply the handbrake, ask all
passengers to leave the vehicle and
keep them away from traffic.
8
If the vehicle is parked on
the hard shoulder, you must
warn other road users of
your vehicle’s presence
with a warning triangle or with other
devices as per the legislation apply-
ing to the country you are in.
– after a maximum of 15 minutes, stop
inflating and read the pressure (on
pressure gauge 5).
n ote: while the container is empty -
ing (approximately 30 seconds), the
pressure gauge 5 will briefly indicate
a pressure of up to 6 bar. The pres-
sure will then drop.
– adjust the pressure: to increase
it, continue inflation with the kit; to
reduce it, press button 6.
If a minimum pressure of 1.8 bar is
not reached after 15 minutes, repair
is not possible; do not drive the ve-
hicle but contact an approved dealer.
2
3
7
6
Page 132 of 185

tool kit ................................................... (up to the end of the DU)
hubcap tool ........................................... (up to the end of the DU)
jack ....................................................... (up to the end of the DU)
puncture ................................................ (up to the end of the DU)
wheelbrace ........................................... (up to the end of the DU)
trims ...................................................... (up to the end of the DU)
emergency spare wheel ....................... (up to the end of the DU)
wheelbrace ............................................................ (current page)
5.6
ENG_UD20555_2
Bloc-outils (E33 - X33 - Renault)
ENG_NU_865-6_E33_Renault_5
Tool kit (jack, wheelbrace, etc.)
Hubcap
t OOL KIt/WHeeL trIm – WHeeL
The tool kit is located in the luggage
compartment: lift the luggage compart-
ment carpet then unscrew the central
mounting.
The tools included in the tool kit depend
on the vehicle.
Wheelbrace 1
This is used to tighten or release the
wheel bolts.
towing hitch 2
Refer to the information on “Towing” in
Section 5.
Jack 3
When replacing the jack, fold it cor -
rectly and position the wheelbrace cor-
rectly before replacing it in its position.
Hubcap tool 4
This tool is used to remove the wheel
trims.
Do not leave the tools un -
secured inside the vehicle
as they may come loose
under braking. After use,
check that all the tools are correctly
clipped into the tool kit, then position
it correctly in its housing: there is a
risk of injury.
If wheel bolts are supplied in the
tool kit, only use these bolts for the
emergency spare wheel: refer to the
label affixed to the emergency spare
wheel.
The jack is designed for wheel
changing purposes only. Under no
circumstances should it be used for
carrying out repairs underneath the
vehicle or to gain access to the un-
derside of the vehicle.
1
23
4
Page 133 of 185

changing a wheel.................................. (up to the end of the DU)
puncture ................................................ (up to the end of the DU)
lifting the vehicle changing a wheel ............................ (up to the end of the DU)
5.7
ENG_UD22214_3
Changement de roue (E33 - X33 - Renault)
ENG_NU_865-6_E33_Renault_5
Changing a wheel
cHangIng a WHeeL (1/2)
Vehicles equipped with
jack, wheelbrace and wheel
wrench
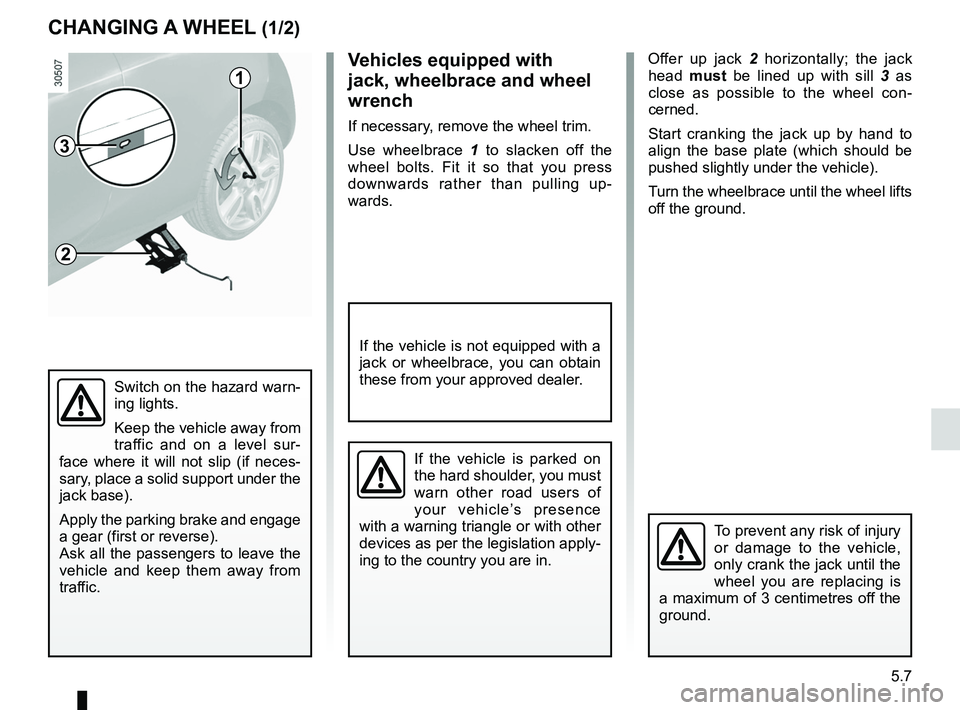
If necessary, remove the wheel trim.
Use wheelbrace 1 to slacken off the
wheel bolts. Fit it so that you press
downwards rather than pulling up -
wards.
Switch on the hazard warn-
ing lights.
Keep the vehicle away from
traffic and on a level sur -
face where it will not slip (if neces -
sary, place a solid support under the
jack base).
Apply the parking brake and engage
a gear (first or reverse).
Ask all the passengers to leave the
vehicle and keep them away from
traffic.
1
2
3
To prevent any risk of injury
or damage to the vehicle,
only crank the jack until the
wheel you are replacing is
a maximum of 3 centimetres off the
ground.
If the vehicle is parked on
the hard shoulder, you must
warn other road users of
your vehicle’s presence
with a warning triangle or with other
devices as per the legislation apply-
ing to the country you are in.
Offer up jack 2 horizontally; the jack
head must be lined up with sill 3 as
close as possible to the wheel con -
cerned.
Start cranking the jack up by hand to
align the base plate (which should be
pushed slightly under the vehicle).
Turn the wheelbrace until the wheel lifts
off the ground.
If the vehicle is not equipped with a
jack or wheelbrace, you can obtain
these from your approved dealer.
Page 134 of 185

5.8
ENG_UD22214_3
Changement de roue (E33 - X33 - Renault)
ENG_NU_865-6_E33_Renault_5
Undo the bolts and take off the wheel.
Fit the emergency spare wheel onto
the hub and rotate it until the mount -
ing holes in the wheel are aligned with
those of the hub.
If bolts are supplied with the emergency
spare wheel, only use these bolts for
the emergency spare wheel. Tighten
the bolts, checking that the wheel is
correctly positioned on its hub and
lower the jack.
With the wheel on the ground, tighten
the bolts fully and have the tightness
of the bolts checked (tightening torque:
105 N.m) and the emergency spare
wheel pressure checked as soon as
possible.
cHangIng a WHeeL (2/2)
If you have a puncture, re -
place the wheel as soon as
possible.
A tyre which has been punc-
tured should always be inspected
(and repaired, where possible) by a
specialist.
Page 135 of 185

tyres ...................................................... (up to the end of the DU)
wheels (safety) ..................................... (up to the end of the DU)
5.9
ENG_UD11227_1
Pneumatiques (E33 - X33 - Renault)
ENG_NU_865-6_E33_Renault_5
Tyres (tyre and wheel safety, use in winter)
tyres (1/3)
maintaining the tyres
The tyres must be in good condition
and the tread form must have sufficient
depth; tyres approved by our techni -
cal department have tread wear indica -
tors 1 which are indicators moulded
into the tread at several points .
tyre and wheel safety
The tyres are the only contact between
the vehicle and the road, so it is essen-
tial to keep them in good condition.
You must make sure that your tyres
conform to local road traffic regulations. When the tyre tread has been worn to
the level of the wear indicators,
they
become visible 2: it is then necessary
to replace your tyres because the tread
rubber is no more than 1.6 mm deep,
resulting in poor roadholding on wet
roads.
An overloaded vehicle, long journeys
by motorway, particularly in very hot
weather, or continual driving on poorly
surfaced minor roads will lead to more
rapid tyre wear and affect safety.
When they need to be re -
placed, only tyres of the
same make, size, type and
profile should be used.
t yres fitted to the vehicle should
either be identical to those fitted
originally or conform to those
recommended by your approved
dealer.
Incidents which occur when
driving, such as striking the
kerb, may damage the tyres
and wheel rims, and could
also lead to misalignment of the
front or rear axle geometry. In this
case, have the condition of these
checked by an approved dealer.
1
2