2012 RENAULT WIND ROADSTER brake
[x] Cancel search: brakePage 118 of 185

brake fluid .............................................................. (current page)
levels: brake fluid ........................................................ (current page)
tanks and reservoirs brake fluid ........................................................ (current page)
4.8
ENG_UD20479_2
Niveaux / filtres (E33 - X33 - Renault)
ENG_NU_865-6_E33_Renault_4
Jaune NoirNoir texte
brake fluid
levelS (2/3)
Brake fluid level
This should be checked frequently,
and immediately if you notice even the
slightest loss in braking efficiency.
The level should be read with the engine
switched off and on level ground. level 2
It is normal for the level to drop as the
brake shoes become worn, but it must
never drop lower than the
“Min” warn-
ing line.
If you wish to check the disc and drum
wear yourself, you should obtain the
document explaining the checking pro-
cedure from our network or from the
manufacturer’s website. t
opping up
After any operation on the hydraulic cir-
cuit, a specialist must replace the fluid.
Only use fluids approved by our
Technical Department (and taken from
a sealed container).
Replacement intervals
Refer to the Maintenance Document for
your vehicle.
The engine may be hot
when working in close prox-
imity. In addition, the engine
cooling fan may start at any
moment.
Risk of injury.When working in the engine
compartment, ensure that
the windscreen wiper stalk
is in the park position.
Risk of injury.
2
Page 130 of 185

5.4
ENG_UD28665_3
Kit de gonflage des pneumatiques (X77 - X85 - B85 - C85 - S85 - X77 ph2\
- K85 - X95 - E95 - X67 - X92 - X10 - X98 - X52 - Renault)
ENG_NU_865-6_E33_Renault_5
Jaune NoirNoir texte
tyre Pressure KIt (2/3)
Depending on the vehicle, in the event
of a puncture, use the kit located in the
boot or underneath the luggage com -
partment carpet.
With the engine running and the
parking brake applied,
– unroll the hose from the container;
– connect the compressor hose 3 to
the container’s inlet 8;
– depending on the vehicle, connect
the container 8 to the compressor
from the container recess 7;
– unscrew the valve cap on the rel -
evant wheel and screw on the con -
tainer’s inflation adapter 1;
– adapter 2 must be connected to the
vehicle accessories socket;
– press switch 4 to inflate the tyre to
the recommended pressure (please
refer to the information in the section
on “Tyre pressure”);
45
1
Before using this kit, park
the vehicle at a sufficient
distance from traffic, switch
on the hazard warning
lights, apply the handbrake, ask all
passengers to leave the vehicle and
keep them away from traffic.
8
If the vehicle is parked on
the hard shoulder, you must
warn other road users of
your vehicle’s presence
with a warning triangle or with other
devices as per the legislation apply-
ing to the country you are in.
– after a maximum of 15 minutes, stop
inflating and read the pressure (on
pressure gauge 5).
n ote: while the container is empty -
ing (approximately 30 seconds), the
pressure gauge 5 will briefly indicate
a pressure of up to 6 bar. The pres-
sure will then drop.
– adjust the pressure: to increase
it, continue inflation with the kit; to
reduce it, press button 6.
If a minimum pressure of 1.8 bar is
not reached after 15 minutes, repair
is not possible; do not drive the ve-
hicle but contact an approved dealer.
2
3
7
6
Page 133 of 185
changing a wheel.................................. (up to the end of the DU)
puncture ................................................ (up to the end of the DU)
lifting the vehicle changing a wheel ............................ (up to the end of the DU)
5.7
ENG_UD22214_3
Changement de roue (E33 - X33 - Renault)
ENG_NU_865-6_E33_Renault_5
Changing a wheel
cHangIng a WHeeL (1/2)
Vehicles equipped with
jack, wheelbrace and wheel
wrench
If necessary, remove the wheel trim.
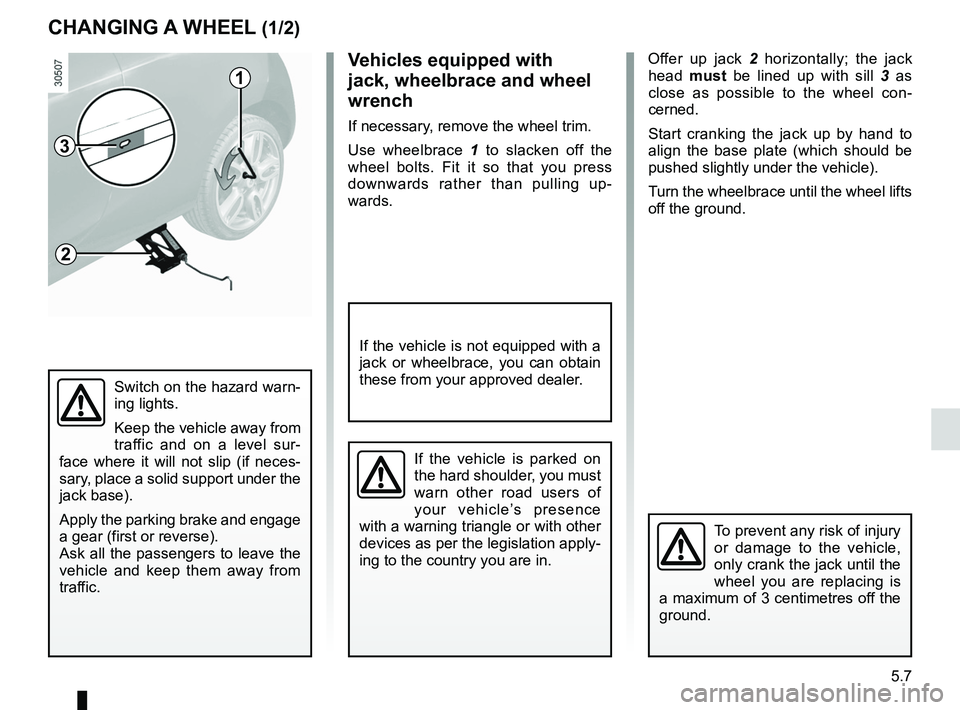
Use wheelbrace 1 to slacken off the
wheel bolts. Fit it so that you press
downwards rather than pulling up -
wards.
Switch on the hazard warn-
ing lights.
Keep the vehicle away from
traffic and on a level sur -
face where it will not slip (if neces -
sary, place a solid support under the
jack base).
Apply the parking brake and engage
a gear (first or reverse).
Ask all the passengers to leave the
vehicle and keep them away from
traffic.
1
2
3
To prevent any risk of injury
or damage to the vehicle,
only crank the jack until the
wheel you are replacing is
a maximum of 3 centimetres off the
ground.
If the vehicle is parked on
the hard shoulder, you must
warn other road users of
your vehicle’s presence
with a warning triangle or with other
devices as per the legislation apply-
ing to the country you are in.
Offer up jack 2 horizontally; the jack
head must be lined up with sill 3 as
close as possible to the wheel con -
cerned.
Start cranking the jack up by hand to
align the base plate (which should be
pushed slightly under the vehicle).
Turn the wheelbrace until the wheel lifts
off the ground.
If the vehicle is not equipped with a
jack or wheelbrace, you can obtain
these from your approved dealer.
Page 140 of 185
bulbschanging ......................................... (up to the end of the DU)
changing a bulb .................................... (up to the end of the DU)
lights: direction indicators ........................................... (current page)
lights: side lights ......................................................... (current page)
lights: brake lights ...................................................... (current page)
lights: reversing lights ................................................. (current page)
lights: fog lights .......................................................... (current page)
indicators: direction indicators ........................................... (current page)
bulbs changing ......................................... (up to the end of the DU)
5.14
ENG_UD11230_1
Feux arrière et latéraux : remplacement des lampes (E33 - X33 - R\
enault)
ENG_NU_865-6_E33_Renault_5
Jaune NoirNoir texte
Rear lights (changing bulbs)
rear LIgHts and sIde LIgHts: changing bulbs (1/3)
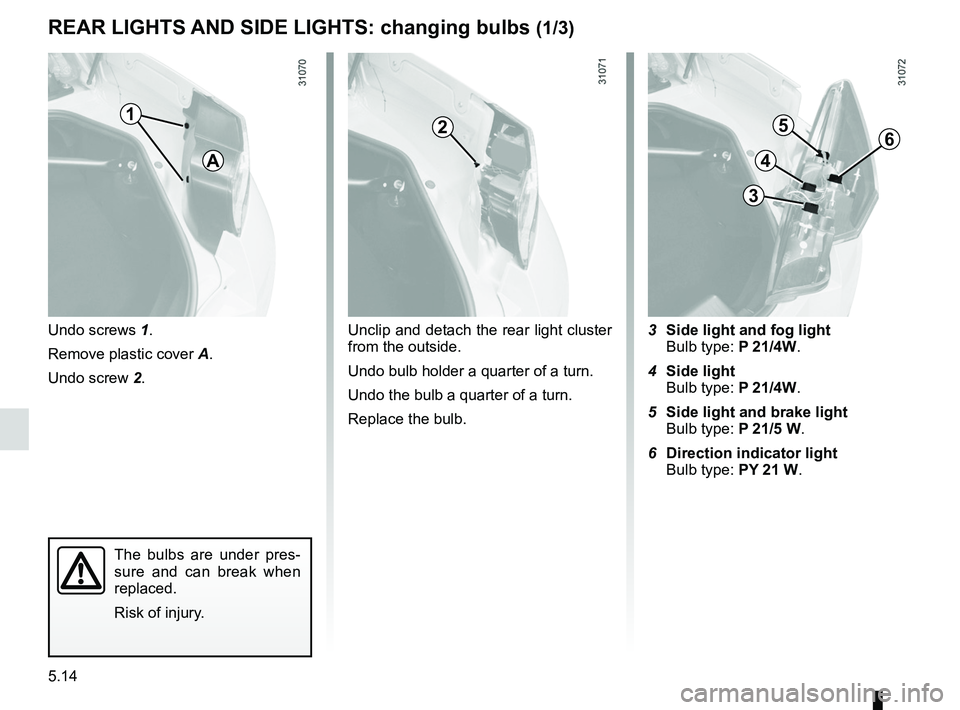
Undo screws 1.
Remove plastic cover A.
Undo screw 2. Unclip and detach the rear light cluster
from the outside.
Undo bulb holder a quarter of a turn.
Undo the bulb a quarter of a turn.
Replace the bulb. 3
side light and fog light
Bulb type: P 21/4W.
4 side light Bulb type: P 21/4W.
5 side light and brake light
Bulb type: P 21/5 W.
6 direction indicator light
Bulb type: Py 21 W.
12
3
4
56
The bulbs are under pres -
sure and can break when
replaced.
Risk of injury.
a
Page 141 of 185
side indicator lightschanging bulbs ................................................. (current page)
lights: number plate lights .......................................... (current page)
JauneNoirNoir texte
5.15
ENG_UD11230_1
Feux arrière et latéraux : remplacement des lampes (E33 - X33 - R\
enault)
ENG_NU_865-6_E33_Renault_5
Indicator lights (changing bulbs)
rear LIgHts and sIde LIgHts: changing bulbs (2/3)
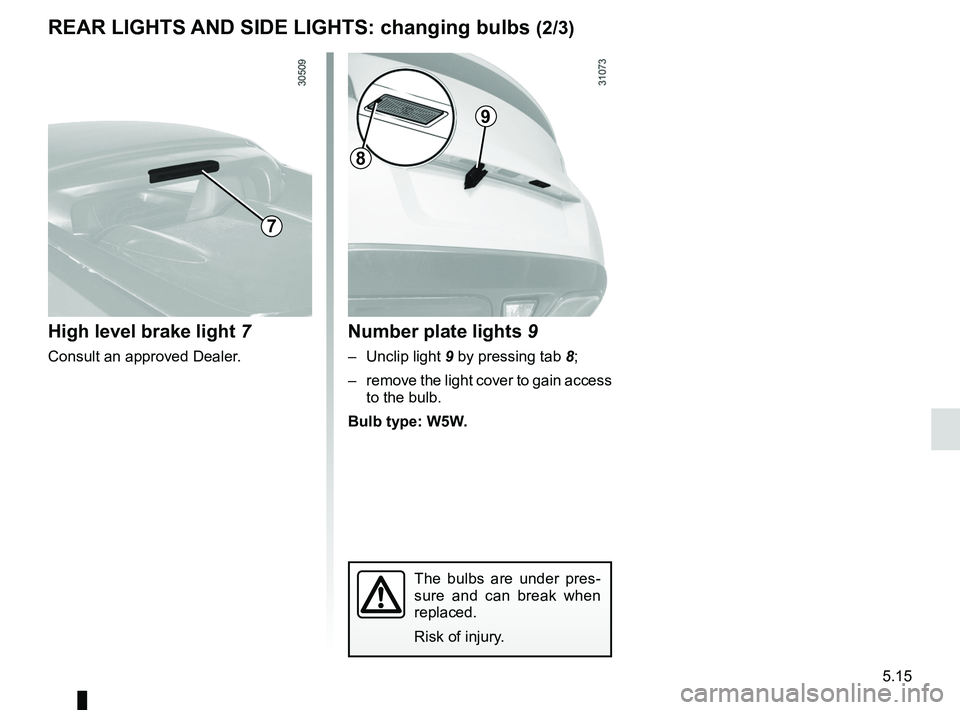
High level brake light 7
Consult an approved Dealer.
number plate lights 9
– Unclip light 9 by pressing tab 8;
– remove the light cover to gain access
to the bulb.
Bulb type: W5W.
The bulbs are under pres -
sure and can break when
replaced.
Risk of injury.
7
8
9
Page 146 of 185
5.20
ENG_UD24358_4
Fusibles (E33 - X33 - Renault)
ENG_NU_865-6_E33_Renault_5
Jaune NoirNoir texte
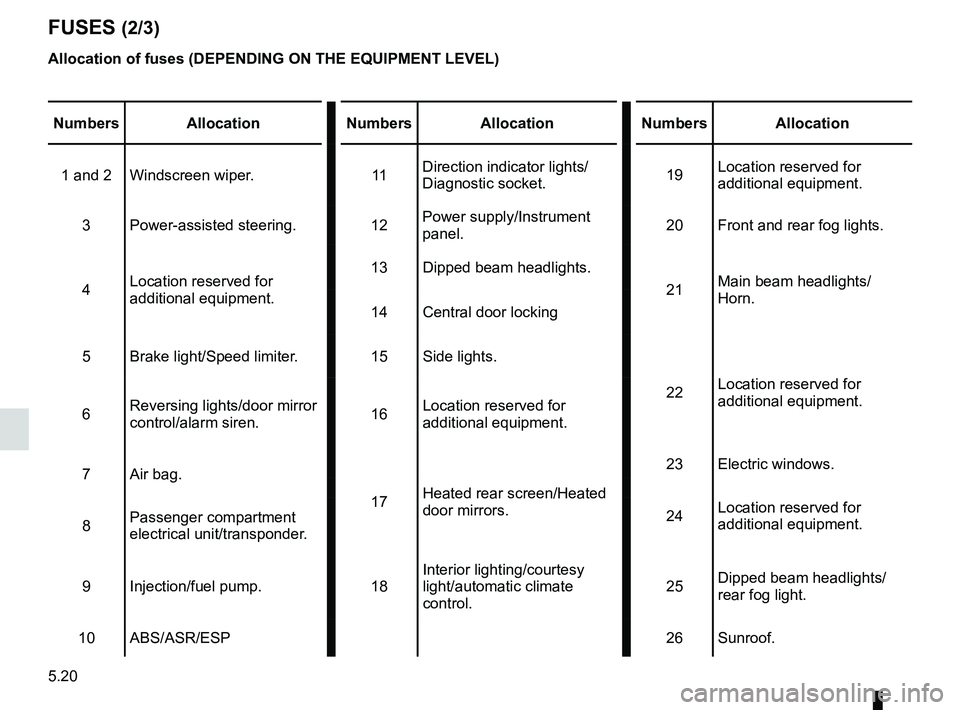
allocation of fuses (dePendIng On tHe eQuIPment LeVeL)
Fuses (2/3)
numbers allocation numbersallocation numbersallocation
1 and 2 Windscreen wiper. 11Direction indicator lights/
Diagnostic socket. 19Location reserved for
additional equipment.
3 Power-assisted steering. 12Power supply/Instrument
panel. 20
Front and rear fog lights.
4 Location reserved for
additional equipment. 13
Dipped beam headlights.
21Main beam headlights/
Horn.
14 Central door locking
5 Brake light/Speed limiter. 15Side lights.
22Location reserved for
additional equipment.
6 Reversing lights/door mirror
control/alarm siren. 16Location reserved for
additional equipment.
7 Air bag.
17Heated rear screen/Heated
door mirrors. 23
Electric windows.
24 Location reserved for
additional equipment.
8 Passenger compartment
electrical unit/transponder.
9 Injection/fuel pump. 18Interior lighting/courtesy
light/automatic climate
control. 25
Dipped beam headlights/
rear fog light.
10 ABS/ASR/ESP 26Sunroof.
Page 151 of 185
accessories...........................................(up to the end of the DU)
5.25
ENG_UD12965_3
Accessoires (S65 - X84 - B84 - C84 - E84 - L84 - K84 - J84 - X85 - B85 \
- C85 - S85 - X91 - B91 - K91 - D91 - B65 - C65 - K85 - X95 - B95 - D95 \
- J95 - R95 - X33 - X38 -
ENG_NU_865-6_E33_Renault_5
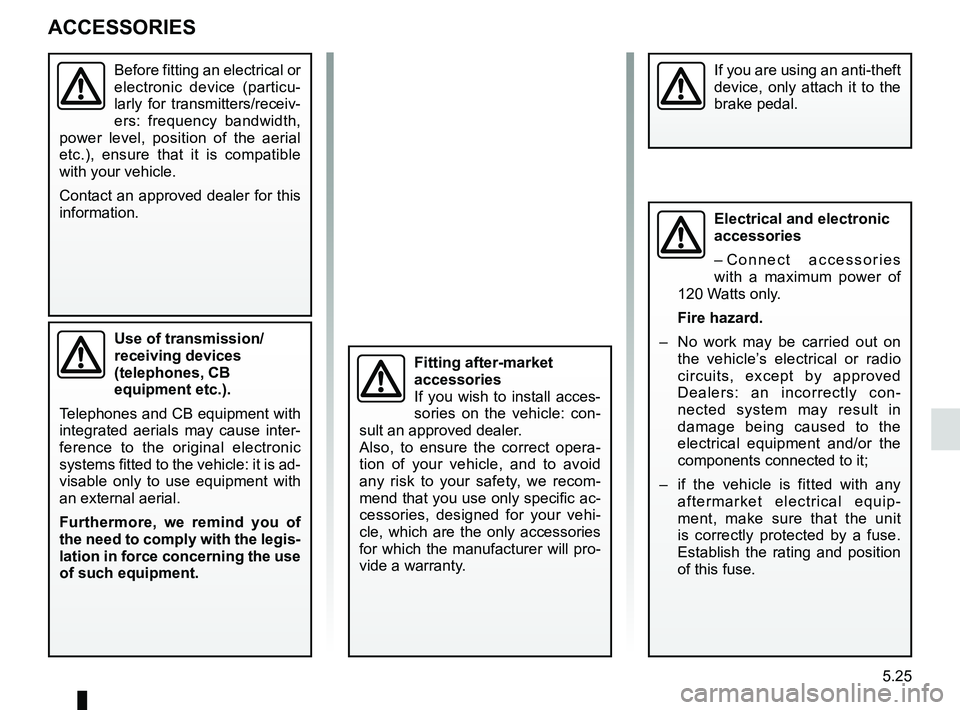
Accessories
accessOrIes
use of transmission/
receiving devices
(telephones, cB
equipment etc.).
Telephones and CB equipment with
integrated aerials may cause inter -
ference to the original electronic
systems fitted to the vehicle: it is ad-
visable only to use equipment with
an external aerial.
Furthermore, we remind you of
the need to comply with the legis-
lation in force concerning the use
of such equipment.
electrical and electronic
accessories
– C o n n e c t a c c e s s o r i e s
with a maximum power of
120 Watts only.
Fire hazard.
– No work may be carried out on
the vehicle’s electrical or radio
circuits, except by approved
Dealers: an incorrectly con -
nected system may result in
damage being caused to the
electrical equipment and/or the
components connected to it;
– if the vehicle is fitted with any
aftermarket electrical equip -
ment, make sure that the unit
is correctly protected by a fuse.
Establish the rating and position
of this fuse.
Before fitting an electrical or
electronic device (particu -
larly for transmitters/receiv-
ers: frequency bandwidth,
power level, position of the aerial
etc.), ensure that it is compatible
with your vehicle.
Contact an approved dealer for this
information.
Fitting after-market
accessories
If you wish to install acces-
sories on the vehicle: con -
sult an approved dealer.
Also, to ensure the correct opera -
tion of your vehicle, and to avoid
any risk to your safety, we recom -
mend that you use only specific ac-
cessories, designed for your vehi -
cle, which are the only accessories
for which the manufacturer will pro-
vide a warranty.
If you are using an anti-theft
device, only attach it to the
brake pedal.
Page 153 of 185

towingbreakdown ...................................... (up to the end of the DU)
towing hitch ........................................... (up to the end of the DU)
5.27
ENG_UD21756_2
Remorquage : dépannage (E33 - X33 - Renault)
ENG_NU_865-6_E33_Renault_5
Towing
tOWIng : breakdown
the steering wheel must be un -
locked and the ignition key must be
in position m (ignition on) to provide
brake lights and hazard warning
lights on the towed vehicle. at night
the vehicle must have its lights on.
You must observe the towing regu -
lations which apply in the country in
which you are driving.
Contact an approved dealer.
Only use:
– a t the front, towing hitch 3 (lo -
cated in the tool kit).
– at the rear, towing point 5.
These towing points may only be used
for pulling the vehicle, never for lifting it
either directly or indirectly.
– The towing hitch must
only be used for towing your
vehicle.
– It is forbidden to tow other
vehicles.
Do not remove the key from
the ignition when the vehi -
cle is being towed.
5
21
3
4
access to front towing
point 1
Unclip cover 2.
t ighten towing hitch 3 fully: first by
hand until it stops then finish by locking
it with wheelbrace 4.
Towing hitch 3 and wheelbrace 4 are
located in the tool kit.
W h e n t h e e n g i n e i s
stopped, steering and brak-
ing assistance are not op -
erational.
Do not push the vehicle
if the steering column is
locked.