2012 RENAULT FLUENCE Rear door
[x] Cancel search: Rear doorPage 77 of 241

JauneNoirNoir texte
1.73
ENG_UD21622_2
Rétroviseurs (L38 - X38 - Renault)
ENG_NU_891_892-7_L38-B32_Renault_1
REAR VIEW MIRRORs (2/2)
Interior rear view mirror
Its position can be adjusted.
Rear view mirror with lever 5
When driving at night, to avoid being
dazzled by the headlights of the vehicle
behind, move the small lever 5 located
behind the rear view mirror.
Rear view mirror without lever 5
The rear view mirror darkens automati-
cally at night if you are being followed
by a vehicle with its lights on.
5
4
Door mirrors with manual
adjustment
To adjust the mirror, move lever 4.
Page 81 of 241

lights:fog lights .......................................................... (current page)
JauneNoirNoir texte
1.77
ENG_UD27178_2
Éclairages et signalisations extérieurs (L38 - X38 - Renault)
ENG_NU_891_892-7_L38-B32_Renault_1
EXTERIOR LIghTINg AND sIgNALs (3/3)
When driving in fog or snow, or
when transporting objects which are
higher than the roof, the headlights
do not come on automatically.
Switching on the fog lights remains
the responsibility of the driver: the
indicator lights on the instrument
panel inform you whether the fog
lights are lit (indicator light on) or not
(indicator light not on).
gFront fog lights
Turn centre ring 4 on stalk 1
until the symbol faces mark 5, then re-
lease it.
Operation of the fog lights depends on
the exterior lighting position selected,
and an indicator light will light up on the
instrument panel.
fRear fog light
Turn centre ring 4 on the stalk
until the symbol faces mark 5, then re-
lease it.
Operation of the fog lights depends on
the exterior lighting selected, and an in-
dicator light will light up on the instru -
ment panel.
To avoid inconveniencing other road
users, remember to switch off the rear
fog light when it is no longer needed.
Lights-on reminder buzzer
If the lights are on after the engine is
switched off, a warning beep sounds
when the driver ’s door is opened to
warn you that the lights are still on.
switching off the lights
Turn ring 4 again until mark 5 is oppo -
site the symbol for the fog light that you
wish to switch off. The corresponding
indicator light on the instrument panel
goes out.
The front and rear fog lights switch off
when the exterior lights are switched
off.
14
145
5
Page 132 of 241

3.4
ENG_UD13665_1
Air conditionné (L38 - X38 - Renault)
ENG_NU_891_892-7_L38-B32_Renault_3
Jaune NoirNoir texte
Manual air conditioning
MANuAl AIR coNDITIoNINg (1/2)
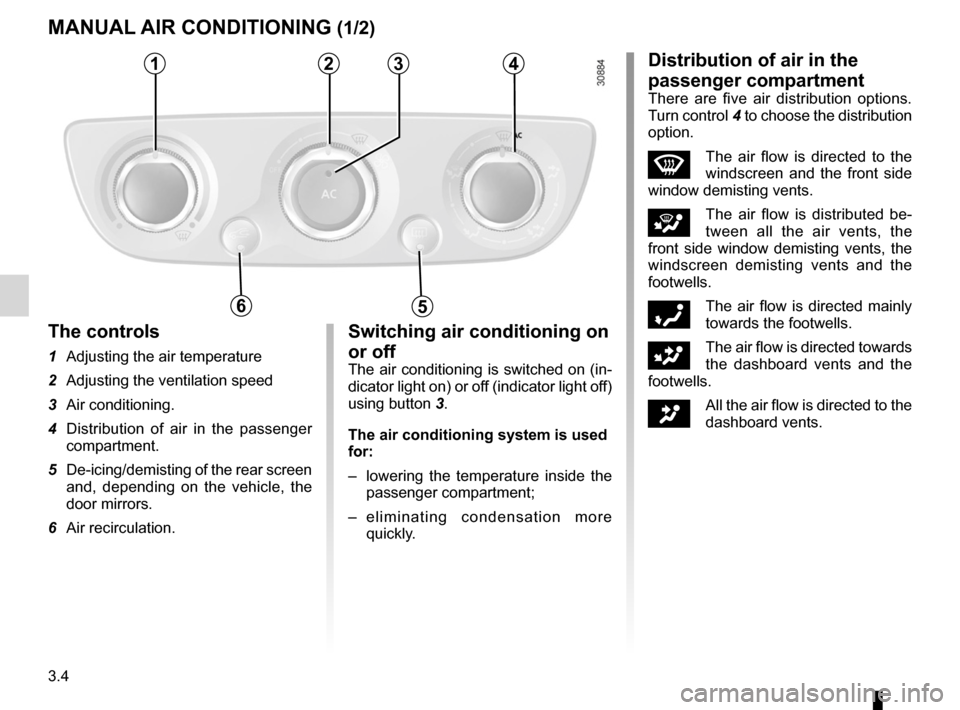
1234
56
The controls
1 Adjusting the air temperature
2 Adjusting the ventilation speed
3 Air conditioning.
4 Distribution of air in the passenger
compartment.
5 De-icing/demisting of the rear screen
and, depending on the vehicle, the
door mirrors.
6 Air recirculation.
Switching air conditioning on
or off
The air conditioning is switched on (in-
dicator light on) or off (indicator light off)
using button 3.
The air conditioning system is used
for:
– lowering the temperature inside the
passenger compartment;
– e l i m i n a t i n g c o n d e n s a t i o n m o r e
quickly.
Distribution of air in the
passenger compartment
There are five air distribution options.
Turn control 4 to choose the distribution
option.
WThe air flow is directed to the
windscreen and the front side
window demisting vents.
iThe air flow is distributed be -
tween all the air vents, the
front side window demisting vents, the
windscreen demisting vents and the
footwells.
óThe air flow is directed mainly
towards the footwells.
GThe air flow is directed towards
the dashboard vents and the
footwells.
JAll the air flow is directed to the
dashboard vents.
Page 134 of 241

3.6
ENG_UD14525_3
Air conditionné automatique (X95 - B95 - D95 - L38 - X38 - X32 - B32\
- Renault)
ENG_NU_891_892-7_L38-B32_Renault_3
Jaune NoirNoir texte
Automatic climate control
AuToMATIc clIMATE coNTRol (1/5)
Automatic mode
The automatic climate control system
guarantees comfort in the passen -
ger compartment and good visibility
(except in the event of extreme condi -
tions), whilst optimising consumption.
The system controls the ventilation
speed, air distribution, air recircula -
tion, and starting and stopping the air
conditioning and air temperature. This
mode consists of a choice of three pro-
grammes:
A uTo : allows the selected comfort
level to be best attained, depending on
the exterior conditions. Press button 3.
SoFT: gently brings the temperature to
the desired comfort level. The comfort
level is then maintained gently and si -
lently. Press button 2.
FAST: increases the operation of the
system to reach the desired comfort
level more quickly. Use this programme
when you have passengers in the rear.
Press button 4.
12
4
9 De-icing/demisting of the rear screen
and, depending on the vehicle, the
door mirrors.
10 “Clear View” function.
11 Air recirculation.
12 Ventilation speed.
13 Display.
16
7891011
32
The controls
1 and 6 Air temperature.
2, 3 and 4 Automatic programmes.
5 Distribution of air in the passenger
compartment.
7 Off button.
8 Air conditioning.
13
5
Page 135 of 241

JauneNoirNoir texte
3.7
ENG_UD14525_3
Air conditionné automatique (X95 - B95 - D95 - L38 - X38 - X32 - B32\
- Renault)
ENG_NU_891_892-7_L38-B32_Renault_3
AuT oMATIc clIMATE coNTRol (2/5)
Varying the ventilation speed
In automatic mode, the system uses
the most suitable amount of air to reach
and maintain the desired comfort level.
You can still adjust the ventilation speed
by pressing buttons 12 to increase or
reduce the ventilation speed.
In this case, the ventilation speed,
which is no longer controlled automat-
ically, appears in zone A on the dis -
play 13.
Some buttons have an operating
tell-tale which indicates the operat -
ing status.
121
3
Temperature adjustment
Press one of the buttons 1 or 6 to in -
crease or reduce the temperature
on the left-hand side 1 or right-hand
side 6. Pressing button 3 for more than
2 seconds sets the passenger tempera-
ture to the driver’s temperature.
Special note: the highest and lowest
settings allow the system to produce
maximum hot or cold temperature
levels (“LO” and “HI” on display 13).
6
A13
clear View function
Press button 10 : the integrated indica -
tor light comes on.
This function quickly demists and de -
ices the windscreen, the rear screen,
the front side windows, and the door
mirrors (depending on the vehicle). The
air conditioning and rear screen de -ic -
ing functions must be activated.
Press button 9 to stop the heated rear
screen operating; the integrated indica -
tor goes out.
You can change the ventilation speed
by pressing button 12.
To exit this function, press:
– button 10 again,
– one of either button 2, 3 or 4.
109
24
Page 137 of 241

rear screen de-icing/demisting .............................. (current page)
windscreen de-icing/demisting .............................. (current page)
JauneNoirNoir texte
3.9
ENG_UD14525_3
Air conditionné automatique (X95 - B95 - D95 - L38 - X38 - X32 - B32\
- Renault)
ENG_NU_891_892-7_L38-B32_Renault_3
AuT oMATIc clIMATE coNTRol (4/5)
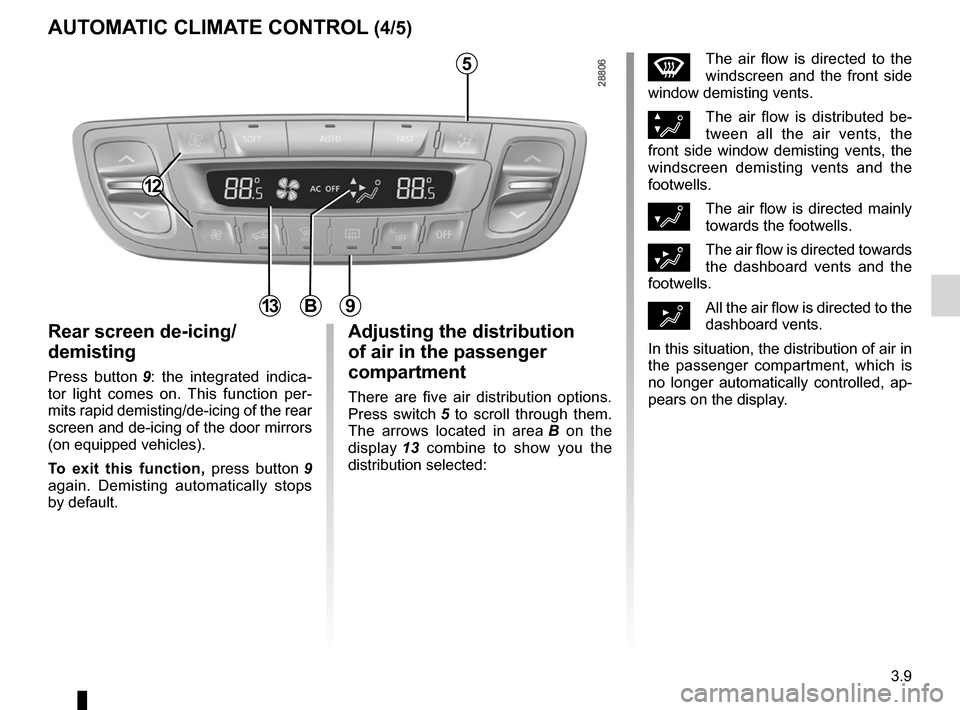
Rear screen de-icing/
demisting
Press button 9 : the integrated indica -
tor light comes on. This function per -
mits rapid demisting/de-icing of the rear
screen and de-icing of the door mirrors
(on equipped vehicles).
To exit this function, press button 9
again. Demisting automatically stops
by default.
12
WThe air flow is directed to the
windscreen and the front side
window demisting vents.
×The air flow is distributed be -
tween all the air vents, the
front side window demisting vents, the
windscreen demisting vents and the
footwells.
¿The air flow is directed mainly
towards the footwells.
¾The air flow is directed towards
the dashboard vents and the
footwells.
½All the air flow is directed to the
dashboard vents.
In this situation, the distribution of air in
the passenger compartment, which is
no longer automatically controlled, ap -
pears on the display.9
Adjusting the distribution
of air in the passenger
compartment
There are five air distribution options.
Press switch 5 to scroll through them.
The arrows located in area B on the
display 13 combine to show you the
distribution selected:
5
B13
Page 140 of 241

electric windows ................................... (up to the end of the DU)
child safety ............................................................. (current page)
children (safety) ..................................................... (current page)
sunroof .................................................. (up to the end of the DU)
3.12
ENG_UD21430_2
Lève-vitres électriques (L38 - X38 - Renault)
ENG_NU_891_892-7_L38-B32_Renault_3
Jaune NoirNoir texte
These systems operate with the igni -
tion on or off, until one of the front doors
is opened (limited to about 3 minutes).
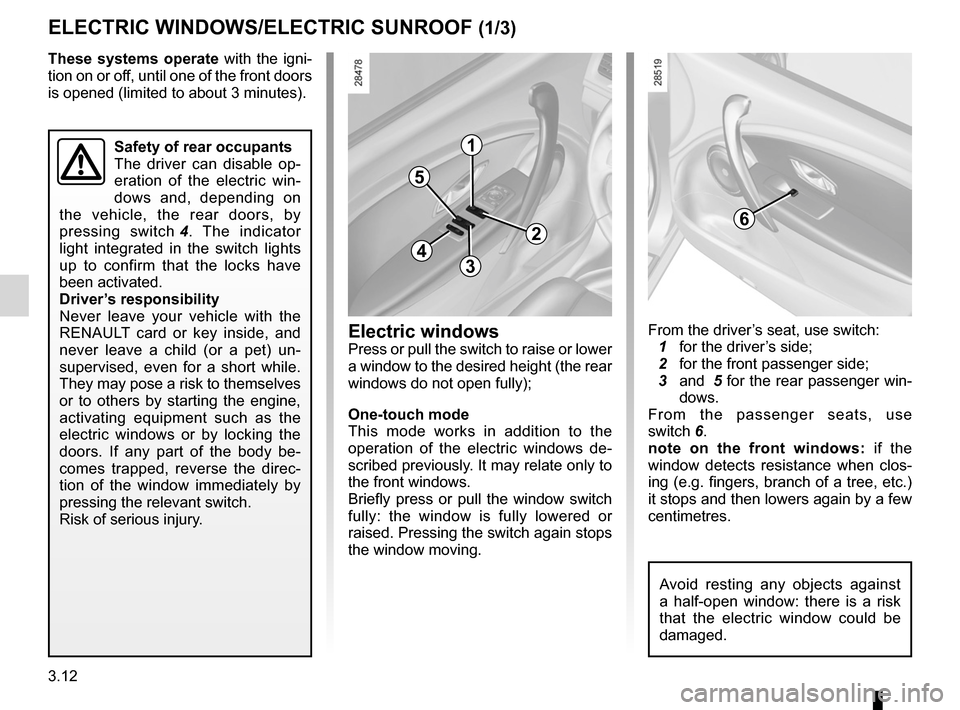
From the driver’s seat, use switch:
1 for the driver’s side;
2 for the front passenger side;
3 and 5 for the rear passenger win-
dows.
From the passenger seats, use
switch 6.
note on the front windows: if the
window detects resistance when clos -
ing (e.g. fingers, branch of a tree, etc.)
it stops and then lowers again by a few
centimetres.
Electric windows/Electric sunroof
ElEcTRIc wINDowS/ElEcTRIc SuNRooF (1/3)
Electric windows
Press or pull the switch to raise or lower
a window to the desired height (the rear
windows do not open fully);
one-touch mode
This mode works in addition to the
operation of the electric windows de -
scribed previously. It may relate only to
the front windows.
Briefly press or pull the window switch
fully: the window is fully lowered or
raised. Pressing the switch again stops
the window moving.
1
2
34
5
6
Safety of rear occupants
The driver can disable op -
eration of the electric win -
dows and, depending on
the vehicle, the rear doors, by
pressing switch 4 . The indicator
light integrated in the switch lights
up to confirm that the locks have
been activated.
Driver’s responsibility
Never leave your vehicle with the
RENAULT card or key inside, and
never leave a child (or a pet) un -
supervised, even for a short while.
They may pose a risk to themselves
or to others by starting the engine,
activating equipment such as the
electric windows or by locking the
doors. If any part of the body be -
comes trapped, reverse the direc -
tion of the window immediately by
pressing the relevant switch.
Risk of serious injury.
Avoid resting any objects against
a half-open window: there is a risk
that the electric window could be
damaged.
Page 151 of 241

rear parcel shelf .................................... (up to the end of the DU)
tailgate .................................................. (up to the end of the DU)
rear parcel shelf .................................... (up to the end of the DU)
3.23
ENG_UD21357_2
Tablette arrière (L38 - X38 - Renault)
ENG_NU_891_892-7_L38-B32_Renault_3
Lift rear parcel shelf 2 slightly and pull it
towards you.
To refit it, proceed in reverse order to
removal.Five-door version
Removal
Unhook the two cords 1 (tailgate side).
Rear parcel shelf
Do not place any objects,
especially heavy or hard
objects, on parcel shelf 2
or 3. These may pose a risk
to the vehicle occupants if the driver
has to brake suddenly or if the vehi-
cle is involved in an accident.
REAR PARcEl ShElF
1
Four-door version
2
3