2012 RENAULT FLUENCE light
[x] Cancel search: lightPage 137 of 241

rear screen de-icing/demisting .............................. (current page)
windscreen de-icing/demisting .............................. (current page)
JauneNoirNoir texte
3.9
ENG_UD14525_3
Air conditionné automatique (X95 - B95 - D95 - L38 - X38 - X32 - B32\
- Renault)
ENG_NU_891_892-7_L38-B32_Renault_3
AuT oMATIc clIMATE coNTRol (4/5)
Rear screen de-icing/
demisting
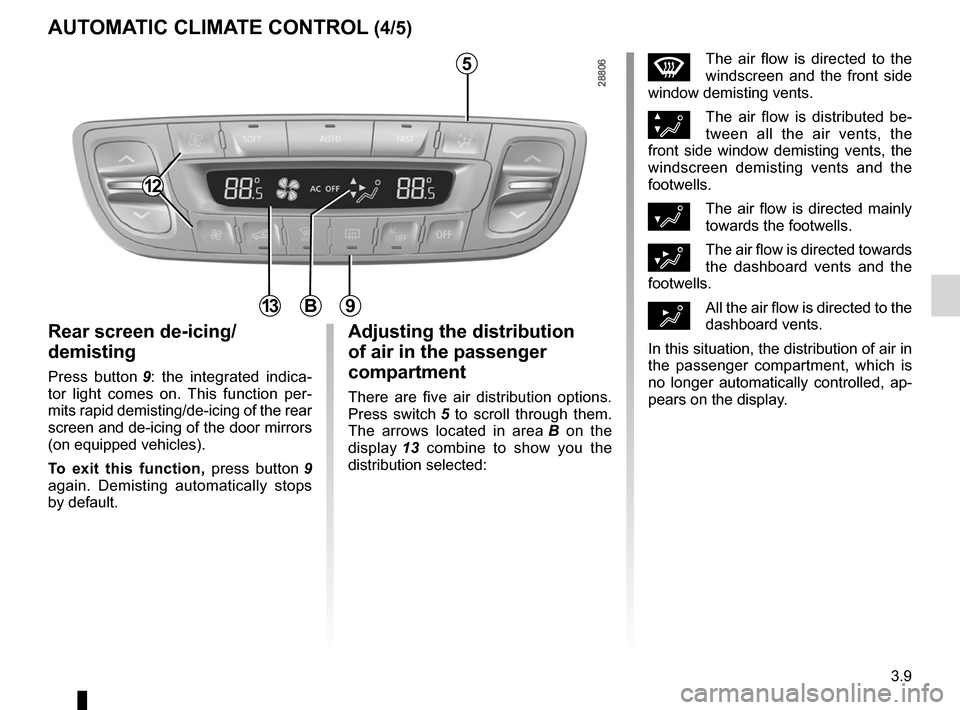
Press button 9 : the integrated indica -
tor light comes on. This function per -
mits rapid demisting/de-icing of the rear
screen and de-icing of the door mirrors
(on equipped vehicles).
To exit this function, press button 9
again. Demisting automatically stops
by default.
12
WThe air flow is directed to the
windscreen and the front side
window demisting vents.
×The air flow is distributed be -
tween all the air vents, the
front side window demisting vents, the
windscreen demisting vents and the
footwells.
¿The air flow is directed mainly
towards the footwells.
¾The air flow is directed towards
the dashboard vents and the
footwells.
½All the air flow is directed to the
dashboard vents.
In this situation, the distribution of air in
the passenger compartment, which is
no longer automatically controlled, ap -
pears on the display.9
Adjusting the distribution
of air in the passenger
compartment
There are five air distribution options.
Press switch 5 to scroll through them.
The arrows located in area B on the
display 13 combine to show you the
distribution selected:
5
B13
Page 140 of 241

electric windows ................................... (up to the end of the DU)
child safety ............................................................. (current page)
children (safety) ..................................................... (current page)
sunroof .................................................. (up to the end of the DU)
3.12
ENG_UD21430_2
Lève-vitres électriques (L38 - X38 - Renault)
ENG_NU_891_892-7_L38-B32_Renault_3
Jaune NoirNoir texte
These systems operate with the igni -
tion on or off, until one of the front doors
is opened (limited to about 3 minutes).
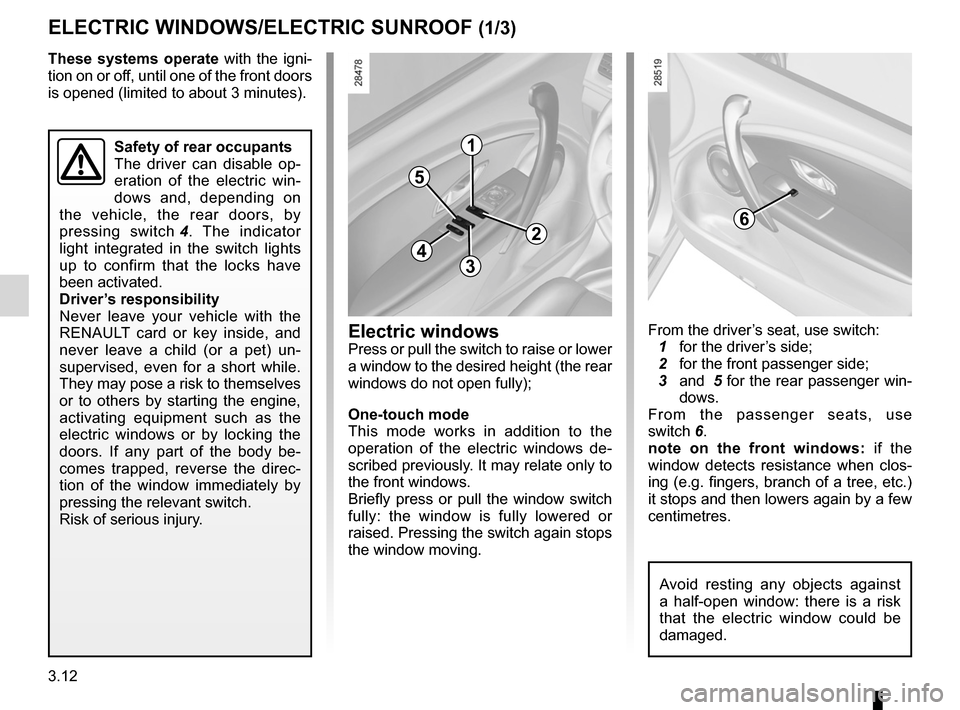
From the driver’s seat, use switch:
1 for the driver’s side;
2 for the front passenger side;
3 and 5 for the rear passenger win-
dows.
From the passenger seats, use
switch 6.
note on the front windows: if the
window detects resistance when clos -
ing (e.g. fingers, branch of a tree, etc.)
it stops and then lowers again by a few
centimetres.
Electric windows/Electric sunroof
ElEcTRIc wINDowS/ElEcTRIc SuNRooF (1/3)
Electric windows
Press or pull the switch to raise or lower
a window to the desired height (the rear
windows do not open fully);
one-touch mode
This mode works in addition to the
operation of the electric windows de -
scribed previously. It may relate only to
the front windows.
Briefly press or pull the window switch
fully: the window is fully lowered or
raised. Pressing the switch again stops
the window moving.
1
2
34
5
6
Safety of rear occupants
The driver can disable op -
eration of the electric win -
dows and, depending on
the vehicle, the rear doors, by
pressing switch 4 . The indicator
light integrated in the switch lights
up to confirm that the locks have
been activated.
Driver’s responsibility
Never leave your vehicle with the
RENAULT card or key inside, and
never leave a child (or a pet) un -
supervised, even for a short while.
They may pose a risk to themselves
or to others by starting the engine,
activating equipment such as the
electric windows or by locking the
doors. If any part of the body be -
comes trapped, reverse the direc -
tion of the window immediately by
pressing the relevant switch.
Risk of serious injury.
Avoid resting any objects against
a half-open window: there is a risk
that the electric window could be
damaged.
Page 143 of 241

lighting:interior ............................................. (up to the end of the DU)
courtesy light ........................................ (up to the end of the DU)
map reading lights ................................ (up to the end of the DU)
3.15
ENG_UD21626_2
Eclairage intérieur (L38 - X38 - Renault)
ENG_NU_891_892-7_L38-B32_Renault_3
Manual window winders
Interior lighting
MANuAl wINDow wINDERS/INTERIoR lIghTINg (1/2)
When the doors or luggage com -
partment are unlocked and opened
the courtesy and footwell lights
come on temporarily.
234
courtesy light
Tilt switch 3 to move it to the position
for:
– permanent lighting;
– intermittent lighting, which comes
on when a door is opened. This
switches off after a time delay, once
the doors concerned have been
closed correctly;
– immediate switching off.
Map reading lights(depending on vehicle)
Tilt switches 2 or 4.
Front door lights
Light 5 comes on when the door is
opened.
5
Manual window winders
Turn handle 1.
1
Page 144 of 241

sun visor ................................................................ (current page)
courtesy mirrors ..................................................... (current page)
3.16
ENG_UD21626_2
Eclairage intérieur (L38 - X38 - Renault)
ENG_NU_891_892-7_L38-B32_Renault_3
luggage compartment light
Depending on the vehicle, light 7
comes on when the luggage compart -
ment is opened.
Sun visor
INTERIoR lIghTINg (2/2)/SuN VISoR
7
Sun visor
Lower the sun visor 8 over the wind -
screen or unclip it and turn it over the
side window.
courtesy mirrors
Slide cover 9 , depending on the vehi -
cle, and the mirror is lit.
89
glove box light
Light 6 comes on when the cover is
opened.
6
Page 148 of 241

ashtray .................................................. (up to the end of the DU)
cigar lighter ........................................... (up to the end of the DU)
accessories socket ............................... (up to the end of the DU)
3.20
ENG_UD21627_2
Cendriers-Allume cigares (L38 - X38 - Renault)
ENG_NU_891_892-7_L38-B32_Renault_3
Accessories socket
Ashtray/cigar lighter
cigar lighter 2
With the ignition on, push in cigar
lighter 2, it will spring back with a click
when it is ready. Pull it out to use. After
use, replace it without pushing it all the
way in.
AShTRAY, cIgAR lIghTER, AccESSoRIES SockET
Accessories sockets
You may use cigar lighter recess 2 or
socket 3 (depending on the vehicle).
They are designed for connecting ac -
cessories with a maximum power rating
of 120 Watts (voltage: 12V) which
have been approved by our Technical
Department.
If your vehicle is not fitted with a cigar lighter and an ashtray, these can be ob-
tained from an approved Dealer.
2
1
13
Ashtray 1
To open, lift the cover. To empty, pull the
ashtray towards you and it will be re -
leased from its housing.
C o n n e c t a c c e s s o r i e s
with a maximum power of
120 Watts only.
Fire hazard.
Page 151 of 241

rear parcel shelf .................................... (up to the end of the DU)
tailgate .................................................. (up to the end of the DU)
rear parcel shelf .................................... (up to the end of the DU)
3.23
ENG_UD21357_2
Tablette arrière (L38 - X38 - Renault)
ENG_NU_891_892-7_L38-B32_Renault_3
Lift rear parcel shelf 2 slightly and pull it
towards you.
To refit it, proceed in reverse order to
removal.Five-door version
Removal
Unhook the two cords 1 (tailgate side).
Rear parcel shelf
Do not place any objects,
especially heavy or hard
objects, on parcel shelf 2
or 3. These may pose a risk
to the vehicle occupants if the driver
has to brake suddenly or if the vehi-
cle is involved in an accident.
REAR PARcEl ShElF
1
Four-door version
2
3
Page 157 of 241

4.1
ENG_UD27183_7
Sommaire 4 (L38 - X38 - Renault)
ENG_NU_891_892-7_L38-B32_Renault_4
Section 4: Maintenance
Bonnet . . . . . . . . . . . . . . . . . . . . . . . . . . . . . . . . . . . . . . . . . . . . . . . . . . . . . . . . . . . . . . . . . . . . . . . . 4.2
Engine oil level: . . . . . . . . . . . . . . . . . . . . . . . . . . . . . . . . . . . . . . . . . . . . . . . . . . . . . . . . . . . . . . . . . 4.4
general information . . . . . . . . . . . . . . . . . . . . . . . . . . . . . . . . . . . . . . . . . . . . . . . . . . . . . . . . 4.4
topping up, filling . . . . . . . . . . . . . . . . . . . . . . . . . . . . . . . . . . . . . . . . . . . . . . . . . . . . . . . . . . 4.6
Engine oil change . . . . . . . . . . . . . . . . . . . . . . . . . . . . . . . . . . . . . . . . . . . . . . . . . . . . . . . . . . . . . . . 4.7
Levels: . . . . . . . . . . . . . . . . . . . . . . . . . . . . . . . . . . . . . . . . . . . . . . . . . . . . . . . . . . . . . . . . . . . . . . . . 4.8
engine coolant . . . . . . . . . . . . . . . . . . . . . . . . . . . . . . . . . . . . . . . . . . . . . . . . . . . . . . . . . . . . 4.8
brake fluid . . . . . . . . . . . . . . . . . . . . . . . . . . . . . . . . . . . . . . . . . . . . . . . . . . . . . . . . . . . . . . . . 4.9
windscreen/headlight washer reservoir . . . . . . . . . . . . . . . . . . . . . . . . . . . . . . . . . . . . . . . . . 4.10
Filters . . . . . . . . . . . . . . . . . . . . . . . . . . . . . . . . . . . . . . . . . . . . . . . . . . . . . . . . . . . . . . . . . . . . . . . . . 4.10
Tyre pressure. . . . . . . . . . . . . . . . . . . . . . . . . . . . . . . . . . . . \
. . . . . . . . . . . . . . . . . . . . . . . . . . . . . . . 4.11
Battery . . . . . . . . . . . . . . . . . . . . . . . . . . . . . . . . . . . . . . . . . . . . . . . . . . . . . . . . . . . . . . . . . . . . . . . . 4.12
Bodywork maintenance . . . . . . . . . . . . . . . . . . . . . . . . . . . . . . . . . . . . . . . . . . . . . . . . . . . . . . . . . . . 4.13
Interior trim maintenance . . . . . . . . . . . . . . . . . . . . . . . . . . . . . . . . . . . . . . . . . . . . . . . . . . . . . . . . . . 4.15
Page 158 of 241

bonnet................................................... (up to the end of the DU)
maintenance: mechanical ...................................... (up to the end of the DU)
4.2
ENG_UD23759_3
Capot moteur (L38 - X38 - Renault)
ENG_NU_891_892-7_L38-B32_Renault_4
Jaune NoirNoir texte
Bonnet
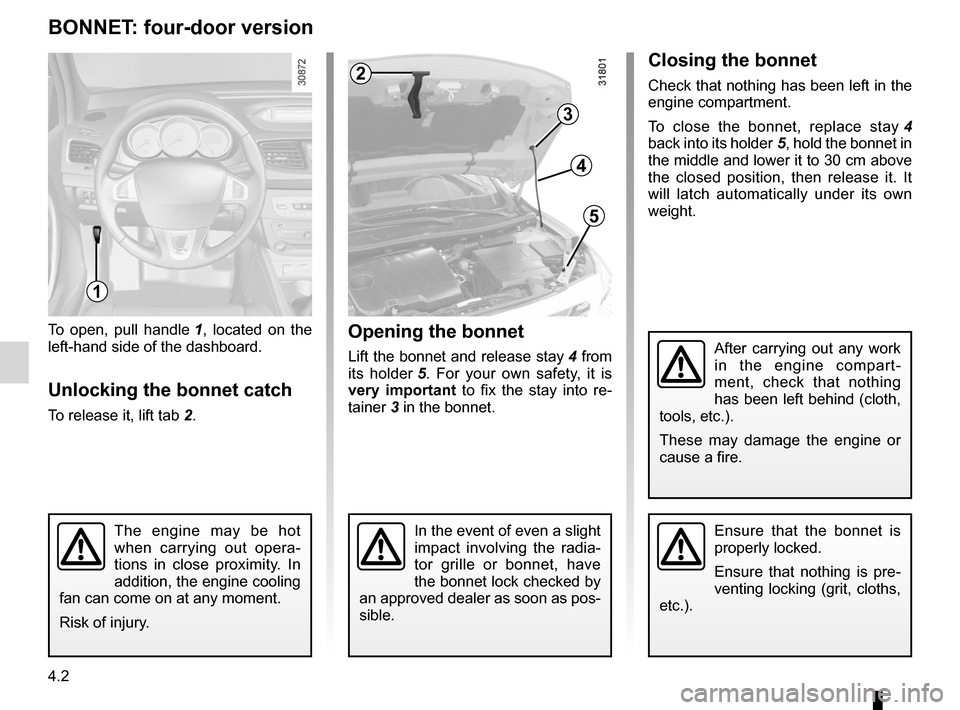
Opening the bonnet
Lift the bonnet and release stay 4 from
its holder 5 . For your own safety, it is
very important to fix the stay into re -
tainer 3 in the bonnet.
To open, pull handle
1 , located on the
left-hand side of the dashboard.
Unlocking the bonnet catch
To release it, lift tab 2.
BOnnet: four-door version
1
2Closing the bonnet
Check that nothing has been left in the
engine compartment.
To close the bonnet, replace stay 4
back into its holder 5, hold the bonnet in
the middle and lower it to 30 cm above
the closed position, then release it. It
will latch automatically under its own
weight.
Ensure that the bonnet is
properly locked.
Ensure that nothing is pre -
venting locking (grit, cloths,
etc.).The engine may be hot
when carrying out opera -
tions in close proximity. In
addition, the engine cooling
fan can come on at any moment.
Risk of injury.In the event of even a slight
impact involving the radia -
tor grille or bonnet, have
the bonnet lock checked by
an approved dealer as soon as pos-
sible.
3
4
5
After carrying out any work
in the engine compart -
ment, check that nothing
has been left behind (cloth,
tools, etc.).
These may damage the engine or
cause a fire.