2012 Peugeot Boxer Benne parking brake
[x] Cancel search: parking brakePage 5 of 184

3
CONTENT
S
Contents
5. SAFETY 114-1326. ACCESSORIES133-136
7. CHECKS 137-144
8. QUICK HELP 145-162
9. TECHNICAL DATA 163-173
Parking brake 114Hazard warning lamps 114Horn 115ABS 115Emergency brakingassistance 115Anti-slip regulation (ASR) and electronic stabilityprogramme (ESP) 116Fixed speed limiter 118Seat belts 119Airbags 122Deactivating the passenger airbag 123Child seats 125ISOFIX seats 129
Towing a trailer 133Roof bars 135Other accessories 135
Opening the bonnet 137Under the bonnet 138Levels 139Checks 141Fuel 144
Battery 145Changing a wheel 148Puncture repair kit 151Changing a bulb 153Changing a fuse 157Changing a wiper blade161Being towed 162
Environment 163Dimensions 164Engines 171Weights 172Identifi cation markings 173
10. VISUAL SEARCH 174-180
Exterior 174Instrumentsand controls 175Interior 177Technical data - Maintenance 178
Child seats in the rear.
Page 33 of 184
31
2
READY TO SET OFF
Instruments and controls
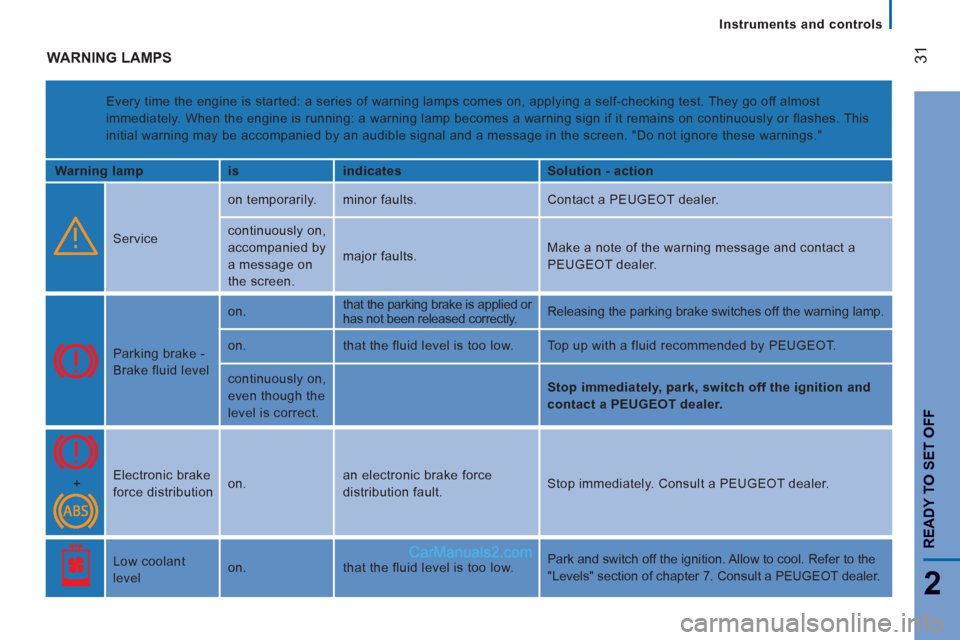
WARNING LAMPS
Every time the engine is started: a series of warning lamps comes on, applying a self-checking test. They go off almost
immediately. When the engine is running: a warning lamp becomes a warning sign if it remains on continuously or flashes. This
initial warning may be accompanied by an audible signal and a message in the screen. "Do not ignore these warnings."
Warning lamp
is
indicates
Solution - action
Service on temporarily. minor faults. Contact a PEUGEOT dealer.
continuously on,
accompanied by
a message on
the screen. major faults. Make a note of the warning message and contact a
PEUGEOT dealer.
Parking brake -
Brake fluid level on. that the parking brake is applied or
has not been released correctly. Releasing the parking brake switches off the warning lamp.
on. that the fluid level is too low. Top up with a fluid recommended by PEUGEOT.
continuously on,
even though the
level is correct.
Stop immediately, park, switch off the ignition and
contact a PEUGEOT dealer.
+ Electronic brake
force distribution on. an electronic brake force
distribution fault. Stop immediately. Consult a PEUGEOT dealer.
Low coolant
level on. that the fluid level is too low. Park and switch off the ignition. Allow to cool. Refer to the
"Levels" section of chapter 7. Consult a PEUGEOT dealer.
Page 44 of 184
42
Starting and stopping
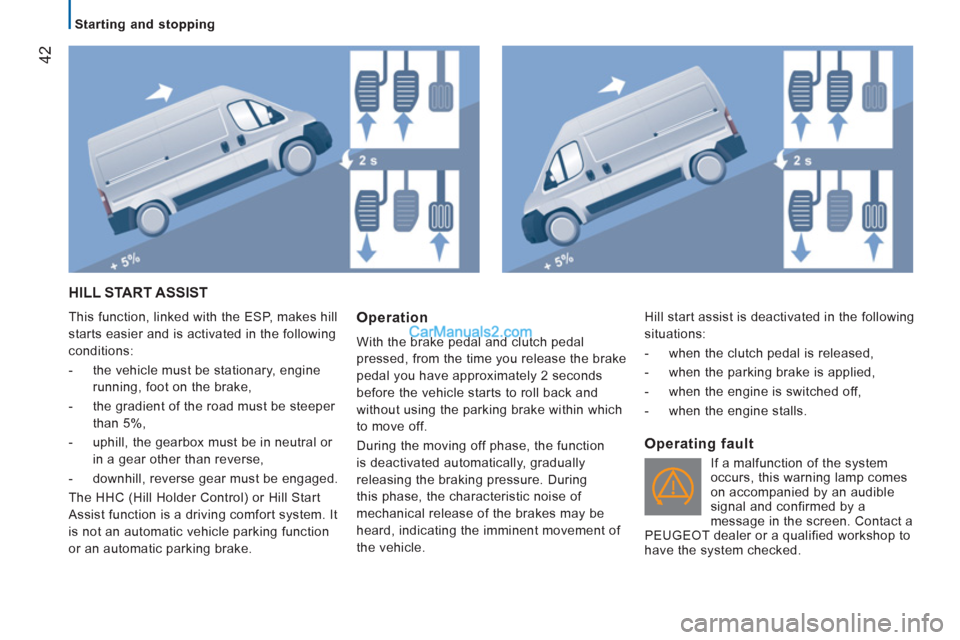
HILL START ASSIST
This function, linked with the ESP, makes hill
starts easier and is activated in the following
conditions:
- the vehicle must be stationary, engine
running, foot on the brake,
- the gradient of the road must be steeper
than 5%,
- uphill, the gearbox must be in neutral or
in a gear other than reverse,
- downhill, reverse gear must be engaged.
The HHC (Hill Holder Control) or Hill Start
Assist function is a driving comfort system. It
is not an automatic vehicle parking function
or an automatic parking brake. Operation
With the brake pedal and clutch pedal
pressed, from the time you release the brake
pedal you have approximately 2 seconds
before the vehicle starts to roll back and
without using the parking brake within which
to move off.
During the moving off phase, the function
is deactivated automatically, gradually
releasing the braking pressure. During
this phase, the characteristic noise of
mechanical release of the brakes may be
heard, indicating the imminent movement of
the vehicle.
Operating fault
If a malfunction of the system
occurs, this warning lamp comes
on accompanied by an audible
signal and confirmed by a
message in the screen. Contact a
PEUGEOT dealer or a qualified workshop to
have the system checked. Hill start assist is deactivated in the following
situations:
- when the clutch pedal is released,
- when the parking brake is applied,
- when the engine is switched off,
- when the engine stalls.
Page 116 of 184
11 4
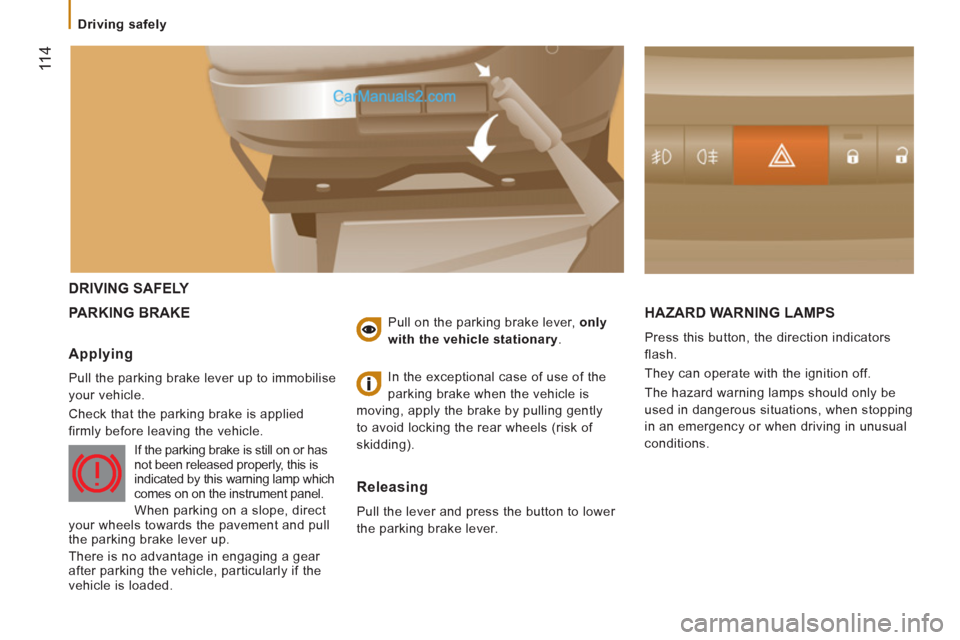
DRIVING SAFELY
PARKING BRAKE HAZARD WARNING LAMP
S
Press this button, the direction indicators
flash.
They can operate with the ignition off.
The hazard warning lamps should only be
used in dangerous situations, when stopping
in an emergency or when driving in unusual
conditions.
Applying
Pull the parking brake lever up to immobilise
your vehicle.
Check that the parking brake is applied
firmly before leaving the vehicle.
Pull on the parking brake lever, only
with the vehicle stationary
.
Releasing
Pull the lever and press the button to lower
the parking brake lever. In the exceptional case of use of the
parking brake when the vehicle is
moving, apply the brake by pulling gently
to avoid locking the rear wheels (risk of
skidding).
If the parking brake is still on or has
not been released properly, this is
indicated by this warning lamp which
comes on on the instrument panel.
When parking on a slope, direct
your wheels towards the pavement and pull
the parking brake lever up.
There is no advantage in engaging a gear
after parking the vehicle, particularly if the
vehicle is loaded.
Drivin
g safely
Page 136 of 184
134
Cooling:
towing a trailer on a slope
increases the coolant temperature.
As the fan is electrically controlled, its
cooling capacity is not dependent on the
engine speed.
On the contrary, use a high gear to lower the
engine speed and reduce your speed.
In all cases, pay attention to the coolant
temperature.
Tyres:
check the tyre pressures of the
towing vehicle (see the "Identification
markings" section of chapter 9) and of
the trailer, observing the recommended
pressures.
We recommend the use of original
PEUGEOT towbars and their harnesses,
which have been tested and approved from
the design stage of your vehicle and that
the fitting of this equipment is entrusted to a
PEUGEOT dealer.
If this equipment is not fitted by a PEUGEOT
dealer, it is imperative that it is fitted using
the electrical pre-equipment installed at the
rear of the vehicle and in accordance with
the manufacturer's instructions.
Good practice
In certain cases of particularly arduous
use (towing the maximum load up a steep
slope in high temperatures), the engine
automatically limits its power. In this
case, the automatic cutting off of the air
conditioning allows the engine power to be
recovered.
If the coolant temperature
warning lamp comes on, stop the
vehicle and switch off the engine
as soon as possible.
See the "Levels" section of chapter 7.
Brakes:
towing increases the braking
distance. Drive at a moderate speed,
change down early and brake gradually.
Side wind:
sensitivity to side wind is
increased. Drive smoothly and at a
moderate speed.
ABS:
the system only controls the vehicle,
not the trailer.
Rear parking sensors:
the system does not
operate while the vehicle is towing.
Towing a trailer
Page 143 of 184
Checks
14
1
7
CHECK
S
CHECKS
Air filter and passenger compartmentfilter
A clogged passenger compartment fi lter may
reduce the performance of the air conditioning
system and generate undesirable odours. The
replacement intervals for these components
are indicated in the servicing booklet.
Depending on the environment (dusty
atmosphere...) and the use of the vehicle
(urban driving...), change them twice as
often if necessary, refer to the "Under the
bonnet" section of chapter 7.
Manual gearbox
Have the level checked in accordance with
the manufacturer's servicing schedule.
To check the main levels and certain
components, in accordance with the
manufacturer's servicing schedule, refer to
the pages of the servicing booklet which
correspond to your vehicle's engine.
Only use products recommended by
PEUGEOT or products of equivalent quality
and specification.
In order to optimise the operation of units as
important as the braking system, PEUGEOT
selects and offers specific products.
In order to avoid damaging the electrical
units, high pressure washing to clean the
engine compartment is strictly prohibited.
Parking brake
Where the parking brake travel is too great
or there is a reduction in the performance
of the system, the parking brake should be
adjusted, even between services.
Have the system checked by a PEUGEOT
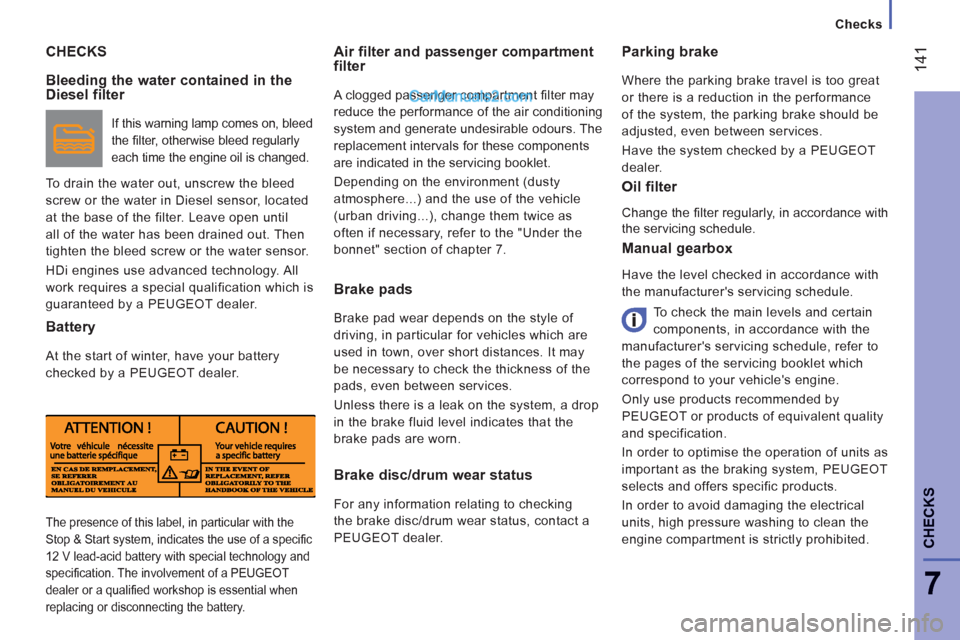
dealer. Bleeding the water contained in the Diesel filter
If this warning lamp comes on, bleed
the fi lter, otherwise bleed regularly
each time the engine oil is changed.
To drain the water out, unscrew the bleed
screw or the water in Diesel sensor, located
at the base of the filter. Leave open until
all of the water has been drained out. Then
tighten the bleed screw or the water sensor.
HDi engines use advanced technology. All
work requires a special qualification which is
guaranteed by a PEUGEOT dealer.
Battery
At the start of winter, have your battery
checked by a PEUGEOT dealer.
Brake pads
Brake pad wear depends on the style of
driving, in particular for vehicles which are
used in town, over short distances. It may
be necessary to check the thickness of the
pads, even between services.
Unless there is a leak on the system, a drop
in the brake fluid level indicates that the
brake pads are worn.
Brake disc/drum wear status
For any information relating to checking
the brake disc/drum wear status, contact a
PEUGEOT dealer.
Oil filter
Change the fi lter regularly, in accordance with
the servicing schedule.
The presence of this label, in particular with the
Stop & Start system, indicates the use of a specifi c
12 V lead-acid battery with special technology and
specifi cation. The involvement of a PEUGEOT
dealer or a qualifi ed workshop is essential when
replacing or disconnecting the battery.
Page 150 of 184
Changing a wheel
14
8
1. PARKING THE VEHICLE
As far as possible, park the vehicle on level,
stable and non-slippery ground.
Apply the parking brake, switch off the
ignition and engage first gear.
Put on a high visibility vest and position the
warning triangle.
If possible, place a chock under the
wheel diagonally opposite the wheel to be
changed. 2. TOOLS
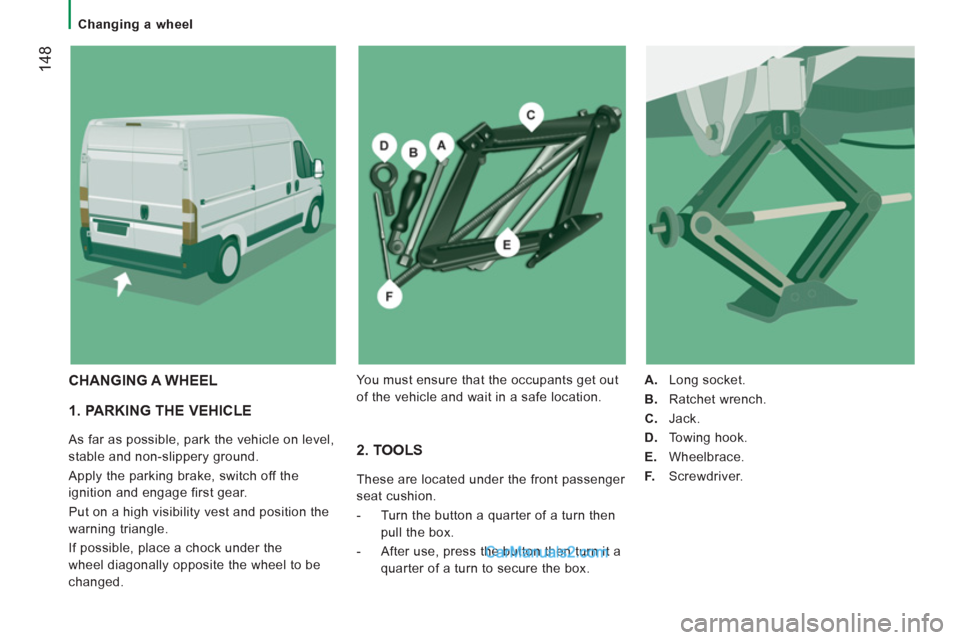
These are located under the front passenger
seat cushion.
- Turn the button a quarter of a turn then
pull the box.
- After use, press the button then turn it a
quarter of a turn to secure the box.
A.
Long socket.
B.
Ratchet wrench.
C.
Jack.
D.
Towing hook.
E.
Wheelbrace.
F.
Screwdriver.
CHANGING A WHEEL
You must ensure that the occupants get out
of the vehicle and wait in a safe location.
Page 153 of 184
Changing a wheel
151
QUICK HELP
8
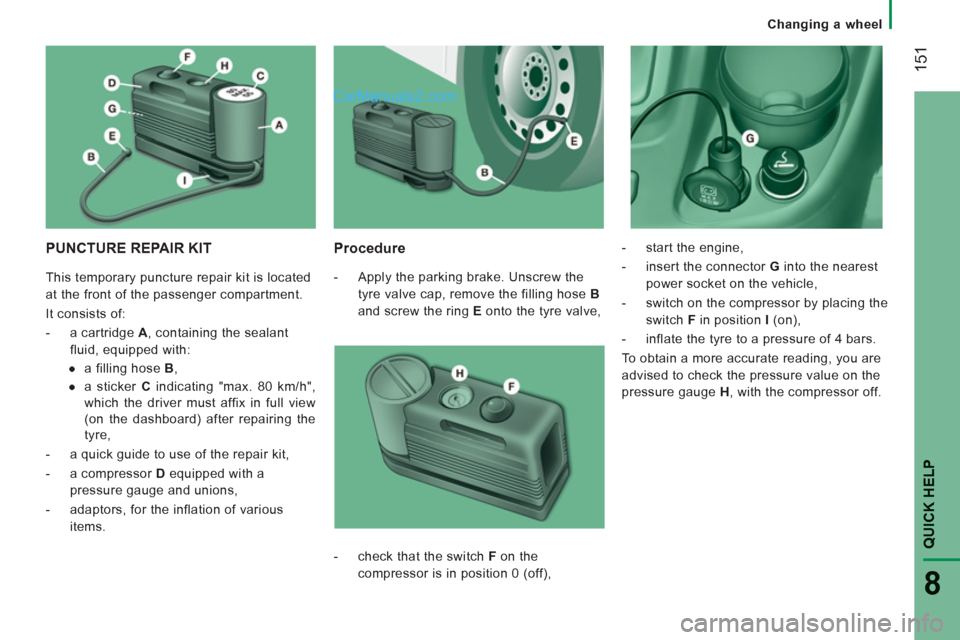
PUNCTURE REPAIR KIT
Procedure
- Apply the parking brake. Unscrew the
tyre valve cap, remove the filling hose B
and screw the ring E
onto the tyre valve,
- start the engine,
- insert the connector G
into the nearest
power socket on the vehicle,
- switch on the compressor by placing the
switch F
in position I
(on),
- inflate the tyre to a pressure of 4 bars.
To obtain a more accurate reading, you are
advised to check the pressure value on the
pressure gauge H
, with the compressor off.
- check that the switch F
on the
compressor is in position 0 (off), This temporary puncture repair kit is located
at the front of the passenger compartment.
It consists of:
- a cartridge A
, containing the sealant
fluid, equipped with:
●
a filling hose B
,
●
a sticker C
indicating "max. 80 km/h",
which the driver must affix in full view
(on the dashboard) after repairing the
tyre,
- a quick guide to use of the repair kit,
- a compressor D
equipped with a
pressure gauge and unions,
- adaptors, for the inflation of various
items.