Page 5 of 340
.
.
Contents
Child seats 149
ISOFIX child seats 156
Child lock 160
Child safety
Direction indicators 161
Emergency or assistance call 162
Horn 162
Tyre under-infl ation detection 163
ESC system 164
Seat belts 167
Airbags 170
Safety
Te m p o r a ry puncture repair kit 174
Changing a wheel 180
Changing a bulb 187
Changing a fuse 196
12 V battery 200
Energy economy mode 203
Changing a wiper blade 204
To w i ng the vehicle 205
To w i ng a trailer 207
Fitting roof bars 209
Accessories 210
Practical information
Opening the bonnet 213
Running out of fuel (Diesel) 214
Petrol engines 215
Diesel engines 216
Checking levels 218
Checks 221
Checks
Petrol engines 223
Petrol weights 224
Diesel en
gines 226
Diesel weights 229
Dimensions 232
Identifi cation markings 233
Technical data
Emergency or assistance 235
JBL equipment 237
Peugeot Connect Navigation (RT6) 239
Audio system 293
Audio equipment and telematics
Alphabetical index
Visual search
Page 49 of 340
2
47
Access
Emergency procedure
Emergency unlocking/locking
using the electronic key
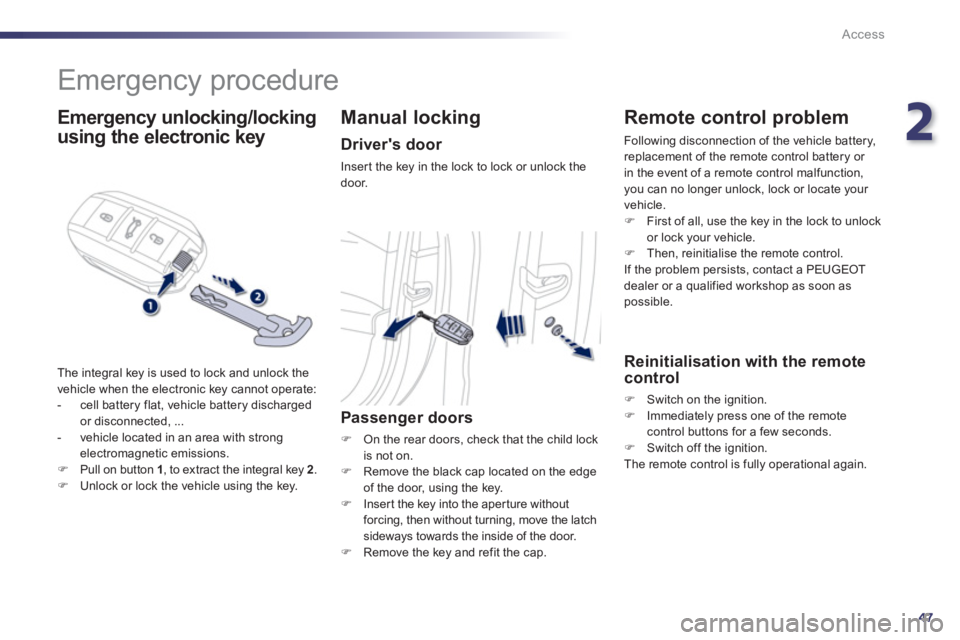
The integral key is used to lock and unlock the
vehicle when the electronic key cannot operate:
- cell battery flat, vehicle battery discharged
or disconnected, ...
- vehicle located in an area with strongelectromagnetic emissions.�)Pull on button 1, to extract the integral key 2
. �)Unlock or lock the vehicle using the key.
Manual locking
Driver's door
Inser t the key in the lock to lock or unlock thedoor.
Passenger doors
�)
On the rear doors, check that the child lock
is not on. �) Remove the black cap located on the edge
of the door, using the key.�) Insert the key into the aper ture withoutforcing, then without turning, move the latch
sideways towards the inside of the door.�)
Remove the key and refit the cap.
Remote control problem
Following disconnection of the vehicle battery,
replacement of the remote control battery or
in the event of a remote control malfunction,you can no longer unlock, lock or locate your
vehicle. �) First of all, use the key in the lock to unlock
or lock your vehicle. �) Then, reinitialise the remote control.
If the problem persists, contact a PEUGEOT
dealer or a qualified workshop as soon as
possible.
Reinitialisation with the remote control
�)
Switch on the ignition.�)
Immediately press one of the remotecontrol buttons for a few seconds.�)
Switch off the ignition.
The remote control is fully operational again.
Page 76 of 340
74
Comfort
Interior fi ttings
Glove box2.Storage3.Retractable cup holderPress the cover to open the cup holder 4.Removable ashtray
Press the lid to open the ashtray.
To e m p ty it, pull it out by pulling it upwards.5.Coin holder
6.Storage with sliding cover7.Front armrest8.12 V accessor y socket(120 W)Observe the maximum power rating toavoid damaging your accessory9.Peugeot Connect USB
Page 78 of 340
76
i
Comfort
Peugeot Connect USB
This connection box, consisting of a JACK
auxiliary socket and a USB port, is located in
the front armrest (under the cover).
It permits the connection of por table device,
such as a di
gital audio player of the iPod® type®
or a USB memory stick.
It reads the audio file formats (MP3, OGG,
WMA , WAV, ...) which are transmitted to your
audio equipment and played via the vehicle's
speakers.
You can mana
ge these files using the steering
mounted controls or the audio system control
panel and displa
y them in the instrument panel screen.
When the USB por t is used, the por table device
charges automatically.
For more information on the use of this system, refer to the "Audio andTelematics" section.
Ski flap
Device for storing and transporting longobjects.
Opening
�)Lower the armrest. �)Press the flap opening control.�)Lower the flap.�)Load the objects from inside the boot.
Page 179 of 340
8
177
i
i
Practical information
If after around 5 to 7 minutes the pressure is not attained, this indicates that the tyre is not repairable; contacta PEUGEOT dealer or a qualifiedworkshop for assistance.
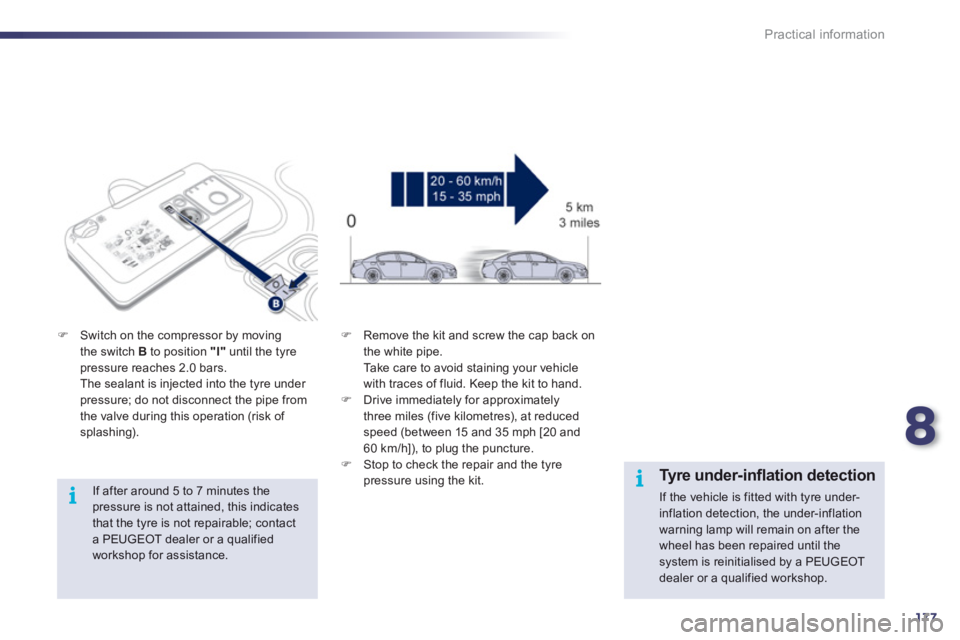
�)Switch on the compressor by moving
the switch B
to position "I"until the tyre pressure reaches 2.0 bars.
The sealant is injected into the tyre under pressure; do not disconnect the pipe from
the valve during this operation (risk of splashing).
�) Remove the kit and screw the cap back on
the white pipe.
Take care to avoid stainin
g your vehicle
with traces of fluid. Keep the kit to hand.
�) Drive immediately for approximately
three miles (five kilometres), at reducedspeed (between 15 and 35 mph [20 and 60 km/h]), to plug the puncture. �) Stop to check the repair and the tyre
pressure using the kit.
Tyre under-infl ation detection
If the vehicle is fitted with tyre under-inflation detection, the under-inflation warning lamp will remain on after thewheel has been repaired until thesystem is reinitialised by a PEUGEOT dealer or a qualified workshop.
Page 180 of 340
178
!
Practical information
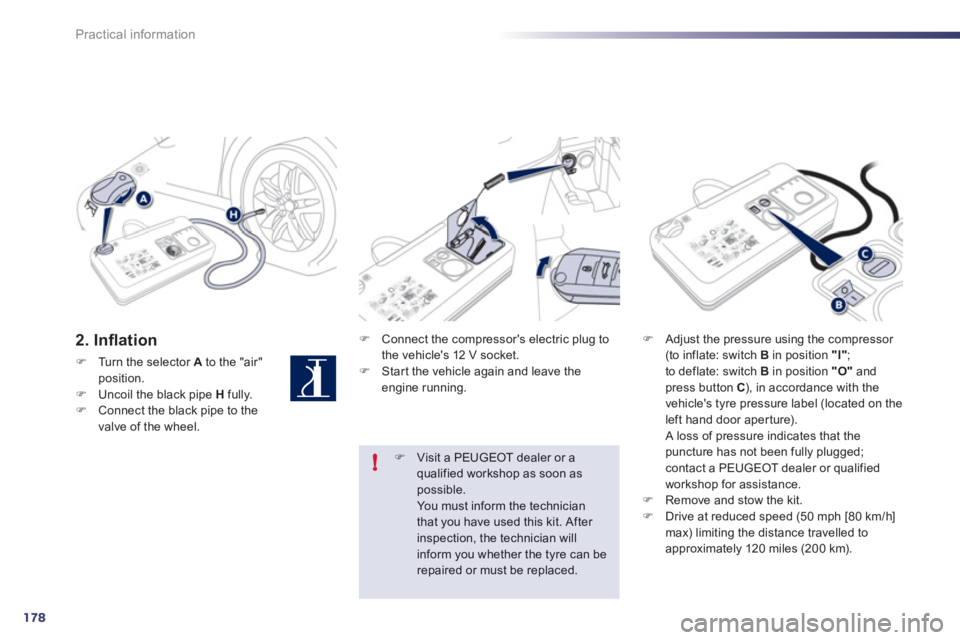
2. Infl ation
�)Turn the selector Ato the "air" position.�)Uncoil the black pipe Hfully. �)Connect the black pipe to the
valve of the wheel.
�) Connect the compressor's electric plug to
the vehicle's 12 V socket.�) Star t the vehicle again and leave the engine running.
�)Adjust the pressure using the compressor (to inflate: switch B
in position "I"
;
to deflate: switch B in position "O"and press button C ), in accordance with the
vehicle's tyre pressure label (located on the
left hand door aper ture).
A loss of pressure indicates that thepuncture has not been fully plugged; contact a PEUGEOT dealer or qualified
workshop for assistance.�)Remove and stow the kit.�)Drive at reduced speed (50 mph [80 km/h] max) limiting the distance travelled to
approximately 120 miles (200 km).
�)Visit a PEUGEOT dealer or aqualified workshop as soon aspossible. You must inform the technician that you have used this kit. After
inspection, the technician willinform you whether the tyre can berepaired or must be replaced.
Page 181 of 340
8
179
!
Practical information
Removing the cartridge
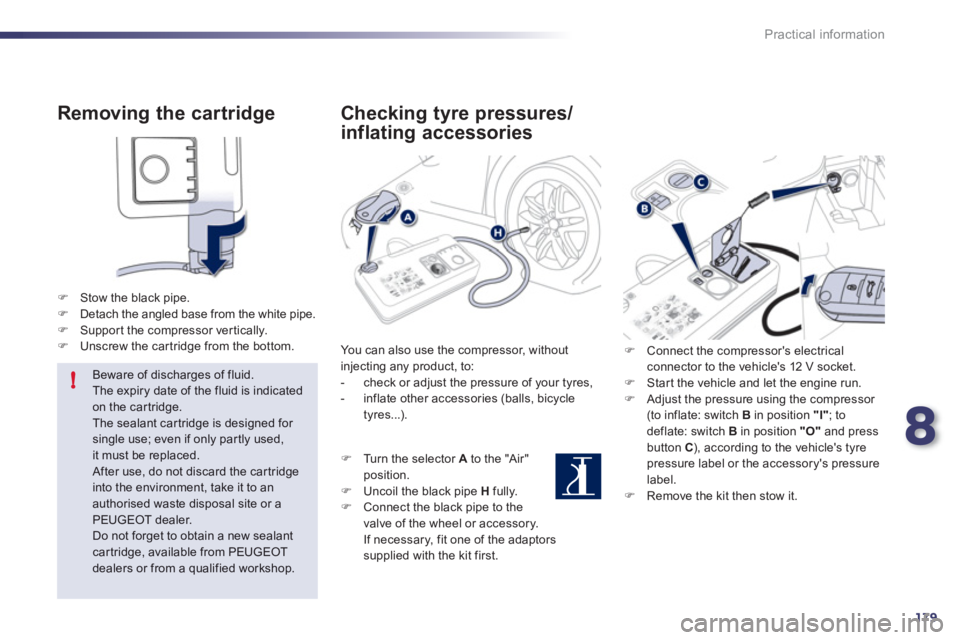
�)Stow the black pipe. �)Detach the angled base from the white pipe.�)Suppor t the compressor ver tically.�)Unscrew the car tridge from the bottom.
Beware of discharges of fluid.
The expiry date of the fluid is indicated on the car tridge.The sealant car tridge is designed for
single use; even if only partly used,it must be replaced. After use, do not discard the car tridgeinto the environment, take it to an authorised waste disposal site or a PEUGEOT dealer.
Do not forget to obtain a new sealantcartridge, available from PEUGEOT dealers or from a qualified workshop.
Checking tyre pressures/
inflating accessories
You can also use the compressor, withoutinjecting any product, to:
- check or adjust the pressure of your tyres,
- inflate other accessories (balls, bicycle
tyres...).
�)
Turn the selector Ato the "Air"
position.
�) Uncoil the black pipe H
fully.�)
Connect the black pipe to the
valve of the wheel or accessory.
If necessary, fit one of the adaptorssupplied with the kit first.
�) Connect the compressor's electrical connector to the vehicle's 12 V socket. �)
Star t the vehicle and let the engine run. �)
Adjust the pressure using the compressor (to inflate: switch B
in position "I"
; to deflate: switch B
in position "O"and press button C), according to the vehicle's tyrepressure label or the accessory's pressure
label. �) Remove the kit then stow it.
Page 190 of 340
188
!!
Practical information
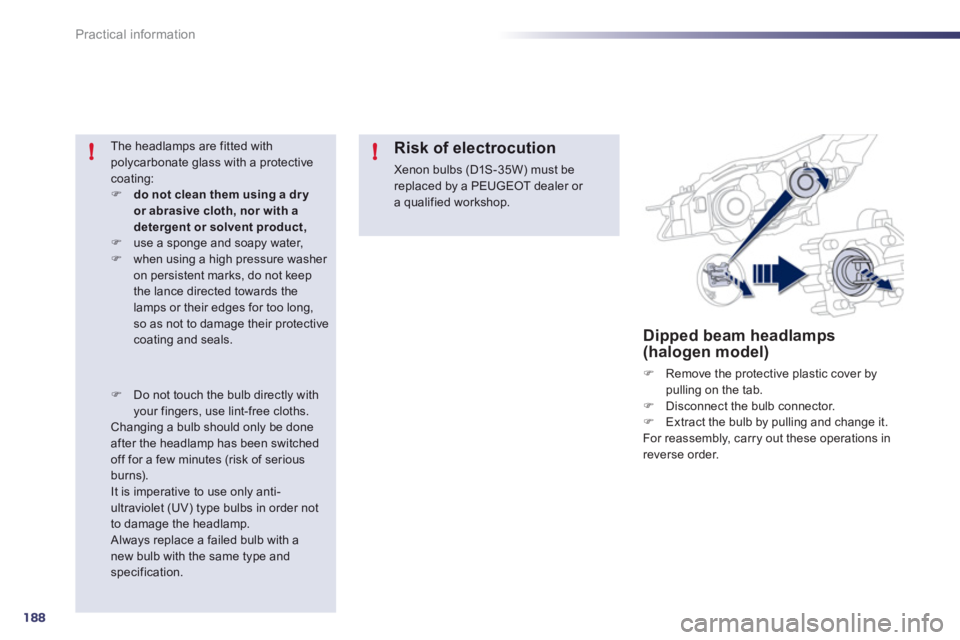
Dipped beam headlamps(halogen model)
�) Remove the protective plastic cover by pulling on the tab.�)
Disconnect the bulb connector.�)
Extract the bulb by pulling and change it.
For reassembly, carry out these operations in
reverse order.
The headlamps are fitted with
polycarbonate glass with a protectivecoating:�)do not clean them using a dryor abrasive cloth, nor with adetergent or solvent product,�)use a sponge and soapy water, �)when using a high pressure washer on persistent marks, do not keepthe lance directed towards thelamps or their edges for too long,so as not to damage their protectivecoating and seals.
Risk of electrocution
Xenon bulbs (D1S-35W) must bereplaced by a PEUGEOT dealer or a qualified workshop.
�)Do not touch the bulb directly withyour fingers, use lint-free cloths. Changing a bulb should only be done
after the headlamp has been switched off for a few minutes (risk of seriousburns). It is imperative to use only anti-ultraviolet (UV) type bulbs in order notto damage the headlamp. Always replace a failed bulb with a new bulb with the same type andspecification.