2012 PEUGEOT 5008 battery
[x] Cancel search: batteryPage 209 of 340
PRACTICAL INFORMATION
Do not disconnect the termi-
nals while the engine is run-
ning.
Do not charge the batteries
without disconnecting the ter-
minals fi rst.
Do not push the vehicle to start the
engine if it is fi tted with a 6-speed
electronic gear control gearbox or an
automatic gearbox.
The batteries contain harmful
substances such as sulphuric
acid and lead. They must be
disposed of in accordance with regu-
lations and must not, in any circum-
stances, be discarded with household
waste.
Take used remote control batteries
and vehicle batteries to a special col-
lection point.
Charging the battery using a
battery charger
�)
Disconnect the battery from the vehicle.
�)
Follow the instructions for use pro-
vided by the manufacturer of the
charger.
�)
Reconnect starting with the nega-
tive terminal (-).
�)
Check that the terminals and con-
nectors are clean. If they are
covered with sulphate (whitish or
greenish deposit), remove them and
clean them.
It is advisable to disconnect
the battery if the vehicle is to
be left unused for more than
one month.
Before disconnecting the battery
Wait 2 minutes after switching off the ig-
nition before disconnecting the battery.
Close the windows and the doors be-
fore disconnecting the battery.
Following reconnection of the
battery
Following reconnection of the battery,
switch on the ignition and wait 1 minute
before starting to permit initialisation
of the electronic systems. However, if
problems remain following this opera-
tion, contact a PEUGEOT dealer or a
qualifi ed workshop.
Referring to the corresponding section,
you must yourself reinitialise:
- the remote control key,
- the panoramic sunroof blind,
- the satellite navigation system.
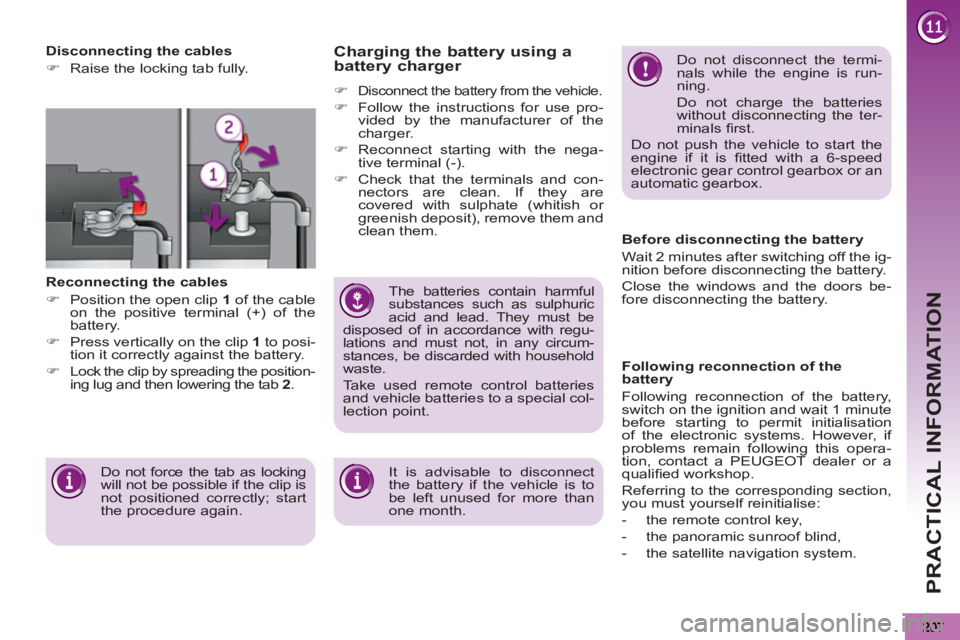
Disconnecting the cables
�)
Raise the locking tab fully.
Reconnecting the cables
�)
Position the open clip 1
of the cable
on the positive terminal (+) of the
battery.
�)
Press vertically on the clip 1
to posi-
tion it correctly against the battery.
�)
Lock the clip by spreading the position-
ing lug and then lowering the tab 2
.
Do not force the tab as locking
will not be possible if the clip is
not positioned correctly; start
the procedure again.
Page 210 of 340
PRACTICAL INFORMATION
208
Let the engine run for the
duration specifi ed to ensure
that the battery charge is suf-
fi cient.
Do not repeatedly and continuously
restart the engine in order to charge
the battery.
A fl at battery prevents the engine
from starting (refer to the "Battery"
paragraph). If the telephone is being used
at this time:
- i
t will be maintained for 5 minutes with
the hands-free kit of your Peugeot
Connect Sound or Peugeot Connect
Navigation,
- it will still be possible to fi nish the
call with the Peugeot Connect
Media.
Exiting economy mode
These functions are reactivated auto-
matically next time the vehicle is driven.
To restore the use of these functions im-
mediately, start the engine and let it run
for at least 5 minutes.
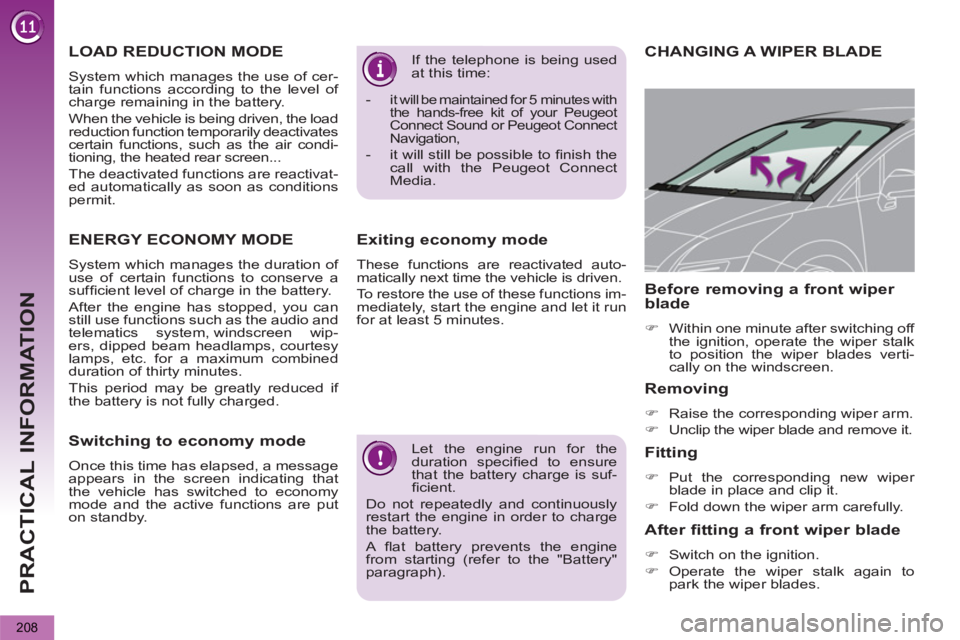
CHANGING A WIPER BLADE
Removing
�)
Raise the corresponding wiper arm.
�)
Unclip the wiper blade and remove it.
Fitting
�)
Put the corresponding new wiper
blade in place and clip it.
�)
Fold down the wiper arm carefully.
Before removing a front wiper
blade
�)
Within one minute after switching off
the ignition, operate the wiper stalk
to position the wiper blades verti-
cally on the windscreen.
After fitting a front wiper blade
�)
Switch on the ignition.
�)
Operate the wiper stalk again to
park the wiper blades.
LOAD REDUCTION MODE
System which manages the use of cer-
tain functions according to the level of
charge remaining in the battery.
When the vehicle is being driven, the load
reduction function temporarily deactivates
certain functions, such as the air condi-
tioning, the heated rear screen...
The deactivated functions are reactivat-
ed automatically as soon as conditions
permit.
ENERGY ECONOMY MODE
System which manages the duration of
use of certain functions to conserve a
suffi cient level of charge in the battery.
After the engine has stopped, you can
still use functions such as the audio and
telematics system, windscreen wip-
ers, dipped beam headlamps, courtesy
lamps, etc. for a maximum combined
duration of thirty minutes.
This period may be greatly reduced if
the battery is not fully charged.
Switching to economy mode
Once this time has elapsed, a message
appears in the screen indicating that
the vehicle has switched to economy
mode and the active functions are put
on standby.
Page 226 of 340
224
EMERGENCY OR ASSISTANCE CALL
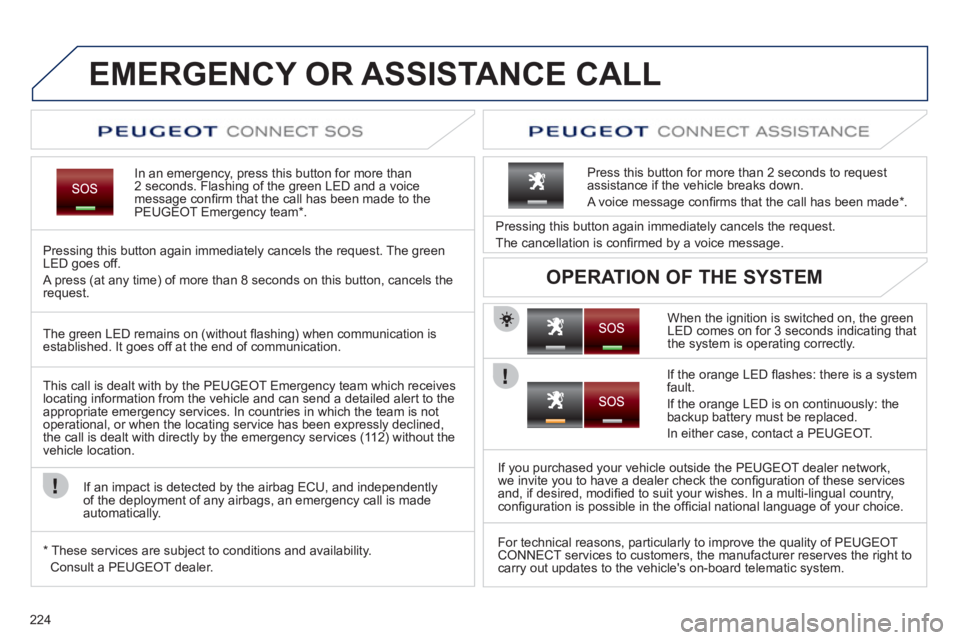
In an emergency, press this button for more than2 seconds. Flashing of the green LED and a voice
message confi rm that the call has been made to the
PEUGEOT Emergency team * .
Pressing this button again immediately cancels the request. The green
LED goes off.
A press
(at any time) of more than 8 seconds on this button, cancels the
request.
When the i
gnition is switched on, the green
LED comes on for 3 seconds indicating that
the system is operating correctly. Pressin
g this button again immediately cancels the request.
The cancellation is confi rmed b
y a voice message.
Press this button
for more than 2 seconds to requestassistance if the vehicle breaks down.
A voice message confi rms that the call has been made *
.
OPERATION OF THE SYSTEM
The green LED remains on (without fl ashing) when communication is established. It goes off at the end of communication.
This call is dealt with b
y the PEUGEOT Emergency team which receiveslocating information from the vehicle and can send a detailed alert to theappropriate emergency services. In countries in which the team is not
operational, or when the locating service has been expressly declined,
the call is dealt with directly by the emergency services (11 2) without the
vehicle location.
I
f an impact is detected by the airbag ECU, and independentlyof the deployment of any airbags, an emergency call is made
automatically.
*
These services are sub
ject to conditions and availability.
Consult a PEUGEOT dealer.
I
f the orange LED fl ashes: there is a systemfault.
I
f the orange LED is on continuously: the
backup battery must be replaced.
In either case, contact a PEUGE
OT.
I
f you purchased your vehicle outside the PEUGEOT dealer network,
we invite you to have a dealer check the confi guration of these servicesand, if desired, modifi ed to suit your wishes. In a multi-lingual country, confi guration is possible in the offi cial national language of your choice.
For technical reasons, particularl
y to improve the quality of PEUGEOTCONNECT services to customers, the manufacturer reserves the right to carry out updates to the vehicle's on-board telematic system.
Page 229 of 340
227
2ABC3DEF5JKL4GHI6MNO8TUV7PQRS9WXYZ0*#
1
RADIO MEDIANAV ESC TRAFFIC
SETUPADDR
BOOK
The Peugeot Connect Media is protected in such a
way that it will only operate in your vehicle. If it is to be
installed in another vehicle, contact a PEUGEOT dealer for confi guration of the system.
Certain functions described in this handbook will
become available during the course of the year.
Peugeot ConnectMedia
For safety reasons, it is imperative that the driver carries out operations which require prolonged attention
while the vehicle is stationary.
When the en
gine is switched off and to prevent
discharging of the battery, the Peugeot Connect Mediaswitches off following the activation of the Energy Economy mode.
01 First steps
02 Voice commands and
steering mounted controls
03 General operation
04 Navigation - Guidance
05 Traffic information
06 Radio
07 Music media players
08 Using the telephone
09 Configuration
10 Screen menu map p.
p.
p.
p.
p.
p.
p.
p.
p.
p. 228
230
233
238
247
249
250
255
260
261
CONTENTS
Frequently asked questions p. 2
66
MULTIMEDIA AUDIO SYSTEM/BLUETOOTH TELEPHONE
GPS EUROPE
Page 262 of 340
260
09
1
4
5
3
SETUP
26
2ABC3DEF5JKL4GHI6MNO8TUV7PQRS9WXYZ0*#
1RADIO MEDIANAV ESC TRAFFIC
SETUPADDR
BOOK
2ABC3DEF5JKL4GHI6MNO8TUV7PQRS9WXYZ0*#
1RADIO MEDIANAV ESC TRAFFIC
SETUPADDR
BOOK
2ABC3DEF5JKL4GHI6MNO8TUV7PQRS9WXYZ0*#
1RADIO MEDIANAV ESC TRAFFIC
SETUPADDR
BOOK
2ABC3DEF5JKL4GHI6MNO8TUV7PQRS9WXYZ0*#
1RADIO MEDIANAV ESC TRAFFIC
SETUPADDR
BOOK
2ABC3DEF5JKL4GHI6MNO8TUV7PQRS9WXYZ0*#
1RADIO MEDIANAV ESC TRAFFIC
SETUPADDR
BOOK
2ABC3DEF5JKL4GHI6MNO8TUV7PQRS9WXYZ0*#
1NAV ESC TRAFFICADDR
BOOKSETUP
CONFIGURATION
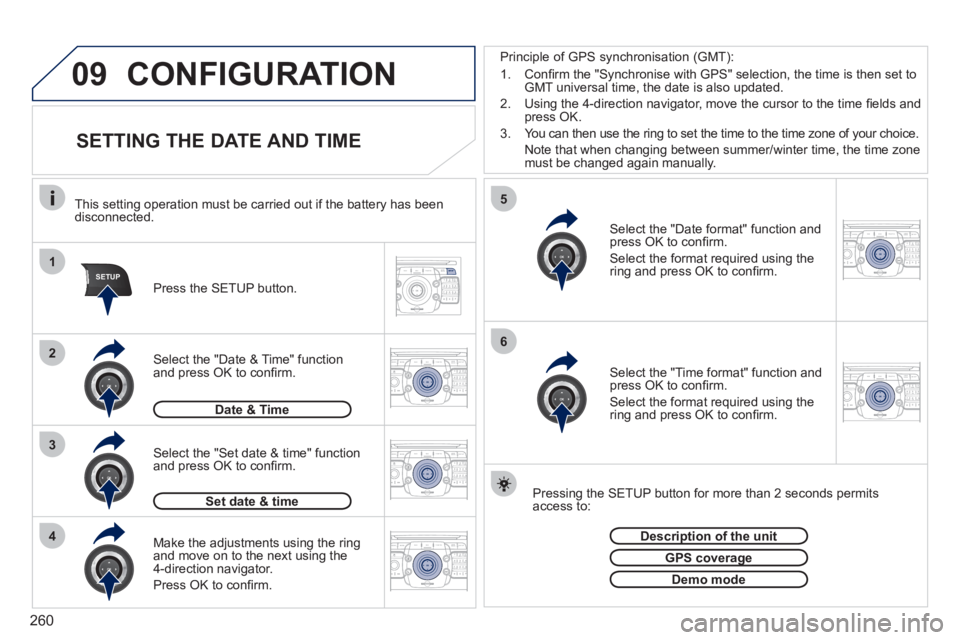
SETTING THE DATE AND TIME
Make the adjustments using the ringand move on to the next using the
4-direction navigator.
Pr
ess OK to confi rm.
Select the "Date format" function andpress OK to confi rm.
Select the format required using thering and press OK to confi rm.
Select the "Set date
& time" functionand press OK to confi rm.
Pressin
g the SETUP button for more than 2 seconds permits access to:
This setting operation must be carried out i
f the battery has been disconnected.
Pr
ess the SETUP button.
Select the "Time format" function and press OK to confi rm.
Select the format required usin
g thering and press OK to confi rm.
Set date & time
Select the "Date & Time" function and press OK to confi rm.
Description of the unitp
GPS coverageg
Demo mode
Date & Time
Principle of GPS synchronisation (GMT):
1. Confi rm the "S
ynchronise with GPS" selection, the time is then set to
GMT universal time, the date is also updated.
2. Usin
g the 4-direction navigator, move the cursor to the time fi elds andpress OK.
3. You can then use the rin
g to set the time to the time zone of your choice.
Note that when changing between summer
/winter time, the time zone must be changed again manually.
Page 269 of 340
267
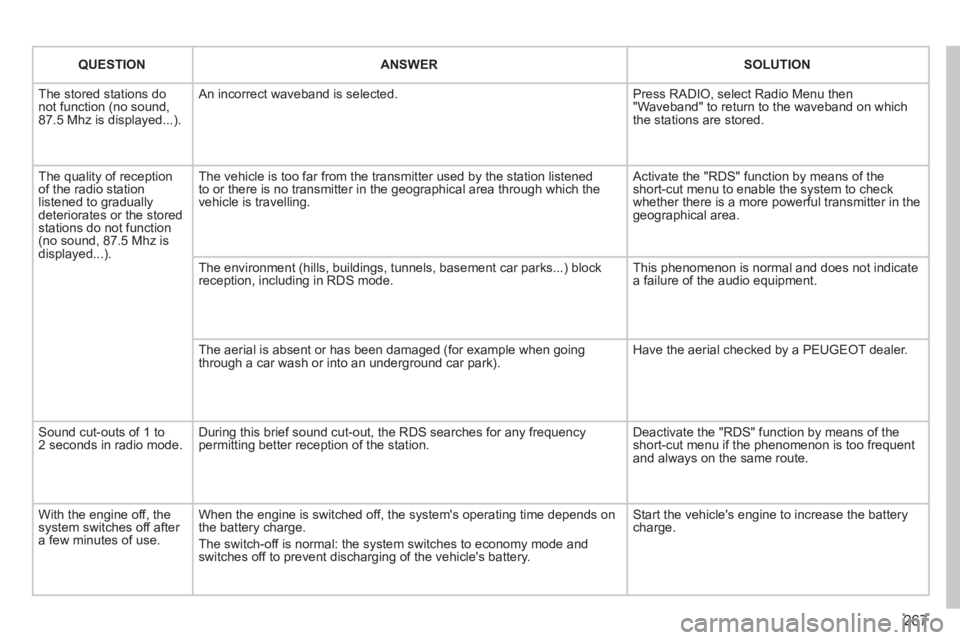
QUESTION
ANSWER
SOLUTION
The stored stations donot function (no sound, 87.5 Mhz is displayed...).
An incorrect waveband is selected.
Press RADIO, select Radio Menu then"Waveband" to return to the waveband on which the stations are stored.
The quality of receptionof the radio station listened to graduallydeteriorates or the stored stations do not function(no sound, 87.5 Mhz is displayed...).
The vehicle is too far from the transmitter used by the station listenedto or there is no transmitter in the geographical area through which the vehicle is travelling.
Activate the "RDS" function by means of theshort-cut menu to enable the system to check whether there is a more powerful transmitter in thegeographical area.
The environment (hills, buildings, tunnels, basement car parks...) block reception, including in RDS mode.
This phenomenon is normal and does not indicate a failure of the audio equipment.
The aerial is absent or has been damaged (for example when goingthrough a car wash or into an underground car park).
Have the aerial checked by a PEUGEOT dealer.
Sound cut-outs of 1 to2 seconds in radio mode.During this brief sound cut-out, the RDS searches for any frequency permitting better reception of the station.
Deactivate the "RDS" function by means of the short-cut menu if the phenomenon is too frequentand always on the same route.
With the engine off, the system switches off after a few minutes of use.
When the engine is switched off, the system's operating time depends on the battery charge.
The switch-off is normal: the system switches to economy mode and switches off to prevent discharging of the vehicle's battery.
Start the vehicle's engine to increase the batterycharge.
Page 273 of 340
271
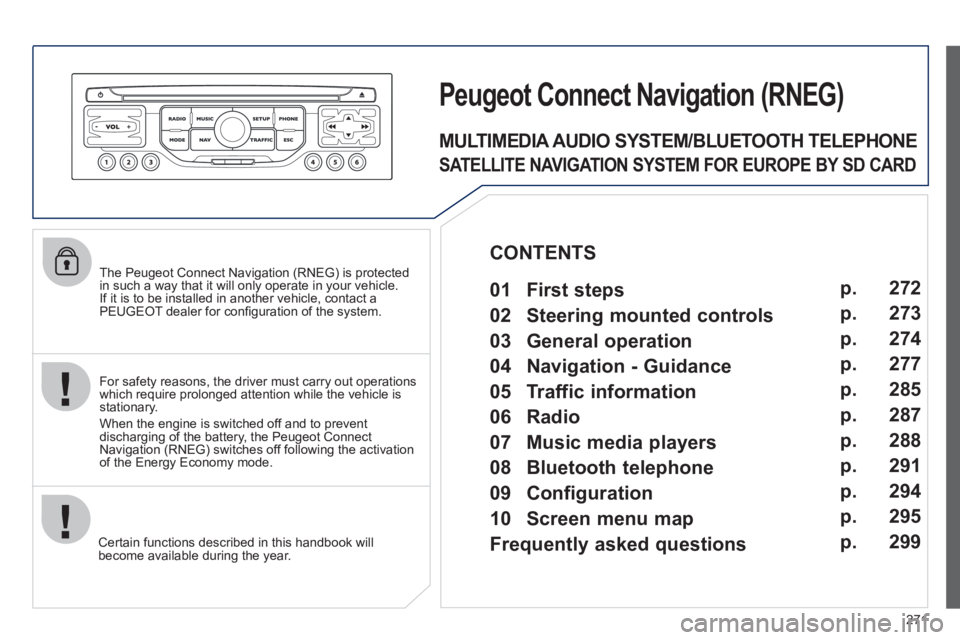
The Peugeot Connect Navigation (RNEG) is protected in such a way that it will only operate in your vehicle.
If it is to be installed in another vehicle, contact aPEUGEOT dealer for confi guration of the system.
Certain functions described in this handbook will
become available during the year.
Peugeot CtonnectNtavigation (RNEG)
For safety reasons, the driver must carry out operations which require prolonged attention while the vehicle is stationary.
When the en
gine is switched off and to prevent
discharging of the battery, the Peugeot Connect
Navigation (RNEG) switches off following the activation of the Energy Economy mode.
MULTIMEDIA AUDIO SYSTEM/BLUETOOTH TELEPHONE
SATELLITE NAVIGATION SYSTEM FOR EUROPE BY SD CARD
01 First steps
CONTENTS
02 Steering mounted controls
03 General operation
04 Navigation - Guidance
05 Traffic information
06 Radio
07 Music media players
08 Bluetooth telephone
09 Configuration
10 Screen menu map p.
p.
p.
p.
p.
p.
p.
p.
p.
p.
Frequently asked questions p. 272
273
274
277
285
287
288
291
294
295
299
Page 296 of 340
294
09
4 3 2 1
65
CONFIGURATION
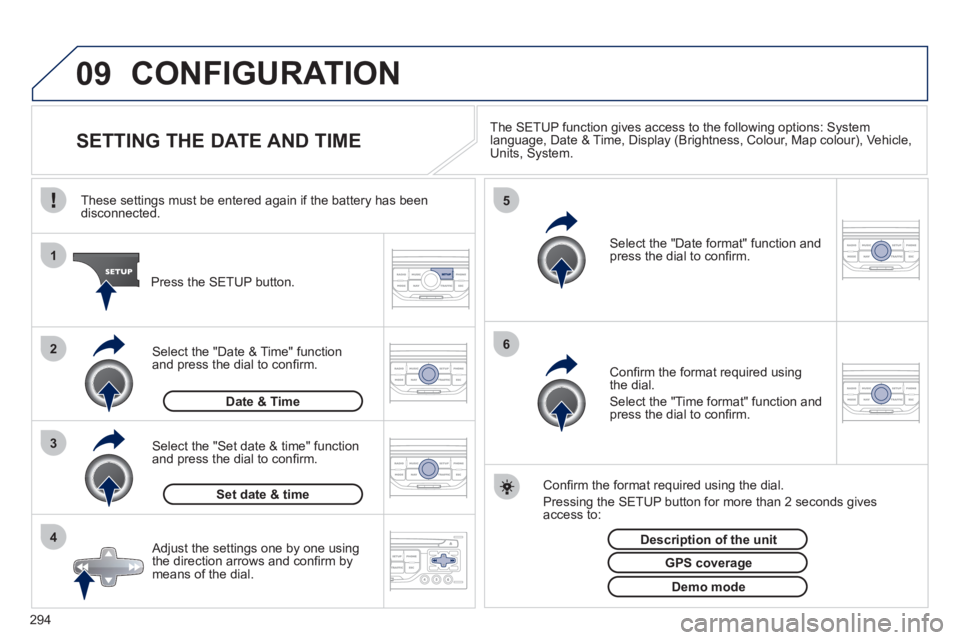
SETTING THE DATE AND TIME The SETUP function gives access to the following options: Systemlanguage, Date & Time, Display (Brightness, Colour, Map colour), Vehicle,Units, System.
Adjust the settings one by one usingthe direction arrows and confi rm bymeans of the dial.
Select the "Date format" function andpress the dial to confi rm.
Select the "Set date
& time" function
and press the dial to confi rm.
Confi rm the format required using the dial.
Pressing the
SETUP button for more than 2 seconds gives access to: These settin
gs must be entered again if the battery has been disconnected.
Pr
ess the SETUP button.
Confi rm the format required usingthe dial.
Select the "Time format" function and press the dial to confi rm.
Set date & tim
e
Select the "Date & Time" function
and press the dial to confi rm.
Demo mode
GPS coverage
Description of the unit
Date & Time