2012 PEUGEOT 5008 door lock
[x] Cancel search: door lockPage 89 of 340
AC
87
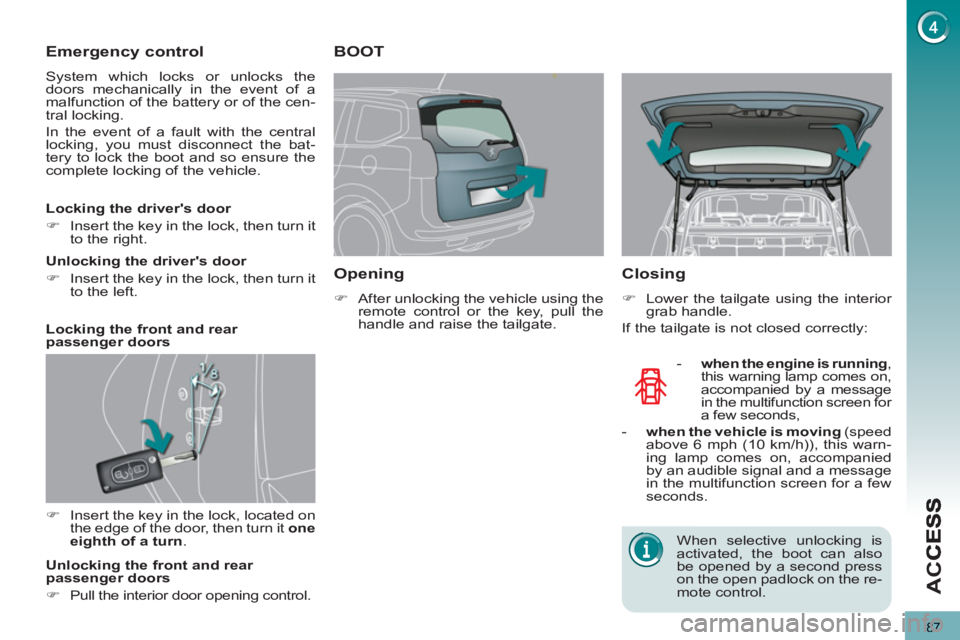
Emergency control
System which locks or unlocks the
doors mechanically in the event of a
malfunction of the battery or of the cen-
tral locking.
In the event of a fault with the central
locking, you must disconnect the bat-
tery to lock the boot and so ensure the
complete locking of the vehicle.
�)
Insert the key in the lock, located on
the edge of the door, then turn it one
eighth of a turn
.
Locking the driver's door
�)
Insert the key in the lock, then turn it
to the right.
Unlocking the driver's door
�)
Insert the key in the lock, then turn it
to the left.
Locking the front and rear
passenger doors
Unlocking the front and rear
passenger doors
�)
Pull the interior door opening control.
BOOT
Openin
g
�)
After unlocking the vehicle using the
remote control or the key, pull the
handle and raise the tailgate.
- when the engine is running
,
this warning lamp comes on,
accompanied by a message
in the multifunction screen for
a few seconds,
- when the vehicle is moving
(speed
above 6 mph (10 km/h)), this warn-
ing lamp comes on, accompanied
by an audible signal and a message
in the multifunction screen for a few
seconds.
Closing
�)
Lower the tailgate using the interior
grab handle.
If the tailgate is not closed correctly:
When selective unlocking is
activated, the boot can also
be opened by a second press
on the open padlock on the re-
mote control.
Page 101 of 340
VIS
99
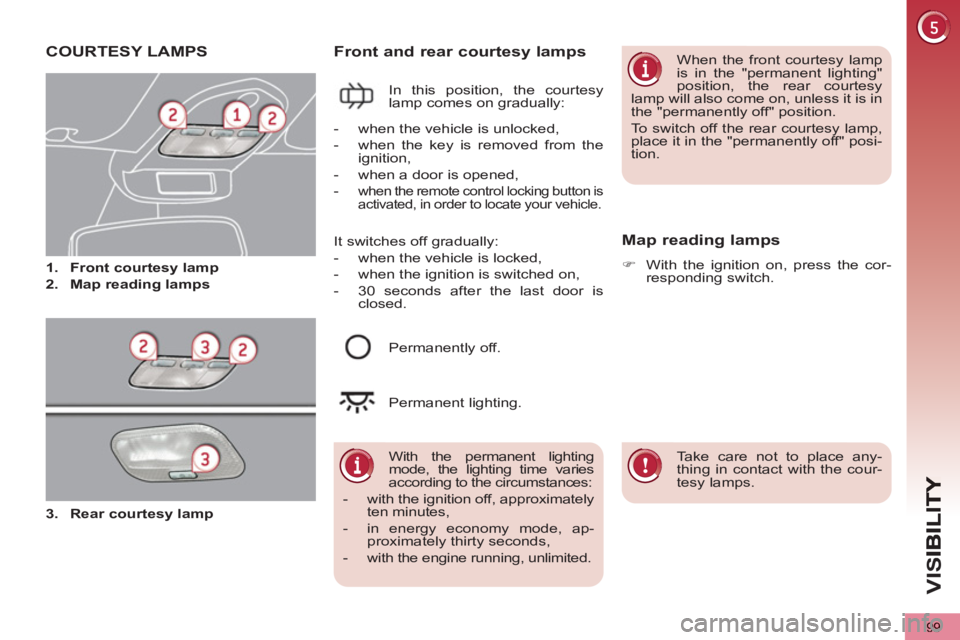
COURTESY LAMPS
1.
Front courtesy lamp
2.
Map reading lamps
Front and rear courtesy lamps
In this position, the courtesy
lamp comes on gradually:
Map reading lamps
�)
With the ignition on, press the cor-
responding switch.
With the permanent lighting
mode, the lighting time varies
according to the circumstances:
- with the ignition off, approximately
ten minutes,
- in energy economy mode, ap-
proximately thirty seconds,
- with the engine running, unlimited.
- when the vehicle is unlocked,
- when the key is removed from the
ignition,
- when a door is opened,
-
when the remote control locking button is
activated, in order to locate your vehicle.
Permanently off.
Permanent lighting. When the front courtesy lamp
is in the "permanent lighting"
position, the rear courtesy
lamp will also come on, unless it is in
the "permanently off" position.
To switch off the rear courtesy lamp,
place it in the "permanently off" posi-
tion.
Take care not to place any-
thing in contact with the cour-
tesy lamps. It switches off gradually:
- when the vehicle is locked,
- when the ignition is switched on,
- 30 seconds after the last door is
closed.
3.
Rear courtesy lamp
Page 102 of 340
VIS
100
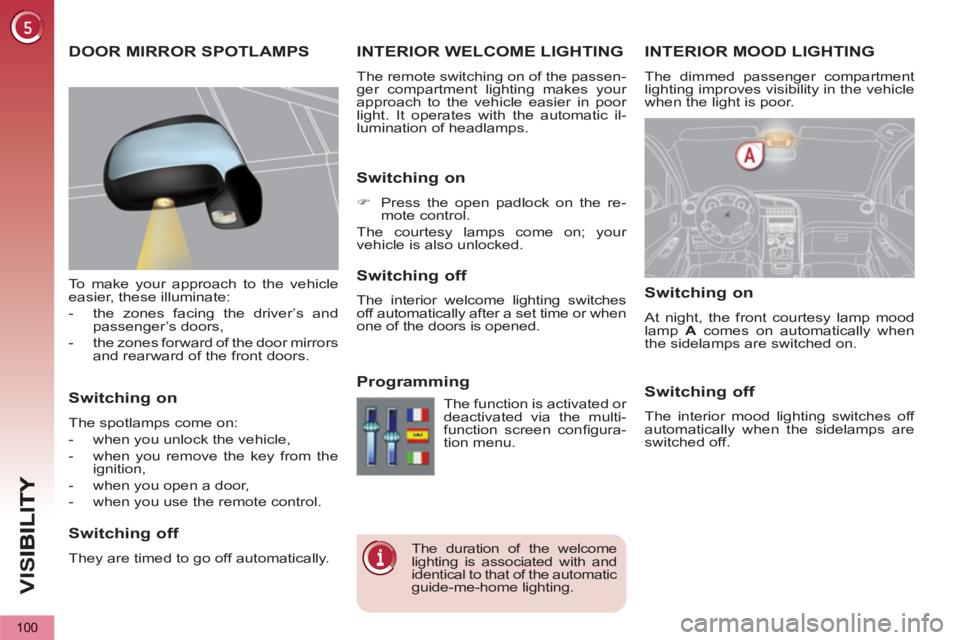
INTERIOR MOOD LIGHTING
The dimmed passenger compartment
lighting improves visibility in the vehicle
when the light is poor.
INTERIOR WELCOME LIGHTING
The remote switching on of the passen-
ger compartment lighting makes your
approach to the vehicle easier in poor
light. It operates with the automatic il-
lumination of headlamps.
Switching on
�)
Press the open padlock on the re-
mote control.
The courtesy lamps come on; your
vehicle is also unlocked.
Switching off
The interior welcome lighting switches
off automatically after a set time or when
one of the doors is opened.
Programming
Switching on
At night, the front courtesy lamp mood
lamp A
comes on automatically when
the sidelamps are switched on.
Switching off
The interior mood lighting switches off
automatically when the sidelamps are
switched off.
The duration of the welcome
lighting is associated with and
identical to that of the automatic
guide-me-home lighting. The function is activated or
deactivated via the multi-
function screen confi gura-
tion menu.
DOOR MIRROR SPOTLAMPS
To make your approach to the vehicle
easier, these illuminate:
- the zones facing the driver’s and
passenger’s doors,
- the zones forward of the door mirrors
and rearward of the front doors.
Switching on
The spotlamps come on:
- when you unlock the vehicle,
- when you remove the key from the
ignition,
- when you open a door,
- when you use the remote control.
Switching off
They are timed to go off automatically.
Page 124 of 340
CHILD SAFETY
122
ADVICE ON CHILD SEATS
The incorrect installation of a child
seat in a vehicle compromises the
child's protection in the event of an
accident.
Remember to fasten the seat belts or
the child seat harnesses keeping the
slack relative to the child's body to a
minimum, even for short journeys.
When installing a child seat using the
seat belt, ensure that the seat belt is
tightened correctly on the child seat
and that it secures the child seat fi rm-
ly on the seat of your vehicle. Move
the seat forwards if necessary.
For optimum installation of the "for-
wards-facing" child seat, ensure that
the back of the child seat is in contact
with the back of the vehicle's seat
and that the head restraint does not
cause any discomfort.
If the head restraint has to be removed,
ensure that it is stored or attached se-
curely to prevent it from being thrown
around the vehicle in the event of
sharp braking.
Installing a booster seat
The chest part of the seat belt must
be positioned on the child's shoulder
without touching the neck.
Ensure that the lap part of the seat
belt passes correctly over the child's
thighs.
PEUGEOT recommends the use of
a booster seat which has a back, fi t-
ted with a seat belt guide at shoulder
level.
As a safety precaution, do not leave:
- a child or children alone and un-
supervised in a vehicle,
- a child or an animal in a vehicle
which is exposed to the sun, with
the windows closed,
- the keys within reach of children
inside the vehicle. To prevent accidental opening of
the doors and rear windows, use
the "Child lock".
Take care not to open the rear win-
dows by more than one third.
To protect young children from the
rays of the sun, fi t side blinds on the
rear windows.
Children under the age of 10 must
not travel in the "forwards-facing"
position on the front passenger seat,
unless the rear seats are already oc-
cupied by other children, cannot be
used or are absent.
Deactivate the passenger airbag
when a "rearwards-facing" child seat
is installed on the front seat.
Otherwise, the child would risk being
seriously injured or killed if the airbag
were to infl ate.
Page 129 of 340
CHILD SAFETY
127
This system is independent
and in no circumstances does
it take the place of the central
locking control.
Check the status of the child lock
each time you switch on the ignition.
Always remove the key from the igni-
tion when leaving the vehicle, even
for a short time.
In the event of a serious impact, the
electric child lock is switched off au-
tomatically to permit the exit of the
rear passengers.
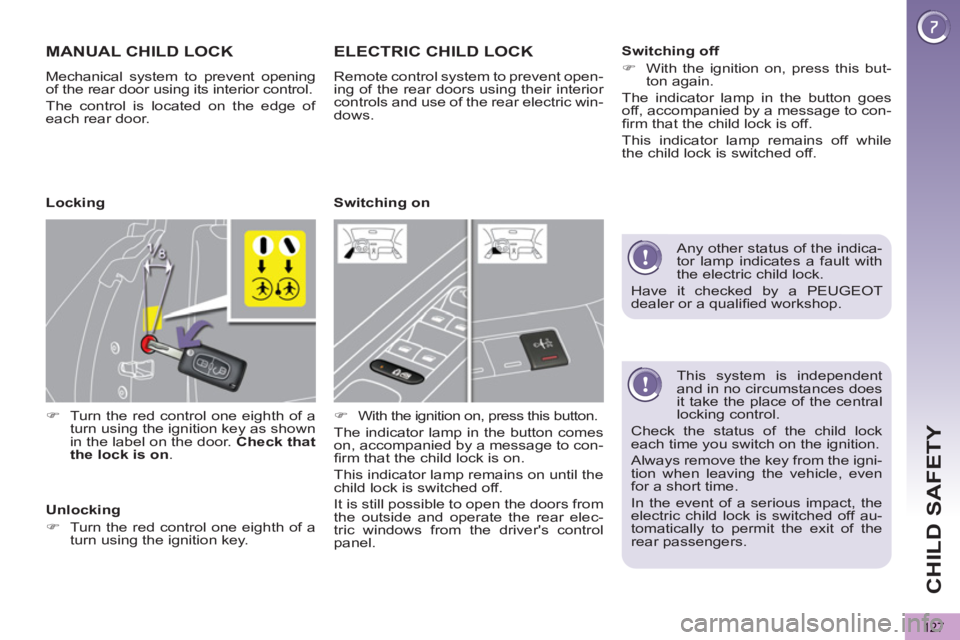
MANUAL CHILD LOCK
Mechanical system to prevent opening
of the rear door using its interior control.
The control is located on the edge of
each rear door.
�)
Turn the red control one eighth of a
turn using the ignition key as shown
in the label on the door. Check that
the lock is on
.
ELECTRIC CHILD LOCK
Remote control system to prevent open-
ing of the rear doors using their interior
controls and use of the rear electric win-
dows.
�)
With the ignition on, press this button.
The indicator lamp in the button comes
on, accompanied by a message to con-
fi rm that the child lock is on.
This indicator lamp remains on until the
child lock is switched off.
It is still possible to open the doors from
the outside and operate the rear elec-
tric windows from the driver's control
panel.
Locking
Unlocking
�)
Turn the red control one eighth of a
turn using the ignition key.
Switching on
Switching off
�)
With the ignition on, press this but-
ton again.
The indicator lamp in the button goes
off, accompanied by a message to con-
fi rm that the child lock is off.
This indicator lamp remains off while
the child lock is switched off.
Any other status of the indica-
tor lamp indicates a fault with
the electric child lock.
Have it checked by a PEUGEOT
dealer or a qualifi ed workshop.
Page 165 of 340

D
R
163
Stopping the vehicle
Before switching off the engine, you
can engage position P
or N
to place the
gearbox in neutral.
In both cases, apply the parking brake
to immobilise the vehicle, unless it is
programmed to automatic mode.
Operating fault
When the ignition is on, the
lighting of this warning lamp,
accompanied by an audible
signal and a message in the
multifunction screen, indicates
a gearbox malfunction.
In this case, the gearbox switches to
back-up mode and is locked in 3rd gear.
You may feel a substantial knock when
changing from P
to R
and from N
to R
.
This will not cause any damage to the
gearbox.
Do not exceed 60 mph (100 km/h), local
speed restrictions permitting.
Have it checked by a PEUGEOT dealer
or a qualifi ed workshop.
This warning lamp may also come on if
a door is opened.
You risk damaging the gear-
box:
Manual operation
�)
Select position M
for sequential
changing of the six gears.
�)
Push the lever towards the +
sign to
change up a gear.
�)
Pull the lever towards the -
sign to
change down a gear.
D
disappears and the gears
engaged appear in succes-
sion in the instrument panel.
If the lever is not in position P
,
when the driver's door is opened
or approximately 45 seconds af-
ter the ignition is switched off, there is an
audible signal and a message appears.
�)
Return the lever to position P
; the
audible signal stops and the mes-
sage disappears.
It is only possible to change from one
gear to another if the vehicle speed and
engine speed permit; otherwise, the
gearbox will operate temporarily in au-
tomatic mode.
Invalid value during manual
operation
This symbol is displayed if a
gear is not engaged correctly
(selector between two posi-
tions).
It is possible to change from position D
(automatic) to position M
(manual) at
any time.
When the vehicle is stationary or mov-
ing very slowly, the gearbox selects
gear M1
automatically.
The sport and snow programmes do not
operate in manual mode. If the engine speed is too low or too
high, the gear selected fl ashes for a few
seconds, then the actual gear engaged
is displayed.
- if you press the accelerator and
brake pedals at the same time,
- if you force the lever from posi-
tion P
to another position when
the battery is fl at.
To reduce fuel consumption when
stationary for long periods with the
engine running (traffi c jam...), posi-
tion the gear lever at N
and apply
the parking brake, unless it is pro-
grammed in automatic mode.
Page 209 of 340
PRACTICAL INFORMATION
Do not disconnect the termi-
nals while the engine is run-
ning.
Do not charge the batteries
without disconnecting the ter-
minals fi rst.
Do not push the vehicle to start the
engine if it is fi tted with a 6-speed
electronic gear control gearbox or an
automatic gearbox.
The batteries contain harmful
substances such as sulphuric
acid and lead. They must be
disposed of in accordance with regu-
lations and must not, in any circum-
stances, be discarded with household
waste.
Take used remote control batteries
and vehicle batteries to a special col-
lection point.
Charging the battery using a
battery charger
�)
Disconnect the battery from the vehicle.
�)
Follow the instructions for use pro-
vided by the manufacturer of the
charger.
�)
Reconnect starting with the nega-
tive terminal (-).
�)
Check that the terminals and con-
nectors are clean. If they are
covered with sulphate (whitish or
greenish deposit), remove them and
clean them.
It is advisable to disconnect
the battery if the vehicle is to
be left unused for more than
one month.
Before disconnecting the battery
Wait 2 minutes after switching off the ig-
nition before disconnecting the battery.
Close the windows and the doors be-
fore disconnecting the battery.
Following reconnection of the
battery
Following reconnection of the battery,
switch on the ignition and wait 1 minute
before starting to permit initialisation
of the electronic systems. However, if
problems remain following this opera-
tion, contact a PEUGEOT dealer or a
qualifi ed workshop.
Referring to the corresponding section,
you must yourself reinitialise:
- the remote control key,
- the panoramic sunroof blind,
- the satellite navigation system.
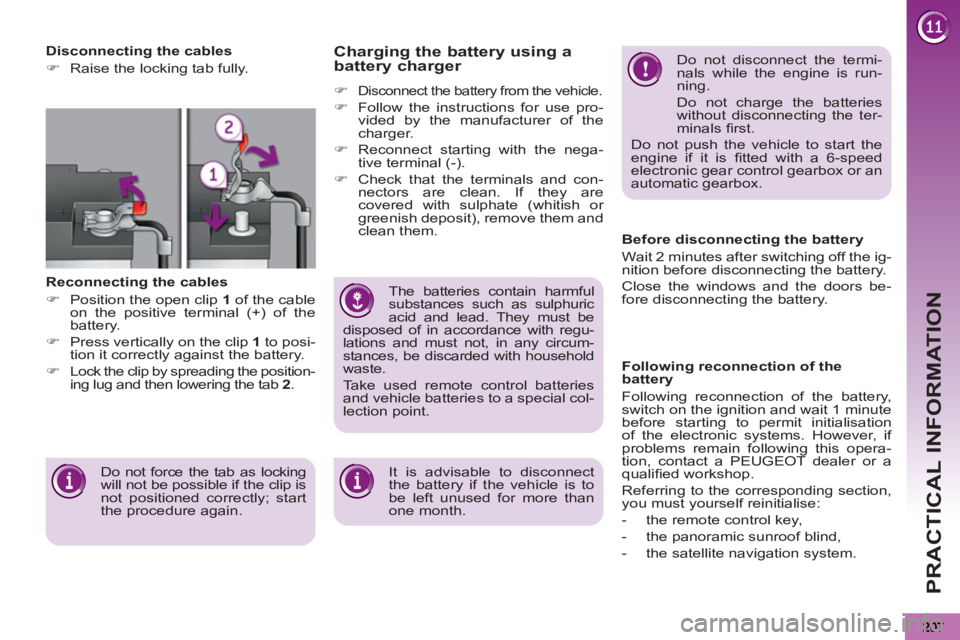
Disconnecting the cables
�)
Raise the locking tab fully.
Reconnecting the cables
�)
Position the open clip 1
of the cable
on the positive terminal (+) of the
battery.
�)
Press vertically on the clip 1
to posi-
tion it correctly against the battery.
�)
Lock the clip by spreading the position-
ing lug and then lowering the tab 2
.
Do not force the tab as locking
will not be possible if the clip is
not positioned correctly; start
the procedure again.
Page 327 of 340

ALPHABETICAL INDEX
325
Accessories ...........................213
Accessory socket,
12 volt ...102, 104, 109, 110, 114
Access to the 3rd row ..............71
Adjusting headlamps .........94, 95
Adjusting
head restraints ................67, 69
Adjusting seat
belt height ...................132, 133
Adjusting
the steering wheel .................75
Airbags ....................................36
Airbags, curtain..............138, 139
Airbags, front .................136, 139
Airbags, lateral...............138, 139
Air conditioning ........................25
Air conditioning, digital.......59, 62
Air conditioning,
manual ............................59, 60
Air fi lter ..................................177
Air fl ow .....................................25
Air vents...................................58
Alarm .......................................81
Anti-pinch.........................83, 108
Anti-theft ..................................78
Armrest, rear .......................... 110
Assistance call .......................224
Audible warning .....................128
Audio/video sockets...............254
Audio streaming
(Bluetooth) ..........................315
Automatic illumination of
headlamps ......................91, 94
Automatic operation of hazard
warning lamps .....................128
Automatic rain sensitive
windscreen wipers ..........96, 98
Auxiliary
socket .........254, 290, 310, 312Battery ...........................177, 206
Battery, charging ....................206
Battery, remote control ......79, 80
Blind for panoramic
sunroof ................................108
Blinds ..................................... 115
Bluetooth (hands-
free) .... 255-257, 291, 292, 313
Bluetooth
(telephone) .... 255-257, 291, 292
Bonnet ...................................172
Bonnet stay............................172
Boot .........................................87
Boot lamp ...................... 101, 115
Brake discs ............................178
Brake lamps...........................197
Brake pads ............................178
Brakes ...................................178Checks...........174, 175, 177, 178
Child lock ...............................127
Children .................120, 124, 125
Child seats ............................ 116
Child seats,
conventional ................ 118, 120
Closing the boot.................77, 87
Closing the doors...............77, 85
Cold climate screen ...............212
Colour screen,
retractable .................49, 51, 53
Concertina boards ..... 72, 109, 110
Connectors,
audio ....103, 104, 290, 310, 312
Control for panoramic
sunroof blind .......................108
Coolant level ....................37, 176
Coolant temperature
indicator ................................37
Courtesy lamps........................99
Courtesy mirror ......................103
Cruise control ........................154
Cup holder ............. 102, 109, 110
A
B
Capacity, fuel tank ...................89
CD MP3 .........................289, 309
Central locking ...................77, 86
Centre console ......................104
Changing a bulb ....194, 197, 198
Changing a fuse ....................199
Changing a wheel ..........188, 190
Changing
a wiper blade ................98, 208
Changing
the date ...............260, 294, 317
Changing the remote
control battery .......................79
Changing
the time ...............260, 294, 317
Checking levels .............176, 177
Checking the engine oil level ......40
Checking tyre pressures
(using the kit) ......................179
C
Date
(setting) .......260, 294, 316, 317
Daytime
running lamps .......93, 194, 196
Deactivating ESP ...................131
Deactivating the passenger
airbag ..................................136
Deadlocking .............................77
Defrosting ..........................60, 61
Demisting.................................60
Dials and gauges .....................27
Diesel additive level ...............177
Dimensions ............................221
Dipped beam ...........91, 194, 195
Dipstick ............................40, 176
Directional lighting ...................95
D