2012 PEUGEOT 4007 light
[x] Cancel search: lightPage 94 of 236
4
VISIBILITY
COURTESY LAMPTESY LAMPS
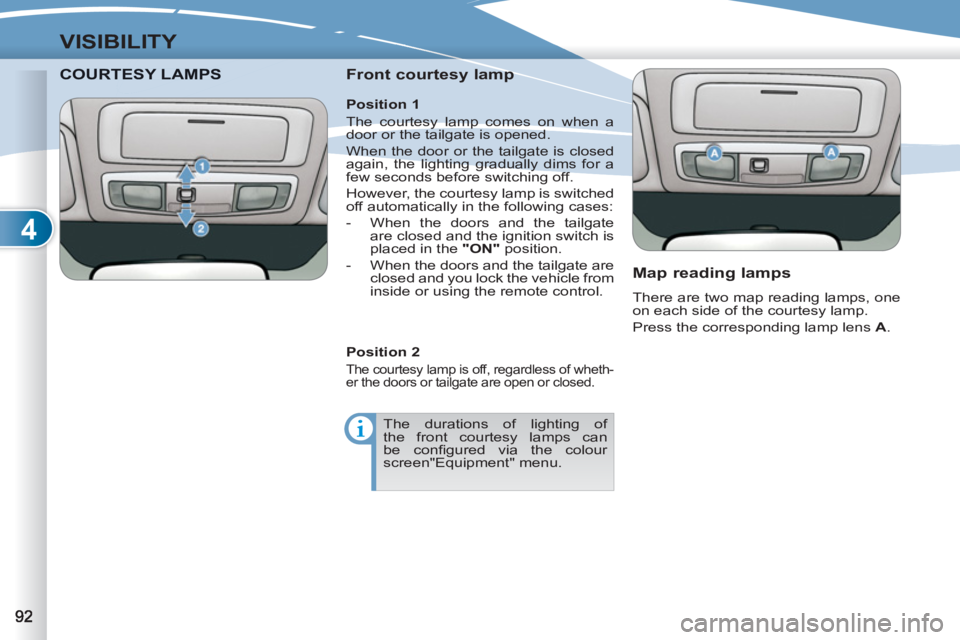
Front courtesy lamp
Map reading lamps
There are two map reading lamps, one
on each side of the courtesy lamp.
Press the corresponding lamp lens A
.
Position 2
The courtesy lamp is off, regardless of wheth-
er the doors or tailgate are open or closed.
The durations of lighting of
the front courtesy lamps can
be confi gured via the colour
screen"Equipment" menu.
Position 1
The courtesy lamp comes on when a
door or the tailgate is opened.
When the door or the tailgate is closed
again, the lighting gradually dims for a
few seconds before switching off.
However, the courtesy lamp is switched
off automatically in the following cases:
- When the doors and the tailgate
are closed and the ignition switch is
placed in the "ON"
position.
- When the doors and the tailgate are
closed and you lock the vehicle from
inside or using the remote control.
Page 95 of 236
4
VISIBILITY
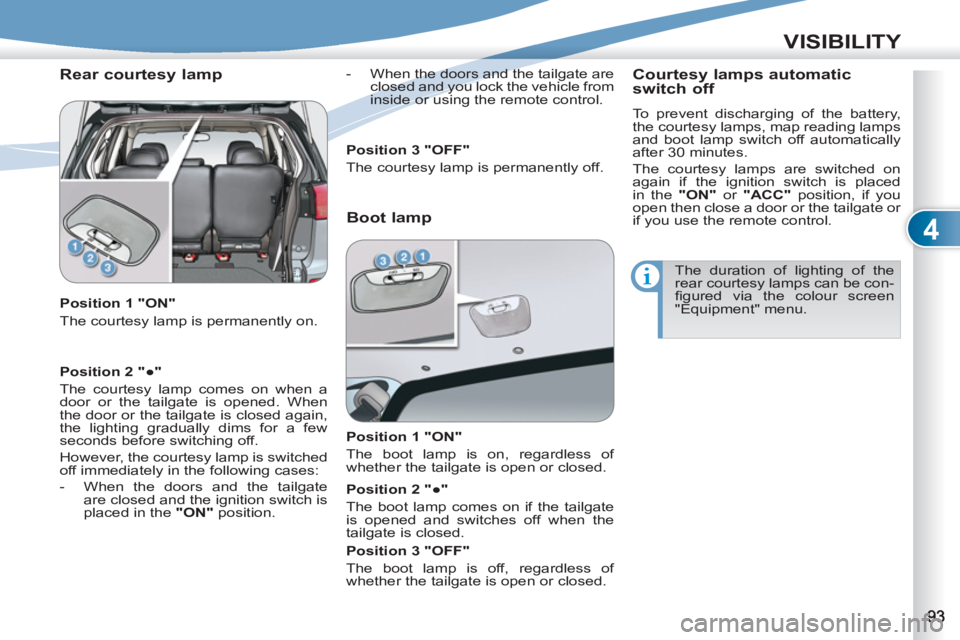
Rear courtesy lamp
Position 1 "ON"
The courtesy lamp is permanently on.
- When the doors and the tailgate are
closed and you lock the vehicle from
inside or using the remote control.
Boot lamp
Position 1 "ON"
The boot lamp is on, regardless of
whether the tailgate is open or closed.
Position 2 "●"
The courtesy lamp comes on when a
door or the tailgate is opened. When
the door or the tailgate is closed again,
the lighting gradually dims for a few
seconds before switching off.
However, the courtesy lamp is switched
off immediately in the following cases:
- When the doors and the tailgate
are closed and the ignition switch is
placed in the "ON"
position.
Position 3 "OFF"
The courtesy lamp is permanently off.
Position 2 "●"
The boot lamp comes on if the tailgate
is opened and switches off when the
tailgate is closed.
Position 3 "OFF"
The boot lamp is off, regardless of
whether the tailgate is open or closed.
Courtesy lamps automatic
switch off
To prevent discharging of the battery,
the courtesy lamps, map reading lamps
and boot lamp switch off automatically
after 30 minutes.
The courtesy lamps are switched on
again if the ignition switch is placed
in the "ON"
or "ACC"
position, if you
open then close a door or the tailgate or
if you use the remote control.
The duration of lighting of the
rear courtesy lamps can be con-
fi gured via the colour screen
"Equipment" menu.
Page 104 of 236

6
SAFETY
DIRECTION INDICATORS
HAZARD WARNING LAMPS
A visual warning by means of the direction
indicators to alert other road users to a
vehicle breakdown, towing or accident.
HORN
�)
Press one of the spokes of the
steering wheel.
�)
Left: lower the lighting stalk passing
the point of resistance.
�)
Right: raise the lighting stalk passing
the point of resistance.
"Motorway" function
�)
Press briefl y upwards or down-
wards, without going beyond the
point of resistance; the direction
indicators will fl ash 3 times.
Audible warning to alert other road users
to an imminent danger.
The audible signal can be con-
fi gured via the colour screen
"Equipment" menu.
�)
Press this button, the direction indi-
cators fl ash.
They can operate with the ignition off.
Automatic operation of hazard
warning lamps
When braking in an emergency, de-
pending on the deceleration, the hazard
warning lamps come on automatically.
They switch off automatically the fi rst
time you accelerate.
�)
You can also switch them off by
pressing the button.
Page 105 of 236
6
SAFETY
BRAKING ASSISTANCE
SYSTEMS
Group of supplementary systems which
help you to obtain optimum braking in
complete safety in emergency situa-
tions:
- anti-lock braking system (ABS),
- electronic brake force distribution
(EBFD).
When braking in an emergency,
press very fi rmly without releasing
the pressure. The two warning lamps comes
on at the same time and the two
warnings are displayed alter-
nately in the instrument panel
screen.
When replacing wheels (tyres and
rims), ensure that they conform to
the manufacturer's recommenda-
tions.
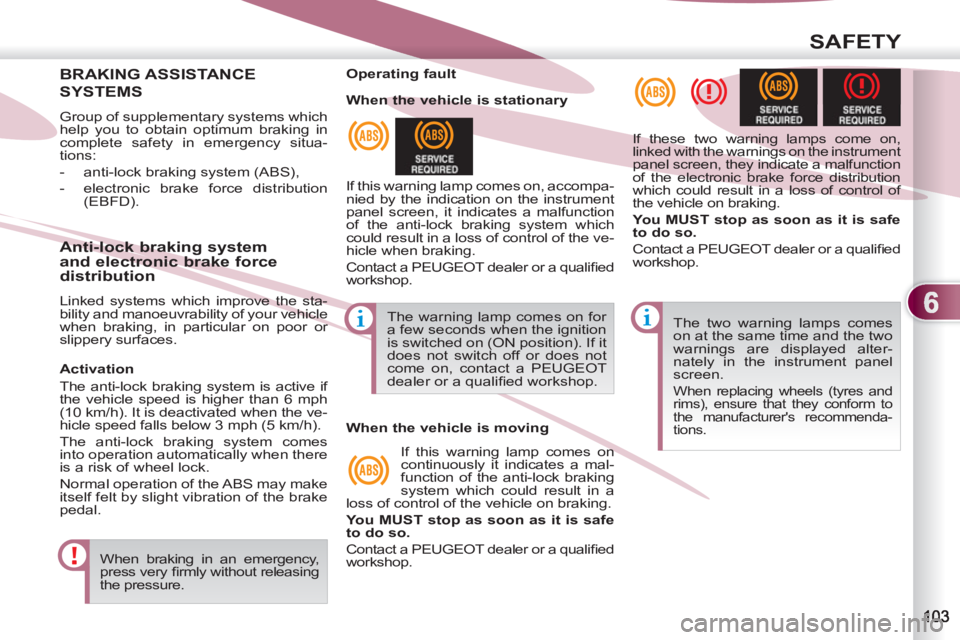
Operating fault
If this warning lamp comes on, accompa-
nied by the indication on the instrument
panel screen, it indicates a malfunction
of the anti-lock braking system which
could result in a loss of control of the ve-
hicle when braking.
Contact a PEUGEOT dealer or a qualifi ed
workshop. If these two warning lamps come on,
linked with the warnings on the instrument
panel screen, they indicate a malfunction
of the electronic brake force distribution
which could result in a loss of control of
the vehicle on braking.
You MUST stop as soon as it is safe
to do so.
Contact a PEUGEOT dealer or a qualifi ed
workshop.
Anti-lock braking system
and electronic brake force
distribution
Linked systems which improve the sta-
bility and manoeuvrability of your vehicle
when braking, in particular on poor or
slippery surfaces. The warning lamp comes on for
a few seconds when the ignition
is switched on (ON position). If it
does not switch off or does not
come on, contact a PEUGEOT
dealer or a qualifi ed workshop.
When the vehicle is stationary
When the vehicle is moving
If this warning lamp comes on
continuously it indicates a mal-
function of the anti-lock braking
system which could result in a
loss of control of the vehicle on braking.
You MUST stop as soon as it is safe
to do so.
Contact a PEUGEOT dealer or a qualifi ed
workshop.
Activation
The anti-lock braking system is active if
the vehicle speed is higher than 6 mph
(10 km/h). It is deactivated when the ve-
hicle speed falls below 3 mph (5 km/h).
The anti-lock braking system comes
into operation automatically when there
is a risk of wheel lock.
Normal operation of the ABS may make
itself felt by slight vibration of the brake
pedal.
Page 109 of 236
6
SAFETY
The driver must ensure that passen-
gers use the seat belts correctly and
that they are all restrained securely
before setting off.
Wherever you are seated in the ve-
hicle, always fasten your seat belt,
even for short journeys.
Do not interchange the seat belt
buckles as they will not fulfi l their
role fully.
The seat belts are fi tted with an in-
ertia reel permitting automatic ad-
justment of the length of the strap
to your size. The seat belt is stowed
automatically when not in use.
Before and after use, ensure that the
seat belt is reeled in correctly.
The lower part of the strap must be
positioned as low as possible on the
pelvis.
The upper part must be positioned
in the hollow of the shoulder.
The inertia reels are fi tted with an
automatic locking device which
comes into operation in the event
of a collision, emergency braking or
if the vehicle rolls over. You can re-
lease the device by pulling fi rmly on
the strap and releasing it so that it
reels in slightly.
Recommendations for children
Use a suitable child seat if the pas-
senger is less than 12 years old or
shorter than one and a half metres.
Never use the same seat belt to se-
cure more than one person.
Never allow a child to travel on your
lap. In order to be effective, a seat belt
must:
- be tightened as close to the body
as possible,
- be pulled in front of you with a
smooth movement, checking that
it does not twist,
-
be used to restrain only one person,
- not bear any trace of cuts or fraying,
- not be converted or modifi ed to
avoid affecting its performance.
In accordance with current safety
regulations, for all repairs on your
vehicle, go to a qualifi ed workshop
with the skills and equipment needed,
which a PEUGEOT dealer is able to
provide.
Have your seat belts checked regu-
larly by a PEUGEOT dealer or a
qualifi ed workshop, particularly if the
straps show signs of damage.
Clean the seat belt straps with soapy
water or a textile cleaning product,
sold by PEUGEOT dealers.
After folding or moving a seat or rear
bench seat, ensure that the seat belt
is positioned and reeled in correctly.
In the event of an impact
Depending on the nature and se-
riousness of the impact
, the pre-
tensioning device may be deployed
before and independently of the
airbags. Deployment of the preten-
sioners is accompanied by a slight
discharge of harmless smoke and
a noise, due to the activation of the
pyrotechnic cartridge incorporated in
the system.
In all cases, the airbag warning lamp
comes on.
Following an impact, have the seat
belts system checked, and if neces-
sary replaced, by a PEUGEOT dealer
or a qualifi ed workshop.
Page 110 of 236
6
SAFETY
AIRBAGS
The airbags do not operate
when the ignition is switched
off.
This equipment will only operate
once. If a second impact occurs
(during the same or a subse-
quent accident), the airbag will
not operate.
Front airbags
System which protects the head and
chest of the driver and front passenger
in the event of a front impact.
The driver's airbag is fi tted in the centre
of the steering wheel; the front passen-
ger's airbag is fi tted in the dashboard
above the glove box.
Deployment
The airbags are deployed simultane-
ously, unless the passenger's front
airbag is deactivated, in the event of
a serious front impact applied to all or
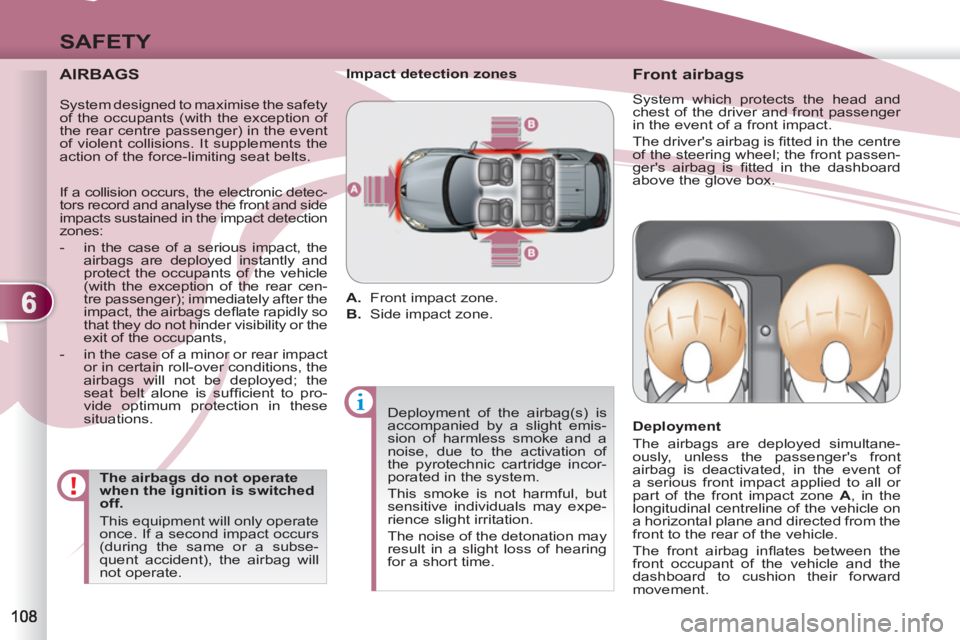
part of the front impact zone A
, in the
longitudinal centreline of the vehicle on
a horizontal plane and directed from the
front to the rear of the vehicle.
The front airbag infl ates between the
front occupant of the vehicle and the
dashboard to cushion their forward
movement.
Impact detection zones
A.
Front impact zone.
B.
Side impact zone.
Deployment of the airbag(s) is
accompanied by a slight emis-
sion of harmless smoke and a
noise, due to the activation of
the pyrotechnic cartridge incor-
porated in the system.
This smoke is not harmful, but
sensitive individuals may expe-
rience slight irritation.
The noise of the detonation may
result in a slight loss of hearing
for a short time.
System designed to maximise the safety
of the occupants (with the exception of
the rear centre passenger) in the event
of violent collisions. It supplements the
action of the force-limiting seat belts.
If a collision occurs, the electronic detec-
tors record and analyse the front and side
impacts sustained in the impact detection
zones:
- in the case of a serious impact, the
airbags are deployed instantly and
protect the occupants of the vehicle
(with the exception of the rear cen-
tre passenger); immediately after the
impact, the airbags defl ate rapidly so
that they do not hinder visibility or the
exit of the occupants,
- in the case of a minor or rear impact
or in certain roll-over conditions, the
airbags will not be deployed; the
seat belt alone is suffi cient to pro-
vide optimum protection in these
situations.
Page 116 of 236
7
DRIVING
Stopping - Starting on a slope
Do not use the accelerator pedal to
immobilise the vehicle on a slope,
apply the parking brake instead.
When starting on a slope, accelerate
gradually while releasing the parking
brake.
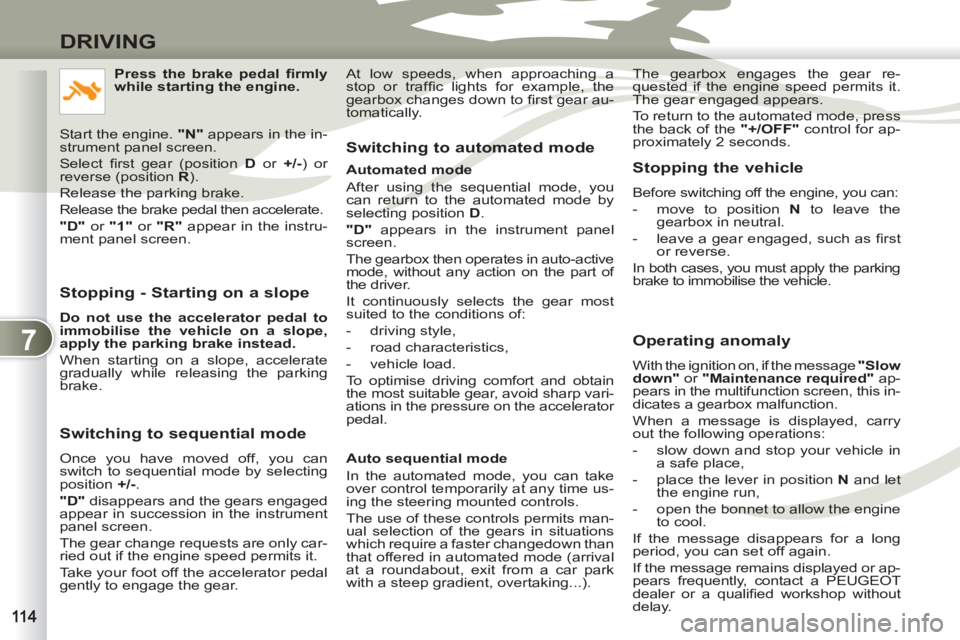
Switching to sequential mode
Once you have moved off, you can
switch to sequential mode by selecting
position +/-
.
"D"
disappears and the gears engaged
appear in succession in the instrument
panel screen.
The gear change requests are only car-
ried out if the engine speed permits it.
Take your foot off the accelerator pedal
gently to engage the gear.
Switching to automated mode
Automated mode
After using the sequential mode, you
can return to the automated mode by
selecting position D
.
"D"
appears in the instrument panel
screen.
The gearbox then operates in auto-active
mode, without any action on the part of
the driver.
It continuously selects the gear most
suited to the conditions of:
- driving style,
- road characteristics,
- vehicle load.
To optimise driving comfort and obtain
the most suitable gear, avoid sharp vari-
ations in the pressure on the accelerator
pedal.
Auto sequential mode
In the automated mode, you can take
over control temporarily at any time us-
ing the steering mounted controls.
The use of these controls permits man-
ual selection of the gears in situations
which require a faster changedown than
that offered in automated mode (arrival
at a roundabout, exit from a car park
with a steep gradient, overtaking...).
Stopping the vehicle
Before switching off the engine, you can:
- move to position N
to leave the
gearbox in neutral.
- leave a gear engaged, such as fi rst
or reverse.
In both cases, you must apply the parking
brake to immobilise the vehicle.
Operating anomaly
With the ignition on, if the message "Slow
down"
or "Maintenance required"
ap-
pears in the multifunction screen, this in-
dicates a gearbox malfunction.
When a message is displayed, carry
out the following operations:
- slow down and stop your vehicle in
a safe place,
- place the lever in position N
and let
the engine run,
- open the bonnet to allow the engine
to cool.
If the message disappears for a long
period, you can set off again.
If the message remains displayed or ap-
pears frequently, contact a PEUGEOT
dealer or a qualifi ed workshop without
delay.
Press the brake pedal fi rmly
while starting the engine.
Start the engine. "N"
appears in the in-
strument panel screen.
Select fi rst gear (position D
or +/-
) or
reverse (position R
).
Release the parking brake.
Release the brake pedal then accelerate.
"D"
or "1"
or "R"
appear in the instru-
ment panel screen. The gearbox engages the gear re-
quested if the engine speed permits it.
The gear engaged appears.
To return to the automated mode, press
the back of the "+/OFF"
control for ap-
proximately 2 seconds.
At low speeds, when approaching a
stop or traffi c lights for example, the
gearbox changes down to fi rst gear au-
tomatically.
Page 118 of 236
7
DRIVING
Moving off
Select position P
or N
.
Press the brake pedal fi rmly
while starting the engine.
Start the engine.
"P"
or "N"
appears in the instrument
panel screen.
Select fi rst gear ( D
or +/-
) or reverse ( R
).
Release the parking brake.
Release the brake pedal then accelerate.
"D"
or "1"
or "R"
appears in the instru-
ment panel screen.
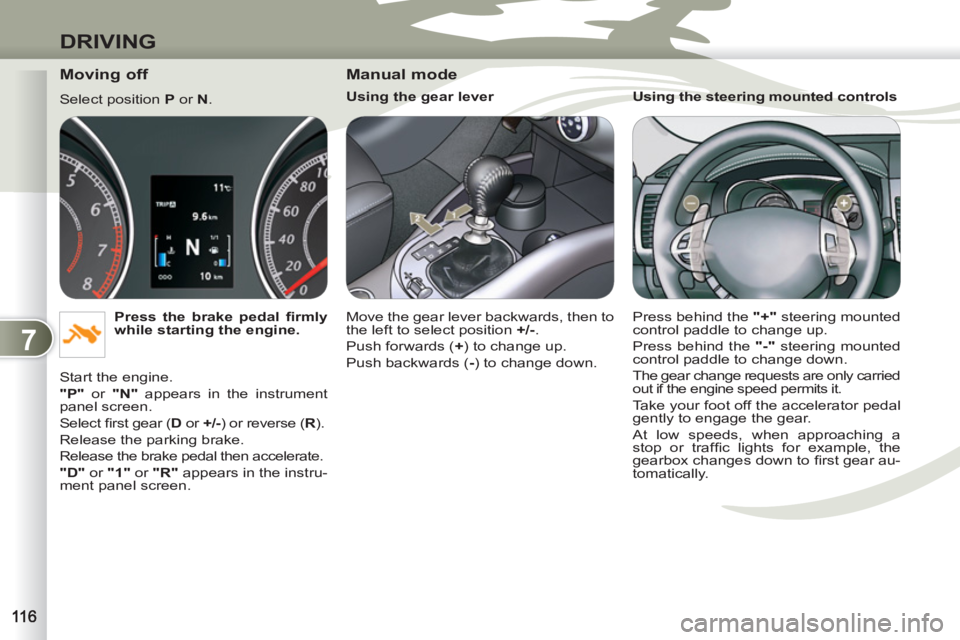
Manual mode
Using the gear lever
Move the gear lever backwards, then to
the left to select position +/-
.
Push forwards ( +
) to change up.
Push backwards ( -
) to change down.
Using the steering mounted controls
Press behind the "+"
steering mounted
control paddle to change up.
Press behind the "-"
steering mounted
control paddle to change down.
The gear change requests are only carried
out if the engine speed permits it.
Take your foot off the accelerator pedal
gently to engage the gear.
At low speeds, when approaching a
stop or traffi c lights for example, the
gearbox changes down to fi rst gear au-
tomatically.