2012 PEUGEOT 308 wipers
[x] Cancel search: wipersPage 4 of 328

CONTENTS
FAMILIARISATION 4-26
INSTRUMENTS and
CONTROLS 27-41CHILD
SAFETY 113-123
MULTIFUNCTION
SCREENS 42-57SAFETY 124-136 COMFORT 58-73
ACCESS 74-88
VISIBILITY 89-99FITTINGS 100-112
Instrument panels 27
Indicator and warning lamps 29
Indicators 37
Adjustment buttons 41Child seats 113
ISOFIX child seats 120
Child lock 123
Screen A without audio
equipment 42
Screen A with audio equipment 44
Screen C
(Peugeot Connect Sound) 46
16/9 retractable colour screen
(Peugeot Connect Navigation
(RNEG)) 49
16/9 high definition retractable
colour screen
(Peugeot Connect Media) 51
Trip computer 54Direction indicators 124
Hazard warning lamps 124
Horn 124
Tyre under-inflation detection 125
ESC system 126
Grip control 128
Front seat belts 130
Airbags 133 Heating and Ventilation 58
Manual air conditioning 60
Rear screen demist/defrost 61
Dual-zone digital air
conditioning 62
Front seats 65
Rear seats 69
Mirrors 71
Steering wheel adjustment 73
Remote control key 74
Alarm 79
Electric windows 81
Doors 83
Boot 85
Lower tailgate 86
Fuel tank 87
Misfuel prevention 88
Lighting controls 89
Automatic illumination of
headlamps 92
Headlamp adjustment 92
Directional lighting 93
Wiper controls 94
Automatic rain sensitive wipers 96
Courtesy lamps 97
Interior mood lighting 98Interior fittings 100
Front armrest 102
Rear multimedia 104
Panoramic sunroof 106
Boot fittings 107
ECO-DRIVING 25
Page 12 of 328
10
FAMILIARISATION
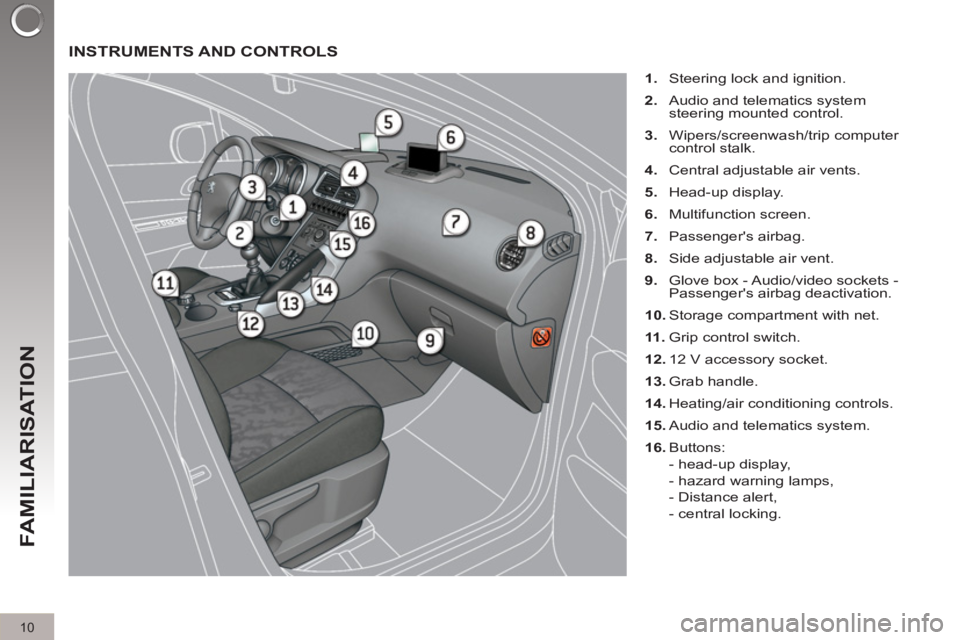
INSTRUMENTS AND CONTROLS
1.
Steering lock and ignition.
2.
Audio and telematics system
steering mounted control.
3.
Wipers/screenwash/trip computer
control stalk.
4.
Central adjustable air vents.
5.
Head-up display.
6.
Multifunction screen.
7.
Passenger's airbag.
8.
Side adjustable air vent.
9.
Glove box - Audio/video sockets -
Passenger's airbag deactivation.
10.
Storage compartment with net.
11 .
Grip control switch.
12.
12 V accessory socket.
13.
Grab handle.
14.
Heating/air conditioning controls.
15.
Audio and telematics system.
16.
Buttons:
- head-up display,
- hazard warning lamps,
- Distance alert,
- central locking.
Page 16 of 328

14
FAMILIARISATION
SEEING CLEARLY
Lighting
Ring A
Lighting off.
Ring B Sidelamps.
Dipped/main beam headlamps.
Rear foglamp.
or
Front and rear foglamps. Automatic illumination of head-
lamps.
89
Direction indicators
Raise or lower the lighting stalk passing
the point of resistance; the correspond-
ing direction indicators will fl ash for as
long as the stalk remains in this position.
"Motorway" function
Press the lighting stalk up or down once,
without passing the point of resistance;
the corresponding direction indicators
will fl ash three times.
This function can be used at any speed,
but it is particularly useful when chang-
ing lane on high-speed roads.
124
Wipers
Stalk A: windscreen wipers
Switching on "AUTO"
�)
Press the stalk down and release it.
Switching off "AUTO"
�)
Push the stalk up and return it to po-
sition "0"
.
94
Ring B: rear wiper
Park.
Intermittent wipe.
Wash-wipe.
95
Page 78 of 328
76
ACCESS
Electronic engine immobiliser
The key contains an electronic chip
which has a special code. When the
ignition is switched on, this code must
be recognised in order for starting to be
possible.
This electronic engine immobiliser locks
the engine management system a few
minutes after the ignition is switched off
and prevents starting of the engine by
anyone who does not have the key.
Anti-theft protection
In the event of a fault, you are
informed by illumination of this
warning lamp, an audible signal
and a message in the screen.
In this case, your vehicle will not start;
contact a PEUGEOT dealer as soon as
possible.
Keep safely the label attached to the
keys given to you on acquisition of the
vehicle.
For more information, refer to the
"Practical information - Energy
economy mode" section.
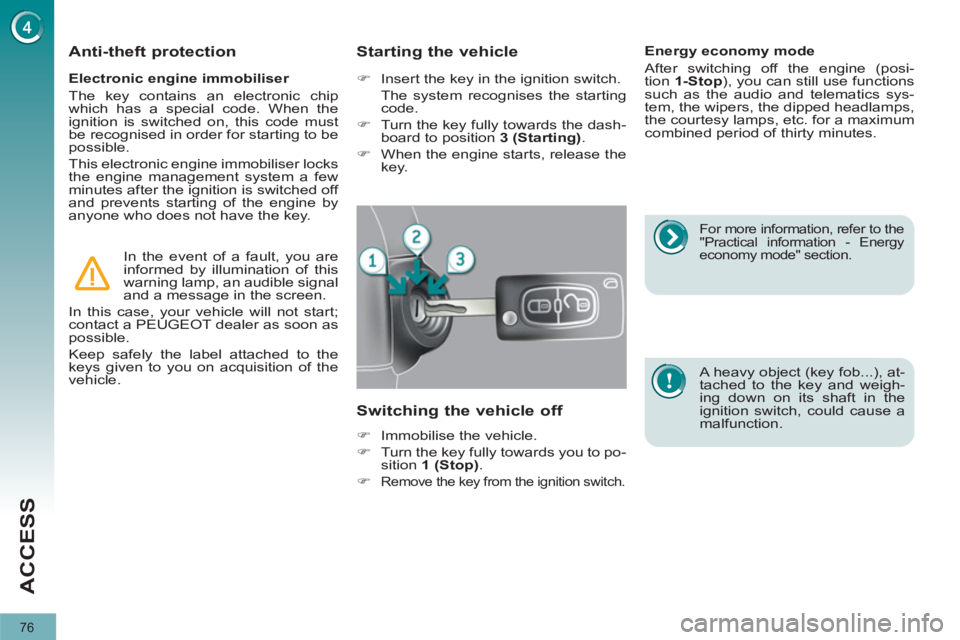
Starting the vehicle
�)
Insert the key in the ignition switch.
The system recognises the starting
code.
�)
Turn the key fully towards the dash-
board to position 3 (Starting)
.
�)
When the engine starts, release the
key.
Switching the vehicle off
�)
Immobilise the vehicle.
�)
Turn the key fully towards you to po-
sition 1 (Stop)
.
�)
Remove the key from the ignition switch.
Energy economy mode
After switching off the engine (posi-
tion 1-Stop
), you can still use functions
such as the audio and telematics sys-
tem, the wipers, the dipped headlamps,
the courtesy lamps, etc. for a maximum
combined period of thirty minutes.
A heavy object (key fob...), at-
tached to the key and weigh-
ing down on its shaft in the
ignition switch, could cause a
malfunction.
Page 94 of 328
92
VISIBILITY
In fog or snow, the sunshine
sensor may detect suffi cient
light. In this case, the lighting
will not come on automatically.
Do not cover the sunshine sensor,
coupled with the rain sensor and lo-
cated in the centre of the windscreen
behind the rear view mirror; the as-
sociated functions would no longer
be controlled.
Associated with the automatic
"Guide-me-home" lighting
Association with the automatic lighting
provides the "guide-me-home" lighting
with the following additional options:
- selection of the lighting duration of
15, 30 or 60 seconds in the vehicle
parameters in the vehicle confi gura-
tion menu,
- automatic activation of "guide-me-
home" lighting when automatic lillumi-
nation of headlamps is in operation.
Automatic illumination of headlamps
The sidelamps and dipped beam head-
lamps are switched on automatically,
without any action on the part of the
driver, when a low level of external light
is detected or in certain cases of activa-
tion of the windscreen wipers.
As soon as the brightness returns to a
suffi cient level or after the windscreen
wipers are switched off, the lamps are
switched off automatically.
Activation
�)
Turn the ring to the "AUTO"
posi-
tion. The automatic illumination of
headlamps is accompanied by a
message in the screen.
Deactivation
�)
Turn the ring to another position.
Deactivation is accompanied by a
message in the screen.
Operating fault
In the event of a malfunction of
the sunshine sensor, the lighting
comes on, this warning lamp is
displayed in the instrument panel
and/or a message appears in the screen,
accompanied by an audible signal.
Contact a PEUGEOT dealer or a quali-
fi ed workshop.
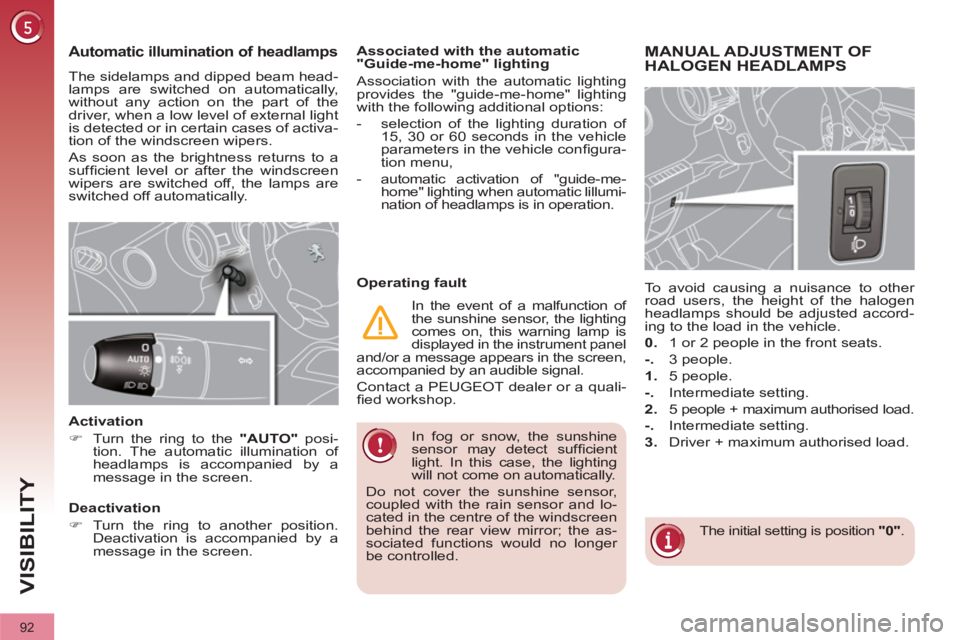
MANUAL ADJUSTMENT OF
HALOGEN HEADLAMPS
The initial setting is position "0"
.
To avoid causing a nuisance to other
road users, the height of the halogen
headlamps should be adjusted accord-
ing to the load in the vehicle.
0.
1 or 2 people in the front seats.
-.
3 people.
1.
5 people.
-.
Intermediate setting.
2.
5 people + maximum authorised load.
-.
Intermediate setting.
3.
Driver + maximum authorised load.
Page 96 of 328
94
VISIBILITY
WIPER CONTROLS
System for selection and control of the
various front and rear wiping modes for
the elimination of rain and cleaning.
The vehicle's front and rear wipers are
designed to improve the driver's visibi-
lity progressively according to the cli-
matic conditions.
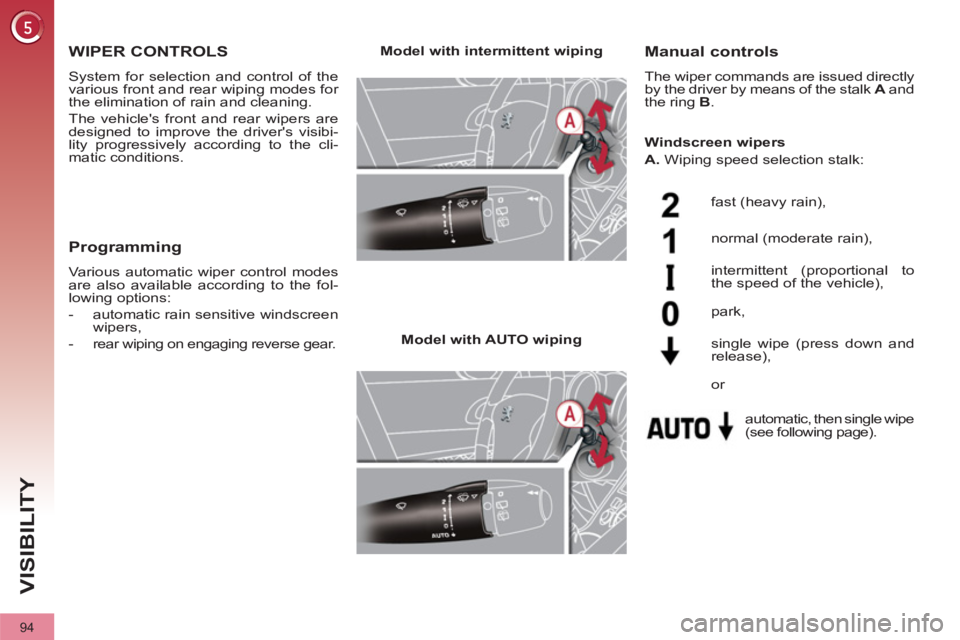
Manual controls
The wiper commands are issued directly
by the driver by means of the stalk A
and
the ring B
.
Model with intermittent wiping
Model with AUTO wiping
fast (heavy rain),
normal (moderate rain),
intermittent (proportional to
the speed of the vehicle),
automatic, then single wipe
(see following page). park,
single wipe (press down and
release),
Windscreen wipers
A.
Wiping speed selection stalk:
or
Programming
Various automatic wiper control modes
are also available according to the fol-
lowing options:
- automatic rain sensitive windscreen
wipers,
- rear wiping on engaging reverse gear.
Page 97 of 328
95
VISIBILITY
Windscreen and headlamp
wash
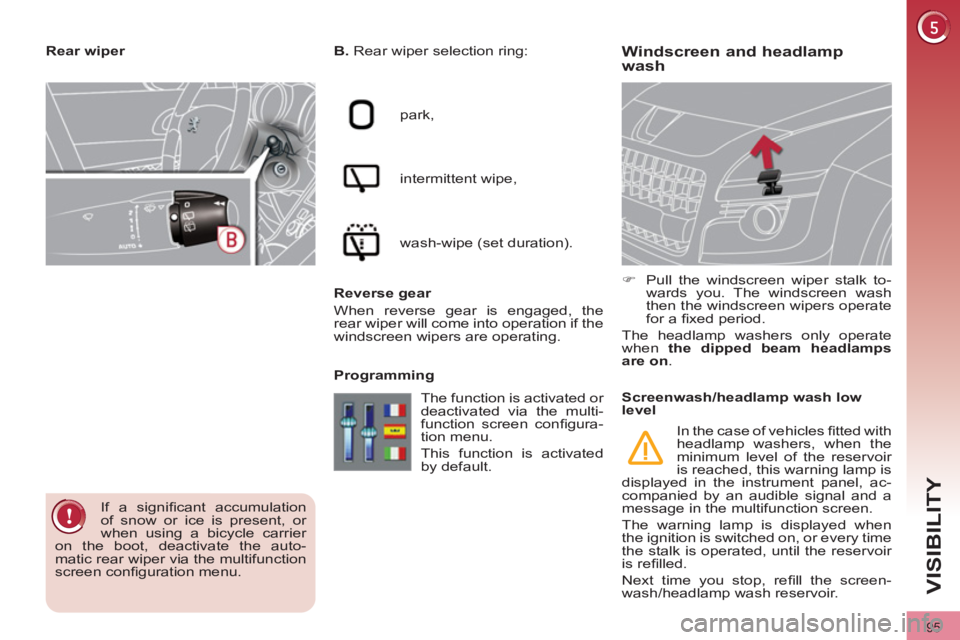
B.
Rear wiper selection ring:
park,
intermittent wipe,
wash-wipe (set duration).
Reverse gear
When reverse gear is engaged, the
rear wiper will come into operation if the
windscreen wipers are operating.
Programming
�)
Pull the windscreen wiper stalk to-
wards you. The windscreen wash
then the windscreen wipers operate
for a fi xed period.
The headlamp washers only operate
when the dipped beam headlamps
are on
.
Rear wiper
If a signifi cant accumulation
of snow or ice is present, or
when using a bicycle carrier
on the boot, deactivate the auto-
matic rear wiper via the multifunction
screen confi guration menu. The function is activated or
deactivated via the multi-
function screen confi gura-
tion menu.
This function is activated
by default.
Screenwash/headlamp wash low
level
In the case of vehicles fi tted with
headlamp washers, when the
minimum level of the reservoir
is reached, this warning lamp is
displayed in the instrument panel, ac-
companied by an audible signal and a
message in the multifunction screen.
The warning lamp is displayed when
the ignition is switched on, or every time
the stalk is operated, until the reservoir
is refi lled.
Next time you stop, refi ll the screen-
wash/headlamp wash reservoir.
Page 98 of 328
96
VISIBILITY
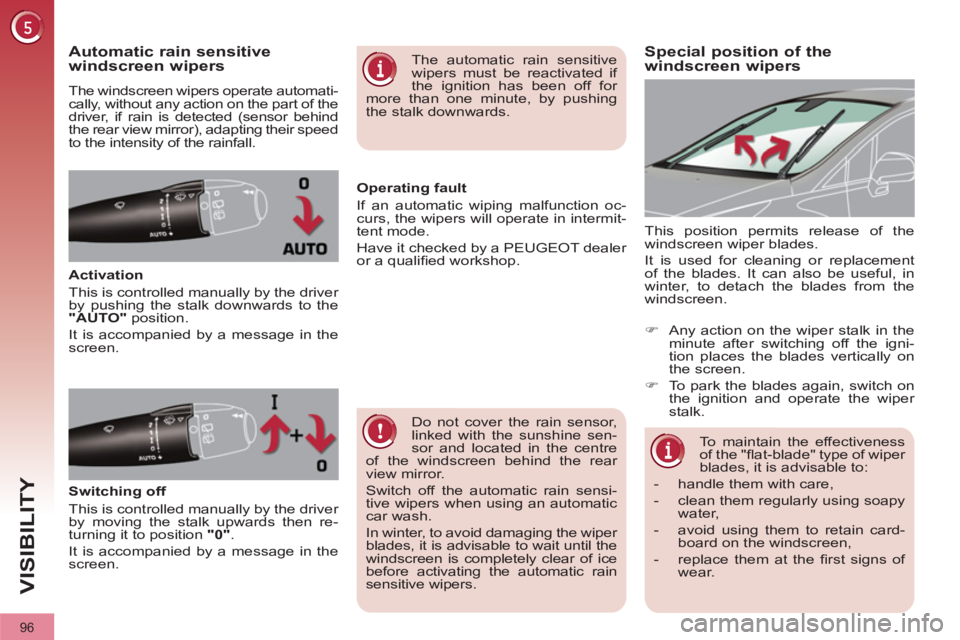
Special position of the
windscreen wipers
Automatic rain sensitive
windscreen wipers
The windscreen wipers operate automati-
cally, without any action on the part of the
driver, if rain is detected (sensor behind
the rear view mirror), adapting their speed
to the intensity of the rainfall.
Activation
This is controlled manually by the driver
by pushing the stalk downwards to the
"AUTO"
position.
It is accompanied by a message in the
screen. This position permits release of the
windscreen wiper blades.
It is used for cleaning or replacement
of the blades. It can also be useful, in
winter, to detach the blades from the
windscreen.
Do not cover the rain sensor,
linked with the sunshine sen-
sor and located in the centre
of the windscreen behind the rear
view mirror.
Switch off the automatic rain sensi-
tive wipers when using an automatic
car wash.
In winter, to avoid damaging the wiper
blades, it is advisable to wait until the
windscreen is completely clear of ice
before activating the automatic rain
sensitive wipers.
The automatic rain sensitive
wipers must be reactivated if
the ignition has been off for
more than one minute, by pushing
the stalk downwards.
Switching off
This is controlled manually by the driver
by moving the stalk upwards then re-
turning it to position "0"
.
It is accompanied by a message in the
screen.
Operating fault
If an automatic wiping malfunction oc-
curs, the wipers will operate in intermit-
tent mode.
Have it checked by a PEUGEOT dealer
or a qualifi ed workshop.
To maintain the effectiveness
of the "fl at-blade" type of wiper
blades, it is advisable to:
- handle them with care,
- clean them regularly using soapy
water,
- avoid using them to retain card-
board on the windscreen,
- replace them at the fi rst signs of
wear.
�)
Any action on the wiper stalk in the
minute after switching off the igni-
tion places the blades vertically on
the screen.
�)
To park the blades again, switch on
the ignition and operate the wiper
stalk.