2012 Peugeot 207 CC ECO mode
[x] Cancel search: ECO modePage 114 of 224

7
i
DRIVING
11 2
CRUISE CONTROL
System which automatically maintains
the speed of the vehicle at the value
programmed by the driver, without any
action on the accelerator pedal.
The cruise control is switched on
manually: it requires a minimum vehicle
speed of 25 mph (40 km/h), as well as
the engaging of:
- fourth gear on a manual gearbox,
- second gear on an automatic gearbox
in sequential mode,
- position D
on an automatic gearbox.
The cruise control is switched off
man-
ually or by pressing the brake or clutch
pedal or on triggering of the ESP sys-
tem for safety reasons.
It is possible to exceed the programmed
speed temporarily by pressing the ac-
celerator pedal.
To return to the programmed speed,
simply release the accelerator pedal.
Switching off the ignition cancels any
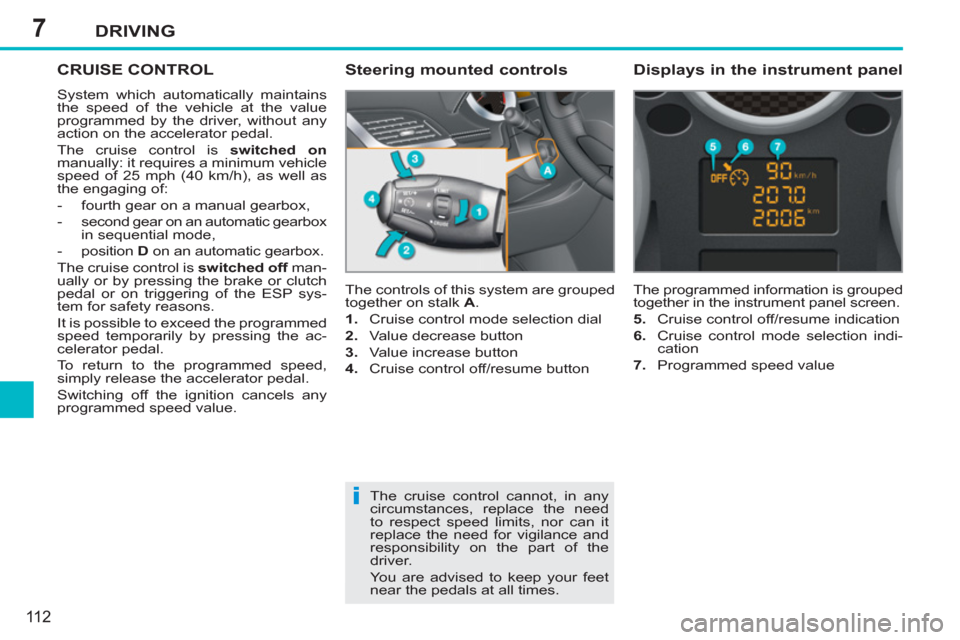
programmed speed value. The controls of this system are grouped
together on stalk A
.
1.
Cruise control mode selection dial
2.
Value decrease button
3.
Value increase button
4.
Cruise control off/resume button
The programmed information is grouped
together in the instrument panel screen.
5.
Cruise control off/resume indication
6.
Cruise control mode selection indi-
cation
7.
Programmed speed value
Steering mounted controls
Displays in the instrument panel
The cruise control cannot, in any
circumstances, replace the need
to respect speed limits, nor can it
replace the need for vigilance and
responsibility on the part of the
driver.
You are advised to keep your feet
near the pedals at all times.
Page 115 of 224

7
!
DRIVING
113
When the cruise control is switched
on, be careful if you maintain the
pressure on one of the programmed
speed changing buttons: this may
result in a very rapid change in the
speed of your vehicle.
Do not use the cruise control on
slippery roads or in heavy traffi c.
On a steep descent, the cruise
control will not be able to prevent
the vehicle from exceeding the pro-
grammed speed.
To avoid any risk of jamming of the
pedals:
- ensure that the mat is posi-
tioned correctly,
- never fi t one mat on top of an-
other.
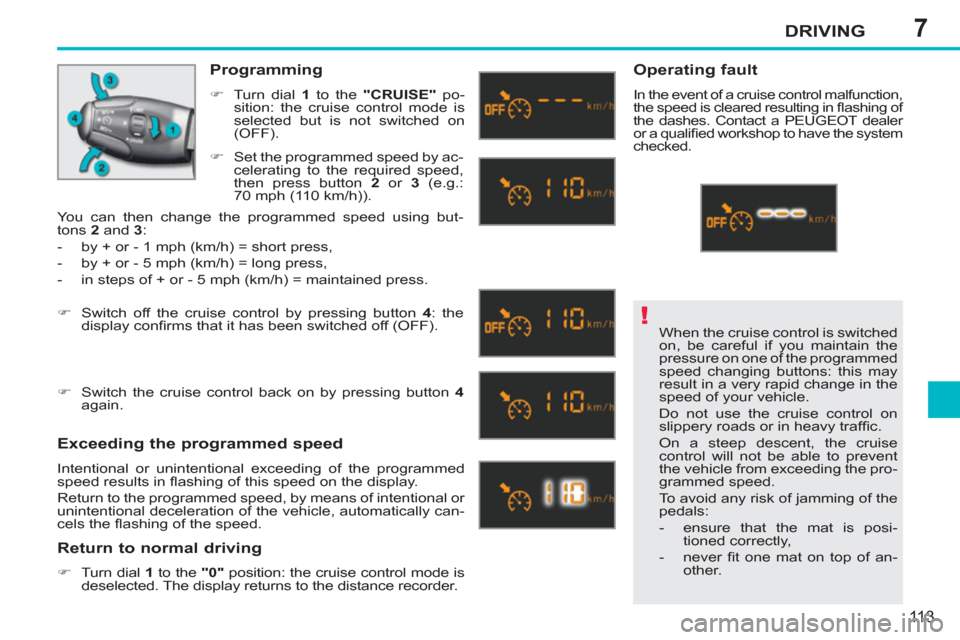
Programming
�)
Turn dial 1
to the "CRUISE"
po-
sition: the cruise control mode is
selected but is not switched on
(OFF).
Exceeding the programmed speed
Intentional or unintentional exceeding of the programmed
speed results in fl ashing of this speed on the display.
Return to the programmed speed, by means of intentional or
unintentional deceleration of the vehicle, automatically can-
cels the fl ashing of the speed.
Return to normal driving
�)
Turn dial 1
to the "0"
position: the cruise control mode is
deselected. The display returns to the distance recorder.
Operating fault
In the event of a cruise control malfunction,
the speed is cleared resulting in fl ashing of
the dashes. Contact a PEUGEOT dealer
or a qualifi ed workshop to have the system
checked.
�)
Set the programmed speed by ac-
celerating to the required speed,
then press button 2
or 3
(e.g.:
70 mph (110 km/h)).
�)
Switch off the cruise control by pressing button 4
: the
display confi rms that it has been switched off (OFF).
�)
Switch the cruise control back on by pressing button 4
again.
You can then change the programmed speed using but-
tons 2
and 3
:
- by + or - 1 mph (km/h) = short press,
- by + or - 5 mph (km/h) = long press,
- in steps of + or - 5 mph (km/h) = maintained press.
Page 145 of 224

9
!
i
PRACTICAL INFORMATION
143
A fl at battery prevents the engine
from starting (refer to the corre-
sponding paragraph). If a roof operation is in progress,
it will be completed, but no further
operation is possible.
ENERGY ECONOMY MODE
System which manages the duration of
use of certain functions to conserve a
suffi cient level of charge in the battery.
After the engine has stopped, you can
still use functions such as the audio
equipment, windscreen wipers, dipped
beam headlamps, courtesy lamp, etc.
for a maximum combined duration of
thirty minutes.
Exiting economy mode
These functions are reactivated auto-
matically next time the vehicle is driven.
�)
In order to resume the use of these
functions immediately, start the
engine and let it run for a few minutes.
The time available to you will then be
double the duration for which the engine
is left running. However, this period will al-
ways be between fi ve and thirty minutes.
Switching to economy mode
Once the thirty minutes are over, a
message appears on the multifunction
screen indicating that the vehicle has
switched to economy mode and the ac-
tive functions are put on standby.
CHANGING A WIPER BLADE
Procedure for replacing a worn wiper
blade with a new one without the use
of tools.
Removing a front wiper blade
�)
Raise the corresponding wiper arm.
�)
Unclip the wiper blade and remove it.
Fitting a front wiper blade
�)
Check the size of the wiper blade
as the shorter blade is fi tted on the
right-hand side of the vehicle.
�)
Put the corresponding new wiper
blade in place and clip it.
�)
Fold down the wiper arm carefully.
LOAD REDUCTION MODE
System which manages the use of cer-
tain functions according to the level of
charge remaining in the battery.
When the vehicle is being driven, the load
reduction function temporarily deactivates
certain functions, such as the air condi-
tioning, the heated rear screen...
The deactivated functions are reactivated
automatically as soon as conditions permit.
Page 159 of 224

157
The Peugeot Connect Navigation (RNEG) is protected in such a way that it will only operate in your vehicle.
If it is to be installed in another vehicle, contact aPEUGEOT dealer for confi guration of the system.
Certain functions described in this handbook will
become available during the year.
PEUGEOT CONNECT
Navigation(RNEG)
For safety reasons, the driver must carry out operations which require prolonged attention while the vehicle is stationary.
When the en
gine is switched off and to prevent
discharging of the battery, the Peugeot Connect
Navigation (RNEG) switches off following the activation of the Energy Economy mode.
MULTIMEDIA AUDIO SYSTEM/BLUETOOTH TELEPHONE
SATELLITE NAVIGATION SYSTEM FOR EUROPE BY SD CARD
01 First steps
CONTENTS
02 Steering mounted controls
03 General operation
04 Navigation - Guidance
05 Traffic information
06 Radio
07 Music media players
08 Bluetooth telephone
09 Configuration
10 Screen menu map p.
p.
p.
p.
p.
p.
p.
p.
p.
p.
Frequently asked questions p. 158
159
160
163
171
173
174
177
180
181
185
Page 162 of 224

160
03 GENERAL OPERATION
For a detailed global view of the menus available, refer to the"Screen menu map" section.
Press the M
ODE button several times in succession for access to the following menus:
For cleaning the screen, the use of a soft, non-abrasive cloth (spectacles cloth) is recommended, with no additional product.
RADIO /MUSIC MEDIA PLAYERS
TELEPHONE
(If a conversation is in progress)
FULL SCREEN MA
P
NAVIGATION
(If guidance is in progress)
SETUP:
system language *
, date and time *
, display,
vehicle settings * , unit and system settings,
"Demo mode".
TRAFFIC:
TMC information and messages.
*
Available accordin
g to model.
TRIP COMPUTER
Page 175 of 224

173
06
3 2 1 1
SELECTING A STATION
When the current radio station isdisplayed on the screen, press thedial.
The radio source short-cuts menu appears and provides access to
the following short-cuts:
Select the function re
quired and press the dial to confi rm to gain
access to the corresponding settings.
TA
RDS, if displayed, allows you to continue listening to the same station by automatic retuning to alternative frequencies. However,
in certain conditions, coverage of an RDS station may not be
assured throughout the entire country as radio stations do notcover 100 % of the territory. This explains the loss of reception of
the station during a journey.
The external environment (hill, building, tunnel, underground car park...)may interfere with the reception, including in RDS following mode. Thisphenomenon is a normal result of the way in which radio waves are
transmitted and does not in any way indicate a failure of the audio equipment.
RDS - REGIONAL MODE
Press the RADIO button to display
the list of stations received locally sorted in alphabetical order.
Select the station required by turningthe dial and press to confi rm.
Re
gional prog.
Radiotext
RDSWhile listening to the radio, press one of the
buttons to select the previous or next station on
the list.
Press one o
f the buttons on the numeric keypad for more than
2 seconds to store the current station.
Press the button on the numeric keypad to recall the stored radio
station.
AM
A long press of one of the buttons starts theautomatic search for a station with a lower or
higher frequency.
RADIO
Page 176 of 224

174
07MUSIC MEDIA PLAYERS
CD, MP3/WMA CD
INFORMATION AND ADVICE
In order to be able to play a recorded CDR or CDRW, when recording it is preferable to select the ISO 9660 level 1, 2 or Jolietstandard.
I
f the disc is recorded in another format it may not be playedcorrectly.
It is recommended that the same recordin
g standard is alwaysused for an individual disc, with as low a speed as possible(4x maximum) for optimum sound quality.
In the particular case o
f a multi-session CD, the Joliet standard is recommended.
The Peu
geot Connect Navigation will only play audio fi les with the extension ".mp3" with a speed of between 8 Kbps and 320 Kbps
and the extension ".wma" with a speed of between 5 Kbps and384 Kbps.
It also supports the VBR
(Variable Bit Rate) mode.
No other t
ype of fi le (.mp4, .m3u...) can be played. The MP3
format, an abbreviation of MPEG 1, 2 & 2.5 Audio Layer 3 and the WMA format, an abbreviation of Windows Media Audio and
the property of Microsoft, are audio compression standards which permit the recording of several tens of music fi les on a single disc.
It is advisable to restrict fi le names to 20 characters
, without
using special characters (e.g.: " ? ; ù) to avoid any play or display
problems.
Page 182 of 224

180
09
4 3 2 1
65
CONFIGURATION
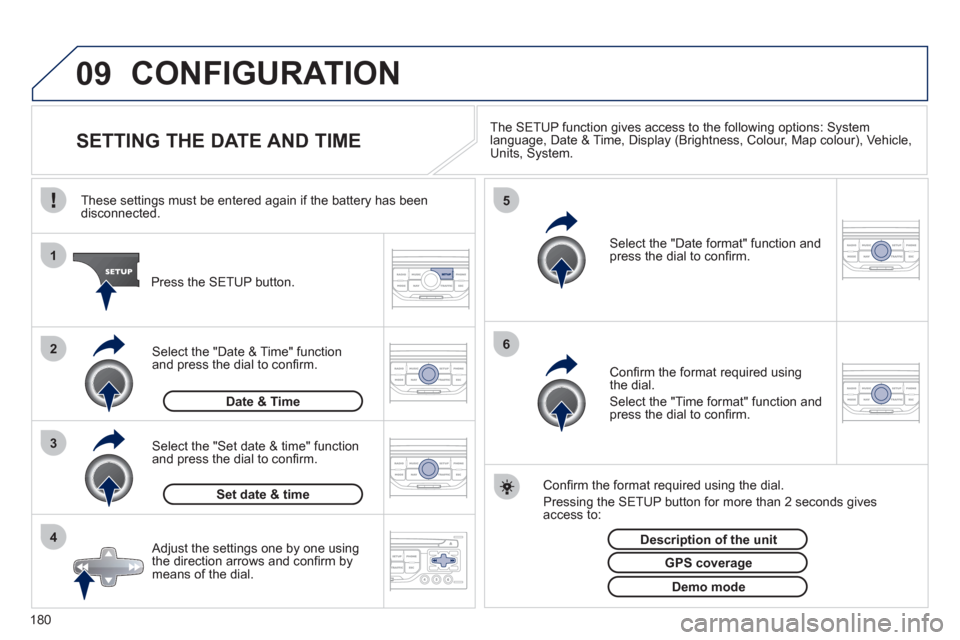
SETTING THE DATE AND TIME The SETUP function gives access to the following options: Systemlanguage, Date & Time, Display (Brightness, Colour, Map colour), Vehicle,Units, System.
Adjust the settings one by one usingthe direction arrows and confi rm bymeans of the dial.
Select the "Date format" function andpress the dial to confi rm.
Select the "Set date
& time" function
and press the dial to confi rm.
Confi rm the format required using the dial.
Pressing the
SETUP button for more than 2 seconds gives access to: These settin
gs must be entered again if the battery has been disconnected.
Pr
ess the SETUP button.
Confi rm the format required usingthe dial.
Select the "Time format" function and press the dial to confi rm.
Set date & tim
e
Select the "Date & Time" function
and press the dial to confi rm.
Demo mode
GPS coverage
Description of the unit
Date & Time