Page 149 of 406
 from the vehicle. The
effective distance depends upon th")
Be sure to remove the key from the vehicle
before locking the doors.
The keyfob can operate at a maximum distance of
approximately 33 ft (10 m) from the vehicle. The
effective distance depends upon the conditions
around the vehicle.
As many as 5 keyfobs can be used with one
vehicle. For information concerning the purchase
and use of additional keyfobs, contact a NISSAN
dealer.
The keyfob will not function when:● the battery is discharged.
● the distance between the vehicle and the
keyfob is over 33 ft (10 m) .
The panic alarm will not activate when the
key is in the ignition switch.
CAUTION
Listed below are conditions or occur-
rences which will damage the keyfob:
● Do not allow the keyfob, which contains
electrical components, to come into
contact with water or salt water. This
could affect the system function.
● Do not drop the keyfob. ●
Do not strike the keyfob sharply against
another object.
● Do not change or modify the keyfob.
● Wetting may damage the keyfob. If the
keyfob gets wet, immediately wipe until
it is completely dry.
● Do not place the keyfob for an extended
period in an area where temperatures
exceed 140°F (60°C) .
● Do not attach the keyfob with a key
holder that contains a magnet.
● Do not place the keyfob near equip-
ment that produces a magnetic field,
such as a TV, audio equipment and per-
sonal computers.
If a keyfob is lost or stolen, NISSAN rec-
ommends erasing the ID code of that key-
fob. This will prevent the keyfob from un-
authorized use to unlock the vehicle. For
information regarding the erasing proce-
dure, please contact a NISSAN dealer.
HOW TO USE REMOTE KEYLESS
ENTRY SYSTEM
Locking doors
1. Close all windows.
2. Remove the key from the ignition switch.
3. Close the hood and all doors.
4. Press the
button on the keyfob. All
the doors lock. The hazard warning lights
flash twice and the horn beeps once to
indicate all doors are locked.
LPD0209
3-8Pre-driving checks and adjustments
ProCarManuals.com
Page 150 of 406

●When thebutton is pressed with all
doors locked, the hazard warning lights flash
twice and the horn beeps once as a re-
minder that the doors are already locked.
● If a door is open and you press the
button, the doors will lock but the horn will
not beep and the hazard warning lights will
not flash.
The horn may or may not beep. For vehicles
without navigation system, refer to “Silencing the
horn beep feature” later in this section. For ve-
hicles with navigation system, refer to “How to
use the setting button” in the “Display screen,
heater, air conditioner, audio and phone systems”
section later in this manual.
Unlocking doors
Press thebutton on the keyfob once.
● Only the driver’s door unlocks.
● The hazard warning lights flash once if all
doors are completely closed with the ignition
switch in any position except the ON posi-
tion.
● The interior lights and puddle lights (if so
equipped) turn on and the light timer acti-
vates for a period of time when the interior
light switch is in the DOOR position with the
ignition switch in any position except the ON
position. Press the
button on the keyfob again
within 5 seconds.
● All doors unlock.
● The hazard warning lights flash once if all
doors are completely closed.
The interior lights can be turned off without wait-
ing by inserting the key into the ignition switch
and placing it in the ON or START position,
locking the doors with the keyfob or pushing the
interior light switch to the OFF position.
Auto relock
When thebutton on the keyfob is pressed,
all doors will lock automatically within 1 minute
unless one of the following operations is per-
formed:
● Any door is opened.
● A key is inserted into the ignition switch and
the switch is cycled from OFF to ON.
Linking the keyfob to automatic drive
positioner memory
If the vehicle is equipped with automatic drive
positioner, the keyfob can be linked to a memory
setting.
See “Automatic drive positioner” in this section.
LPD0210
Pre-driving checks and adjustments3-9
ProCarManuals.com
Page 152 of 406

To deactivate:Press and hold the
andbuttonsfor at least 2 seconds.
The hazard warning lights will flash 3 times to
confirm that the horn beep feature has been
deactivated.
To activate: Press and hold the
andbuttonsfor at least 2 seconds
once more.
The hazard warning lights will flash once and the
horn will sound once to confirm that the horn
beep feature has been reactivated.
Deactivating the horn beep feature does not si-
lence the horn if the alarm is triggered.
�1Pull the hood lock release handle located
below the driver side instrument panel. The
hood will spring up slightly.
�2Push the lever at the front of the hood to the
side as illustrated with your fingertips and
raise the hood.
When closing the hood, lower it slowly and make
sure it locks into place.
WARNING
● Make sure the hood is completely
closed and latched before driving. Fail-
ure to do so could cause the hood to fly
open and result in an accident.
● If you see steam or smoke coming from
the engine compartment, to avoid injury
do not open the hood.
LPD0244
HOOD
Pre-driving checks and adjustments3-11
ProCarManuals.com
Page 154 of 406
 to illuminate.
If the
light illuminates because
the fuel-filler cap is loose or missing,
tighten or")
●Failure to tighten the fuel-filler cap
properly may cause the
Malfunc-
tion Indicator Light (MIL) to illuminate.
If the
light illuminates because
the fuel-filler cap is loose or missing,
tighten or install the cap and continue
to drive the vehicle. The
light
should turn off after a few driving trips.
If the
light does not turn off after a
few driving trips, have the vehicle in-
spected by a NISSAN dealer.
● For additional information, see the
“Malfunction Indicator Light (MIL)” in
the “Instruments and Controls” section
in this manual.
● If fuel is spilled on the vehicle body,
flush it away with water to avoid paint
damage.
For additional information, see “Fuel recommen-
dation (without Flexible Fuel Vehicle option)” and
“Flexible fuel vehicle (FFV) fuel recommendation”
in the “Technical and consumer information” sec-
tion in this manual. To remove the fuel-filler cap:
1. Turn the fuel-filler cap counterclockwise to remove.
2. Loop the tether strap around the hook
�1
while refueling.
To install the fuel-filler cap: 1. Insert the fuel-filler cap straight into the fuel- filler tube.
2. Turn the fuel-filler cap clockwise until a single click is heard.
Loose Fuel Cap warning
The LOOSE FUEL CAP warning appears in the
odometer when the fuel-filler cap is not tightened
correctly after the vehicle has been refueled. It
may take a few driving trips for the message to be
displayed. To turn off the warning, perform the
following:
1. Remove and install the fuel-filler cap as pre- viously described as soon as possible.
2. Tighten the fuel-filler cap until it clicks.
LPD0325LRS2005
Pre-driving checks and adjustments3-13
ProCarManuals.com
Page 155 of 406

3. Press the loose fuel cap warning reset but-ton
�Aon the instrument panel located be-
hind the steering wheel for about 1 second
to turn off the LOOSE FUEL CAP warning
�Bafter tightening the fuel-filler cap.
TILT OPERATION
WARNING
Do not adjust the steering wheel while
driving. You could lose control of your
vehicle and cause an accident.
Pull the lock lever forward and hold it to adjust the
steering wheel up or down to the desired posi-
tion.
Release the lock lever to lock the steering wheel
in place. The accelerator and brake pedals can be ad-
justed for driving comfort.
Use the pedal adjusting switch to adjust the
brake and accelerator pedal position away from
the driver
�1or toward the driver�2.
The brake and accelerator pedals cannot be ad-
justed separately.
WARNING
Do not adjust the pedal position while
driving. You can lose control of your ve-
hicle and cause an accident.
LPD0254LPD0255
STEERING WHEEL PEDAL POSITION ADJUSTMENT (if so
equipped)
3-14Pre-driving checks and adjustments
ProCarManuals.com
Page 156 of 406
CAUTION
Do not adjust the pedal position with your
foot on the pedal.
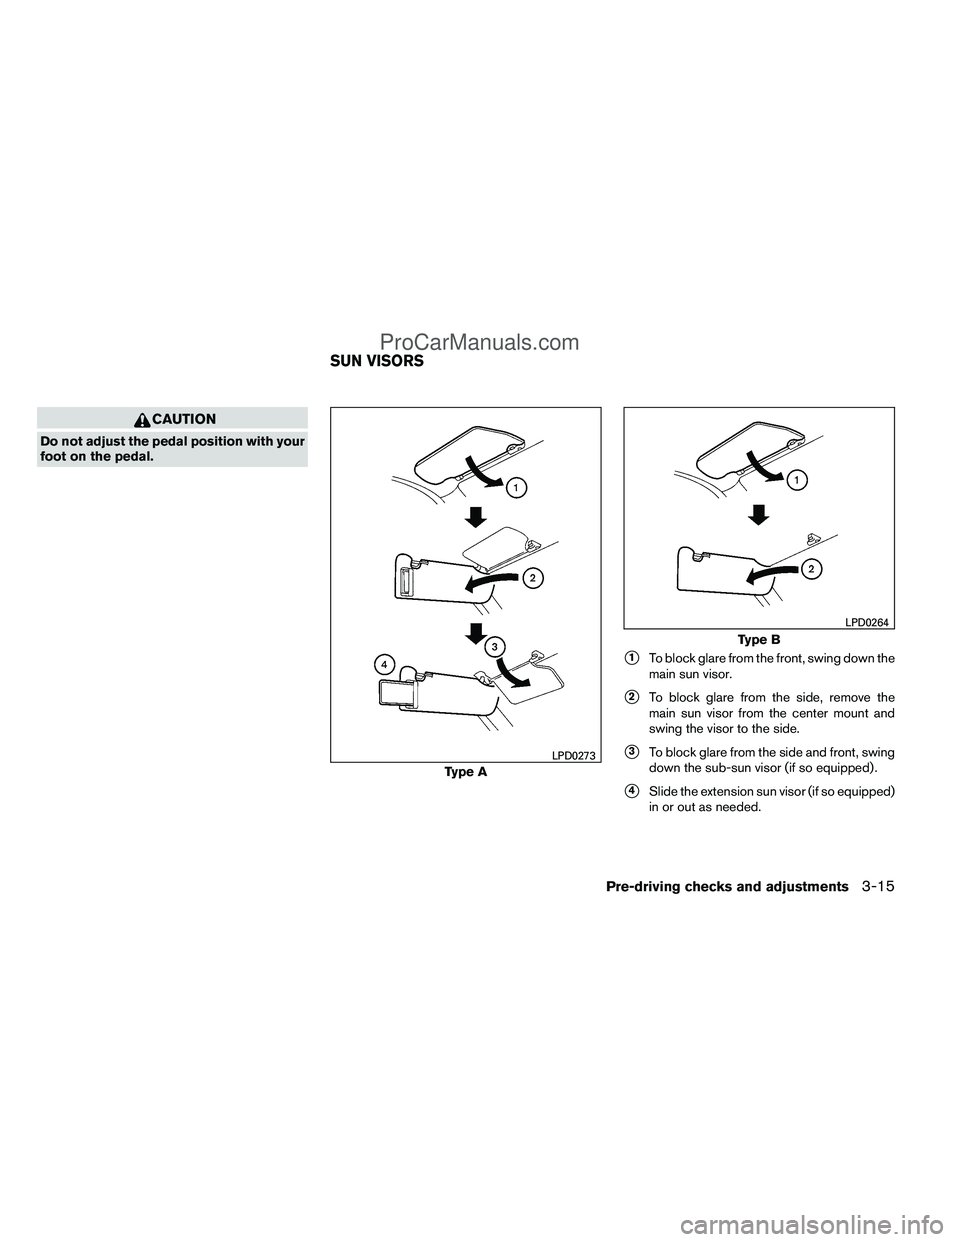
�1To block glare from the front, swing down the
main sun visor.
�2To block glare from the side, remove the
main sun visor from the center mount and
swing the visor to the side.
�3To block glare from the side and front, swing
down the sub-sun visor (if so equipped) .
�4Slide the extension sun visor (if so equipped)
in or out as needed.
Type A
LPD0273
Type B
LPD0264
SUN VISORS
Pre-driving checks and adjustments3-15
ProCarManuals.com
Page 163 of 406

Some outside mirrors can be heated to defrost,
defog, or de-ice for improved visibility. For addi-
tional information, see “Rear window and outside
mirror defroster s")
Heated mirrors (if so equipped)
Some outside mirrors can be heated to defrost,
defog, or de-ice for improved visibility. For addi-
tional information, see “Rear window and outside
mirror defroster switch” in the “Instruments and
controls” section of this manual.
TAILGATE
Opening the tailgate
Pull the tailgate handle upward and lower the
tailgate. The support cables hold the tailgate
open.
When closing the tailgate, make sure the latches
are securely locked.
Do not drive the vehicle with the tailgate
down, unless equipped with NISSAN’s Bed
Extender (accessory) or equivalent in the
extended position.For proper truck box loading see “Vehicle loading
information” in the “Technical and consumer in-
formation” section of this manual.
WARNING
●
It is extremely dangerous to ride in a
cargo area inside a vehicle. In a colli-
sion, people riding in these areas are
more likely to be seriously injured or
killed.
● Do not allow people to ride in any area
of your vehicle that is not equipped with
seats and seat belts.
● Be sure everyone in your vehicle is in a
seat and using a seat belt properly.
LPD0270
TRUCK BOX
3-22Pre-driving checks and adjustments
ProCarManuals.com
Page 164 of 406

Removing the tailgate
1. Release the tailgate support cables.
CAUTION
●The tailgate is heavy. Two people
should remove or install it. Be careful
not to drop it during removal.
● After releasing the support cables, do
not let the tailgate rest on the bumper.
2. Hold the tailgate at a 45 degree angle.
3. Pull the tailgate out from the left side hinge.
4. Slide the tailgate out of the right side hinge.
Installing the tailgate
1. Insert the tailgate into the right side hinge.
2. Hold the tailgate at a 45 degree angle and insert into the left side hinge.
3. Continue to hold the tailgate at a 45 degree angle and attach the tailgate support cables.
4. Close the tailgate securely.
Locking the tailgate
To unlock the tailgate, turn the key toward the
passenger side of the vehicle
�1. To lock, turn the
key toward the driver side
�2.
Both the master key and the valet key can be
used to lock and unlock the tailgate.
LPD0271LPD0272
Pre-driving checks and adjustments3-23
ProCarManuals.com