2012 NISSAN QASHQAI rear light
[x] Cancel search: rear lightPage 111 of 297
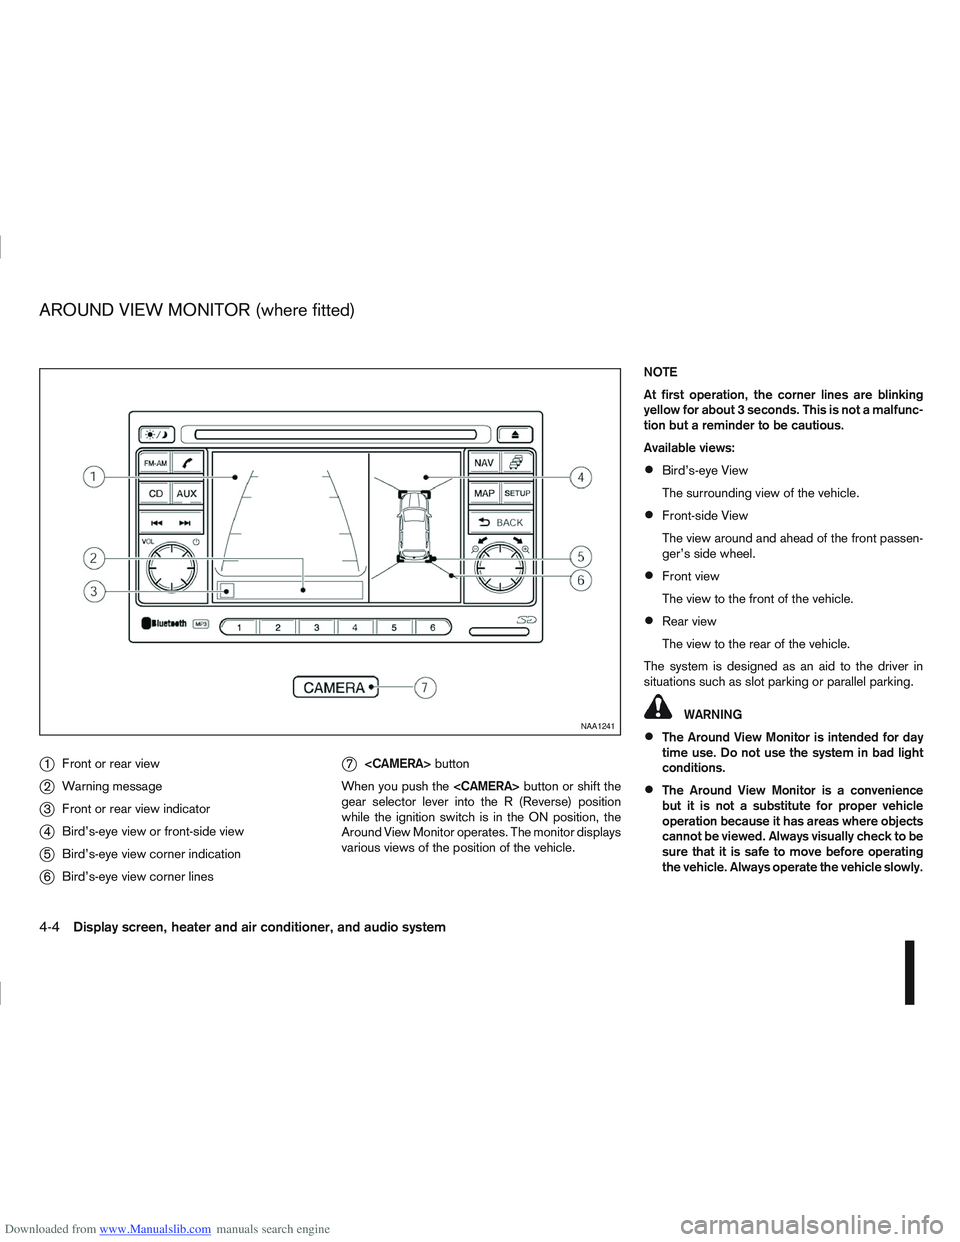
Downloaded from www.Manualslib.com manuals search engine j1Front or rear view
j2Warning message
j3Front or rear view indicator
j4Bird’s-eye view or front-side view
j5Bird’s-eye view corner indication
j6Bird’s-eye view corner lines
j7
button
When you push the
gear selector lever into the R (Reverse) position
while the ignition switch is in the ON position, the
Around View Monitor operates. The monitor displays
various views of the position of the vehicle. NOTE
At first operation, the corner lines are blinking
yellow for about 3 seconds. This is not a malfunc-
tion but a reminder to be cautious.
Available views:
Bird’s-eye View
The surrounding view of the vehicle.
Front-side View
The view around and ahead of the front passen-
ger’s side wheel.
Front view
The view to the front of the vehicle.
Rear view
The view to the rear of the vehicle.
The system is designed as an aid to the driver in
situations such as slot parking or parallel parking.
WARNING
The Around View Monitor is intended for day
time use. Do not use the system in bad light
conditions.
The Around View Monitor is a convenience
but it is not a substitute for proper vehicle
operation because it has areas where objects
cannot be viewed. Always visually check to be
sure that it is safe to move before operating
the vehicle. Always operate the vehicle slowly.
NAA1241
AROUND VIEW MONITOR (where fitted)
4-4Display screen, heater and air conditioner, and audio system
Page 115 of 297

Downloaded from www.Manualslib.com manuals search engine Yellow linej2 :approx.1m(3ft)
Green linej3 :approx.2m(7ft)
Green linej4 :approx.3m(10ft)
Vehicle width guide lines
j5:
Indicate the vehicle width when reversing.
Predictive course lines
j6:
Indicate the predictive course when operating the
vehicle. The predictive course lines will be displayed
on the monitor when the steering wheel is turned.
The predictive course lines will move depending on
how much the steering wheel is turned and will not
be displayed while the steering wheel is in the neu-
tral position.
The front view will not be displayed when the vehicle
speed is above 10 km/h (6 MPH).
WARNING
The distance between objects viewed in the
rear view differs from actual distance because
a wide-angle lens is used. Objects in the rear
view will appear visually opposite than when
viewed in the rear view and outside mirrors.
On a snow-covered or slippery road, there
may be a difference between the predictive
course line and the actual course line.
If the battery is disconnected or becomes dis-
charged, the predictive course lines may be
displayed incorrectly. If this occurs visit a
NISSAN dealer or qualified workshop.
If predictive course lines are displayed incor-
rectly visit a NISSAN dealer or qualified work-
shop.
The displayed lines on the rear view will ap-
pear slightly off to the right because the rear
view camera is not installed in the rear centre
of the vehicle.
NOTE
When the monitor displays the front view and the
steering wheel turns about 90 degrees or less
from the neutral position, both the right and left
predictive course lines
j6 are displayed. When
the steering wheel turns about 90 degrees or
more, a line is displayed only on the opposite
side of the turn.
Bird’s-eye view
The bird’s-eye view shows the overhead view of the
vehicle which helps to confirm the vehicle position.
The vehicle icon
j1 shows the position of the ve-
hicle.
NOTE
The size of the vehicle icon on the bird’s-eye
view may differ somewhat from the actual ve-
hicle.
The areas that the cameras cannot cover are indi-
cated in black.
At first operation, the corner lines
j2 on all four cor-
ners of the vehicle icon are blinking yellow for about
3 seconds. The four corners
j3 of the vehicle are
displayed in red.
NOTE
Corner lines
j2 blink (yellow) on all four corners
of the vehicle icon as a reminder to be cautious.
This is not a malfunction.
WARNING
Objects in the bird’s-eye view will appear fur-
ther than the actual distance because the
bird’s-eye view is a pseudo view that is pro-
cessed by combining the views from the cam-
eras on the outside mirrors, the front and the
rear of the vehicle.NAA1236
Bird’s-eye view
4-8Display screen, heater and air conditioner, and audio system
Page 165 of 297

Downloaded from www.Manualslib.com manuals search engine During the first 1,600 km (1,000 miles), follow these
recommendations for the future reliability and
economy of your new vehicle. Failure to follow the
recommendations may result in shortened engine
life and reduced engine performance.
Avoid driving for long periods at a constant
speed, either fast or slow.
Do not accelerate at full throttle in any gear.
Avoid quick starts.
Avoid hard braking as much as possible.
Do not tow a trailer during the first 800 km (500
miles).
NOTE
Models with K9K diesel engine will achieve top
performance only after approximately 5,000 km
(3,000 miles).
WARNING
The driving characteristics of your vehicle can be
changed remarkably by any additional load and
its distribution as well as by adding optional
equipment (trailer couplings, roof racks, etc.).
Your driving style and speed have to be adjusted
accordingly. Especially when carrying heavy
loads, your speed must be reduced adequately.
Make sure the area around the vehicle is free of
obstacles.
Check fluid levels such as engine oil, coolant,
brake and clutch fluid, and window washer fluid
as frequently as possible, at least whenever you
refuel.
Visually inspect tyres for their appearance and
condition. Also check the tyre pressure for
proper inflation.
Maintenance items in the “8. Maintenance and
do-it-yourself” section should be checked peri-
odically.
Check that all windows and light lenses are
clean.
Check that all doors are closed.
Position the seat and adjust the head restraints.
Adjust the inside and outside mirrors.
Fasten your seat belt and ask all passengers to
do likewise.
Check the operation of the warning/indicator
lights when the ignition switch is turned to the
ON position.
Do not place hard or heavy objects on the dash-
board or rear parcel shelf in order to prevent
injury in the event of a sudden stop.
RUNNING-IN SCHEDULE BEFORE STARTING THE ENGINE
5-2Starting and driving
Page 182 of 297

Downloaded from www.Manualslib.com manuals search engine Place the ignition switch in the “OFF” position.
Models without Intelligent Key system:
Place the ignition switch in the LOCK position.
P (Park):
Use this position when the vehicle is parked or when
starting the engine. Make sure that the vehicle is
completely stopped and move the selector lever
into the P (Park) position. Apply the handbrake.
When parking on a hill, first depress the footbrake
pedal, apply the handbrake, and then move the se-
lector lever into the P (Park) position.
R (Reverse):
Use this position to reverse. Make sure that the
vehicle is completely stopped before selecting the R
(Reverse) position.
When the selector lever is in the R (Reverse) posi-
tion, either the NISSAN Connect monitor (where fit-
ted) or the ultra sonic parking sensor (where fitted)
will be activated. For details, see “Rear-view moni-
tor (where fitted)” or “Around view monitor (where
fitted)” earlier in this section or “Ultrasonic Parking
Sensor (where fitted)” later in this section
N (Neutral):
Neither the forward nor reverse gear is engaged.
The engine can be started in this position. You may
shift to the N (Neutral) position and restart a stalled
engine while the vehicle is moving.
D (Drive):
Use this position for all normal forward driving. L (Low):
Use this position when climbing steep hills slowly or
driving slowly through deep snow, sand or mud, or
for maximum engine braking on steep downhill
grades.
SPORT mode switch
To select the SPORT mode, push the SPORT mode
switch with the selector lever in the D (Drive) posi-
tion. The SPORT mode indicator light
in the
meter panel illuminates. To turn off the SPORT
mode, push the SPORT mode switch again. The
SPORT mode indicator light will turn off. When the
selector lever is shifted to any position other than D,
the SPORT mode will be automatically turned off.
OFF position:
For normal driving and fuel economy, use the OFF
position. ON position:
For driving up or down long slopes where engine
braking is necessary, or for powerful acceleration,
use the ON position. The transmission will automati-
cally select a different gear ratio, allowing the en-
gine to provide high output.
When driving conditions change, push the switch to
turn the SPORT mode off.
Remember not to drive at high speeds for extended
periods of time with the SPORT mode in the ON
position. This reduces fuel economy.
Accelerator downshift
- in the D position -
For passing or climbing hills, depress the accelera-
tor pedal to the floor. This shifts the transmission
down into a lower gear, depending on the vehicle
speed.NSD399
Left-Hand Drive (LHD) model
NSD400
Starting and driving5-19
Page 184 of 297
Downloaded from www.Manualslib.com manuals search engine NISSAN GREEN PROGRAM
The Stop/Start System is designed to prevent un-
necessary fuel consumption, exhaust emissions,
and noise during a journey:
When the vehicle comes to rest the engine is
automatically stopped*.
The engine is then automatically restarted before
you are ready to drive away**.
CAUTION
At the end of the journey the engine must be
stopped and ignition turned OFF. Lock the ve-
hicle as normal. Turning the ignition OFF will shut
down all electrical systems. Failure to do this may
result in a flat battery.
NORMAL OPERATION
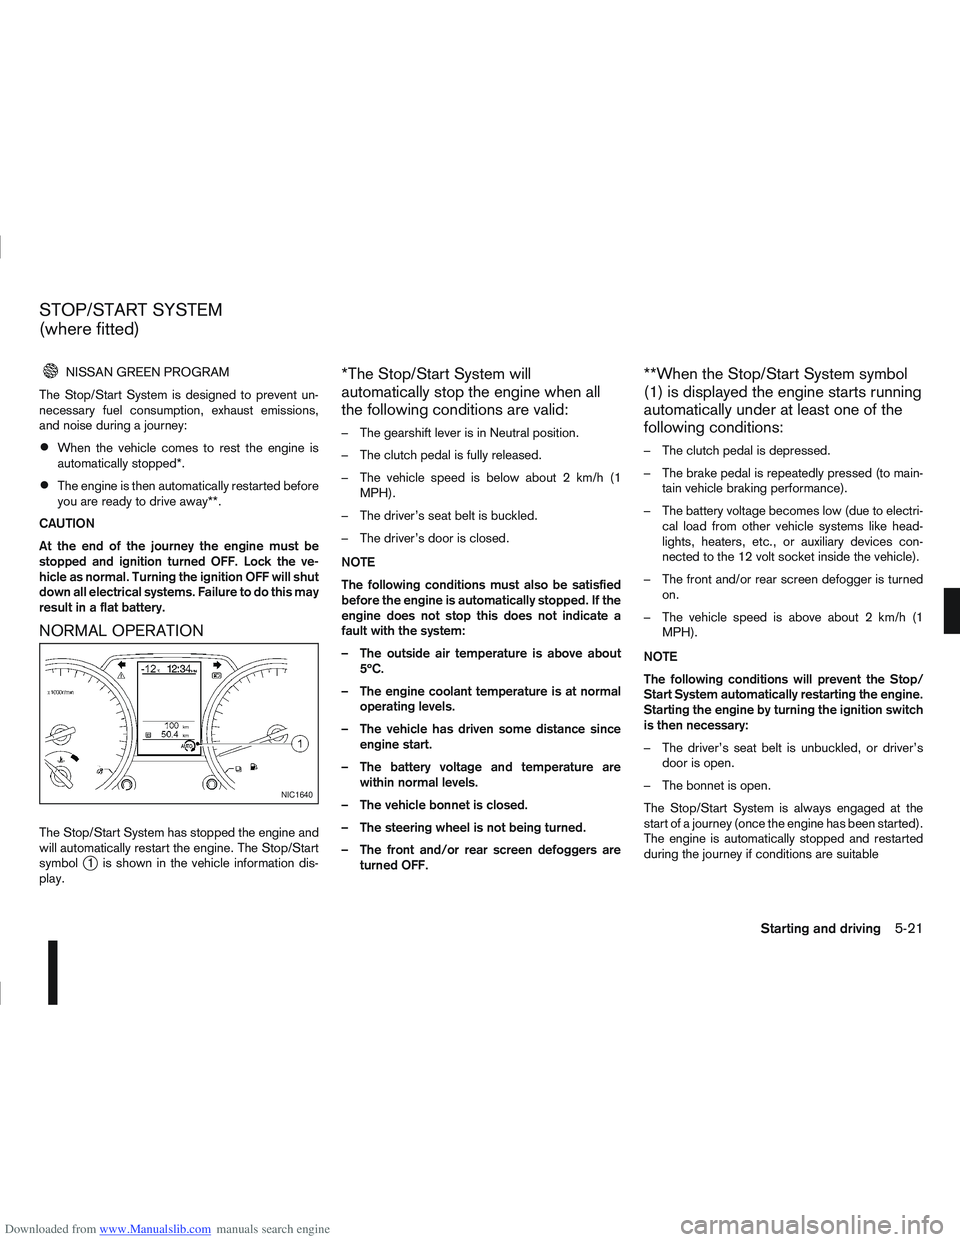
The Stop/Start System has stopped the engine and
will automatically restart the engine. The Stop/Start
symbol
j1 is shown in the vehicle information dis-
play.
*The Stop/Start System will
automatically stop the engine when all
the following conditions are valid:
– The gearshift lever is in Neutral position.
– The clutch pedal is fully released.
– The vehicle speed is below about 2 km/h (1 MPH).
– The driver’s seat belt is buckled.
– The driver’s door is closed.
NOTE
The following conditions must also be satisfied
before the engine is automatically stopped. If the
engine does not stop this does not indicate a
fault with the system:
– The outside air temperature is above about 5ºC.
– The engine coolant temperature is at normal operating levels.
– The vehicle has driven some distance since engine start.
– The battery voltage and temperature are within normal levels.
– The vehicle bonnet is closed.
– The steering wheel is not being turned.
– The front and/or rear screen defoggers are turned OFF.
**When the Stop/Start System symbol
(1) is displayed the engine starts running
automatically under at least one of the
following conditions:
– The clutch pedal is depressed.
– The brake pedal is repeatedly pressed (to main-tain vehicle braking performance).
– The battery voltage becomes low (due to electri- cal load from other vehicle systems like head-
lights, heaters, etc., or auxiliary devices con-
nected to the 12 volt socket inside the vehicle).
– The front and/or rear screen defogger is turned on.
– The vehicle speed is above about 2 km/h (1 MPH).
NOTE
The following conditions will prevent the Stop/
Start System automatically restarting the engine.
Starting the engine by turning the ignition switch
is then necessary:
– The driver’s seat belt is unbuckled, or driver’s door is open.
– The bonnet is open.
The Stop/Start System is always engaged at the
start of a journey (once the engine has been started).
The engine is automatically stopped and restarted
during the journey if conditions are suitable
NIC1640
STOP/START SYSTEM
(where fitted)
Starting and driving5-21
Page 187 of 297
![NISSAN QASHQAI 2012 Owners Manual Downloaded from www.Manualslib.com manuals search engine – [Total Saving]
Estimated CO2 exhaust emissions pre-
vented.
Time that the engine has been stopped by
the Stop/Start System.
NOTE
The [Total](/manual-img/5/56764/w960_56764-186.png "NISSAN QASHQAI 2012 Owners Manual Downloaded from www.Manualslib.com manuals search engine – [Total Saving]
Estimated CO2 exhaust emissions pre-
vented.
Time that the engine has been stopped by
the Stop/Start System.
NOTE
The [Total")
Downloaded from www.Manualslib.com manuals search engine – [Total Saving]
Estimated CO2 exhaust emissions pre-
vented.
Time that the engine has been stopped by
the Stop/Start System.
NOTE
The [Total Saving] values cannot be reset
and show accumulated Stop/Start System
information since the vehicle was built.Ultrasonic sensors
jA , fitted in the vehicle’s rear
bumper, measure the distance between the vehicle
and an obstacle when reversing. When reverse gear
is engaged a beeping sound is heard. The frequency
of the beeps will increase the closer you come to
the obstacle until, the sound becomes a constant
beep when, the vehicle is approximately 30 cm (12
in) from the obstacle.
NOTE
This system is intended as an aid to reversing,
to be used in conjunction with your rear view
mirror.
Make sure that the ultrasonic sensors are not
obscured (by dirt, mud, snow, etc.). The Four Wheel Drive (4WD) system is used to
select 2WD, AUTO, or LOCK depending on the
driving conditions.
The Four Wheel Drive (4WD) system controls the
coupling operation. Turn the control (located on the
centre console) to select each mode: 2WD, AUTO
or LOCK depending on the driving conditions.
AUTO: Turn the 4WD mode control to the neutral
(AUTO) position and the Four-Wheel Drive (4WD)
AUTO indicator light
on the combination meter
illuminates.
2WD: Turn the control clockwise to the 2WD posi-
tion.
LOCK: When the control is turned anticlockwise to
the LOCK position, it springs back to the AUTO
position when released. The 4WD LOCK mode in-
dicator light
illuminates on the combination
meter, to show LOCK mode is engaged. To disen-
gage LOCK mode, turn the control anticlockwise
again to the LOCK position and release. The 4WD
LOCK mode indicator light will go out.
NSD300ZNSD297Z
ULTRASONIC PARKING SENSOR
(where fitted) FOUR-WHEEL DRIVE (4WD)
(where fitted)
5-24Starting and driving
Page 188 of 297

Downloaded from www.Manualslib.com manuals search engine 4WD MODE OPERATIONSCAUTION
Depending on the driving conditions, the 4WD
mode may automatically change from 2WD to
4WD even when the 2WD mode is selected.
Do not start the engine while in the 2WD, AUTO,
or LOCK mode:
When on free-roller or jacking the front tyres
with the rear tyres on the ground.
When towing with the rear tyres raised from
the ground.
4WD SHIFT TIPS
If the 4WD mode control is operated while cor-
nering, accelerating or decelerating, or if the ig-
nition is turned OFF while in the AUTO or LOCK
position you may feel a jolt - this is normal.
The oil temperature of power train parts will in-
crease if the vehicle is continuously operated
under conditions where the difference in rotation
between the front and rear wheels is large (wheel
slip), such as when driving the vehicle on rough
roads through sand or mud, or when freeing a
stuck vehicle. In these cases, the 4WD warning
light blinks rapidly, and the 4WD mode changes
to the 2WD condition to protect the power train
parts. If you stop the vehicle, with the engine
idling, and wait until the warning light stops blink-
ing the 4WD mode returns to the AUTO mode.
Braking distance in 4WD mode is the same as in
2WD mode.
4WD Mode Wheels driven4WD mode
indicator light
(
m,m) Driving conditions
2WD Front wheels-
The wheel drive mode is in
2WD when driving on a normal
road Goes off For driving on dry, paved roads
AUTO Distribution of torque to the
front and rear wheels changes
automatically, depending on
road conditions encountered
[ratio; 100:0 (2WD)
→50:50
(4WD)]. This results in
improved driving stability
m
For driving on paved or slippery roads
LOCK Four wheels
*1m/mFor driving on rough roads
*1LOCK mode changes to AUTO mode automatically when the vehicle is sharply accelerated or when the vehicle speed
is over approximately 40 km/h (25 MPH). The 4WD LOCK indicator light goes off. Turning off the ignition automatically
cancels LOCK mode.
Starting and driving5-25
Page 189 of 297
Downloaded from www.Manualslib.com manuals search engine Even if the mode automatically changes to AUTO
mode, when driving in the LOCK mode, the indi-
cator light stays in the LOCK mode.
CAUTION
Only use the 4WD mode control when driving
in a straight direction (to select 2WD, AUTO or
LOCK).
Do not use the 4WD mode control when turn-
ing or reversing.
Do not use the 4WD mode control with the
front wheels spinning (to select 2WD, AUTO,
or LOCK).
Be especially careful when starting or driving
on slippery surfaces with the 4WD mode set
to AUTO.
Do not drive on dry, hard surfaced roads in
the LOCK position.
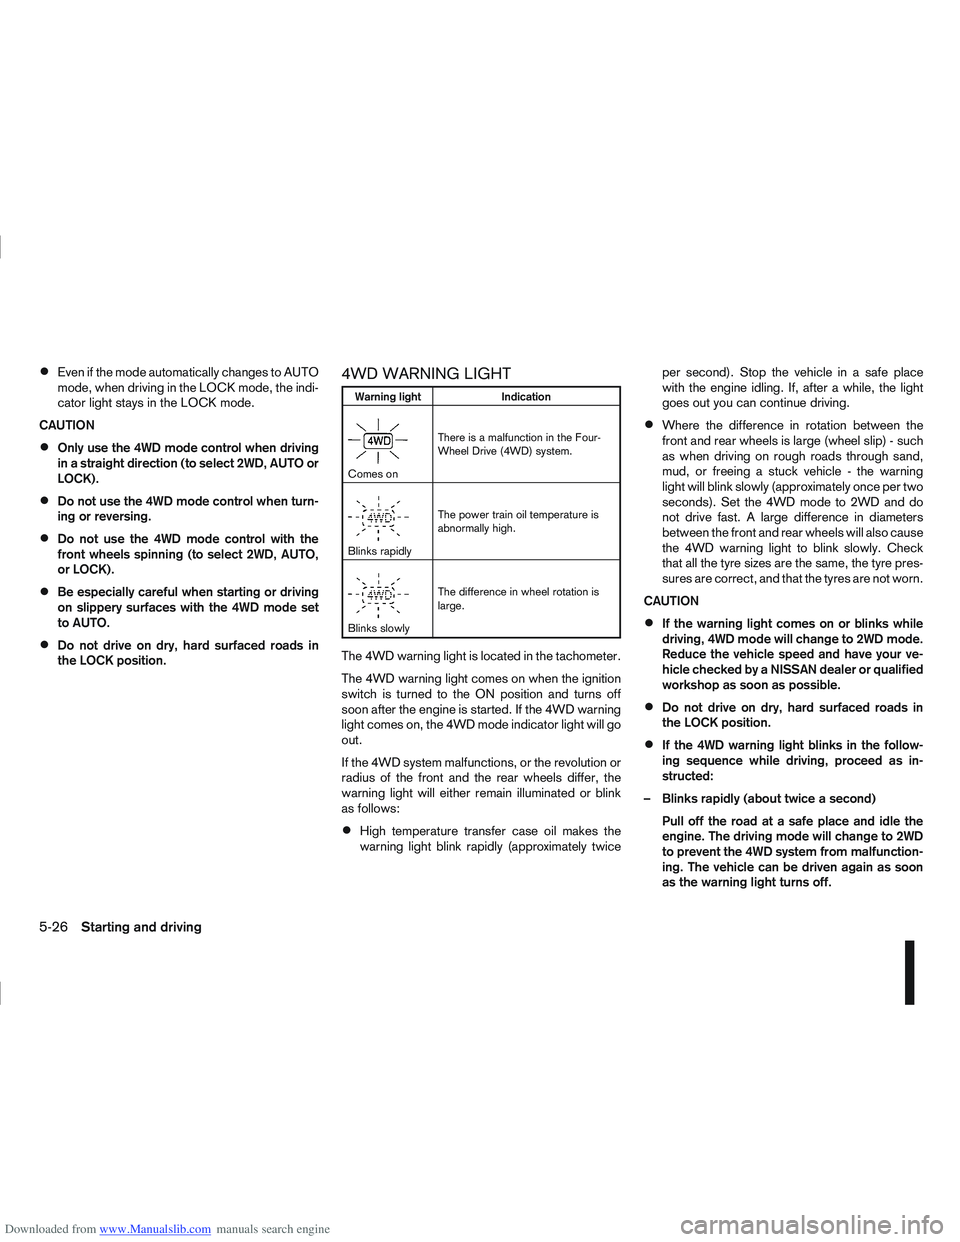
4WD WARNING LIGHT
Warning light Indication
mComes onThere is a malfunction in the Four-
Wheel Drive (4WD) system.
mBlinks rapidlyThe power train oil temperature is
abnormally high.
mBlinks slowlyThe difference in wheel rotation is
large.
The 4WD warning light is located in the tachometer.
The 4WD warning light comes on when the ignition
switch is turned to the ON position and turns off
soon after the engine is started. If the 4WD warning
light comes on, the 4WD mode indicator light will go
out.
If the 4WD system malfunctions, or the revolution or
radius of the front and the rear wheels differ, the
warning light will either remain illuminated or blink
as follows:
High temperature transfer case oil makes the
warning light blink rapidly (approximately twice per second). Stop the vehicle in a safe place
with the engine idling. If, after a while, the light
goes out you can continue driving.
Where the difference in rotation between the
front and rear wheels is large (wheel slip) - such
as when driving on rough roads through sand,
mud, or freeing a stuck vehicle - the warning
light will blink slowly (approximately once per two
seconds). Set the 4WD mode to 2WD and do
not drive fast. A large difference in diameters
between the front and rear wheels will also cause
the 4WD warning light to blink slowly. Check
that all the tyre sizes are the same, the tyre pres-
sures are correct, and that the tyres are not worn.
CAUTION
If the warning light comes on or blinks while
driving, 4WD mode will change to 2WD mode.
Reduce the vehicle speed and have your ve-
hicle checked by a NISSAN dealer or qualified
workshop as soon as possible.
Do not drive on dry, hard surfaced roads in
the LOCK position.
If the 4WD warning light blinks in the follow-
ing sequence while driving, proceed as in-
structed:
– Blinks rapidly (about twice a second) Pull off the road at a safe place and idle the
engine. The driving mode will change to 2WD
to prevent the 4WD system from malfunction-
ing. The vehicle can be driven again as soon
as the warning light turns off.
5-26Starting and driving