2012 NISSAN QASHQAI nissan connect
[x] Cancel search: nissan connectPage 178 of 297

Downloaded from www.Manualslib.com manuals search engine 2. Keep the footbrake pedal depressed and pushthe selector lever button to shift into a driving
gear.
3. Release the handbrake and footbrake, then gradually start the vehicle in motion by pressing
the accelerator pedal.
The automatic transmission or continuously variable
transmission is designed so that the footbrake pedal
MUST be depressed before shifting from P (Park)
to any drive position while the ignition switch is ON.
Shifting
j
A LHD models
jB RHD models
To move the selector lever:
mPush the button while depressing the
brake pedal.
mPush the button to shift.
mShift without depressing the brake
pedal.
Push the button to shift into P (Park) or R (Reverse).
All other positions can be selected without pushing
the button.
P (Park):
Use this position when the vehicle is parked or when
starting the engine. Always make sure that the ve-
hicle is completely stopped before moving the se-
lector lever into the P (Park) position. For maximum
safety, the footbrake pedal must be depressed be-
fore moving the selector lever into the P (Park) posi-
tion. Use this position together with the handbrake.
When parking on a hill, first depress the footbrake
pedal, apply the handbrake and then shift into the P
(Park) position.
R (Reverse):
CAUTION
Shift into this position only after the vehicle has
completely stopped.
Use this position to reverse the vehicle.
When the selector lever is in the R (Reverse) posi-
tion, either the NISSAN Connect monitor (where fit-
ted) or the ultra sonic parking sensor (where fitted)
will be activated. For details, see “Rear-view moni-
tor (where fitted)” in the “4. Display screen, heater and air conditioner, and audio system” section,
“Around view monitor (where fitted)” in the “4. Dis-
play screen, heater and air conditioner, and audio
system” section or “Ultrasonic Parking Sensor
(where fitted)” later in this section.
N (Neutral):
Neither forward nor reverse gear is engaged. The
engine can be started in this position. You may shift
to N and restart a stalled engine while driving the
vehicle.
D (Drive):
Use this position for all normal forward driving.
Gear shift indicator:
The gear shift indicator
jA located in the lower part
of the vehicle information display shows the current
position of the transmission.
It shows the P,R,N,D modes when the transmission
is in auto mode. It shows the gear number when the
transmission is in manual mode.
NSD323Z
NIC1649
Starting and driving5-15
Page 182 of 297

Downloaded from www.Manualslib.com manuals search engine Place the ignition switch in the “OFF” position.
Models without Intelligent Key system:
Place the ignition switch in the LOCK position.
P (Park):
Use this position when the vehicle is parked or when
starting the engine. Make sure that the vehicle is
completely stopped and move the selector lever
into the P (Park) position. Apply the handbrake.
When parking on a hill, first depress the footbrake
pedal, apply the handbrake, and then move the se-
lector lever into the P (Park) position.
R (Reverse):
Use this position to reverse. Make sure that the
vehicle is completely stopped before selecting the R
(Reverse) position.
When the selector lever is in the R (Reverse) posi-
tion, either the NISSAN Connect monitor (where fit-
ted) or the ultra sonic parking sensor (where fitted)
will be activated. For details, see “Rear-view moni-
tor (where fitted)” or “Around view monitor (where
fitted)” earlier in this section or “Ultrasonic Parking
Sensor (where fitted)” later in this section
N (Neutral):
Neither the forward nor reverse gear is engaged.
The engine can be started in this position. You may
shift to the N (Neutral) position and restart a stalled
engine while the vehicle is moving.
D (Drive):
Use this position for all normal forward driving. L (Low):
Use this position when climbing steep hills slowly or
driving slowly through deep snow, sand or mud, or
for maximum engine braking on steep downhill
grades.
SPORT mode switch
To select the SPORT mode, push the SPORT mode
switch with the selector lever in the D (Drive) posi-
tion. The SPORT mode indicator light
in the
meter panel illuminates. To turn off the SPORT
mode, push the SPORT mode switch again. The
SPORT mode indicator light will turn off. When the
selector lever is shifted to any position other than D,
the SPORT mode will be automatically turned off.
OFF position:
For normal driving and fuel economy, use the OFF
position. ON position:
For driving up or down long slopes where engine
braking is necessary, or for powerful acceleration,
use the ON position. The transmission will automati-
cally select a different gear ratio, allowing the en-
gine to provide high output.
When driving conditions change, push the switch to
turn the SPORT mode off.
Remember not to drive at high speeds for extended
periods of time with the SPORT mode in the ON
position. This reduces fuel economy.
Accelerator downshift
- in the D position -
For passing or climbing hills, depress the accelera-
tor pedal to the floor. This shifts the transmission
down into a lower gear, depending on the vehicle
speed.NSD399
Left-Hand Drive (LHD) model
NSD400
Starting and driving5-19
Page 218 of 297

Downloaded from www.Manualslib.com manuals search engine 6. Open the bonnet. For details, see “Bonnetrelease” in the “3. Pre-driving checks and
adjustments” section.
7. Remove the vent caps (where fitted) on the bat- tery and cover the battery with an old cloth.
8. Connect the jump leads in the sequence (
j1 →j2→j3→j4 ) as illustrated.
CAUTION
Always connect positivej+ to positivej+
and negativej- to body ground (for ex-
ample, engine lift bracket, etc.) – not to
the battery’s negative
j-.
An incorrect connection could damage the
charging system.
Be sure that the jumper cables do not
touch moving parts in the engine compart-
ment.
Be careful not to allow contact between
the positive jump lead connector and the
vehicle or the negative lead during con-
nection and disconnection.
9. Start the engine of the other vehicle
jA and let it
run for a few minutes. Keep the engine speed at
about 2,000 rpm.
10. Start the engine of your vehicle
jB in the nor-
mal way. CAUTION
Do not keep the starter motor engaged for
more than 10 seconds. If the engine does not
start immediately, turn the ignition switch to
“OFF” and wait 10 seconds before trying
again.
11. After starting the engine of your vehicle, care- fully disconnect the negative lead and then the
positive lead (
j4→j3→j2→j1).
12. Remove and dispose of the cloth that was used to cover the vent holes as it may be contami-
nated with corrosive acid.
13. Install the vent caps (where fitted).
14. Close the bonnet.
NOTE
For models which incorporate the Stop/Start
System:
Ensure that the battery fitted is the special
battery that is enhanced with regard to the
charge-discharge capacity and life perfor-
mance. Avoid using any other battery for the
Stop/Start System, as this may cause early
deterioration of the battery or a malfunction
of the Stop/Start System. It is recommended
that a Genuine NISSAN battery is fitted. For
more information, contact a NISSAN dealer or
qualified workshop
If the battery terminal is disconnected (for bat-
tery replacement, etc.) and then reconnected,
there may be some delay before the Stop/
Start System reactivates.
In case of emergency6-11
Page 236 of 297

Downloaded from www.Manualslib.com manuals search engine If you must run the engine in an enclosed
space such as a garage, be sure there is
proper ventilation for exhaust gases.
Do not get under a vehicle that is supported
only by a jack: Use vehicle support stands.
Keep smoking materials, flame and sparks
away from fuel and battery.
Never connect or disconnect either the bat-
tery or any transistorised component connec-
tor while the ignition switch is in the ON posi-
tion.
Never leave the engine or transmission re-
lated component harness connector discon-
nected while the ignition switch is in the ON
position.
On petrol engine models with the multiport
fuel injection (MFI) system, the fuel filter or
fuel lines should be serviced by a NISSAN
dealer or qualified workshop because the fuel
lines are under high pressure even when the
engine is off.
Always wear eye protection whenever you
work on your vehicle.
Failure to follow these or other common sense
guidelines may lead to serious injury or ve-
hicle damage.
NISSAN GREEN PROGRAMImproperly disposed engine oil and/or other
vehicle fluids can pollute the environment. Al-
ways conform to local regulations for disposal
of vehicle fluid.
This section gives instructions regarding only those
items which are relatively easy for an owner to per-
form.
You should be aware that incomplete or improper
servicing may result in operating difficulties or ex-
cessive emissions, and could affect your warranty
coverage. If in doubt about any servicing, have it
done by your NISSAN dealer or qualified work-
shop. For an overview of the engine compartment, see
“Instrument and control layout” in the “0. Illus-
trated table of contents” section
.
ENGINE COMPARTMENT
Maintenance and do-it-yourself8-5
Page 244 of 297

Downloaded from www.Manualslib.com manuals search engine 12. Lower the vehicle carefully to the ground.
13. Close the bonnet.
PROTECT THE ENVIRONMENT
NISSAN GREEN PROGRAM
It is illegal to pollute drains, water courses and soil.
Use authorised waste collection facilities, including
civic amenity sites and garages providing facilities
for the disposal of used oil and used oil filters. If in
doubt, contact your local authority for advice on dis-
posal.
The regulations concerning the pollution of the
environment will vary from country to country.
DRAINING WATER
Drain the water from the fuel filter:
– Every time you perform an engine oil change.
– When the water in fuel filter warning light
(orange) comes on or flashes irregularly.
Except for models with R9M diesel engine.
Proceed as follows:
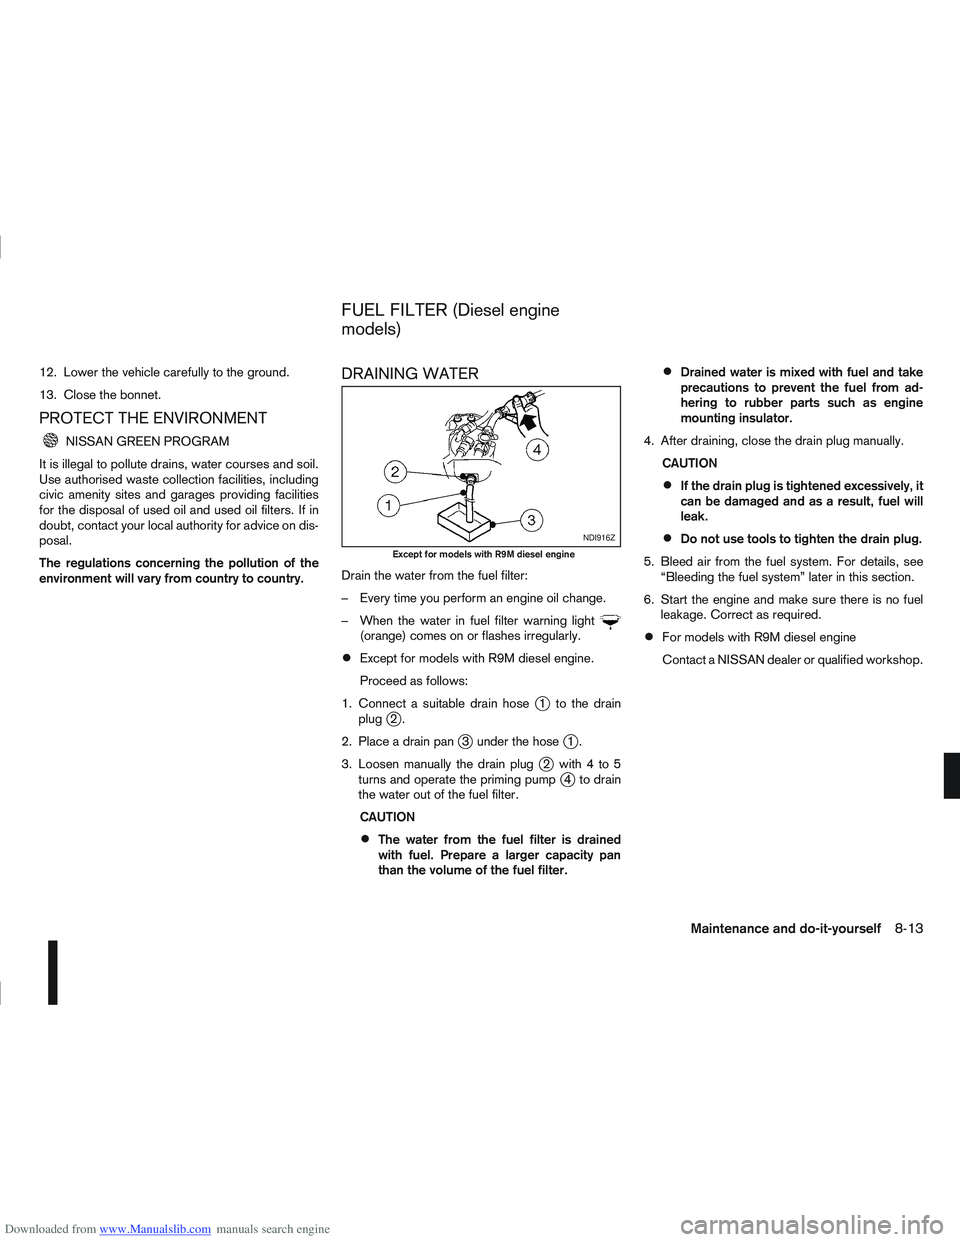
1. Connect a suitable drain hose
j1 to the drain
plugj2.
2. Place a drain pan
j3 under the hosej1.
3. Loosen manually the drain plug
j2 with4to5
turns and operate the priming pumpj4 to drain
the water out of the fuel filter.
CAUTION
The water from the fuel filter is drained
with fuel. Prepare a larger capacity pan
than the volume of the fuel filter.
Drained water is mixed with fuel and take
precautions to prevent the fuel from ad-
hering to rubber parts such as engine
mounting insulator.
4. After draining, close the drain plug manually. CAUTION
If the drain plug is tightened excessively, it
can be damaged and as a result, fuel will
leak.
Do not use tools to tighten the drain plug.
5. Bleed air from the fuel system. For details, see “Bleeding the fuel system” later in this section.
6. Start the engine and make sure there is no fuel leakage. Correct as required.
For models with R9M diesel engine
Contact a NISSAN dealer or qualified workshop.
NDI916Z
Except for models with R9M diesel engine
FUEL FILTER (Diesel engine
models)
Maintenance and do-it-yourself8-13
Page 248 of 297

Downloaded from www.Manualslib.com manuals search engine VEHICLE BATTERY
WARNING
Do not operate the vehicle if the fluid in the bat-
tery is low. Low battery fluid can cause a higher
load on the battery which can generate heat, re-
duce battery life, and in some cases lead to an
explosion.
Keep the battery surface clean and dry. Any cor-
rosion should be washed off with a solution of
baking soda and water.
Make certain the terminal connections are clean
and securely tightened.
If the vehicle is not used for 30 days or longer,
disconnect the “–” negative battery terminal
cable to prevent discharge.
If battery replacement or check is required, con-
tact a NISSAN dealer or qualified workshop.
Caution symbols for batterymWARNING
j1
m
No smoking
No exposed flames No sparks Never smoke around the battery. Never expose the battery to open flames or
electrical sparks.
j2
m
Shield eyes
Handle the battery cautiously. Always wear eye protection glasses to protect
against explosion or battery acid.
j3
m
Keep away from
children Never allow children to handle the battery. Keep the battery out of reach of
children.
j4
m
Battery acid Do not allow battery fluid to contact your skin, eyes, fabrics, or painted surfaces.
After handling the battery or battery cap, immediately wash your hands
thoroughly. If the battery fluid gets into your eyes, or onto your skin or clothing,
flush with water immediately for at least 15 minutes and seek medical attention.
Battery fluid is acid. If the battery fluid gets into your eyes or onto your skin, it
could cause eyesight loss or burns.
j5
m
Note operating
instructions Before handling the battery, read this instruction carefully to ensure correct and
safe handling.
j6mExplosive gas Hydrogen gas, generated by battery fluid, is explosive.
BATTERY
Maintenance and do-it-yourself8-17
Page 249 of 297

Downloaded from www.Manualslib.com manuals search engine Battery (Type A)
Check the fluid level in each cell. It should be be-
tween the UPPERj1 and LOWERj2 level lines.
If it is necessary to add fluid, add only distilled water
to bring the level to the indicator in each filler open-
ing. Do not overfill.
1. Remove the cell plugs
jA using a suitable tool.
j1 OK
j2ADD
2. Add distilled water up to the UPPER level line
j1.
If the side of the battery is not clear, check the
electrolyte water level by looking directly above
the cell, as illustrated.
3. Tighten cell plugs.
CAUTION
Do not overfill battery cells. Excessive electrolyte
may leak out of the battery during charging, and
cause paint damage.
Maintenance free battery (Type B)
For a maintenance free battery it is not required to
check the fluid level. However, NISSAN recom-
mends to visually check the green indicator
jA sta-
tus periodically. If it is not visible, replace the battery
as soon as possible.
Reinitialisation procedure after battery
reconnection
If the battery has been reconnected, check the fol-
lowing items:
Re-enter the anti-theft system code (where fit-
ted). For details, see the separately provided
NISSAN Connect Owner’s Manual.
Clock setting. For details, see “Vehicle informa-
tion display” in the “2. Instruments and controls”
section or the separately provided NISSAN Con-
nect (where fitted) Owner’s Manual.
The C-View® sunshade or power window sys-
tem may need to be reinitialised. For details, see
“C-View® glass roof (where fitted)” in the “2. In-
struments and controls” section or “Windows”
in the “2. Instruments and controls” section.
Models with Stop/Start System
Ensure that the battery fitted is the special bat-
tery that is enhanced with regard to the charge-
discharge capacity and life performance. Avoid
using any other battery for the Stop/Start Sys-
tem, as this may cause early deterioration of the
battery or a malfunction of the Stop/Start Sys-
tem. It is recommended that a Genuine NISSAN
battery is fitted. For more information, contact a
NISSAN dealer or qualified workshop.
If the battery terminal is disconnected (for bat-
tery replacement, etc.) and then reconnected,
there may be some delay before the Stop/Start
System reactivates.
DI0137MAZ
NDI688Z
Indicator
NDI920Z
8-18Maintenance and do-it-yourself
Page 255 of 297

Downloaded from www.Manualslib.com manuals search engine Be careful not to damage the connector sup-
port bracket when disconnecting the connec-
tor.
If any electrical equipment does not operate, check
for an open fuse.
The fuse box is located in the lower part of the
instrument panel at the driver’s side.
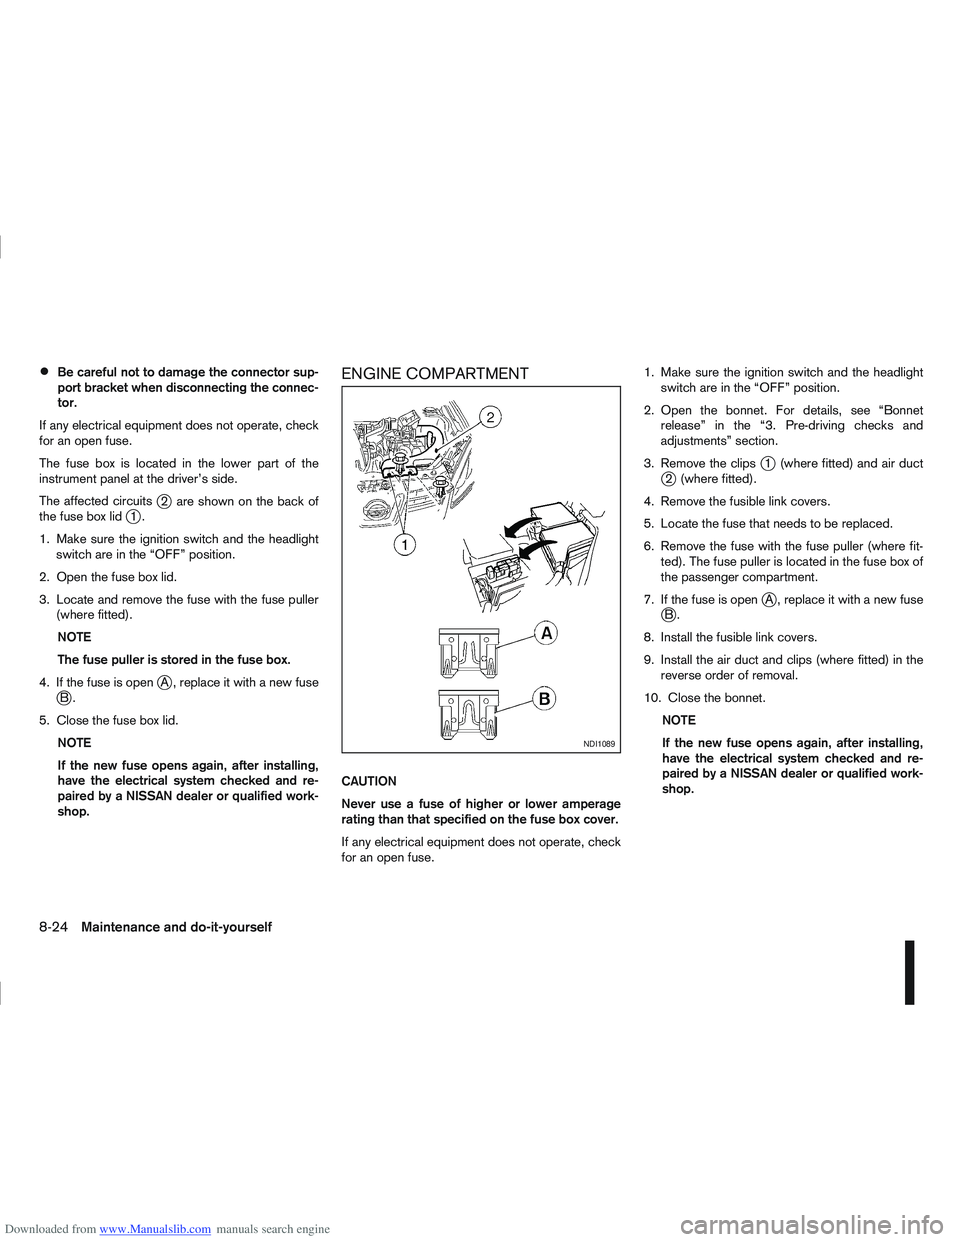
The affected circuits
j2 are shown on the back of
the fuse box lidj1.
1. Make sure the ignition switch and the headlight switch are in the “OFF” position.
2. Open the fuse box lid.
3. Locate and remove the fuse with the fuse puller (where fitted).
NOTE
The fuse puller is stored in the fuse box.
4. If the fuse is open
jA , replace it with a new fusejB.
5. Close the fuse box lid. NOTE
If the new fuse opens again, after installing,
have the electrical system checked and re-
paired by a NISSAN dealer or qualified work-
shop.
ENGINE COMPARTMENT
CAUTION
Never use a fuse of higher or lower amperage
rating than that specified on the fuse box cover.
If any electrical equipment does not operate, check
for an open fuse. 1. Make sure the ignition switch and the headlight
switch are in the “OFF” position.
2. Open the bonnet. For details, see “Bonnet release” in the “3. Pre-driving checks and
adjustments” section.
3. Remove the clips
j1 (where fitted) and air ductj2 (where fitted).
4. Remove the fusible link covers.
5. Locate the fuse that needs to be replaced.
6. Remove the fuse with the fuse puller (where fit- ted). The fuse puller is located in the fuse box of
the passenger compartment.
7. If the fuse is open
jA , replace it with a new fusejB.
8. Install the fusible link covers.
9. Install the air duct and clips (where fitted) in the reverse order of removal.
10. Close the bonnet. NOTE
If the new fuse opens again, after installing,
have the electrical system checked and re-
paired by a NISSAN dealer or qualified work-
shop.
NDI1089
8-24Maintenance and do-it-yourself