2012 NISSAN QASHQAI Turn signal
[x] Cancel search: Turn signalPage 160 of 297
Downloaded from www.Manualslib.com manuals search engine BLUETOOTH® settings
To setup the Bluetooth system to pair (connect or
register) your preferred mobile phone, push the
then push the
enter the setup menu directly via the <
> (phone)
button.
The following options can be selected:
[Pair Device]
Bluetooth mobile phones can be paired with the
system. A maximum of 5 Bluetooth mobile
phones can be registered.
[Select Device]
Paired Bluetooth mobile phones (
) are listed
on the display and can be selected for connec-
tion.
[Delete Device]
A registered Bluetooth mobile phone can be de-
leted.
[On]/[Off]
If this setting is turned off, the connection be-
tween the Bluetooth devices and the in-vehicle
Bluetooth module will be cancelled.
For details, see “BLUETOOTH® settings” earlier in
this section.
When successfully paired, a notification message
will be displayed. During the connection the follow-
ing status icons will be displayed (top left of dis- play): Signal strength (
), Battery status (), and
Bluetooth ().
*: If the low battery message comes on, the Blue-
tooth® device must be recharged soon.
HANDS-FREE TELEPHONE
CONTROL
The hands-free mode can be operated using the
telephone <>button on the audio system, or
(where fitted) on the steering wheel.
Initiating a call
A call can be initiated using one of the following
methods:
– Redial
– Phone book
– Manual dialling
– Missed calls
– Dialled calls
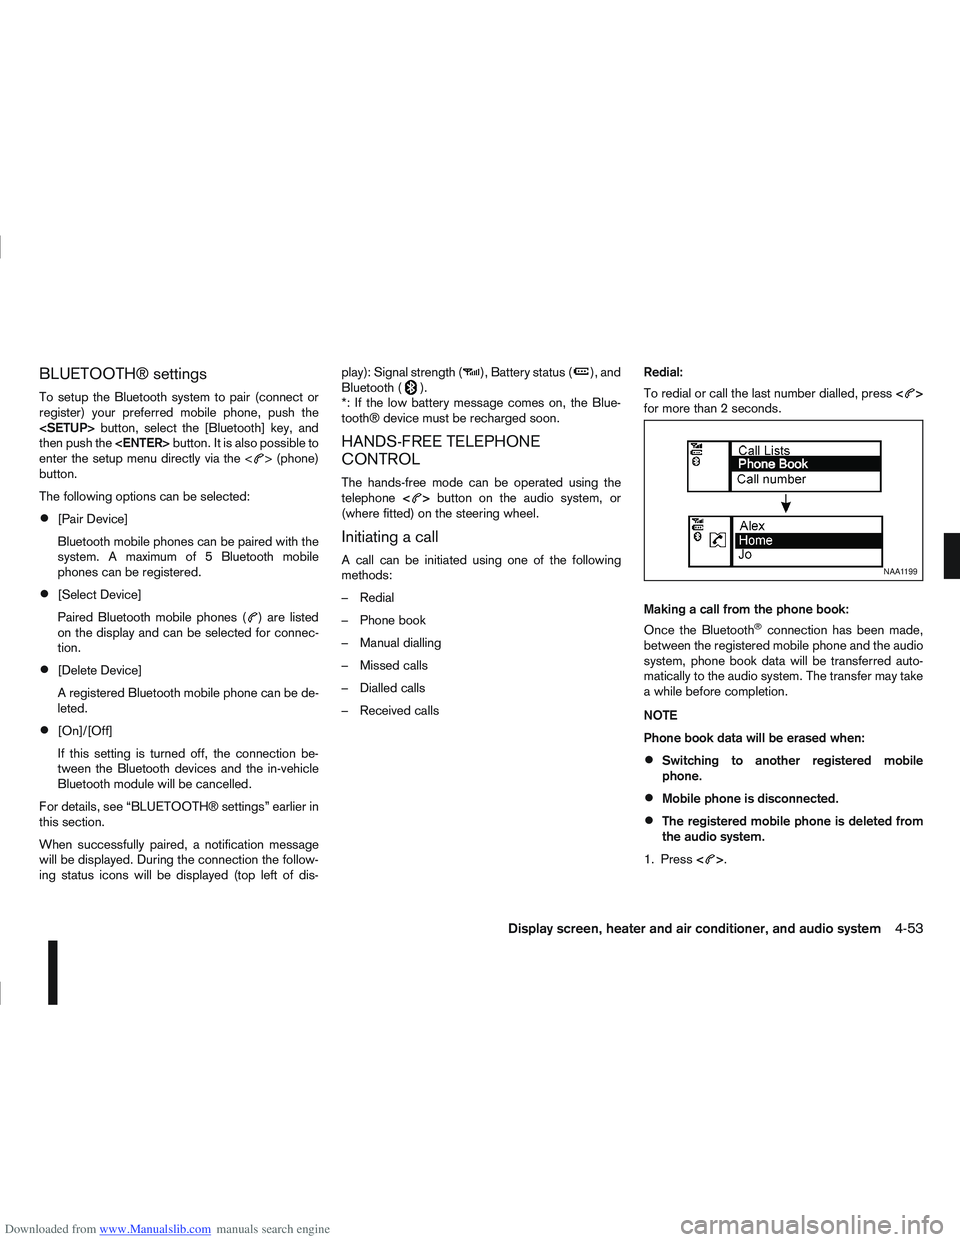
– Received calls Redial:
To redial or call the last number dialled, press
<
>
for more than 2 seconds.
Making a call from the phone book:
Once the Bluetooth
®connection has been made,
between the registered mobile phone and the audio
system, phone book data will be transferred auto-
matically to the audio system. The transfer may take
a while before completion.
NOTE
Phone book data will be erased when:
Switching to another registered mobile
phone.
Mobile phone is disconnected.
The registered mobile phone is deleted from
the audio system.
1. Press <
>.
NAA1199
Display screen, heater and air conditioner, and audio system4-53
Page 199 of 297

Downloaded from www.Manualslib.com manuals search engine steep slope consider the incline (the towing
weights quoted are for a 12% slope).
Follow the trailer manufacturer’s instructions.
Have your vehicle serviced more often than at
the intervals specified in the separately provided
Warranty Information and Maintenance booklet.
Trailer towing requires more fuel than under nor-
mal circumstances because of a considerable
increase in traction power required and resis-
tance.
When towing a trailer, observe the following re-
stricted towing speed:
Speed: below 100 km/h (62 MPH)
CAUTION
While towing a trailer, check the engine coolant
temperature gauge regularly to prevent engine
overheating.
TYRE PRESSURE
When towing a trailer, inflate the vehicle tyres to the
maximum recommended COLD tyre pressure, as
indicated on the tyre placard (for full loading). Make
sure the trailer tyre pressures are correct.
CAUTION
Do not tow a trailer when the vehicle is installed
with a temporary-use spare tyre.
SAFETY CHAINS
Always use a suitable chain between the vehicle
and trailer. The chain should be attached to the hitch
and not to the vehicle bumper or axle. Be sure to
leave enough slack in the chain to permit turning
corners. The chain should not drag on the ground:
passing the chain across the trailer hitch may be the
best practice depending on your trailer.
TRAILER BRAKES
Ensure that trailer brakes are installed as required
by local regulations. Also check that all other trailer
equipment conforms to local regulations.
TRAILER DETECTION (where fitted)
When towing a trailer and the turn signal switch is
used, the electrical system of the vehicle will detect
an additional electrical load of the trailer lighting. As
a result, the trailer direction indicator light comes
on.
INSTALLATION OF COUPLING
DEVICE
NISSAN recommends that the coupling device for
trailer towing be installed under the following condi-
tions:
Maximum permissible vertical load on the cou-
pling device: 736 N (75 kg, 165 lb)
The coupling device, mounting points and instal-
lation parts on your vehicle: as shown as an ex-
ample in the illustration. Follow all of the coupling device manufacturer’s in-
structions for installation and use.
5-36Starting and driving
Page 210 of 297
Downloaded from www.Manualslib.com manuals search engine 6. Turn off the engine.
7. Open the bonnet (for details, see “Bonnetrelease” in the “3. Pre-driving checks and
adjustments” section) in order to:
Warn other traffic.
Signal to professional road assistance that
you require assistance.
8. Have all passengers exit the vehicle and stand in a safe place, away from traffic and clear of the
vehicle.
CHANGING FLAT TYRE (Models with
spare wheel, where fitted)
Blocking the wheels
WARNING
Make sure to block the appropriate wheel to pre-
vent the vehicle from moving, which may cause
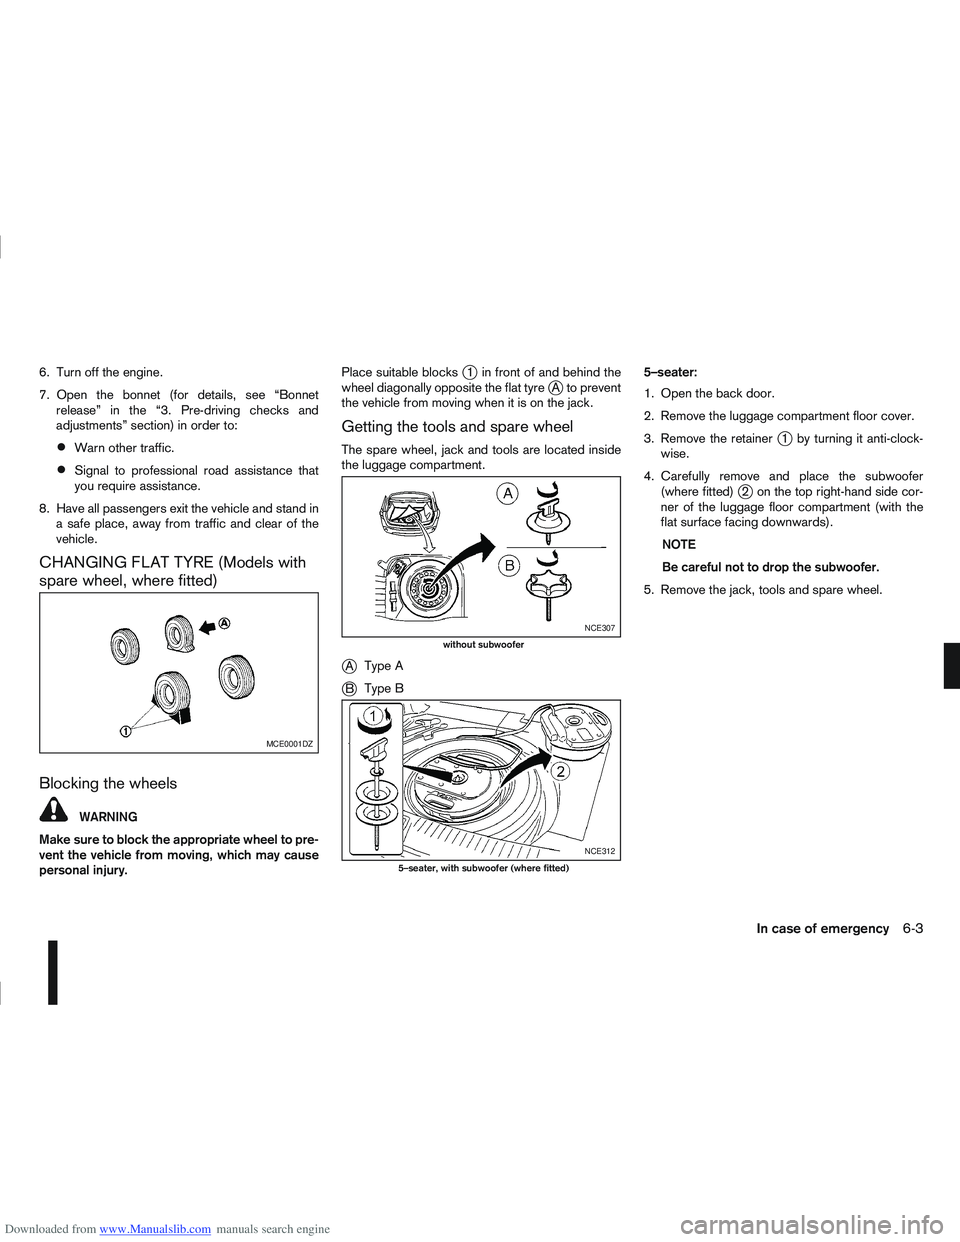
personal injury. Place suitable blocks
j1 in front of and behind the
wheel diagonally opposite the flat tyrejA to prevent
the vehicle from moving when it is on the jack.
Getting the tools and spare wheel
The spare wheel, jack and tools are located inside
the luggage compartment.
jA Type A
jB Type B 5–seater:
1. Open the back door.
2. Remove the luggage compartment floor cover.
3. Remove the retainer
j1 by turning it anti-clock-
wise.
4. Carefully remove and place the subwoofer (where fitted)
j2 on the top right-hand side cor-
ner of the luggage floor compartment (with the
flat surface facing downwards).
NOTE
Be careful not to drop the subwoofer.
5. Remove the jack, tools and spare wheel.
MCE0001DZ
NCE307
without subwoofer
NCE312
5–seater, with subwoofer (where fitted)
In case of emergency6-3
Page 234 of 297

Downloaded from www.Manualslib.com manuals search engine Lights*:
Clean the headlights on a regular basis. Make sure
that the headlights, stop lights, tail lights, turn signal
lights, and other lights are all operating properly and
installed securely. Also check headlight aim.
Tyres*:
Check the pressure with a gauge periodically when
at a service station (including the spare) and adjust
to the specified pressure if necessary. Check care-
fully for damage, cuts or excessive wear.
Tyre rotation*:
Tyres should be rotated every 10,000 km (6,000
miles) for Two-Wheel Drive (2WD) models and
5,000 km (3,000 miles) for Four-Wheel Drive (4WD)
models. However, the timing for tyre rotation may
vary according to your driving habits and road sur-
face conditions.
Wheel alignment and balance:
If the vehicle pull to either side while driving on a
straight and level road, or if you detect uneven or
abnormal tyre wear, there may be a need for wheel
alignment. If the steering wheel or seat vibrates at
normal highway speeds, wheel balancing may be
needed.
Wheel nuts:
When checking the tyres, make sure no wheel nuts
are missing, and check for any loose wheel nuts.
Tighten if necessary.Windscreen:
Clean the windscreen on a regular basis. Check the
windscreen at least every six months for cracks or
other damage. Have a damaged windscreen re-
paired by a qualified repair facility.
Wiper blades*:
Check for cracks or wear if they do not wipe prop-
erly.
Under the bonnet and vehicle
The maintenance items listed here should be
checked periodically, e.g. each time you check the
engine oil or refuel.
Battery*:
Check if the green indicator on the top of the main-
tenance free battery is visible. If it is not visible,
replace the battery as soon as possible.
Vehicles operated in high temperatures or under
severe conditions, check the fluid level frequently.
Brake and clutch fluid level*:
Make sure that the brake and clutch fluid level is
between the MAX and MIN lines on the reservoir.
Engine coolant level*:
Check the coolant level when the engine is cold.
Engine drive belts*:
Make sure that the drive belts are not frayed, worn,
cracked or oily.Engine oil level*:
Check the level after parking the vehicle on a level
surface and turning off the engine.
Fluid leaks:
Check under the vehicle for fuel, oil, water or other
fluid leaks after the vehicle has been parked for a
while. Water dripping from the air conditioner after
use is normal. If you should notice any leaks or if
petrol fumes are evident, check for the cause and
have it corrected immediately.
Window washer fluid*:
Check that there is adequate fluid in the tank.
Inside the vehicle
The maintenance items listed here should be
checked on a regular basis, such as when perform-
ing periodic maintenance, cleaning the vehicle, etc.
Accelerator pedal:
Check the pedal for smooth operation and make
sure that the pedal does not catch or require uneven
effort. Keep the floor mats away from the pedal.
Brake pedal*:
Check the pedal for smooth operation. If the brake
pedal suddenly goes down further than normal, the
pedal feels spongy or the vehicle seems to take
longer to stop, contact a NISSAN dealer or qualified
workshop immediately. Keep the floor mat away
from the pedal.
Maintenance and do-it-yourself8-3
Page 258 of 297
Downloaded from www.Manualslib.com manuals search engine EXTERIOR LIGHTS
ItemWattage (W)
Headlight (Low or high beam:
type H7) 55
Front turn signal light 21
Front side light 5
Front fog light (H11 type, where
fitted) *1 55
Side turn signal light 5
Rear combination light Turn signal light 21
Stop/Tail light *1 LED
Reverse light *1 21
High-mounted stop light *1 LED
Number plate light 5
Rear fog light 21
*1: If replacement is required, contact a NISSAN dealer or qualified workshop.
INTERIOR LIGHTS
Item Wattage
(W)
Room light/Map lights (where fitted)
Foot well light (where fitted) 5
3
Room light — rear (where fitted) 5
Reading lights — rear (where fitted) 8
Luggage compartment light (where fitted) 5
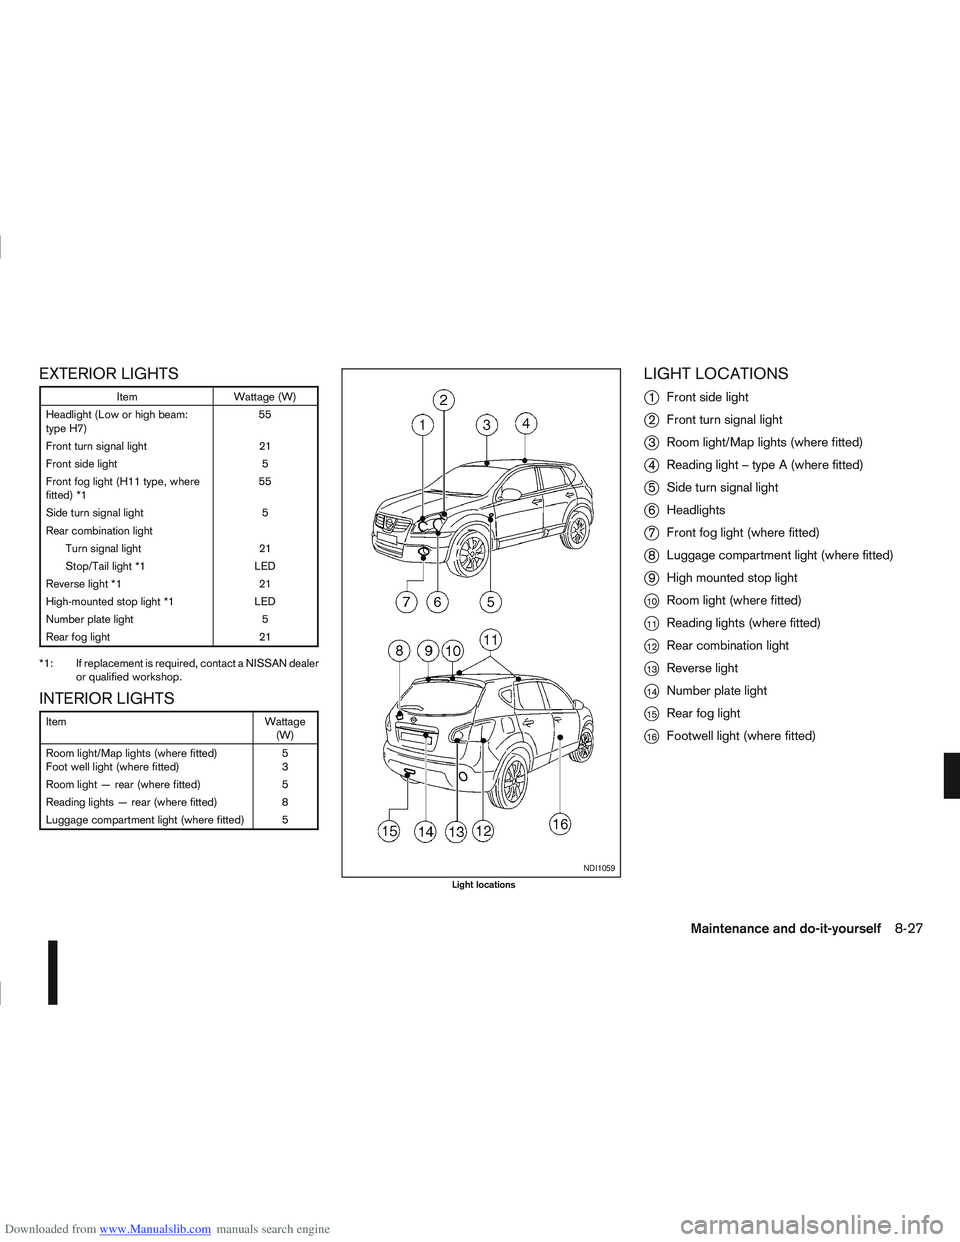
LIGHT LOCATIONS
j
1 Front side light
j2Front turn signal light
j3Room light/Map lights (where fitted)
j4Reading light – type A (where fitted)
j5Side turn signal light
j6Headlights
j7Front fog light (where fitted)
j8Luggage compartment light (where fitted)
j9High mounted stop light
j10Room light (where fitted)
j11Reading lights (where fitted)
j12Rear combination light
j13Reverse light
j14Number plate light
j15Rear fog light
j16Footwell light (where fitted)
NDI1059
Light locations
Maintenance and do-it-yourself8-27
Page 259 of 297

Downloaded from www.Manualslib.com manuals search engine Replacing procedures
m
NDI707
All other lights are either type A, B, C or D.
When replacing a bulb, first remove the lens
and/or cover.
mREMOVE
mINSTALLNDI930
Front side light
NDI931
Front turn signal light
8-28Maintenance and do-it-yourself
Page 260 of 297
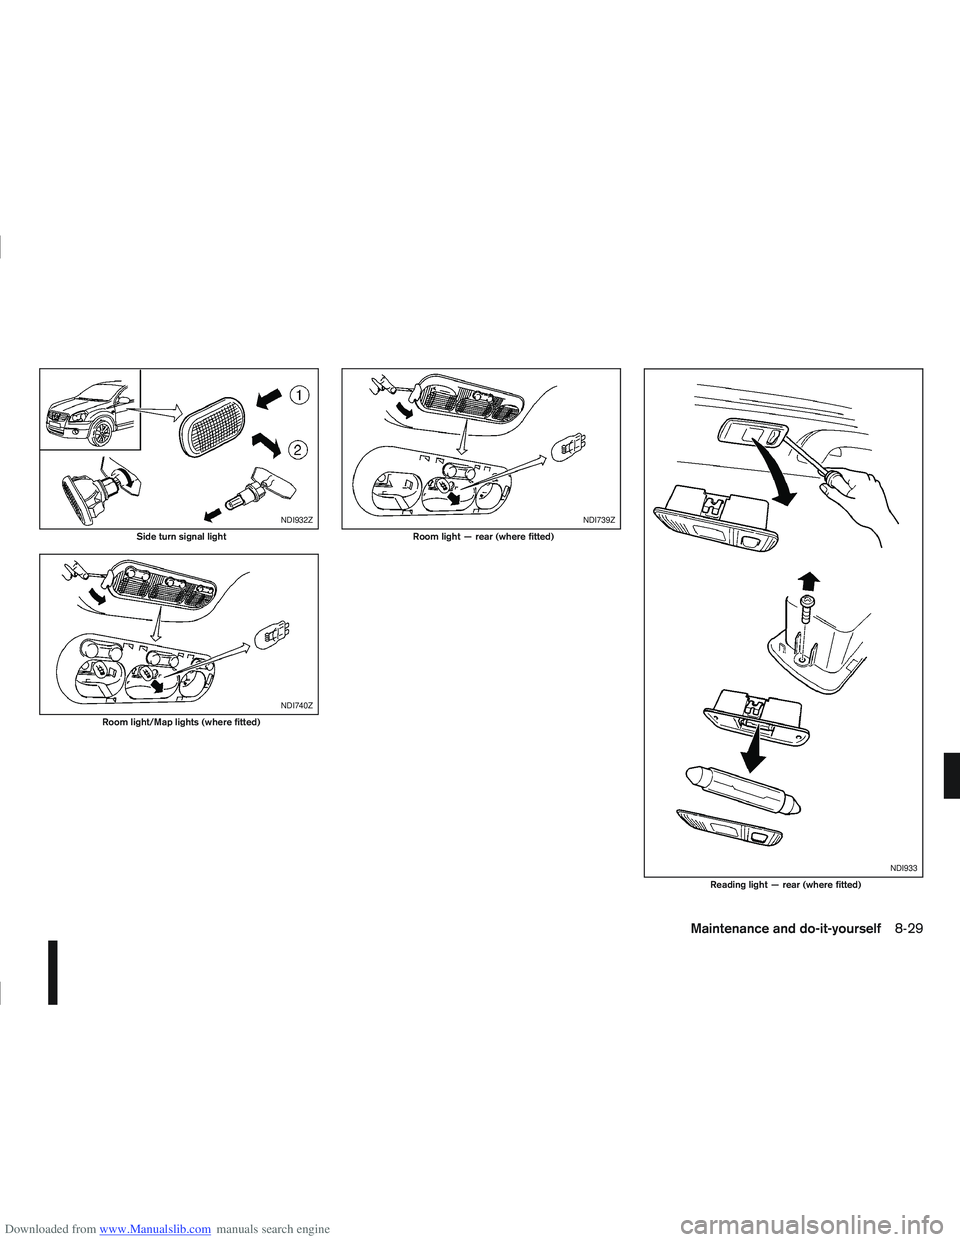
Downloaded from www.Manualslib.com manuals search engine NDI932Z
Side turn signal light
NDI740Z
Room light/Map lights (where fitted)
NDI739Z
Room light — rear (where fitted)
NDI933
Reading light — rear (where fitted)
Maintenance and do-it-yourself8-29
Page 262 of 297
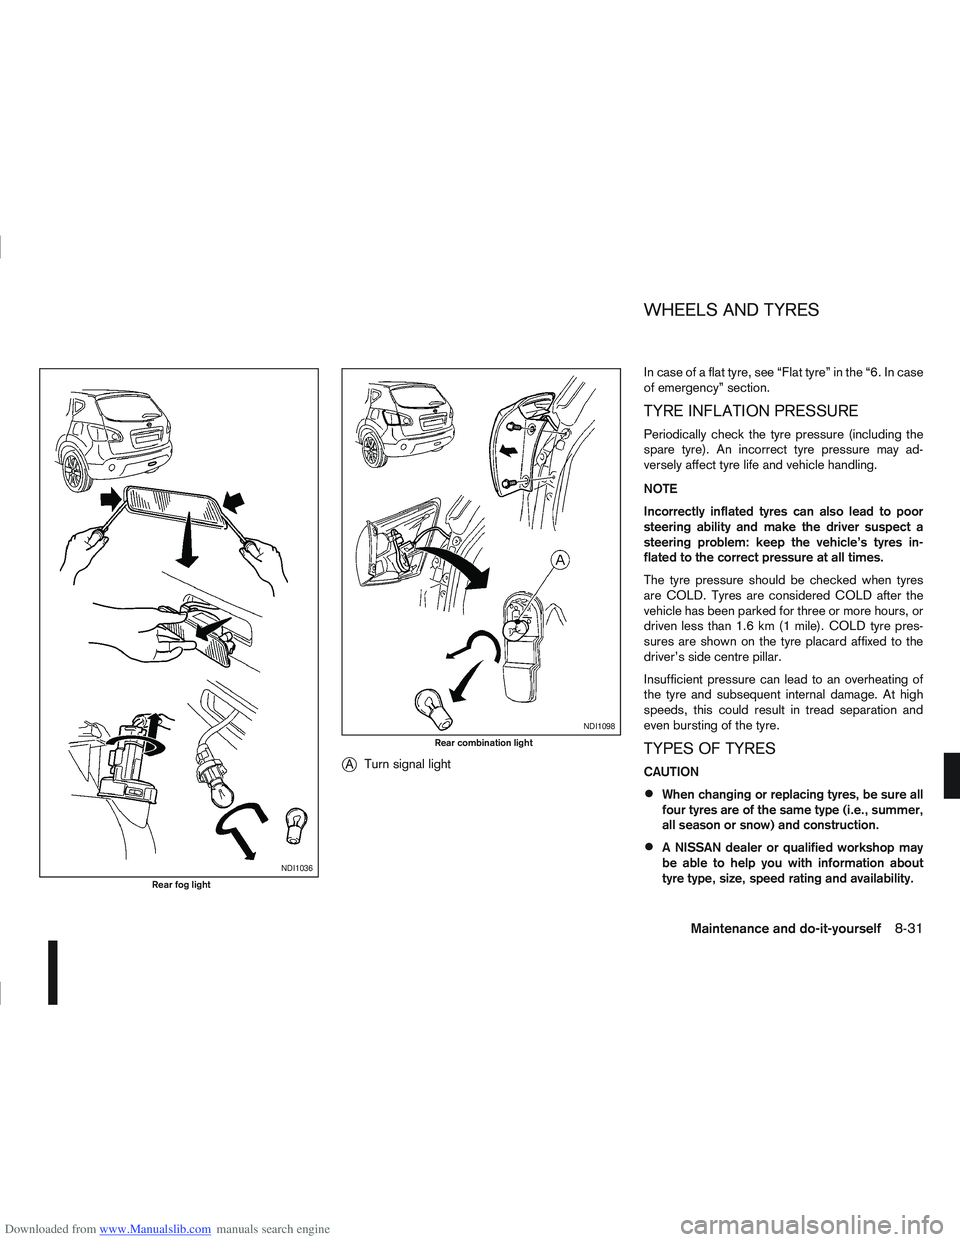
Downloaded from www.Manualslib.com manuals search engine jATurn signal light In case of a flat tyre, see “Flat tyre” in the “6. In case
of emergency” section.
TYRE INFLATION PRESSURE
Periodically check the tyre pressure (including the
spare tyre). An incorrect tyre pressure may ad-
versely affect tyre life and vehicle handling.
NOTE
Incorrectly inflated tyres can also lead to poor
steering ability and make the driver suspect a
steering problem: keep the vehicle’s tyres in-
flated to the correct pressure at all times.
The tyre pressure should be checked when tyres
are COLD. Tyres are considered COLD after the
vehicle has been parked for three or more hours, or
driven less than 1.6 km (1 mile). COLD tyre pres-
sures are shown on the tyre placard affixed to the
driver’s side centre pillar.
Insufficient pressure can lead to an overheating of
the tyre and subsequent internal damage. At high
speeds, this could result in tread separation and
even bursting of the tyre.
TYPES OF TYRES
CAUTION
When changing or replacing tyres, be sure all
four tyres are of the same type (i.e., summer,
all season or snow) and construction.
A NISSAN dealer or qualified workshop may
be able to help you with information about
tyre type, size, speed rating and availability.
NDI1036
Rear fog light
NDI1098
Rear combination light
WHEELS AND TYRES
Maintenance and do-it-yourself8-31