2012 NISSAN NOTE locking
[x] Cancel search: lockingPage 35 of 235

propriate child restraint should be chosen and
purchased according to the child and the ve-
hicle as it may not be possible to properly
install some types of child restraints in your
vehicle.
•Improper use of a child restraint can increase
injuries for both the infant or child and other
occupants in the vehicle.
•When your child restraint is not in use, keep it
secured with a seat belt to prevent it from
being thrown forward in case of a sudden stop
or accident.
•Remember that a child restraint left in a closed
vehicle can become very hot. Check the seat-
ing surface and buckles before placing your
child in the child restraint.
•After attaching a child restraint, test the seat
before you place the child in it. Tilt it from side
to side. Try to tug it forward and check
whether the belt holds it in place. If the re-
straint is not secure, tighten the belt as nec-
essary, or put the restraint in another seat
and test it again.
•If the child restraint is not anchored properly,
the risk of a child being injured in a collision
or a sudden stop greatly increases.
•The front passenger seat and adjustable rear
bench seat should be positioned to fit the
child seat appropriately. See “Installation of a
child restraint system on the front passengerseat” later in this section and “Installation of a
child restraint system on rear seats” later in
this section.
•For a front facing child restraint, installed on a
three-point type lap/shoulder belt, make sure
the shoulder belt does not go in front of the
child’s face or neck. If it does, put the shoul-
der belt behind the child restraint.
•If the child restraint is equipped with a locking
clip, ensure that the clip is securely fastened
to the vehicle seat belt. If the locking clip is
not used, injuries could result from the child
restraint tipping over during normal vehicle
braking or cornering.
Safety — seats, seat belts and supplemental restraint system1-17
Page 37 of 235

in this position could cause serious injury to
the infant in case of air bag deployment dur-
ing a collision.
•In vehicles equipped with a side air bag sys-
tem, do not let any infants or small children sit
in the front passenger’s seat as the air bag
may cause serious injury in case of deploy-
ment during a collision.
NOTE
Universal child restraints approved to ECE Regu-
lation No. 44.03 are clearly marked “Universal”.
INSTALLATION OF A CHILD
RESTRAINT SYSTEM ON THE FRONT
PASSENGER SEAT
WARNING
•Never install a rear facing child restraint sys-
tem in the front seat without first deactivating
the front passenger air bag. Inflating supple-
mental front-impact air bags inflate with greatforce. A child restraint system could be struck
by the supplemental front-impact air bags in
an accident and could seriously injure or kill
your child.
•NISSAN recommends that infants or small
children be seated in a child restraint system
in the rear seat. According to accident statis-
tics, children are safer when properly
restrained in the rear seat than in the front
seat.
Rear facing
If you install a child restraint system in the front seat,
follow these steps:
1. Deactivate the front passenger air bag. See
“Supplemental Restraint System (air bag
system)” earlier in this section for further details.
2. Move the seat to the rearmost position.
3. Adjust the head restraint to its highest position.
Remove it if it interferes with the child restraint
installation. In such situation, securely store the
head restraint in the luggage compartment so
that it does not become a dangerous projectile
during a sudden stop or in an accident.
4. Position the child restraint system in the front
passenger’s seat.
Always follow the child restraint system manu-
facturer’s instructions for installation and use.5. Route the seat belt tongue through the child re-
straint system and insert it into the buckle until
you hear and feel the latch engage.
To prevent slack in the lap belt, it will be neces-
sary to secure the shoulder belt in place with a
locking clip
jA . Use a locking clip attached to
the child restraint system, or one which is equiva-
lent in dimensions and strength.
Be sure to follow the child restraint system
manufacturer’s instructions for belt routing.
6. Slide the seat forward so that the seat belt fully
tightens the child restraint system and the child
restraint reaches the vehicle dashboard.
7. Test the child restraint system before you place
the child in it. Tilt it from side to side. Try to tug it
forward and check if it is held securely in place.
NPA679Z
Front passenger air bag left active
SSS0513Z
Safety — seats, seat belts and supplemental restraint system1-19
Page 38 of 235

INSTALLATION OF A CHILD
RESTRAINT SYSTEM ON REAR
SEATS
WARNING
•NISSAN recommends that infants or small
children be seated in a child restraint system.
According to accident statistics, children are
safer when properly restrained in the rear seat
than in the front seat.
•The direction of the child restraint system de-
pends on the type of the child restraint sys-
tem and the size of the child.
Front-facing
When you install a front-facing child restraint system
in a rear outer or centre seat, follow these steps:
1. Position the rear sliding bench seat to its rear-
most position and the front passenger seat as far
forward as possible.
2. Position the front-facing child restraint system on
the rear seat.
Always follow the child restraint system manu-
facturer’s instructions for installation and use.3. Route the seat belt tongue through the child re-
straint system and insert it into the buckle until
you hear and feel the latch engage.
To prevent slack in the lap belt, it will be neces-
sary to secure the shoulder belt in place with a
locking clipjA . Use a locking clip attached to
the child restraint system, or one which is equiva-
lent in dimensions and strength.
Be sure to follow the child restraint system
manufacturer’s instructions for belt routing.
4. Test the child restraint system before you place
the child in it. Tilt it from side to side. Try to tug it
forward and check if it is held securely in place.
5. Check to make sure that the child restraint sys-
tem is properly secured prior to each use.
SSS0374AZ
Rear outer seat
NPA736Z
Rear centre seat
SSS0513Z
1-20Safety — seats, seat belts and supplemental restraint system
Page 39 of 235

Rear-facing
When you install a rear-facing child restraint system
in a rear outer or centre seat, follow these steps:
1. Slide the front passenger seat as far backwards
as possible and slide the rear bench seat for-
wards.
2. Position the rear-facing child restraint system on
the rear seat.
Always follow the child restraint system manu-
facturer’s instructions for installation and use.3. Route the seat belt tongue through the child re-
straint system and insert it into the buckle until
you hear and feel the latch engage.
To prevent slack in the lap belt, it will be neces-
sary to secure the shoulder belt in place with a
locking clip
jA . Use a locking clip attached to
the child restraint system, or one which is equiva-
lent in dimensions and strength.
Be sure to follow the child restraint system
manufacturer’s instructions for belt routing.
4. Test the child restraint system before you place
the child in it. Tilt it from side to side. Try to tug it
forward and check if it is held securely in place.
Then adjust the rear bench seat so that the edge
of the child restraint touches the front seat.
5. Check to make sure that the child restraint sys-
tem is properly secured prior to each use.
SSS0375AZ
Rear outer seat
NPA737Z
Rear centre seat
SSS0513Z
Safety — seats, seat belts and supplemental restraint system1-21
Page 68 of 235

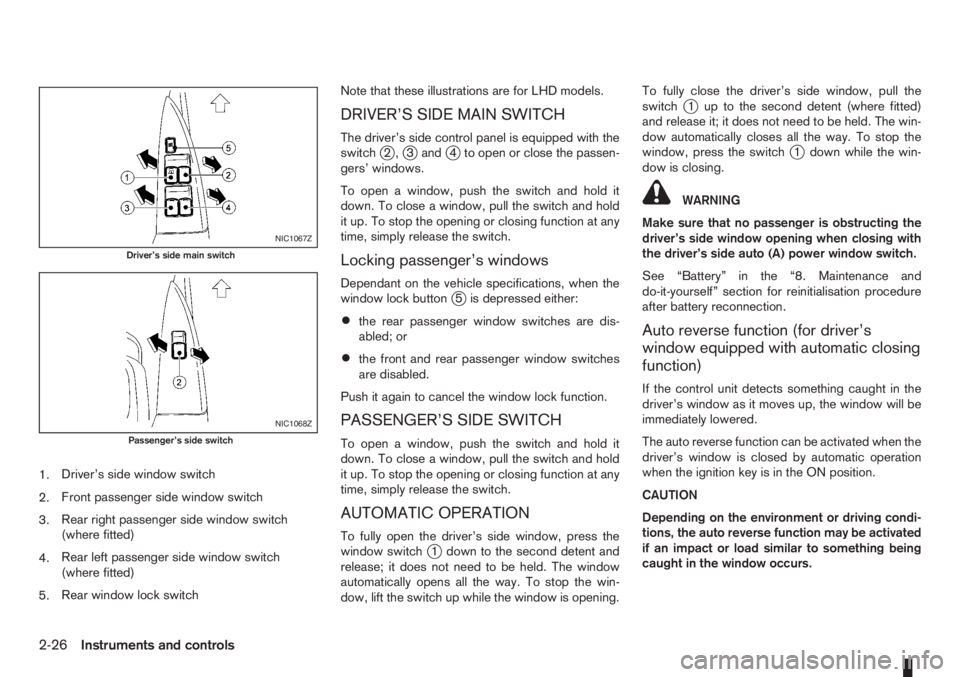
1.Driver’s side window switch
2.Front passenger side window switch
3.Rear right passenger side window switch
(where fitted)
4.Rear left passenger side window switch
(where fitted)
5.Rear window lock switchNote that these illustrations are for LHD models.
DRIVER’S SIDE MAIN SWITCH
The driver’s side control panel is equipped with the
switchj2,j3andj4 to open or close the passen-
gers’ windows.
To open a window, push the switch and hold it
down. To close a window, pull the switch and hold
it up. To stop the opening or closing function at any
time, simply release the switch.
Locking passenger’s windows
Dependant on the vehicle specifications, when the
window lock buttonj5 is depressed either:
•the rear passenger window switches are dis-
abled; or
•the front and rear passenger window switches
are disabled.
Push it again to cancel the window lock function.
PASSENGER’S SIDE SWITCH
To open a window, push the switch and hold it
down. To close a window, pull the switch and hold
it up. To stop the opening or closing function at any
time, simply release the switch.
AUTOMATIC OPERATION
To fully open the driver’s side window, press the
window switchj1 down to the second detent and
release; it does not need to be held. The window
automatically opens all the way. To stop the win-
dow, lift the switch up while the window is opening.To fully close the driver’s side window, pull the
switch
j1 up to the second detent (where fitted)
and release it; it does not need to be held. The win-
dow automatically closes all the way. To stop the
window, press the switch
j1 down while the win-
dow is closing.
WARNING
Make sure that no passenger is obstructing the
driver’s side window opening when closing with
the driver’s side auto (A) power window switch.
See “Battery” in the “8. Maintenance and
do-it-yourself” section for reinitialisation procedure
after battery reconnection.
Auto reverse function (for driver’s
window equipped with automatic closing
function)
If the control unit detects something caught in the
driver’s window as it moves up, the window will be
immediately lowered.
The auto reverse function can be activated when the
driver’s window is closed by automatic operation
when the ignition key is in the ON position.
CAUTION
Depending on the environment or driving condi-
tions, the auto reverse function may be activated
if an impact or load similar to something being
caught in the window occurs.
NIC1067Z
Driver’s side main switch
NIC1068Z
Passenger’s side switch
2-26Instruments and controls
Page 71 of 235

3Pre-driving checks and adjustmentsPre-driving checks and adjustments
Keys ........................................................................ 3-2
Integrated keyfob/remote control system .................. 3-3
Using the remote keyless entry system ................ 3-3
Locking the doors ............................................... 3-3
Unlocking the doors – convenience mode ........... 3-4
Unlocking the doors – anti-hijack mode ............... 3-4
Switching from convenience mode to
anti-hijack mode.................................................. 3-4
Keyfob operation failure ...................................... 3-4
Intelligent Key system (where fitted) ......................... 3-5
Locking/unlocking .............................................. 3-5
Starting the engine with the Intelligent Key .......... 3-6
Door locks ............................................................... 3-6
Super Lock System (Right-hand drive models) .... 3-6
Vehicle dead battery – left-hand side door
handle ................................................................ 3-7
Locking with power door lock switch .................. 3-7Child safety rear door lock .................................. 3-8
Back door lock ................................................... 3-8
Security system ....................................................... 3-9
NISSAN Anti-Theft System (NATS)..................... 3-9
Bonnet release ........................................................ 3-10
Fuel filler lid ............................................................. 3-11
Fuel filler lid opener lever .................................... 3-11
Fuel filler cap ...................................................... 3-11
Handbrake lever ...................................................... 3-11
Tilting steering wheel ............................................... 3-12
Mirrors..................................................................... 3-12
Inside rear-view mirror ........................................ 3-12
Outside rear-view mirrors.................................... 3-12
Vanity mirror ....................................................... 3-13
Rear parcel shelf...................................................... 3-14
Rear parcel shelf removal.................................... 3-14
Rear parcel shelf installation................................ 3-14
Page 73 of 235

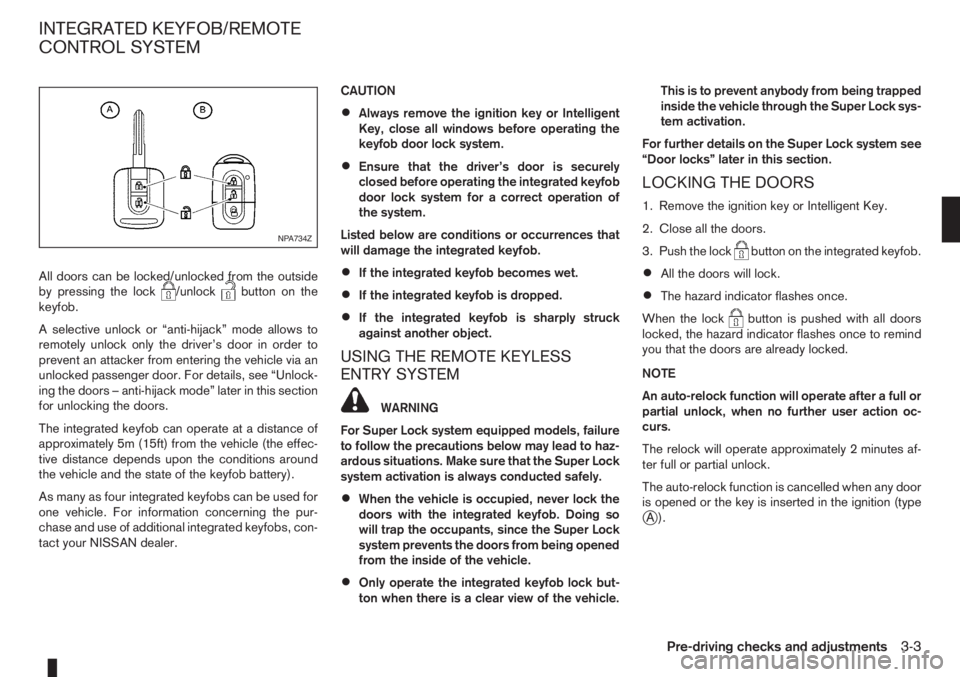
All doors can be locked/unlocked from the outside
by pressing the lock/unlockbutton on the
keyfob.
A selective unlock or “anti-hijack” mode allows to
remotely unlock only the driver’s door in order to
prevent an attacker from entering the vehicle via an
unlocked passenger door. For details, see “Unlock-
ing the doors – anti-hijack mode” later in this section
for unlocking the doors.
The integrated keyfob can operate at a distance of
approximately 5m (15ft) from the vehicle (the effec-
tive distance depends upon the conditions around
the vehicle and the state of the keyfob battery).
As many as four integrated keyfobs can be used for
one vehicle. For information concerning the pur-
chase and use of additional integrated keyfobs, con-
tact your NISSAN dealer.CAUTION
•Always remove the ignition key or Intelligent
Key, close all windows before operating the
keyfob door lock system.
•Ensure that the driver’s door is securely
closed before operating the integrated keyfob
door lock system for a correct operation of
the system.
Listed below are conditions or occurrences that
will damage the integrated keyfob.
•If the integrated keyfob becomes wet.
•If the integrated keyfob is dropped.
•If the integrated keyfob is sharply struck
against another object.
USING THE REMOTE KEYLESS
ENTRY SYSTEM
WARNING
For Super Lock system equipped models, failure
to follow the precautions below may lead to haz-
ardous situations. Make sure that the Super Lock
system activation is always conducted safely.
•When the vehicle is occupied, never lock the
doors with the integrated keyfob. Doing so
will trap the occupants, since the Super Lock
system prevents the doors from being opened
from the inside of the vehicle.
•Only operate the integrated keyfob lock but-
ton when there is a clear view of the vehicle.This is to prevent anybody from being trapped
inside the vehicle through the Super Lock sys-
tem activation.
For further details on the Super Lock system see
“Door locks” later in this section.
LOCKING THE DOORS
1. Remove the ignition key or Intelligent Key.
2. Close all the doors.
3. Push the lock
button on the integrated keyfob.
•All the doors will lock.
•The hazard indicator flashes once.
When the lock
button is pushed with all doors
locked, the hazard indicator flashes once to remind
you that the doors are already locked.
NOTE
An auto-relock function will operate after a full or
partial unlock, when no further user action oc-
curs.
The relock will operate approximately 2 minutes af-
ter full or partial unlock.
The auto-relock function is cancelled when any door
is opened or the key is inserted in the ignition (type
jA).
NPA734Z
INTEGRATED KEYFOB/REMOTE
CONTROL SYSTEM
Pre-driving checks and adjustments3-3
Page 74 of 235

UNLOCKING THE DOORS –
CONVENIENCE MODE
Push the unlockbutton on the integrated keyfob.
•All doors unlock
•The hazard indicator flashes twice.
UNLOCKING THE DOORS –
ANTI-HIJACK MODE
1. Push the unlockbutton on the integrated
keyfob once.
•Only the driver’s door unlocks.
•The hazard indicator flashes twice, quickly.
2. Push the unlock
button on the integrated
keyfob again.
•All doors unlock.
•The hazard indicator flashes twice.
SWITCHING FROM CONVENIENCE
MODE TO ANTI-HIJACK MODE
Type
jA – Integrated keyfob
While in the convenience mode, press the lock/unlockbuttons simultaneously for 5 seconds
to set the anti-hijack mode. Note that the above pro-
cedure must be done with the ignition switch “OFF”.
The hazard indicator flashes once as anti-hijack
mode setting confirmation.The same procedure should be used in order to dis-
able the anti-hijack system and return to conve-
nience mode.
The hazard indicator flashes three times as conve-
nience mode setting confirmation.
TypejB – Intelligent Key keyfob
While in the convenience mode, lock the vehicle
using the integrated keyfob. Press the lock
/unlockbuttons simultaneously for 10 seconds
to set the anti-hijack mode. Then, immediately press
the door lock/unlock switch on the driver’s door
handle. Note that the above procedure must be done
after the ignition knob has been turned from the ON
to the LOCK position. A confirmation flash of the
Intelligent Key indicator light (green) will indicate
that the anti-hijack mode has been properly set.
The same procedure should be used in order to dis-
able the anti-hijack and return to convenience mode.
A confirmation flash of the
Intelligent Key warn-
ing light (red) will indicate that the anti-hijack mode
has been properly disabled.
See “Warning/indicator lights and audible
reminders” in the “2. Instruments and controls” sec-
tion for further details on the
Intelligent Key warn-
ing light/Intelligent Key indicator light.
KEYFOB OPERATION FAILURE
The keyfob may not work properly in several situa-
tions as listed below:
•When the keyfob battery is dead.
•When the locking/unlocking system is used con-
tinuously, an anti lock-abuse system prevents the
lock motors from overheating and disables the
keyfob locking operation for a short period of
time.
•When the door handle is pulled while the keyfob
is being activated.
See “Integrated Keyfob/Intelligent Key battery
replacement” in the “8. Maintenance and
do-it-yourself” section for battery replacement and
requested battery type.
3-4Pre-driving checks and adjustments