2012 NISSAN NOTE battery replacement
[x] Cancel search: battery replacementPage 74 of 235

UNLOCKING THE DOORS –
CONVENIENCE MODE
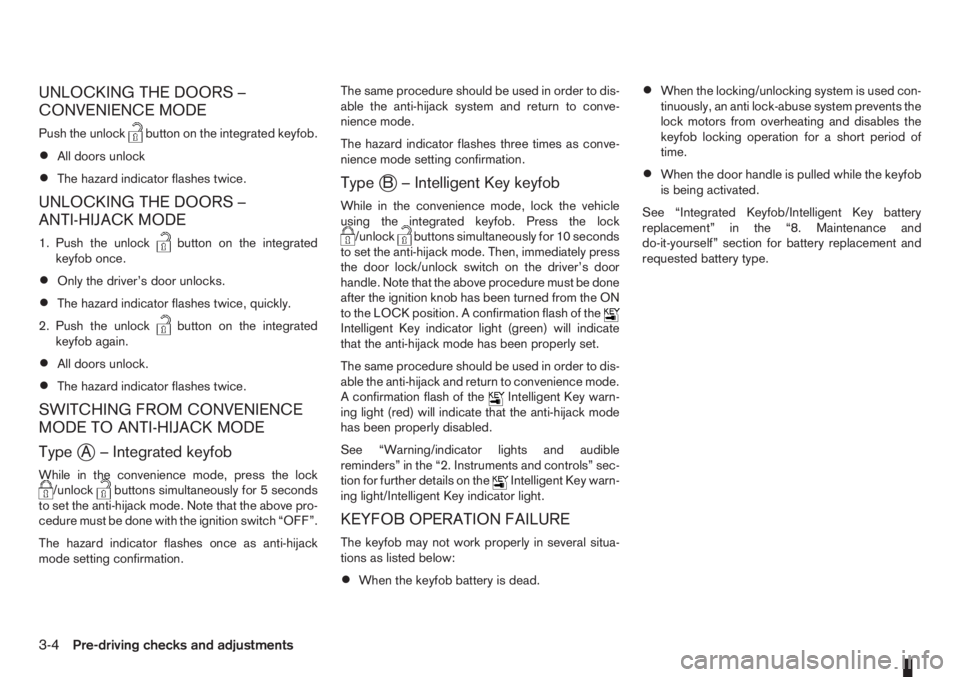
Push the unlockbutton on the integrated keyfob.
•All doors unlock
•The hazard indicator flashes twice.
UNLOCKING THE DOORS –
ANTI-HIJACK MODE
1. Push the unlockbutton on the integrated
keyfob once.
•Only the driver’s door unlocks.
•The hazard indicator flashes twice, quickly.
2. Push the unlock
button on the integrated
keyfob again.
•All doors unlock.
•The hazard indicator flashes twice.
SWITCHING FROM CONVENIENCE
MODE TO ANTI-HIJACK MODE
Type
jA – Integrated keyfob
While in the convenience mode, press the lock/unlockbuttons simultaneously for 5 seconds
to set the anti-hijack mode. Note that the above pro-
cedure must be done with the ignition switch “OFF”.
The hazard indicator flashes once as anti-hijack
mode setting confirmation.The same procedure should be used in order to dis-
able the anti-hijack system and return to conve-
nience mode.
The hazard indicator flashes three times as conve-
nience mode setting confirmation.
TypejB – Intelligent Key keyfob
While in the convenience mode, lock the vehicle
using the integrated keyfob. Press the lock
/unlockbuttons simultaneously for 10 seconds
to set the anti-hijack mode. Then, immediately press
the door lock/unlock switch on the driver’s door
handle. Note that the above procedure must be done
after the ignition knob has been turned from the ON
to the LOCK position. A confirmation flash of the
Intelligent Key indicator light (green) will indicate
that the anti-hijack mode has been properly set.
The same procedure should be used in order to dis-
able the anti-hijack and return to convenience mode.
A confirmation flash of the
Intelligent Key warn-
ing light (red) will indicate that the anti-hijack mode
has been properly disabled.
See “Warning/indicator lights and audible
reminders” in the “2. Instruments and controls” sec-
tion for further details on the
Intelligent Key warn-
ing light/Intelligent Key indicator light.
KEYFOB OPERATION FAILURE
The keyfob may not work properly in several situa-
tions as listed below:
•When the keyfob battery is dead.
•When the locking/unlocking system is used con-
tinuously, an anti lock-abuse system prevents the
lock motors from overheating and disables the
keyfob locking operation for a short period of
time.
•When the door handle is pulled while the keyfob
is being activated.
See “Integrated Keyfob/Intelligent Key battery
replacement” in the “8. Maintenance and
do-it-yourself” section for battery replacement and
requested battery type.
3-4Pre-driving checks and adjustments
Page 77 of 235

VEHICLE DEAD BATTERY –
LEFT-HAND SIDE DOOR HANDLE
The left-hand side door can be locked or unlocked
with the door key/emergency key when the vehi-
cle’s battery is dead.
To lock the door with the key/emergency
key
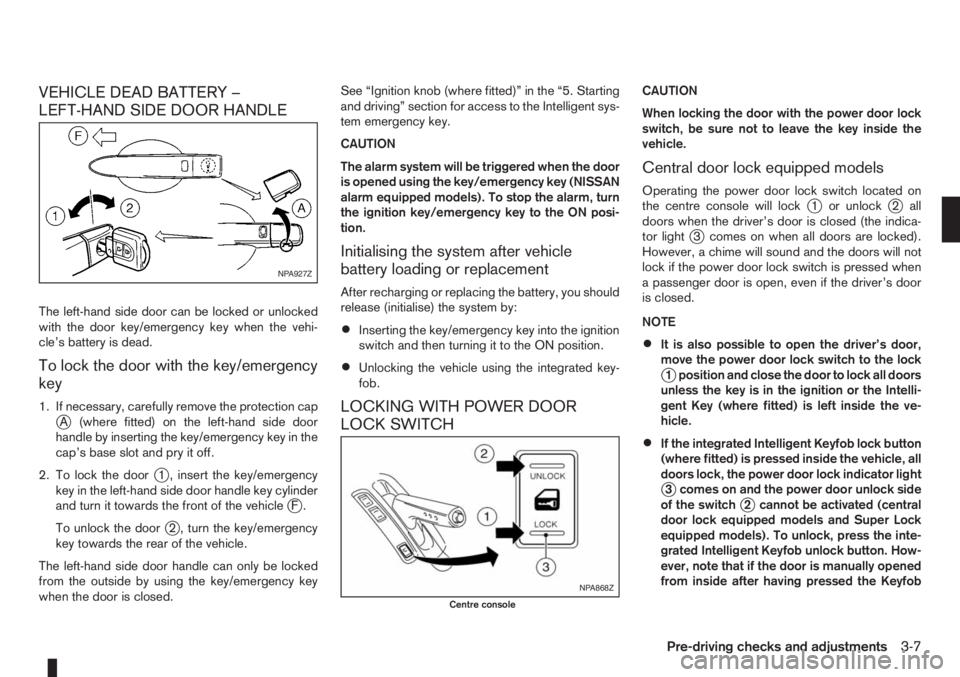
1. If necessary, carefully remove the protection capjA (where fitted) on the left-hand side door
handle by inserting the key/emergency key in the
cap’s base slot and pry it off.
2. To lock the door
j1 , insert the key/emergency
key in the left-hand side door handle key cylinder
and turn it towards the front of the vehicle
jF.
To unlock the door
j2 , turn the key/emergency
key towards the rear of the vehicle.
The left-hand side door handle can only be locked
from the outside by using the key/emergency key
when the door is closed.See “Ignition knob (where fitted)” in the “5. Starting
and driving” section for access to the Intelligent sys-
tem emergency key.
CAUTION
The alarm system will be triggered when the door
is opened using the key/emergency key (NISSAN
alarm equipped models). To stop the alarm, turn
the ignition key/emergency key to the ON posi-
tion.
Initialising the system after vehicle
battery loading or replacement
After recharging or replacing the battery, you should
release (initialise) the system by:
•Inserting the key/emergency key into the ignition
switch and then turning it to the ON position.
•Unlocking the vehicle using the integrated key-
fob.
LOCKING WITH POWER DOOR
LOCK SWITCH
CAUTION
When locking the door with the power door lock
switch, be sure not to leave the key inside the
vehicle.
Central door lock equipped models
Operating the power door lock switch located on
the centre console will lockj1 or unlockj2 all
doors when the driver’s door is closed (the indica-
tor light
j3 comes on when all doors are locked).
However, a chime will sound and the doors will not
lock if the power door lock switch is pressed when
a passenger door is open, even if the driver’s door
is closed.
NOTE
•It is also possible to open the driver’s door,
move the power door lock switch to the lock
j1 position and close the door to lock all doors
unless the key is in the ignition or the Intelli-
gent Key (where fitted) is left inside the ve-
hicle.
•If the integrated Intelligent Keyfob lock button
(where fitted) is pressed inside the vehicle, all
doors lock, the power door lock indicator light
j3 comes on and the power door unlock side
of the switchj2 cannot be activated (central
door lock equipped models and Super Lock
equipped models). To unlock, press the inte-
grated Intelligent Keyfob unlock button. How-
ever, note that if the door is manually opened
from inside after having pressed the Keyfob
NPA927Z
NPA868Z
Centre console
Pre-driving checks and adjustments3-7
Page 109 of 235

– Turn the
– Press the
RADIO OPERATION
When the<>(power ON/OFF) button is
pressed, the audio unit will switch on with the last
received radio station, if the audio unit was previ-
ously switched off in radio mode.
Radio band select
buttons
Press the
wave band as follows:
FM1→FM2→FMT→AM→FM1
When
come on at the last received radio station. If the CD
or AUX source mode is already playing, pressing
the
source mode and the last received radio station will
be selected.
FM Auto store
When the
than 1.5 seconds the six stations with the strongest
frequencies are stored in the preset (1 to 6) buttons
of the FMT band. During the search, a notification
message [AUTOSTORE] appears in the display and
the sound is muted until the operation is complete.
Once completed, the radio selects preset button
j1.
Manual tuning
When adjusting the broadcasting station frequency
manually, turn the
sired station is tuned in.
The frequency increases or decreases in steps of
100 kHz on the FM band, and 9 kHz on the AM
band.
WARNING
The radio should not be tuned while driving in
order for full attention to be given to the driving
operation.
SEEK tuning buttons
Pressing the<>or<>button starts the tun-
ing mode. The radio tuner seeks from low to high or
high to low frequencies and stops at the next broad-
casting station. During seek mode, the audio output
is muted. If no broadcasting station can be found
within the complete band cycle, it will return to the
initial frequency.
Preset station buttonsj1j2j3j4j5j6
Pressing a preset button for less than 2 seconds will
select the stored radio station.
Pressing a preset button for more than 2 seconds
will cause the station currently being received to be
stored against that preset button.
•Eighteen stations can be stored in the FM band.
(Six each for FM1, FM2 and FMT)
•Six stations can be set for the AM band.
If the battery is disconnected, or if the fuse blows,
the radio memory will be erased. In that case, reset
the desired stations after battery connection or fuse
replacement.
Radio data system (RDS) operation
The RDS is a system through which encoded digital
information is transmitted by FM radio stations in
addition to the normal FM radio broadcasting. The
RDS provides information services such as station
name, traffic information, or news.
NOTE
In some countries or regions, some of these ser-
vices may not be available.
Alternative Frequency (AF) mode:
The AF mode operates in the FM (radio) mode.
•The AF mode operates both in the FM (radio)
and CD mode (if FM was previously selected in
the radio mode).
•The AF function compares signal strengths and
selects the station with the optimum reception
conditions for the currently tuned-in station.
RDS functions
Programme Service (PS) function (station name
display function):
When an RDS station is tuned in with seek or manual
tuning, the RDS data is received and the PS name
is displayed.
Heater and air conditioner, and audio system4-25
Page 165 of 235

After repairing tyre
See a NISSAN dealer or qualified workshop for tyre
repair/replacement as soon as possible.
WARNING
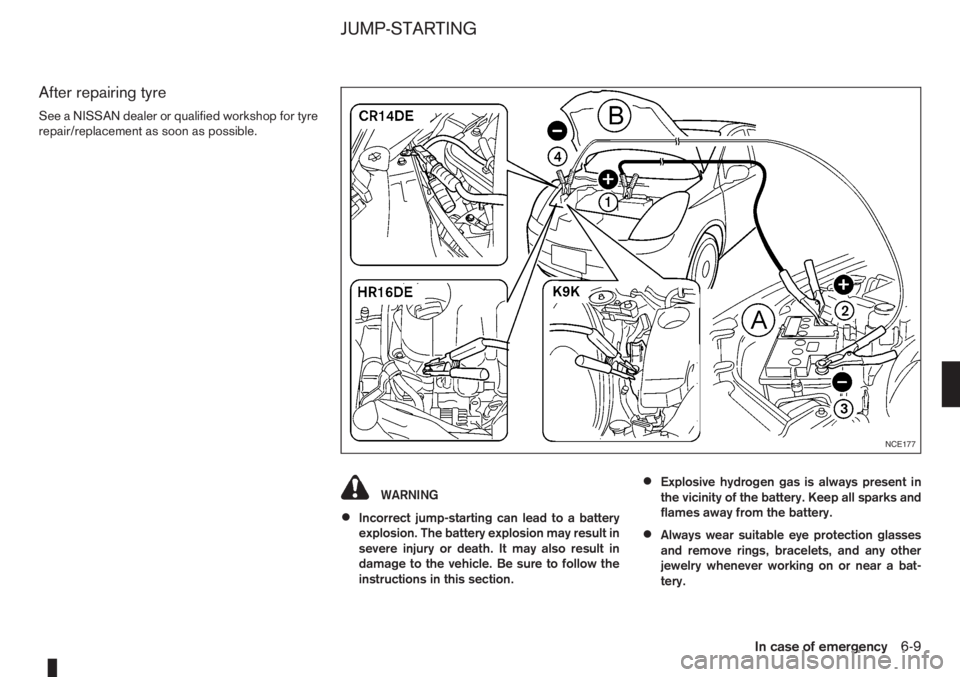
•Incorrect jump-starting can lead to a battery
explosion. The battery explosion may result in
severe injury or death. It may also result in
damage to the vehicle. Be sure to follow the
instructions in this section.
•Explosive hydrogen gas is always present in
the vicinity of the battery. Keep all sparks and
flames away from the battery.
•Always wear suitable eye protection glasses
and remove rings, bracelets, and any other
jewelry whenever working on or near a bat-
tery.
NCE177
JUMP-STARTING
In case of emergency6-9
Page 176 of 235

8Maintenance and do-it-yourselfMaintenance and do-it-yourself
Maintenance requirements ....................................... 8-2
Scheduled maintenance...................................... 8-2
General maintenance .......................................... 8-2
Where to go for service ...................................... 8-2
General maintenance ............................................... 8-2
Explanation of general maintenance items ........... 8-2
Maintenance precautions ......................................... 8-4
Engine compartment ................................................ 8-5
Engine cooling system ............................................. 8-6
Checking engine coolant level............................. 8-6
Changing engine coolant .................................... 8-6
Engine oil................................................................. 8-8
Checking engine oil level .................................... 8-9
Changing engine oil ............................................ 8-9
Changing engine oil filter .................................... 8-11
Protect the environment ...................................... 8-12
Fuel filter (Diesel engine models) ............................. 8-12
Bleeding the fuel system ..................................... 8-12
Automatic transmission fluid (ATF) ........................... 8-13
Brakes ..................................................................... 8-13
Checking brake pedal......................................... 8-13
Checking handbrake........................................... 8-13
Brake and clutch fluid .............................................. 8-13
Window washer fluid/headlight cleaner fluid
(where fitted) ........................................................... 8-14
Battery..................................................................... 8-15
Vehicle battery .................................................... 8-15
Reinitialisation procedure after battery
reconnection....................................................... 8-16
Jump-starting ...................................................... 8-16Integrated Keyfob/Intelligent Key battery
replacement........................................................ 8-17
Drive belts ............................................................... 8-18
Spark plugs (Petrol engine models).......................... 8-18
Air cleaner filter........................................................ 8-19
Viscous paper type ............................................. 8-19
Dry paper type (where fitted) .............................. 8-19
Wiper blades ........................................................... 8-19
Cleaning ............................................................. 8-19
Front window wiper replacement ........................ 8-20
Back door window wiper replacement ................ 8-20
Windscreen washer nozzle ................................. 8-20
Fuses ...................................................................... 8-21
Passenger compartment ..................................... 8-21
Engine compartment ........................................... 8-22
Lights ...................................................................... 8-23
Headlights .......................................................... 8-23
Exterior lights ...................................................... 8-24
Interior lights....................................................... 8-24
Light locations .................................................... 8-25
Wheels and tyres ..................................................... 8-29
Tyre inflation pressure......................................... 8-29
Types of tyres ..................................................... 8-29
Snow chains....................................................... 8-30
Tyre rotation ....................................................... 8-30
Tyre wear and damage ....................................... 8-30
Tyre age ............................................................. 8-31
Changing tyres and wheels ................................. 8-31
Wheel balance.................................................... 8-31
Spare tyre .......................................................... 8-31
Page 192 of 235

ommends to visually check the green indicatorjA status periodically. If it is not visible, replace
the battery as soon as possible.
•If battery replacement or check is required, con-
tact a NISSAN dealer or qualified workshop.
REINITIALISATION PROCEDURE
AFTER BATTERY RECONNECTION
Power window (Driver’s side —
where fitted)
When the vehicle battery has been connected, the
system must be reinitialised as follows:
1. Push down and hold the driver’s side window
switch until the window glass is completely low-
ered then release the switch.
2.In one continuous operation, pull up and hold
the driver’s side window switch until the window
glass is completely closed and continue holding
the switch for a further 5 seconds.
3. The system is now reinitialised.
Repeat the procedure every time the vehicle battery
is connected.
If the reinitialisation procedure cannot be performed
successfully, take your vehicle to a NISSAN dealer
or qualified workshop.
JUMP-STARTING
If jump-starting is necessary, see “Jump-starting” in
the “6. In case of emergency” section. If the engine
does not start by jump starting, the battery may have
to be replaced. Contact a NISSAN dealer or quali-
fied workshop.
8-16Maintenance and do-it-yourself
Page 193 of 235

INTEGRATED KEYFOB/INTELLIGENT
KEY BATTERY REPLACEMENT
CAUTION
•Be careful not to touch a circuit board or a
battery terminal.
NISSAN GREEN PROGRAM
An improperly disposed battery can harm the
environment. Always conform to local regula-
tions for battery disposal.
•The Integrated keyfob/Intelligent Key is wa-
ter-resistant; however, if it does get wet, im-
mediately wipe it until it gets completely dry.
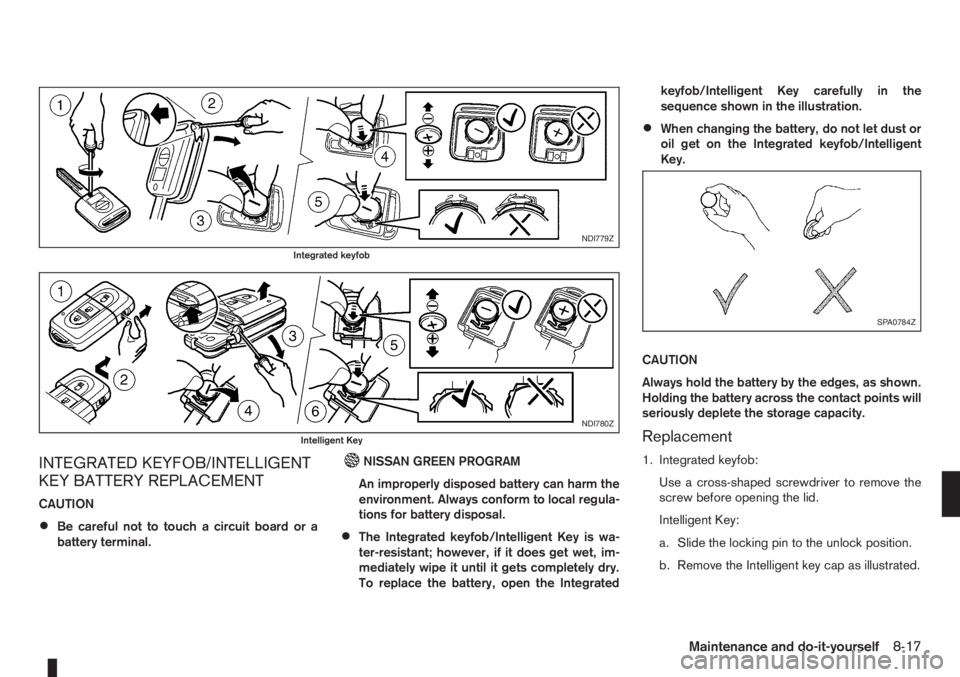
To replace the battery, open the Integratedkeyfob/Intelligent Key carefully in the
sequence shown in the illustration.
•When changing the battery, do not let dust or
oil get on the Integrated keyfob/Intelligent
Key.
CAUTION
Always hold the battery by the edges, as shown.
Holding the battery across the contact points will
seriously deplete the storage capacity.
Replacement
1. Integrated keyfob:
Use a cross-shaped screwdriver to remove the
screw before opening the lid.
Intelligent Key:
a. Slide the locking pin to the unlock position.
b. Remove the Intelligent key cap as illustrated.
NDI779Z
Integrated keyfob
NDI780Z
Intelligent Key
SPA0784Z
Maintenance and do-it-yourself8-17
Page 194 of 235

2. Insert a flat blade screwdriver or a suitable tool
into the slit of the corner and twist it to open the
lid.
3. Replace the battery with a new one.
For models equipped with Integrated keyfob, use
the following battery type:
CR2016
For models equipped with Intelligent Key, use
the following battery type:
CR2032
•Do not touch the internal circuit and electric ter-
minals as doing so could cause a malfunction.
•Make sure that the + side faces the bottom of the
case, as illustrated.
4. Install the lid in the reverse order of removal.
5. Operate the buttons to check its operation.
Contact a NISSAN dealer or qualified workshop
if you need assistance for battery replacement.
WARNING
Be sure the ignition switch is in the “OFF” or
LOCK position. Otherwise the cooling fan or the
engine may start to operate suddenly.
1. Visually inspect each belt for signs of unusual
wear, cuts, fraying or looseness. If the belt is in
poor condition or loose, have it replaced or ad-
justed by a NISSAN dealer or qualified work-
shop.
2. Have the belts checked regularly for condition
and tension in accordance with the maintenance
schedule as shown in the separately provided
Warranty Information and Maintenance booklet.WARNING
Be sure the engine and ignition switch are off
and that the handbrake is engaged securely.
CAUTION
•Be sure to use the correct socket to remove
the spark plugs. An incorrect socket can
cause damage to the spark plugs.
•Always replace spark plugs with recom-
mended or equivalent ones.
Replace spark plugs according to the maintenance
schedule. For details, see the separately provided
Warranty Information & Maintenance Booklet.
If replacement is required, see a NISSAN dealer or
qualified workshop for servicing.
DRIVE BELTS SPARK PLUGS (Petrol engine
models)
8-18Maintenance and do-it-yourself