2012 NISSAN NOTE Connector cable
[x] Cancel search: Connector cablePage 95 of 235

•Occasionally, the CD player may not function
when the compartment temperature is extremely
high. Decrease the temperature before use.
•Do not expose the CD to direct sunlight.
•CDs that are of poor quality, dirty, scratched,
covered with finger prints, or that have pin holes
may not work properly.
•The following CDs may not work properly.
– Copy control compact discs (CCCD)
– Recordable compact discs (CD-R)
– Rewritable compact discs (CD-RW)
•Do not use the following CDs as they may cause
the CD player to malfunction.
– 8 cm (3.1 in) discs with an adaptor
– CDs that are not round
– CDs with a paper label
– CDs that are warped, scratched, or have un-
usual edges.
•This audio system can only play prerecorded
CDs. It has no capabilities to record or burn
CDs.
•If the CD cannot be played, a notification mes-
sage will be displayed.
– Confirm that the CD is inserted correctly (the
label side is facing up, etc.).
– Confirm that the CD is not bent or warped
and it is free of scratches.
– Confirm that the disc is CD and not a DVD.
– Confirm that the disc is recorded with audio
files.
USB (Universal Serial Bus)
(where fitted)
This system supports various USB memory sticks,
USB hard drives, and iPod® players. There are
some USB devices which may not be supported
with this system.
•Make sure that the USB device is connected
correctly into the USB connector.
•Do not force the memory stick or USB cable into
the USB connector. This could damage the con-
nector.
•During cold weather or rainy days, the player
may malfunction due to humidity. If this occurs,
remove the USB device and dehumidify or venti-
late the USB player completely.
SAA0480
Heater and air conditioner, and audio system4-11
Page 96 of 235

•The USB player sometimes cannot function
when the passenger compartment temperature
is extremely high. Decrease the temperature be-
fore use.
•Do not leave USB memory in a place prone to
static electricity or where the air conditioner
blows directly. The data in the USB memory may
be damaged.
•The vehicle is not equipped with a USB memory
stick.
•A USB device cannot be formatted with this sys-
tem. To format a USB device, use a personal
computer.
•Partitioned USB devices may not be played cor-
rectly.
•Some characters used in other languages (Chi-
nese, Japanese, etc.) are not displayed properly
on the vehicle centre screen. Using English lan-
guage characters with a USB device is recom-
mended.
•Do not connect a USB device if a connector or
cable is wet. Allow the cable and/or connectors
to dry completely before connecting the USB
device. If the connector is exposed to fluids other
than water, evaporative residue may cause a
short between the connector pins.
•Large video podcast files cause slow responses
in an iPod®. The display of the audio system
may momentarily black out, but it will soon re-
cover.
•If an iPod® automatically selects large video
podcast files while in the shuffle mode. The dis-
play of the audio system may momentarily black
out, but it will soon recover.
•Some iPod® operations may not be available
with this system.
•At the time of publication, this audio system was
tested with the latest iPod® players available.
Due to the frequent update of consumer devices
like MP3 players, NISSAN cannot guarantee that
all new iPods launched will be compatible with
this audio system.
•Make sure that the iPod® is updated with the lat-
est firmware.
•iPod® is trademarks of Apple Inc., registered in
the U.S. and other countries.
Bluetooth® audio player (where fitted)
•Some Bluetooth® audio devices may not be
used with this system. For detailed information
about Bluetooth® audio devices that are avail-
able for use with this system, contact a NISSAN
dealer or qualified workshop.
•Before using a Bluetooth® audio system, the ini-
tial registration process for the audio device is
necessary.
•Operation of the Bluetooth® audio system may
vary depending on the audio device that is con-
nected. Confirm the operation procedure before
use.
•The playback of Bluetooth® audio will be paused
under the following conditions. The playback will
be resumed after the following conditions are
completed:
– while using a mobile phone.
– while checking a connection with a mobile
phone.
•The in-vehicle antenna for Bluetooth® communi-
cation is built in the audio system. Do not place
the Bluetooth audio device in an area surrounded
by metal, far away from the system, or in a nar-
row space where the device closely contacts the
body or the seat. Otherwise, sound degradation
or connection interference may occur.
•While a Bluetooth® audio device is connected
through the Bluetooth wireless connection, the
battery power of the device may discharge
quicker than usual.
•This system is compatible with the Bluetooth®
AV profile (A2DP and AVRCP ver. 1.3, 1.0 or
earlier).
m
Bluetooth® is a trademark
owned by Bluetooth SIG, Inc.,
and licensed to Daewoo IS
Corp.
4-12Heater and air conditioner, and audio system
Page 114 of 235

Audio main operation
The following operations are identical to the audio
main operation of the Compact Disc (CD) opera-
tion. For details, see “Audio main operation” earlier
in this section.
•List view
•Quick search
•,
•MIX (Random play)
•RPT (Repeat track)
•Folder browsing
button
While a track with recorded music information tags
(ID3–tags) is being played, the title of the played
track is displayed. If the tags are not provided then
a notification message is displayed.
When the<
/j5>button is pressed repeat-
edly, further information about the track can be dis-
played along with the track title as follows:
Track time→Artist name→Album title→Folder
name→Track time
Track details:
A long press on the<
/j5>button will turn the
display into a detailed overview and after a few sec-
onds it returns to the main display, or press
<
/j5>briefly.
iPod® PLAYER OPERATION
Connecting iPod®
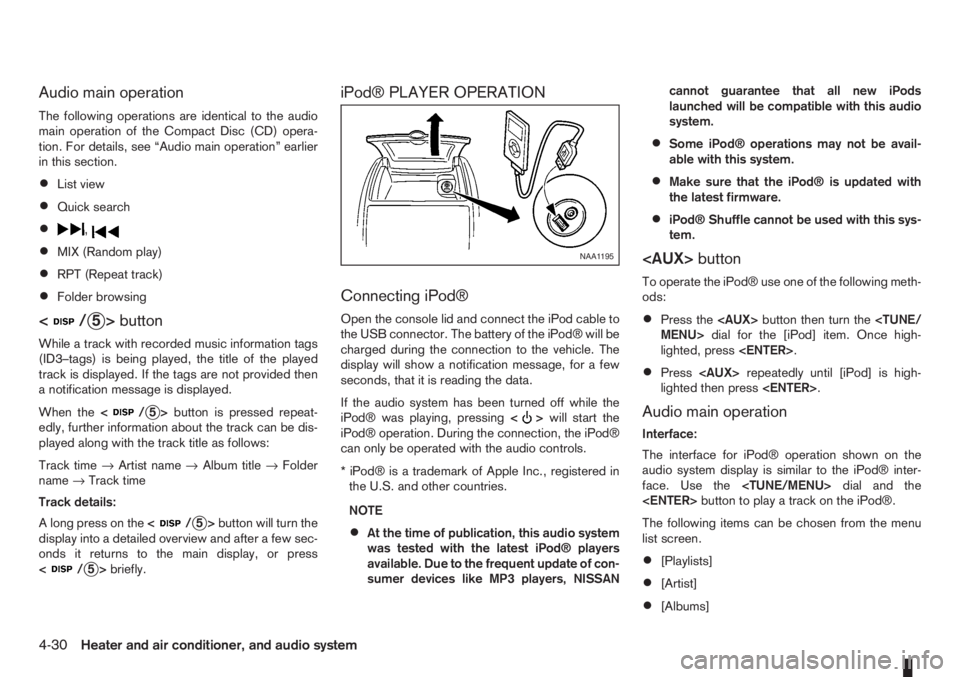
Open the console lid and connect the iPod cable to
the USB connector. The battery of the iPod® will be
charged during the connection to the vehicle. The
display will show a notification message, for a few
seconds, that it is reading the data.
If the audio system has been turned off while the
iPod® was playing, pressing<
>will start the
iPod® operation. During the connection, the iPod®
can only be operated with the audio controls.
* iPod® is a trademark of Apple Inc., registered in
the U.S. and other countries.
NOTE
•At the time of publication, this audio system
was tested with the latest iPod® players
available. Due to the frequent update of con-
sumer devices like MP3 players, NISSANcannot guarantee that all new iPods
launched will be compatible with this audio
system.
•Some iPod® operations may not be avail-
able with this system.
•Make sure that the iPod® is updated with
the latest firmware.
•iPod® Shuffle cannot be used with this sys-
tem.
To operate the iPod® use one of the following meth-
ods:
•Press the
lighted, press
•Press
lighted then press
Audio main operation
Interface:
The interface for iPod® operation shown on the
audio system display is similar to the iPod® inter-
face. Use the
The following items can be chosen from the menu
list screen.
•[Playlists]
•[Artist]
•[Albums]
NAA1195
4-30Heater and air conditioner, and audio system
Page 166 of 235

•Never lean over the battery while jump-start-
ing.
•Never allow battery fluid to come into contact
with eyes, skin, clothes or the vehicle’s
painted surfaces. Battery fluid is a corrosive
sulphuric acid which can cause severe burns.
If the fluid comes into contact with anything,
immediately flush the contacted area with
plenty of water.
•Keep the battery out of the reach of children.
•The booster battery must be rated at 12 volts.
Use of an incorrectly rated battery will dam-
age your vehicle.
•Never attempt to jump-start a frozen battery.
It could explode and cause serious injury.
1. Prepare vehicle
jA with the booster battery for
the vehiclejB being jump-started.
CAUTION
Do not allow the two vehicles to touch.
2. Apply the handbrake.
3. Shift the gear lever (MT models) into the N (Neu-
tral) position [AT models, move the selector lever
to the P (Park) position].
4. Switch off all unnecessary electrical systems
(headlights, hazard lights etc,).
5. Ensure that the ignition switch of the vehicle be-
ing jump-started is in the LOCK position.6. Open the bonnet. For details, see “Bonnet
release” in the “3. Pre-driving checks and
adjustments” section.
7. Remove the vent caps (where fitted) on the bat-
tery and cover the battery with an old cloth.
8. Connect the jump leads in the sequence (
j1→j2→j3→j4 ) as illustrated.
CAUTION
•Always connect positivej+ to positivej+
and negativej- to body ground (for ex-
ample, engine lift bracket, etc.) – not to
the battery’s negative
j-.
•An incorrect connection could damage the
charging system.
•Be sure that the jumper cables do not
touch moving parts in the engine compart-
ment.
•Be careful not to allow contact between
the positive jump lead connector and the
vehicle or the negative lead during con-
nection and disconnection.
9. Start the engine of the other vehicle
jA and let it
run for a few minutes. Keep the engine speed at
about 2,000 rpm.
10. Start the engine of your vehicle
jB in the nor-
mal way.
CAUTION
Do not keep the starter motor engaged formore than 10 seconds. If the engine does not
start immediately, turn the ignition switch to
“OFF” and wait 10 seconds before trying
again.
11. After starting the engine of your vehicle, care-
fully disconnect the negative lead and then the
positive lead (
j4→j3→j2→j1).
12. Remove and dispose of the cloth that was used
to cover the vent holes as it may be contami-
nated with corrosive acid.
13. Install the vent caps (where fitted).
14. Close the bonnet.
6-10In case of emergency
Page 200 of 235

3. Disconnect the electrical connector from the rear
end of the headlight bulb.
4. Remove the cap.
5. Push and turn the retaining spring to loosen it.
6. Remove the headlight bulb. Do not shake or ro-
tate the bulb during the removal.
7. Install the new bulb in the reverse order of re-
moval and make sure that the cap is securely
sealed with the headlight body.
8. Reconnect the negative (—) battery cable and
close the bonnet.
Contact a NISSAN dealer or qualified workshop, if
you need assistance for bulb replacement.
NOTE
Fog may temporarily form inside the lens of the
exterior lights in the rain or in a car wash. The fog
is caused by a temperature difference between
the inside and the outside of the lens. This is not
a malfunction. If large droplets can be seen, then
contact a NISSAN dealer or qualified workshop.EXTERIOR LIGHTS
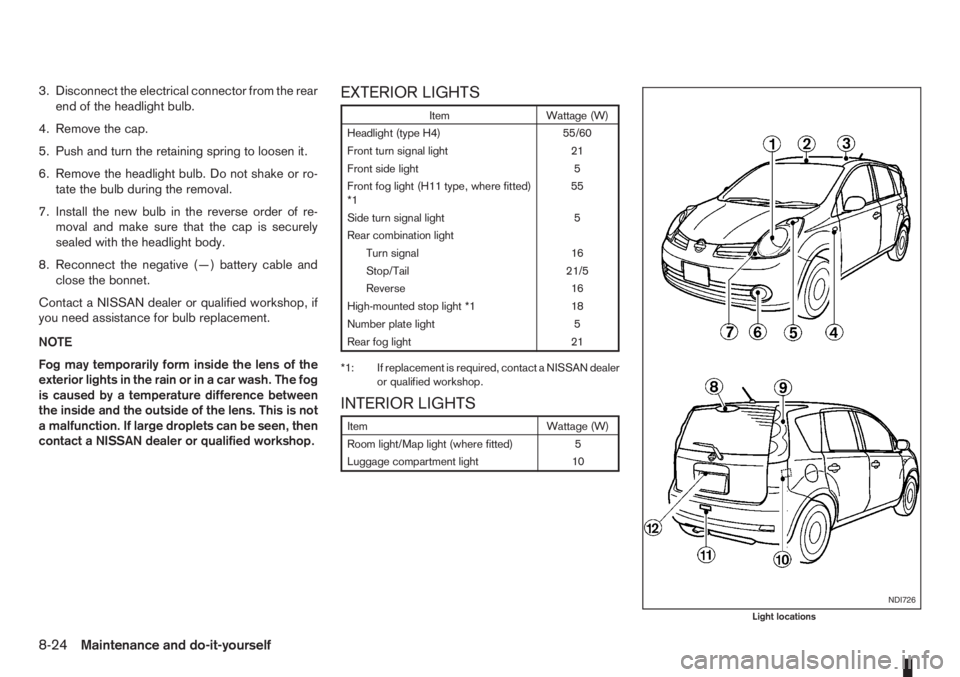
Item Wattage (W)
Headlight (type H4) 55/60
Front turn signal light 21
Front side light 5
Front fog light (H11 type, where fitted)
*155
Side turn signal light 5
Rear combination light
Turn signal 16
Stop/Tail 21/5
Reverse 16
High-mounted stop light *1 18
Number plate light 5
Rear fog light 21
*1: If replacement is required, contact a NISSAN dealer
or qualified workshop.
INTERIOR LIGHTS
Item Wattage (W)
Room light/Map light (where fitted) 5
Luggage compartment light 10
NDI726
Light locations
8-24Maintenance and do-it-yourself