2012 NISSAN NOTE turn signal
[x] Cancel search: turn signalPage 149 of 235

•Trailer towing requires more fuel than under nor-
mal circumstances because of a considerable
increase in traction power required and resis-
tance.
•When towing a trailer, observe the following re-
stricted towing speeds:
Speed: below 100 km/h (62 MPH)
CAUTION
While towing a trailer, make sure the engine cool-
ant temperature warning light does not come on,
in order to prevent engine overheating.
TYRE PRESSURE
When towing a trailer, inflate the vehicle tyres to the
maximum recommended COLD tyre pressure, as
indicated on the tyre placard (for full loading). Make
sure the trailer tyre pressures are correct.
CAUTION
Do not tow a trailer when the vehicle is installed
with a temporary-use spare tyre.
SAFETY CHAINS
Always use a suitable chain between the vehicle
and trailer. The chain should be attached to the hitch
and not to the vehicle bumper or axle. Be sure to
leave enough slack in the chain to permit turning
corners. The chain should not drag on the ground:
passing the chain across the trailer hitch may be the
best practice depending on your trailer.
TRAILER BRAKES
Ensure that trailer brakes are installed as required
by local regulations. Also check that all other trailer
equipment conforms to local regulations.
TRAILER DETECTION (where fitted)
When towing a trailer and the turn signal switch is
used, the electrical system of the vehicle will detect
an additional electrical load of the trailer lighting. As
a result, the direction indicator tone will sound dif-
ferently.
INSTALLATION OF COUPLING
DEVICE
NISSAN recommends that the coupling device for
trailer towing be installed under the following condi-
tions:
•Maximum permissible vertical load on the cou-
pling device: 490N (50 kg, 110 lb)
•The coupling device, mounting points and instal-
lation parts on your vehicle: as shown as an ex-
ample in the illustration.
Follow all of the coupling device manufacturer’s in-
structions for installation and use.
Starting and driving5-25
Page 159 of 235
In case of a flat tyre, follow the instructions as de-
scribed below:
STOPPING THE VEHICLE
WARNING
•Make sure that the handbrake is securely ap-
plied.
•For Manual Transmission (MT) models: Make
sure the gear lever is in the R (Reverse) posi-
tion.
For Automatic Transmission (AT) models:
Make sure that the selector lever is in the P
(Park) position.
•Never change tyres when the vehicle is on a
slope, ice or a slippery area. This is hazard-
ous.
•Never change tyres if oncoming traffic is close
to your vehicle. Wait for professional road as-
sistance.
1. Safely move the vehicle off the road, away from
traffic.
2. Switch on the hazard warning flashers.
3. Park on a level surface.
4. Apply the handbrake.
5. Shift the gear lever (MT models) into the R (Re-
verse) position [AT models, move the selector
lever to the P (Park) position].
6. Turn off the engine.7. Open the bonnet (for details, see “Bonnet
release” in the “3. Pre-driving checks and
adjustments” section) in order to:
•Warn other traffic.
•Signal to professional road assistance that
you require assistance.
8. Have all passengers exit the vehicle and stand in
a safe place, away from traffic and clear of the
vehicle.
CHANGING FLAT TYRE (Models with
spare wheel, where fitted)
Blocking the wheels
WARNING
Make sure to block the appropriate wheel to pre-
vent the vehicle from moving, which may cause
personal injury.
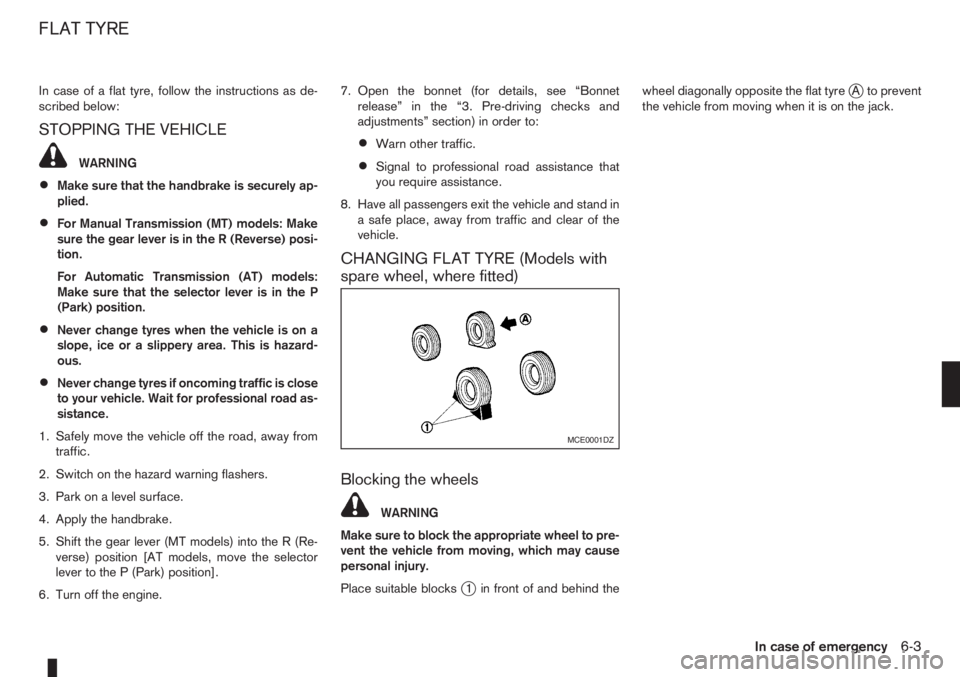
Place suitable blocks
j1 in front of and behind thewheel diagonally opposite the flat tyre
jA to prevent
the vehicle from moving when it is on the jack.
MCE0001DZ
FLAT TYRE
In case of emergency6-3
Page 179 of 235

Lights*:
Clean the headlights on a regular basis. Make sure
that the headlights, stop lights, tail lights, turn signal
lights, and other lights are all operating properly and
installed securely. Also check headlight aim.
Tyres*:
Check the pressure with a gauge periodically when
at a service station (including the spare) and adjust
to the specified pressure if necessary. Check care-
fully for damage, cuts or excessive wear.
Tyre rotation*:
Tyres should be rotated at least every 10,000 km
(6,000 miles). However, the timing for tyre rotation
may vary according to your driving habits and road
surface conditions.
Wheel alignment and balance:
If the vehicle pull to either side while driving on a
straight and level road, or if you detect uneven or
abnormal tyre wear, there may be a need for wheel
alignment. If the steering wheel or seat vibrates at
normal highway speeds, wheel balancing may be
needed.
Wheel bolts:
When checking the tyres, make sure no wheel bolts
are missing, and check for any loose wheel bolts.
Tighten if necessary.Windscreen:
Clean the windscreen on a regular basis. Check the
windscreen at least every six months for cracks or
other damage. Have a damaged windscreen re-
paired by a qualified repair facility.
Wiper blades*:
Check for cracks or wear if they do not wipe prop-
erly.
Under the bonnet and vehicle
The maintenance items listed here should be
checked periodically, e.g. each time you check the
engine oil or refuel.
Battery*:
Check if the green indicator on the top of the main-
tenance free battery is visible. If it is not visible,
replace the battery as soon as possible.
Vehicles operated in high temperatures or under
severe conditions, check the fluid level frequently.
Brake and clutch fluid level*:
Make sure that the brake and clutch fluid level is
between the MAX and MIN lines on the reservoir.
Engine coolant level*:
Check the coolant level when the engine is cold.
Engine drive belts*:
Make sure that the drive belts are not frayed, worn,
cracked or oily.Engine oil level*:
Check the level after parking the vehicle on a level
surface and turning off the engine.
Fluid leaks:
Check under the vehicle for fuel, oil, water or other
fluid leaks after the vehicle has been parked for a
while. Water dripping from the air conditioner after
use is normal. If you should notice any leaks or if
petrol fumes are evident, check for the cause and
have it corrected immediately.
Window washer fluid*:
Check that there is adequate fluid in the tank.
Inside the vehicle
The maintenance items listed here should be
checked on a regular basis, such as when perform-
ing periodic maintenance, cleaning the vehicle, etc.
Accelerator pedal:
Check the pedal for smooth operation and make
sure that the pedal does not catch or require uneven
effort. Keep the floor mats away from the pedal.
Brake pedal*:
Check the pedal for smooth operation. If the brake
pedal suddenly goes down further than normal, the
pedal feels spongy or the vehicle seems to take
longer to stop, contact a NISSAN dealer or qualified
workshop immediately. Keep the floor mat away
from the pedal.
Maintenance and do-it-yourself8-3
Page 200 of 235
3. Disconnect the electrical connector from the rear
end of the headlight bulb.
4. Remove the cap.
5. Push and turn the retaining spring to loosen it.
6. Remove the headlight bulb. Do not shake or ro-
tate the bulb during the removal.
7. Install the new bulb in the reverse order of re-
moval and make sure that the cap is securely
sealed with the headlight body.
8. Reconnect the negative (—) battery cable and
close the bonnet.
Contact a NISSAN dealer or qualified workshop, if
you need assistance for bulb replacement.
NOTE
Fog may temporarily form inside the lens of the
exterior lights in the rain or in a car wash. The fog
is caused by a temperature difference between
the inside and the outside of the lens. This is not
a malfunction. If large droplets can be seen, then
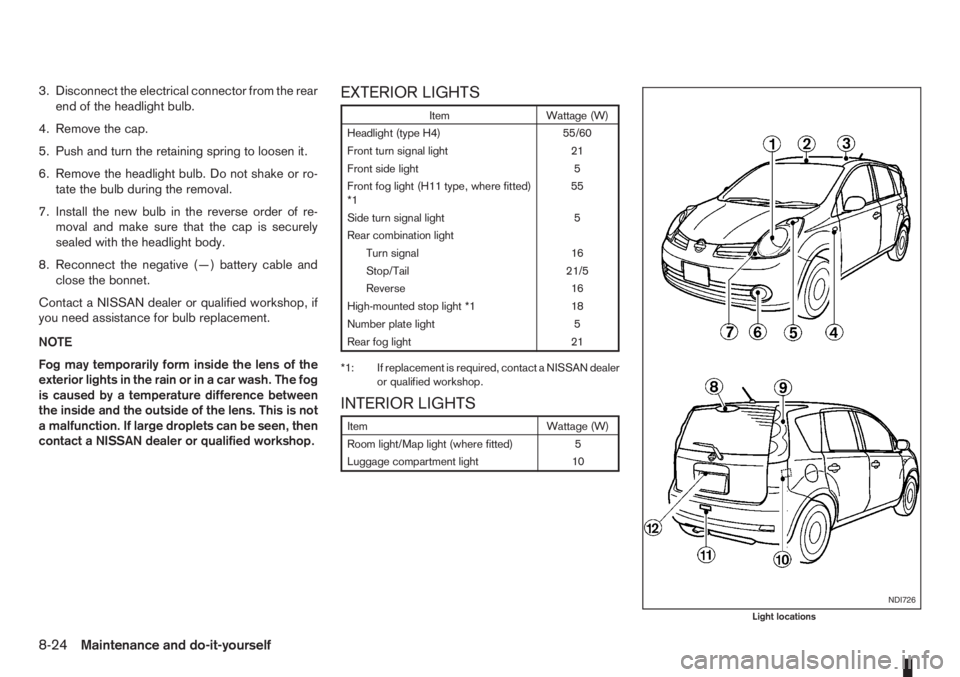
contact a NISSAN dealer or qualified workshop.EXTERIOR LIGHTS
Item Wattage (W)
Headlight (type H4) 55/60
Front turn signal light 21
Front side light 5
Front fog light (H11 type, where fitted)
*155
Side turn signal light 5
Rear combination light
Turn signal 16
Stop/Tail 21/5
Reverse 16
High-mounted stop light *1 18
Number plate light 5
Rear fog light 21
*1: If replacement is required, contact a NISSAN dealer
or qualified workshop.
INTERIOR LIGHTS
Item Wattage (W)
Room light/Map light (where fitted) 5
Luggage compartment light 10
NDI726
Light locations
8-24Maintenance and do-it-yourself
Page 201 of 235
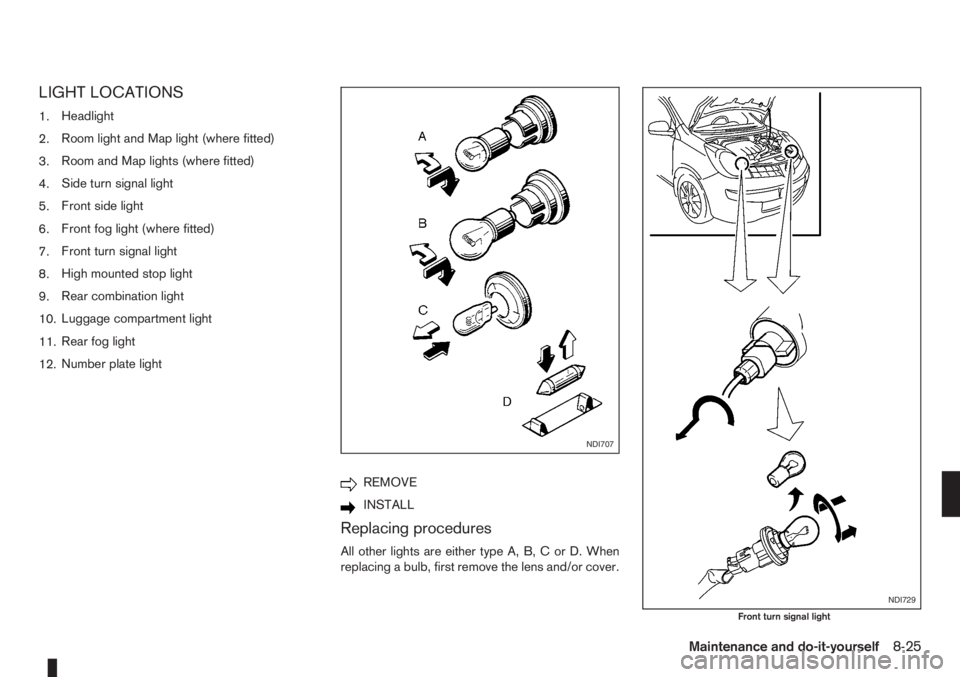
LIGHT LOCATIONS
1.Headlight
2.Room light and Map light (where fitted)
3.Room and Map lights (where fitted)
4.Side turn signal light
5.Front side light
6.Front fog light (where fitted)
7.Front turn signal light
8.High mounted stop light
9.Rear combination light
10.Luggage compartment light
11.Rear fog light
12.Number plate light
REMOVE
INSTALL
Replacing procedures
All other lights are either type A, B, C or D. When
replacing a bulb, first remove the lens and/or cover.
NDI707
NDI729
Front turn signal light
Maintenance and do-it-yourself8-25
Page 202 of 235
NDI727
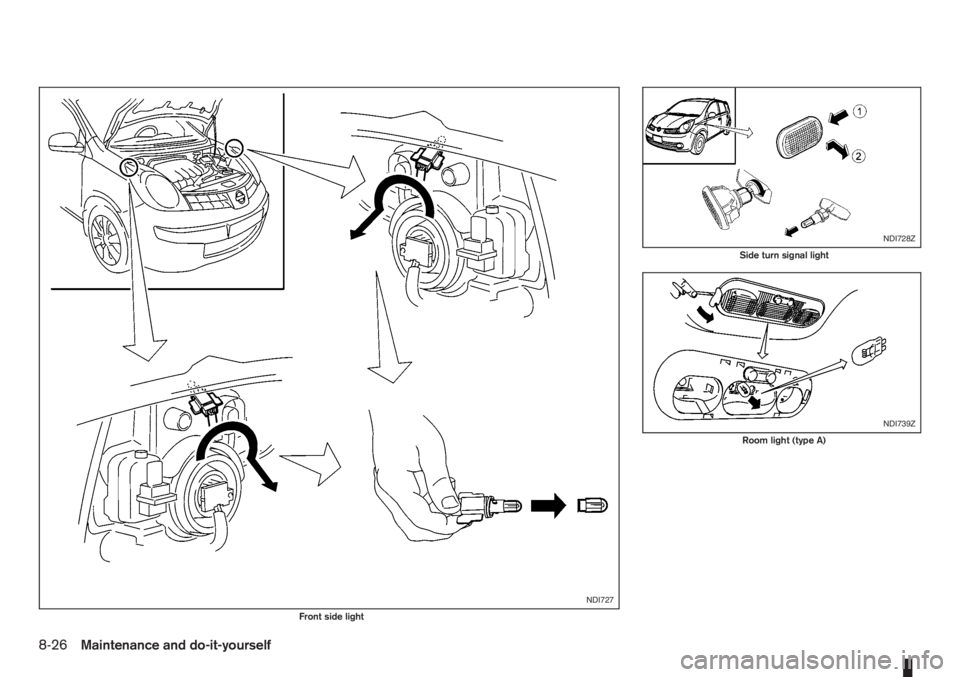
Front side light
NDI728Z
Side turn signal light
NDI739Z
Room light (type A)
8-26Maintenance and do-it-yourself
Page 205 of 235
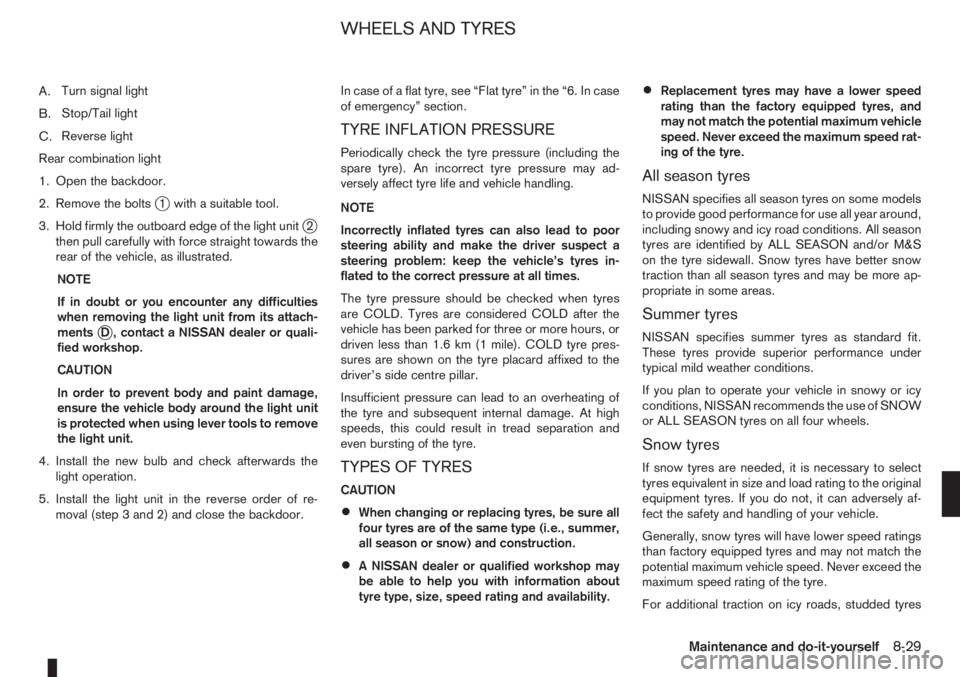
A.Turn signal light
B.Stop/Tail light
C.Reverse light
Rear combination light
1. Open the backdoor.
2. Remove the bolts
j1 with a suitable tool.
3. Hold firmly the outboard edge of the light unit
j2
then pull carefully with force straight towards the
rear of the vehicle, as illustrated.
NOTE
If in doubt or you encounter any difficulties
when removing the light unit from its attach-
ments
jD , contact a NISSAN dealer or quali-
fied workshop.
CAUTION
In order to prevent body and paint damage,
ensure the vehicle body around the light unit
is protected when using lever tools to remove
the light unit.
4. Install the new bulb and check afterwards the
light operation.
5. Install the light unit in the reverse order of re-
moval (step 3 and 2) and close the backdoor.In case of a flat tyre, see “Flat tyre” in the “6. In case
of emergency” section.
TYRE INFLATION PRESSURE
Periodically check the tyre pressure (including the
spare tyre). An incorrect tyre pressure may ad-
versely affect tyre life and vehicle handling.
NOTE
Incorrectly inflated tyres can also lead to poor
steering ability and make the driver suspect a
steering problem: keep the vehicle’s tyres in-
flated to the correct pressure at all times.
The tyre pressure should be checked when tyres
are COLD. Tyres are considered COLD after the
vehicle has been parked for three or more hours, or
driven less than 1.6 km (1 mile). COLD tyre pres-
sures are shown on the tyre placard affixed to the
driver’s side centre pillar.
Insufficient pressure can lead to an overheating of
the tyre and subsequent internal damage. At high
speeds, this could result in tread separation and
even bursting of the tyre.
TYPES OF TYRES
CAUTION
•When changing or replacing tyres, be sure all
four tyres are of the same type (i.e., summer,
all season or snow) and construction.
•A NISSAN dealer or qualified workshop may
be able to help you with information about
tyre type, size, speed rating and availability.
•Replacement tyres may have a lower speed
rating than the factory equipped tyres, and
may not match the potential maximum vehicle
speed. Never exceed the maximum speed rat-
ing of the tyre.
All season tyres
NISSAN specifies all season tyres on some models
to provide good performance for use all year around,
including snowy and icy road conditions. All season
tyres are identified by ALL SEASON and/or M&S
on the tyre sidewall. Snow tyres have better snow
traction than all season tyres and may be more ap-
propriate in some areas.
Summer tyres
NISSAN specifies summer tyres as standard fit.
These tyres provide superior performance under
typical mild weather conditions.
If you plan to operate your vehicle in snowy or icy
conditions, NISSAN recommends the use of SNOW
or ALL SEASON tyres on all four wheels.
Snow tyres
If snow tyres are needed, it is necessary to select
tyres equivalent in size and load rating to the original
equipment tyres. If you do not, it can adversely af-
fect the safety and handling of your vehicle.
Generally, snow tyres will have lower speed ratings
than factory equipped tyres and may not match the
potential maximum vehicle speed. Never exceed the
maximum speed rating of the tyre.
For additional traction on icy roads, studded tyres
WHEELS AND TYRES
Maintenance and do-it-yourself8-29
Page 223 of 235

E
Electronic Stability Programme (ESP) system ...................... 5-29
– ESP OFF switch ........................................................... 5-30
Engine
– Before starting the engine ................................................ 5-2
– Changing engine coolant ................................................. 8-6
– Changing engine oil ......................................................... 8-9
– Changing engine oil filter ............................................... 8-11
– Checking engine coolant level ......................................... 8-6
– Checking engine oil level ................................................. 8-9
– Data ................................................................................ 9-5
– Engine cold start period ................................................... 5-5
– Engine compartment ................................................ 0-9, 8-5
– Engine coolant ............................................................... 5-31
– Engine cooling system ..................................................... 8-6
– Engine oil ........................................................................ 8-8
– Engine overheat ............................................................. 6-11
– Engine serial number ....................................................... 9-7
– Fuel filter (Diesel engine models) ................................... 8-12
– Starting the engine ........................................................ 5-10
Exhaust gas (Carbon Monoxide) ............................................ 5-3
Exterior lights ...................................................................... 8-24
F
Filter
– Air cleaner filter ............................................................. 8-19
– Air conditioner filter ......................................................... 4-7
– Fuel filter (Diesel engine models) ................................... 8-12
Floor mats ............................................................................. 7-4
Fluid
– Automatic transmission fluid (ATF) ................................. 8-13
– Brake and clutch fluid .................................................... 8-13
– Window washer/headlight cleaner fluid .......................... 8-14Fog light
– Front fog light ................................................................ 2-17
– Rear fog light ................................................................. 2-18
Front passenger air bag indicator light ................................. 1-14
Fuel
– Bleeding the fuel system ................................................ 8-12
– Capacities and recommended fuel/lubricants ................... 9-2
– Fuel filler lid ................................................................... 3-11
– Fuel filter (Diesel engine models) ................................... 8-12
– Fuel gauge ...................................................................... 2-2
– Fuel recommendation ...................................................... 9-4
Fuel filler lid ......................................................................... 3-11
– Cap ............................................................................... 3-11
– Opener lever ................................................................. 3-11
Fuses .................................................................................. 8-21
– Engine compartment ...................................................... 8-22
– Passenger compartment ................................................ 8-21
H
Handbrake lever .................................................................. 3-11
Hazard warning flasher switch ............................................. 2-19
Head restraint ....................................................................... 1-4
– Active head restraints ...................................................... 1-5
Headlight
– Headlight aiming control switch ..................................... 2-18
– Headlight and turn signal switch .................................... 2-16
– Headlight cleaner .......................................................... 2-14
– Headlight switch ............................................................ 2-16
– Headlights (bulb replacement) ....................................... 8-23
– Replacement (bulb) ....................................................... 8-23
– Turn signal switch .......................................................... 2-17
Heated seats ....................................................................... 2-19
Heater and air conditioner/ventilation ..................................... 4-2
Horn ................................................................................... 2-19
Index10-3