Page 187 of 450

Color theme:
Select the “Display” key, then select the “Color
Theme” key. The Color Theme select screen will
appear.
Select the key for the desired color. The appear-
ance of the background, arrows and bars will
change for all screens accordingly. You can
choose a black, blue or red color theme.Clock
The following display will appear after pressing
the SETTING button, then selecting the “Clock”
key using the NISSAN controller.
On-screen Clock:
When this item is enabled (indicator light illumi-
nated) , a clock is always displayed in the upper
right corner of the screen.
This clock will indicate the time almost exactly
because it is always adjusted by the GPS system.Clock Format (24h):
When this item is enabled (indicator light illumi-
nated) , the clock format will change from the
default 12-hour display to a 24-hour display.
Offset (hour):
Adjust the time by increasing or decreasing the
hours.
Offset (minute):
Adjust the time by increasing or decreasing the
minutes.
Daylight Savings Time:
When this item is enabled (indicator light illumi-
nated) , daylight savings time is on. To turn off the
daylight savings time, touch the “ON” key; the
amber indicator light will go out.
LHA1240LHA1241
4-26Monitor, climate, audio, phone and voice recognition systems
Page 188 of 450
Time Zone:
Select the “Time Zone” key; the Time Zone
screen will appear.
Select one of the following zones, depending on
the current location, by selecting the correct time
zone key to enable that time zone (indicator light
will illuminate for that location) .● Pacific
● Mountain
● Central
● Eastern
● Atlantic ●
Newfoundland
● Hawaii
● Alaska
After selection/settings, press the BACK button
or any other mode button to accept the changes.Others settings
Select the “Others” key using the NISSAN con-
troller. Voice recognition, language and units set-
ting screen will be displayed.
LHA1243LHA1248
Monitor, climate, audio, phone and voice recognition systems4-27
Page 189 of 450

Comfort settings
Select the “Others” key using the NISSAN con-
troller, then select the “Comfort” key. The Com-
fort settings screen will be displayed.
You can set the following operating conditions by
selecting the desired item using the NISSAN
controller. The indicator light (box at the right of
the selected item) alternately turns on and off
each time the item is touched or the ENTER
button is pressed.
Indicator light is illuminated — ON
Indicator light is not illuminated — OFFAuto Interior Illumination:
Select to turn on or
turn off the illumination of the interior lights when
any door is unlocked.
Light Sensitivity: Select to adjust the sensitivity
of the automatic headlights higher (right) or lower
(left) . After selecting the item, turn the NISSAN
controller or touch the “+” or “-” key to change
the setting.
Light Off Delay: Select to change the duration
of the automatic headlight off timer. After select-
ing the item, turn the NISSAN controller or touch
the “+” or “-” key to change the setting. The
available delays are 0, 30, 45, 60, 90, 120, 150
and 180 seconds. Speed Sensing Wiper Interval:
Select to turn
on or turn off the wiper interval adjusted automati-
cally according to the vehicle speed.
Selective Door Unlock: When this item is
turned on, only the driver’s door is unlocked first
after the door unlock operation. When the door
handle request switch on the driver’s or front
passenger’s side door is pushed to be unlocked,
only the corresponding door is unlocked first. All
the doors can be unlocked if the door unlock
operation is performed again within one minute.
When this item is turned to off, all the doors will
be unlocked after the door unlock operation is
performed once.
Intelligent Key Lock / Unlock: Select to turn
on or turn off the door lock/unlock function by
pushing the door handle request switch.
Lift Steering Wheel on Exit: Select to turn on
or turn off the steering wheel moving upward for
easy exit when the ignition switch is in the OFF
position and the driver’s door is opened. After
getting into the vehicle and placing the ignition
switch in the ACC position, the steering wheel
moves to the previous position.
LHA1246LHA1247
4-28Monitor, climate, audio, phone and voice recognition systems
Page 191 of 450
 key or the “Metric”
(km, °C, L/100 km) key to change the units
shown on the display.
Voice Recognition:
For Voice Recognition settings, refer to �")
Select Units:
Select the “US” (mi, °F, MPG) key or the “Metric”
(km, °C, L/100 km) key to change the units
shown on the display.
Voice Recognition:
For Voice Recognition settings, refer to “NISSAN
Voice Recognition system” in this section.Camera settings
Select the “Camera” key. The Camera settings
screen will appear.
When this option is on (indicator light illumi-
nated) , predictive course lines will be displayed
when the RearView monitor is displayed on the
screen. See “RearView Monitor” in this section
for more information.
Image viewer settings
For information about these settings, refer to
“Image viewer” in this section.
Navigation settings
Refer to the separate Navigation System Own-
er’s Manual for information regarding these set-
tings.
Audio settings
For audio settings, refer to “Audio System” in this
section.
Phone settings
For phone settings refer to “Bluetooth�
Hands-
Free Phone System with Navigation System” in
this section.
Bluetooth� settings
For Bluetooth� phone settings, refer to
“Bluetooth� Hands-Free Phone System with
Navigation System” in this section.
For Bluetooth� audio settings, refer to
“Bluetooth� streaming audio” in this section.
Volume & beeps settings
Navigation volume
For navigation volume settings, refer to the sepa-
rate Navigation System Owner’s Manual for infor-
mation regarding these settings.
LHA1252LHA1249
4-30Monitor, climate, audio, phone and voice recognition systems
Page 192 of 450
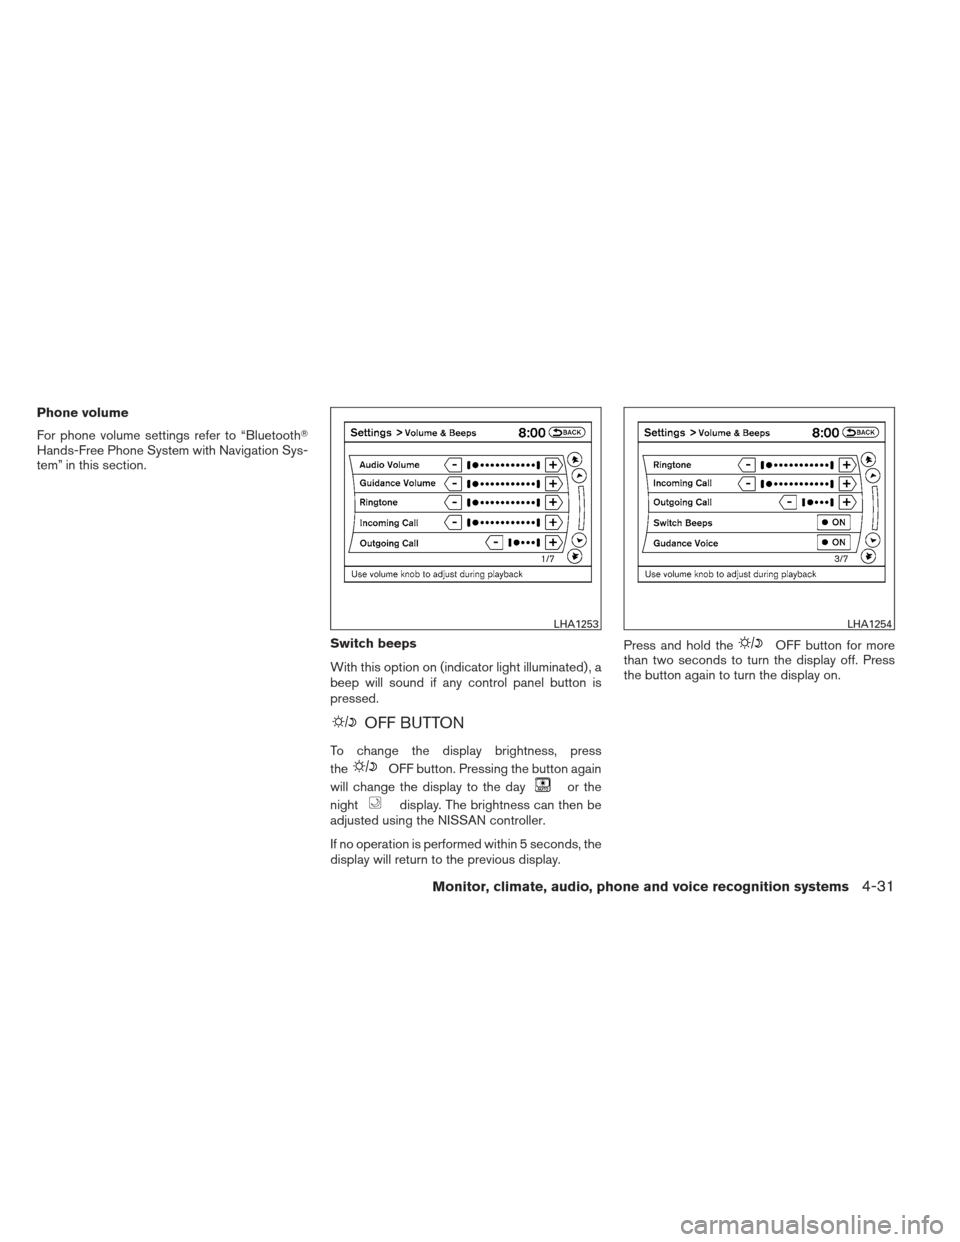
Phone volume
For phone volume settings refer to “Bluetooth�
Hands-Free Phone System with Navigation Sys-
tem” in this section.Switch beeps
With this option on (indicator light illuminated) , a
beep will sound if any control panel button is
pressed.
OFF BUTTON
To change the display brightness, press
the
OFF button. Pressing the button again
will change the display to the day
or the
night
display. The brightness can then be
adjusted using the NISSAN controller.
If no operation is performed within 5 seconds, the
display will return to the previous display. Press and hold the
OFF button for more
than two seconds to turn the display off. Press
the button again to turn the display on.
LHA1253LHA1254
Monitor, climate, audio, phone and voice recognition systems4-31
Page 193 of 450

USING THE IMAGE VIEWER
When a compatible portable storage device is
plugged into the USB jack located in the center
console, compatible image files stored on the
device can be viewed on the control panel de-
vice.
Connecting the portable storage
device
To connect a portable storage device to the sys-
tem so that images stored on it can be viewed,
insert the device into the USB jack located in the
center console.
Viewing images
To view an image, press the SETTING button and
then select the “Image Viewer” key with the
NISSAN controller. The Image Viewer screen will
be displayed.
A list of compatible images on the storage device
is displayed on the left side of the screen, while
the selected image is displayed on the right side
of the screen. To choose a different picture from
the list, use the NISSAN controller to scroll
through the list once the desired image is high-
lighted.Select the “Full Screen Display” key and press
the ENTER button to view a full screen version of
the image.
Image requirements:
● Image type: JPEG
● File extensions: *.jpg, *.jpeg
● Maximum resolution: 2048 x 1536
● Maximum size: 2 MB
● Colors: 32,768 (15-bit)
● Maximum file name length: 253 bytes (dis-
play only shows first 8 characters)
● Maximum folders: 500
● Maximum images per folder: 1024
LHA1309
IMAGE VIEWER (if so equipped)
4-32Monitor, climate, audio, phone and voice recognition systems
Page 194 of 450

Viewing images in a slideshow
To view all of the images on the device in a slide-
show, first enter the full screen mode while viewing
one of the images. The slideshow control buttons
are located on the right side of the screen.
Select the play keyto begin the slideshow.
The images shown on the screen will periodically
change at a given interval of time. To skip through
the images without waiting for them to change
automatically, select the
key to skip back-
ward or the
key to skip forward. Select the
stop key
to end the slideshow and return
to the full screen display of the image currently on
the screen.
Slideshow settings
While in slideshow mode, select the “Settings”
key. The Slideshow Settings screen will be dis-
played. The following settings can be accessed: Slideshow speed:
To change the interval of time at which images are
changed during a slideshow, select the desired
interval key. The indicator light to the right of the
interval will come on to show that it is selected.
If the option “No Auto Change” is chosen, the
slideshow will not change images automatically.
The slideshow can then only be operated using
the manual controls.
To return to the slideshow screen, select the
“Back” key or press the BACK button on the
control panel.
LHA1310LHA1311LHA1312
Monitor, climate, audio, phone and voice recognition systems4-33
Page 200 of 450

Backing up behind a projecting object
The position�Cis shown farther than the position
�Bin the display. However, the position�Cis
actually at the same distance as the position
�A.
The vehicle may hit the object when backing up to the position
�Aif the object projects over the
actual backing up course.
HOW TO ADJUST THE SCREEN
To adjust the Display ON/OFF, Brightness, Tint,
Color, Contrast and Black Level of the RearView
Monitor, press the SETTING button with the
RearView Monitor on and select the “Display”
key. Select one of the items and change the value
by touching the “+” or “-” key or by turning the
NISSAN controller.
Do not adjust the Brightness, Tint, Color, Con-
trast and Black Level of the RearView Monitor
while the vehicle is moving. Make sure the park-
ing brake is firmly applied and the engine is not
running.
OPERATING TIPS
● When the shift selector is shifted to the R
(Reverse) position, the display screen auto-
matically changes to the RearView Monitor
mode. However, the radio can be heard. ●
It may take some time until the RearView
Monitor or the normal screen is displayed
after the shift selector has been shifted to R
(Reverse) from another position or to an-
other position from R (Reverse) . Objects
may be distorted momentarily until the Rear-
View Monitor screen is displayed com-
pletely.
● When the temperature is extremely high or
low, the screen may not clearly display ob-
jects. This is not a malfunction.
● When strong light directly enters the cam-
era, objects may not be displayed clearly.
This is not a malfunction.
● Vertical lines may be seen in objects on the
screen. This is due to strong reflected light
from the bumper. This is not a malfunction.
● The screen may flicker under fluorescent
light. This is not a malfunction.
● The colors of objects on the RearView Moni-
tor may differ somewhat from those of the
actual object.
● Objects on the monitor may not be clear in a
dark place or at night. This is not a malfunc-
tion.
WHA1506
Monitor, climate, audio, phone and voice recognition systems4-39