2012 NISSAN CUBE set clock
[x] Cancel search: set clockPage 147 of 331
times of day, while “Automatic” controls the
display automatically.
.Scroll Direction:
The direction that menus scroll can be adjusted.
Choose either “up” or “down”.
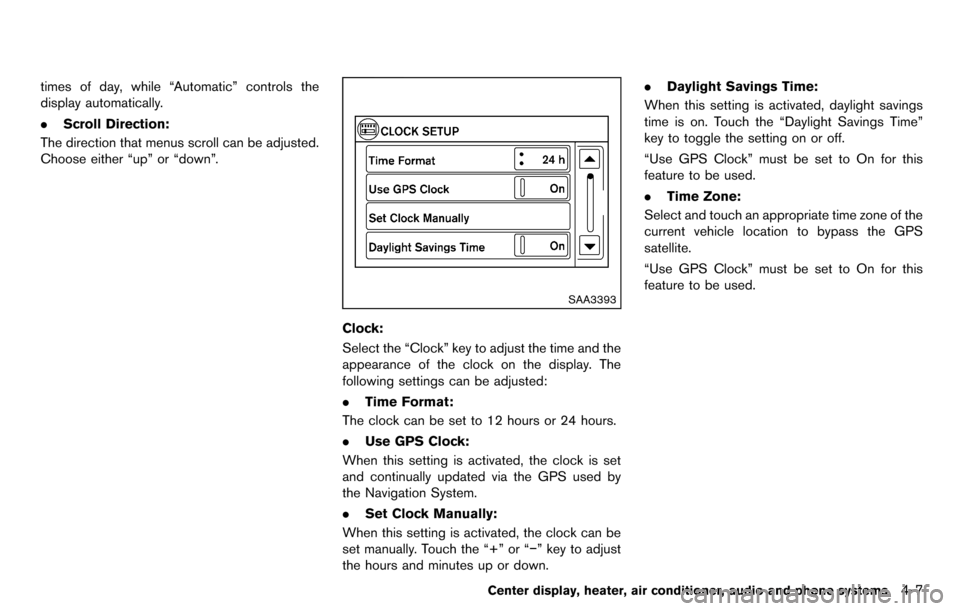
SAA3393
Clock:
Select the “Clock” key to adjust the time and the
appearance of the clock on the display. The
following settings can be adjusted:
. Time Format:
The clock can be set to 12 hours or 24 hours.
. Use GPS Clock:
When this setting is activated, the clock is set
and continually updated via the GPS used by
the Navigation System.
. Set Clock Manually:
When this setting is activated, the clock can be
set manually. Touch the “+” or “−” key to adjust
the hours and minutes up or down. .
Daylight Savings Time:
When this setting is activated, daylight savings
time is on. Touch the “Daylight Savings Time”
key to toggle the setting on or off.
“Use GPS Clock” must be set to On for this
feature to be used.
. Time Zone:
Select and touch an appropriate time zone of the
current vehicle location to bypass the GPS
satellite.
“Use GPS Clock” must be set to On for this
feature to be used.
Center display, heater, air conditioner, audio and phone systems4-7
Page 175 of 331
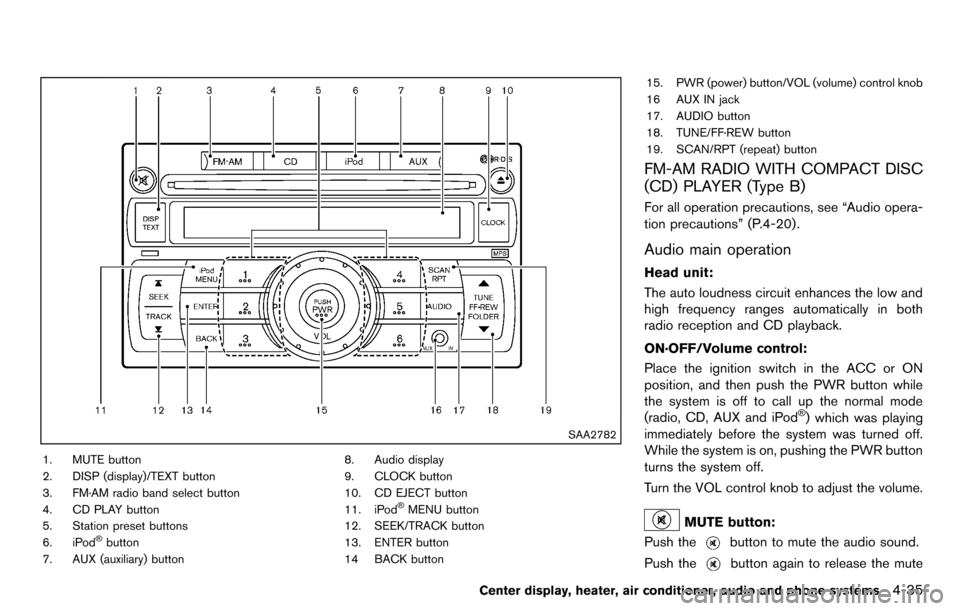
SAA2782
1. MUTE button
2. DISP (display)/TEXT button
3. FM·AM radio band select button
4. CD PLAY button
5. Station preset buttons
6. iPod
®button
7. AUX (auxiliary) button 8. Audio display
9. CLOCK button
10. CD EJECT button
11. iPod
®MENU button
12. SEEK/TRACK button
13. ENTER button
14 BACK button 15. PWR (power) button/VOL (volume) control knob
16 AUX IN jack
17. AUDIO button
18. TUNE/FF·REW button
19. SCAN/RPT (repeat) button
FM-AM RADIO WITH COMPACT DISC
(CD) PLAYER (Type B)
For all operation precautions, see “Audio opera-
tion precautions” (P.4-20) .
Audio main operation
Head unit:
The auto loudness circuit enhances the low and
high frequency ranges automatically in both
radio reception and CD playback.
ON·OFF/Volume control:
Place the ignition switch in the ACC or ON
position, and then push the PWR button while
the system is off to call up the normal mode
(radio, CD, AUX and iPod
®) which was playing
immediately before the system was turned off.
While the system is on, pushing the PWR button
turns the system off.
Turn the VOL control knob to adjust the volume.
MUTE button:
Push the
button to mute the audio sound.
Push the
button again to release the mute
Center display, heater, air conditioner, audio and phone systems4-35
Page 176 of 331
4-36Center display, heater, air conditioner, audio and phone systems
setting.
AUDIO button:
Push the AUDIO button to change the selecting
mode as follows.
Push the TUNE (,) or SEEK (,)
button to adjust Bass and Treble to the desired
level. Use the TUNE or SEEK button also to
adjust Fade or Balance modes. Fade adjusts the
sound level between the front and rear speakers
and Balance adjusts the sound between the
right and left speakers.
To turn the beep sound off or on, push the TUNE
or SEEK button until the desired mode is
displayed. This turns on or off the beep sound
when audio buttons are pushed.
To change the Speed Sensitive Volume (Spd
Sen Vol) mode to OFF, LOW, MID or HIGH,
push the TUNE or SEEK button until the desired
mode is displayed.
Once you have adjusted the sound quality to the
desired level, push the AUDIO button repeatedly
until the normal mode display reappears. Other-
wise, the normal mode display will automatically
reappear after approximately 5 seconds.
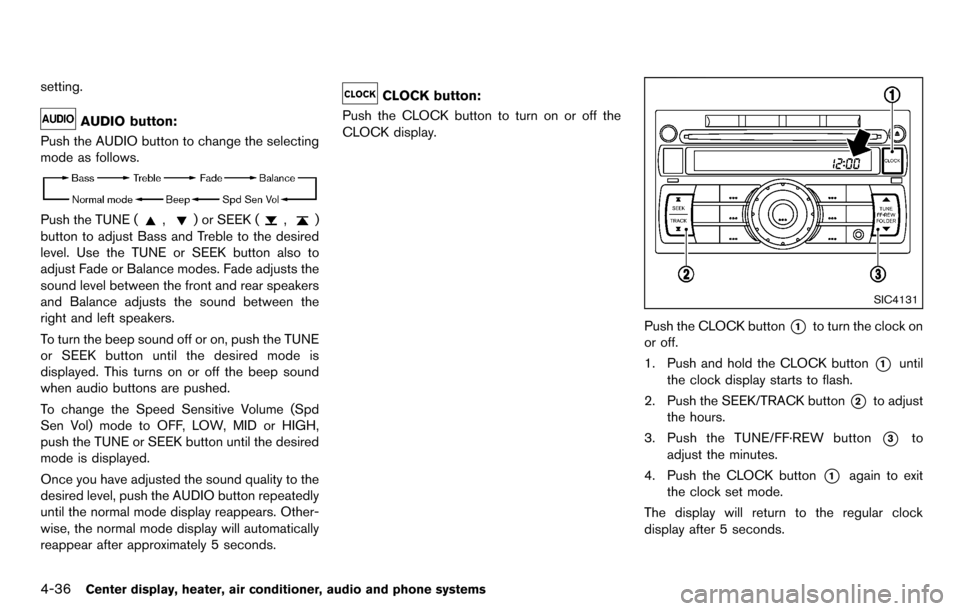
CLOCK button:
Push the CLOCK button to turn on or off the
CLOCK display.
SIC4131
Push the CLOCK button*1to turn the clock on
or off.
1. Push and hold the CLOCK button
*1until
the clock display starts to flash.
2. Push the SEEK/TRACK button
*2to adjust
the hours.
3. Push the TUNE/FF·REW button
*3to
adjust the minutes.
4. Push the CLOCK button
*1again to exit
the clock set mode.
The display will return to the regular clock
display after 5 seconds.
Page 182 of 331
4-42Center display, heater, air conditioner, audio and phone systems
FM-AM-SAT RADIO WITH COMPACT
DISC (CD) PLAYER (Type C)
For all operation precautions, see “Audio opera-
tion precautions” (P.4-20) .
The satellite radio mode requires an active XM
Satellite Radio subscription. The satellite radio is
not available in Alaska, Hawaii and Guam.
It may take some time to receive the activation
signal after subscribing the XM Satellite Radio.
After receiving the activation signal, an available
channel list will be automatically updated in the
radio. For XM, place the ignition switch in LOCK
to ACC to update the channel list.
Audio main operation
Head unit:
The auto loudness circuit enhances the low and
high frequency ranges automatically in both
radio reception and CD playback.
ON·OFF/Volume control:
Place the ignition switch in the ACC or ON
position, and then push the ON·OFF button
while the system is off to turn on the last audio
source, which was playing immediately before
the system was turned off. While the system is
on, pushing the ON·OFF button turns the system
off.
Turn the VOL control knob to adjust the volume.Adjusting tone quality and speaker bal-
ance:
To adjust Bass, Treble, Balance and Fade, push
the Audio control knob. When the display shows
the setting you want to change (Bass, Treble,
Balance and Fade) , rotate the Audio control
knob to set the desired setting. For the other
setting methods, see “How to use the setup
button” (P.4-5).
This audio system is equipped with Speed
Volume for audio. When this feature is active,
the audio volume increases/decreases in re-
sponse to an increase/decrease in the speed
that the vehicle is being driven. For more details,
see “How to use the setup button” (P.4-5) .
Adjusting AUX level:
The volume level of incoming sound can be
selected from “Quiet”, “Medium” and “Loud”
when an auxiliary device is connected to the
system. For more details, see “How to use the
setup button” (P.4-5) .
Switching the display:
Pushing the AUX button will switch the displays
between USB/iPod
®and AUX.
Adjusting clock:
For information about adjusting the clock dis-
play, see “How to use the setup button” (P.4-5) .
FM-AM-SAT radio operation
When the radio band select button is pushed
while the ignition switch is in the ACC or ON
position, the radio will come on at the channel
last played.
The last channel played will also come on when
the ON·OFF button is pushed to ON.
If another audio source is playing when the radio
band select button is turned to ON, the audio
source will automatically be turned off and the
last radio channel played will come on.
When the stereo broadcast signal is weak, the
radio will automatically change from stereo to
monaural reception.
FM·AM radio band select:
Pushing the FM·AM radio band select button will
change the band as follows:
AM ?FM1 ?FM2 ?AM
XM radio band select:
Pushing the XM radio band select button will
change the band as follows:
XM1 ?XM2 ?XM3 ?XM1
The satellite radio is not available in Alaska,
Hawaii and Guam.
Page 190 of 331
4-50Center display, heater, air conditioner, audio and phone systems
SAT (XM1, XM2 or XM3) (if so equipped)
If no CD is loaded or AUX and/or iPod®are not
connected, the CD, AUX and/or iPod®modes
will be skipped.
VOLUME control switch
Push up or down the VOLUME control switch to
increase or decrease the volume.
Tuning switch
Memory change (radio):
Push the tuning switch for less than 1.5 seconds
to change the next or previous radio preset.
SEEK tuning (radio):
Push the tuning switch for more than 1.5
seconds to seek the next or previous radio
station.
Next/Previous Track and Fast Forward/
Rewind (CD, USB and iPod
®):
Push the tuning switch for less than 1.5 seconds
to return to the beginning of the present
program or skip to the next program. Push
several times to skip back or skip through
programs.
This system searches for the blank intervals
between selections. If there is a blank interval
within one program or there is no interval
between programs, the system may not stop in the desired or expected location.
Push the tuning switch for more than 1.5
seconds while the CD, USB or iPod
®are being
played to fast forward or rewind through the
program. When the tuning switch is released,
CD, USB or iPod
®will return to normal play
speed.
SAA2102
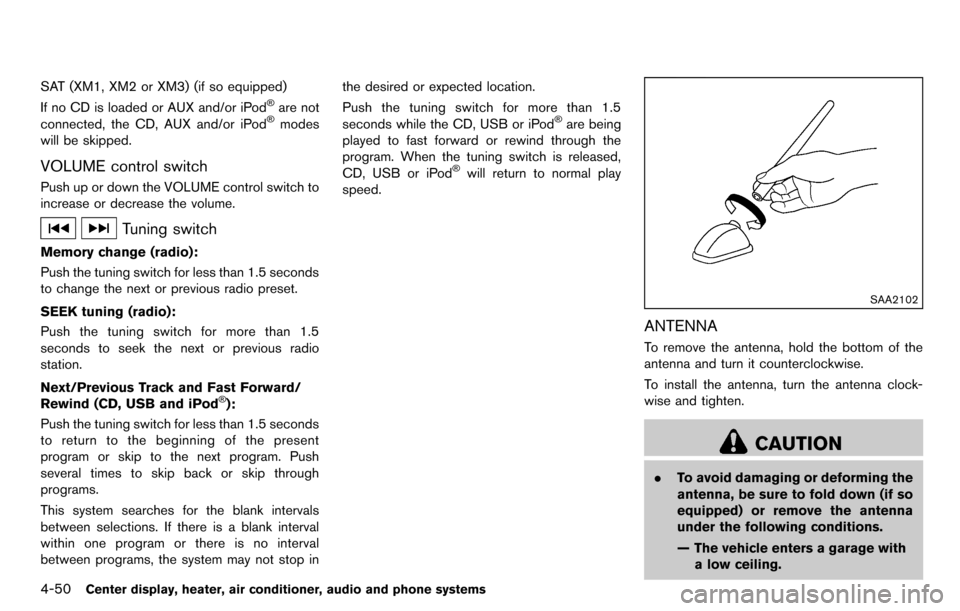
ANTENNA
To remove the antenna, hold the bottom of the
antenna and turn it counterclockwise.
To install the antenna, turn the antenna clock-
wise and tighten.
CAUTION
. To avoid damaging or deforming the
antenna, be sure to fold down (if so
equipped) or remove the antenna
under the following conditions.
— The vehicle enters a garage with
a low ceiling.
Page 323 of 331
10 Index
A
A/C (Air Conditioner) operation.............................. 4-15
ABS (Anti-lock Braking System) ............................ 5-26
Advanced air bag system ......................................... 1-46
Air bag system Advanced air bag system .................................. 1-46
Front passenger air bag and status light....... 1-47
Front-seat mounted side-impact
supplemental air bag system ............................ 1-50
Roof-mounted curtain side-impact
supplemental air bag system ............................ 1-50
Air bag warning labels............................................... 1-53
Air bag warning light...................................... 1-53, 2-15
Air cleaner housing filter ........................................... 8-17
Air conditioner Air conditioner operation.................................... 4-13
Air conditioner service ........................................ 4-19
Air conditioner specification label.................... 9-10
Air conditioning system refrigerant and
lubricant recommendations....................... 4-19, 9-6
In-cabin microfilter ............................................... 4-19
Alarm, How to stop alarm (see vehicle
security system)........................................................... 2-20
Alcohol, drugs and driving.......................................... 5-7
Antenna.......................................................................... 4-50
Anti-lock Braking System (ABS) ............................ 5-26
Anti-lock braking system (ABS) warning light..... 2-12
Appearance care Exterior appearance care ...................................... 7-2
Interior appearance care ....................................... 7-4
Armrest ............................................................................ 1-9
Audible reminders....................................................... 2-18
Audio operation precautions.................................... 4-20
Audio setup .................................................................... 4-5
Audio system................................................................ 4-20 Steering wheel audio controls.......................... 4-49
Autolight system.......................................................... 2-25
Automatic Air conditioner....................................................... 4-17
Door locks................................................................. 3-6
AUX (Auxiliary) button........................ 4-34, 4-41, 4-45
AUX (Auxiliary) input........................... 4-34, 4-41, 4-45
Average fuel consumption ........................................ 2-10
Average speed............................................................. 2-10
Avoiding collision and rollover ................................... 5-6
B
Back door...................................................................... 3-20
Battery............................................................................ 8-13 Battery replacement, Intelligent Key................ 8-25
Battery replacement, Keyfob............................. 8-24
Battery saver system........................................... 2-26
Variable voltage control system........................ 8-15
Before starting the engine........................................ 5-12
Bluetooth
®Hands-Free Phone System ................ 4-52
Booster seats............................................................... 1-37
Brake Anti-lock Braking System (ABS) ..................... 5-26
Brake and clutch fluid......................................... 8-12
Brake system......................................................... 5-26
Parking brake operation ..................................... 5-20
Warning light......................................................... 2-12
Break-in schedule ....................................................... 5-23
Brightness control Display ON/OFF button ........................................ 4-5
Instrument panel................................................... 2-27
Bulb check/instrument panel ................................... 2-12
Bulb replacement........................................................ 8-26
C
Cabin air filter............................................................... 4-19
Capacities and recommended fuel/lubricants ....... 9-2
Car phone or CB radio ............................................. 4-51
Cargo light.................................................................... 2-40
Catalytic converter, Three way catalyst................... 5-3
CD/USB memory care and cleaning ..................... 4-49
Ceiling light................................................................... 2-39
Check tire pressure warning...................................... 2-6
Child restraints............................................................. 1-21 Booster seats........................................................ 1-37
Precautions on child restraints......................... 1-21
Child safety................................................................... 1-19
Child safety rear door lock ......................................... 3-6
Chimes, Audible reminders ...................................... 2-18
Circuit breaker, Fusible link...................................... 8-21
Cleaning exterior and interior............................ 7-2, 7-4
Clock (models with navigation system)................... 4-7
Clutch fluid.................................................................... 8-12
Cockpit ............................................................................ 2-2
Cold weather driving.................................................. 5-29
Compact Disc (CD) player
(See audio system) ............................ 4-33, 4-38, 4-43
Continuously Variable Transmission
(CVT) fluid..................................................................... 8-11
Control panel buttons — color screen with
navigation system.......................................................... 4-2
Controls, Steering wheel audio controls............... 4-49
Coolant Capacities and
recommended fuel/lubricants............................... 9-2
Changing engine coolant...................................... 8-8
Checking engine coolant level............................. 8-8
Corrosion protection .................................................... 7-6
Cruise control............................................................... 5-21