2012 NISSAN CUBE lights
[x] Cancel search: lightsPage 120 of 331
3-8Pre-driving checks and adjustments
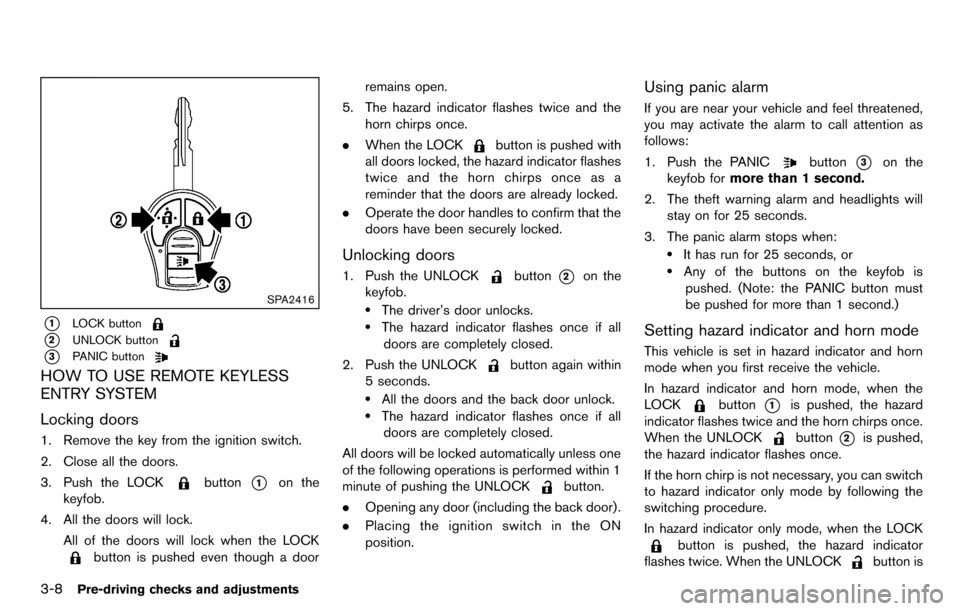
SPA2416
*1LOCK button
*2UNLOCK button
*3PANIC button
HOW TO USE REMOTE KEYLESS
ENTRY SYSTEM
Locking doors
1. Remove the key from the ignition switch.
2. Close all the doors.
3. Push the LOCK
button*1on the
keyfob.
4. All the doors will lock.
All of the doors will lock when the LOCK
button is pushed even though a door remains open.
5. The hazard indicator flashes twice and the horn chirps once.
. When the LOCK
button is pushed with
all doors locked, the hazard indicator flashes
twice and the horn chirps once as a
reminder that the doors are already locked.
. Operate the door handles to confirm that the
doors have been securely locked.
Unlocking doors
1. Push the UNLOCKbutton*2on the
keyfob.
.The driver’s door unlocks..The hazard indicator flashes once if all
doors are completely closed.
2. Push the UNLOCK
button again within
5 seconds.
.All the doors and the back door unlock..The hazard indicator flashes once if all doors are completely closed.
All doors will be locked automatically unless one
of the following operations is performed within 1
minute of pushing the UNLOCK
button.
. Opening any door (including the back door) .
. Placing the ignition switch in the ON
position.
Using panic alarm
If you are near your vehicle and feel threatened,
you may activate the alarm to call attention as
follows:
1. Push the PANIC
button*3on the
keyfob for more than 1 second.
2. The theft warning alarm and headlights will stay on for 25 seconds.
3. The panic alarm stops when:
.It has run for 25 seconds, or.Any of the buttons on the keyfob is pushed. (Note: the PANIC button must
be pushed for more than 1 second.)
Setting hazard indicator and horn mode
This vehicle is set in hazard indicator and horn
mode when you first receive the vehicle.
In hazard indicator and horn mode, when the
LOCK
button*1is pushed, the hazard
indicator flashes twice and the horn chirps once.
When the UNLOCK
button*2is pushed,
the hazard indicator flashes once.
If the horn chirp is not necessary, you can switch
to hazard indicator only mode by following the
switching procedure.
In hazard indicator only mode, when the LOCK
button is pushed, the hazard indicator
flashes twice. When the UNLOCK
button is
Page 126 of 331
3-14Pre-driving checks and adjustments
Locking doors
1. Place the ignition switch in the OFF positionand carry the Intelligent Key with you.*1
2. Close all the doors.*2
3. Push the door handle request switch (dri- ver’s or front passenger’s)
*Aor the back
door request switch
*Bwhile carrying the
Intelligent Key with you.*3
4. All the doors and the back door will lock.
5. The hazard indicator flashes twice and the outside chime sounds twice.
*1: Doors will lock with the request switch while
the ignition switch is in the ACC or ON position.
*2: Doors will not lock with the request switch
while any door is open.
*3: Doors will not lock with the request switch
when the Intelligent Key is left inside the vehicle.
However, when an Intelligent Key is inside the
vehicle, doors can be locked with another
registered Intelligent Key.
Unlocking doors
1. Push the door handle request switch*Aor
the back door request switch
*Bwhile
carrying the Intelligent Key with you.
2. The hazard indicator flashes once and out- side chime sounds once. The corresponding
door or the back door will unlock. 3. Push the request switch again within 1
minute.
4. The hazard indicator flashes once and out- side chime sounds once again. All the doors
and the back door will unlock.
All doors will be locked automatically unless one
of the following operations is performed within 1
minute after pushing the request switch while
the doors are locked.
. Opening any door.
. Pushing the ignition switch.
During this 1-minute time period, if the UNLOCK
button on the Intelligent Key is pushed, all
doors will be locked automatically after another
1 minute.
BATTERY SAVER SYSTEM
When all the following conditions are met for 60
minutes, the battery saver system will cut off the
power supply to prevent battery discharge.
. The ignition switch is in the ACC position,
and
. All doors are closed, and
. The selector lever is in the P (Park) position.
WARNING LIGHTS AND AUDIBLE
REMINDERS
To help prevent the vehicle from moving
unexpectedly by erroneous operation of the
Intelligent Key listed on the following chart or
to help prevent the vehicle from being stolen,
chime or beep sounds inside and outside the
vehicle and a warning light illuminates or blinks.
When a chime or beep sounds or the warning
light illuminates or blinks, be sure to check the
vehicle and Intelligent Key.
See “Troubleshooting guide” (P.3-15) and
“Warning/indicator lights and audible remin-
ders” (P.2-11) .
Intelligent Key system warning light:
P position selecting warning light:
Page 129 of 331
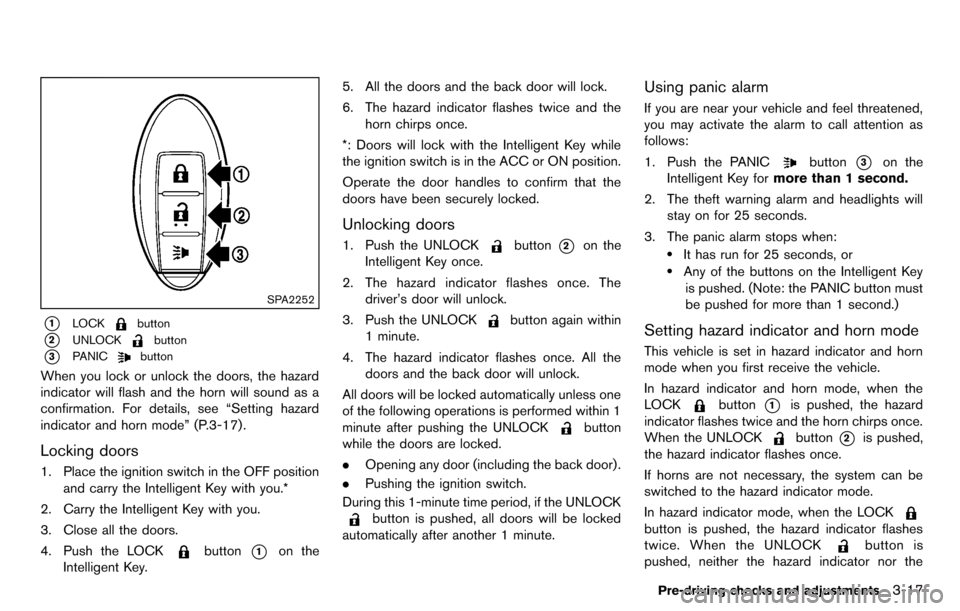
SPA2252
*1LOCKbutton
*2UNLOCKbutton
*3PANICbutton
When you lock or unlock the doors, the hazard
indicator will flash and the horn will sound as a
confirmation. For details, see “Setting hazard
indicator and horn mode” (P.3-17) .
Locking doors
1. Place the ignition switch in the OFF positionand carry the Intelligent Key with you.*
2. Carry the Intelligent Key with you.
3. Close all the doors.
4. Push the LOCK
button*1on the
Intelligent Key. 5. All the doors and the back door will lock.
6. The hazard indicator flashes twice and the
horn chirps once.
*: Doors will lock with the Intelligent Key while
the ignition switch is in the ACC or ON position.
Operate the door handles to confirm that the
doors have been securely locked.
Unlocking doors
1. Push the UNLOCKbutton*2on the
Intelligent Key once.
2. The hazard indicator flashes once. The driver’s door will unlock.
3. Push the UNLOCK
button again within
1 minute.
4. The hazard indicator flashes once. All the doors and the back door will unlock.
All doors will be locked automatically unless one
of the following operations is performed within 1
minute after pushing the UNLOCK
button
while the doors are locked.
. Opening any door (including the back door) .
. Pushing the ignition switch.
During this 1-minute time period, if the UNLOCK
button is pushed, all doors will be locked
automatically after another 1 minute.
Using panic alarm
If you are near your vehicle and feel threatened,
you may activate the alarm to call attention as
follows:
1. Push the PANIC
button*3on the
Intelligent Key for more than 1 second.
2. The theft warning alarm and headlights will stay on for 25 seconds.
3. The panic alarm stops when:
.It has run for 25 seconds, or.Any of the buttons on the Intelligent Key is pushed. (Note: the PANIC button must
be pushed for more than 1 second.)
Setting hazard indicator and horn mode
This vehicle is set in hazard indicator and horn
mode when you first receive the vehicle.
In hazard indicator and horn mode, when the
LOCK
button*1is pushed, the hazard
indicator flashes twice and the horn chirps once.
When the UNLOCK
button*2is pushed,
the hazard indicator flashes once.
If horns are not necessary, the system can be
switched to the hazard indicator mode.
In hazard indicator mode, when the LOCK
button is pushed, the hazard indicator flashes
twice. When the UNLOCK
button is
pushed, neither the hazard indicator nor the
Pre-driving checks and adjustments3-17
Page 132 of 331
3-20Pre-driving checks and adjustments
WARNING
.Always be sure the back door has
been closed securely to prevent it
from opening while driving.
. Do not drive with the back door
open. This could allow dangerous
exhaust gases to be drawn into the
vehicle. See “Exhaust gas (carbon
monoxide)” (P.5-2) of this manual.
. Make sure that all passengers have
their hands, etc. inside the vehicle
before closing the back door.
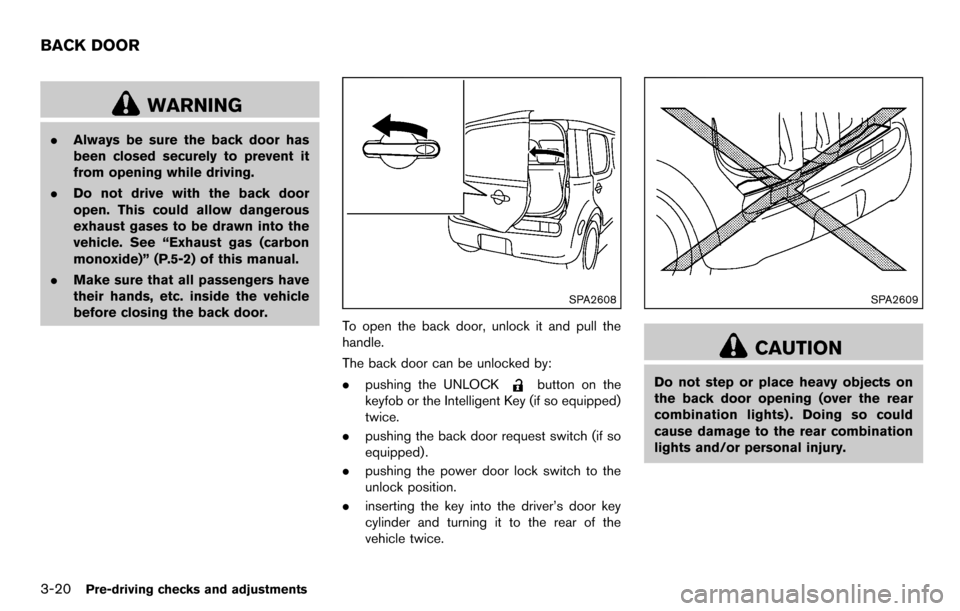
SPA2608
To open the back door, unlock it and pull the
handle.
The back door can be unlocked by:
.pushing the UNLOCK
button on the
keyfob or the Intelligent Key (if so equipped)
twice.
. pushing the back door request switch (if so
equipped) .
. pushing the power door lock switch to the
unlock position.
. inserting the key into the driver’s door key
cylinder and turning it to the rear of the
vehicle twice.
SPA2609
CAUTION
Do not step or place heavy objects on
the back door opening (over the rear
combination lights) . Doing so could
cause damage to the rear combination
lights and/or personal injury.
BACK DOOR
Page 136 of 331
3-24Pre-driving checks and adjustments
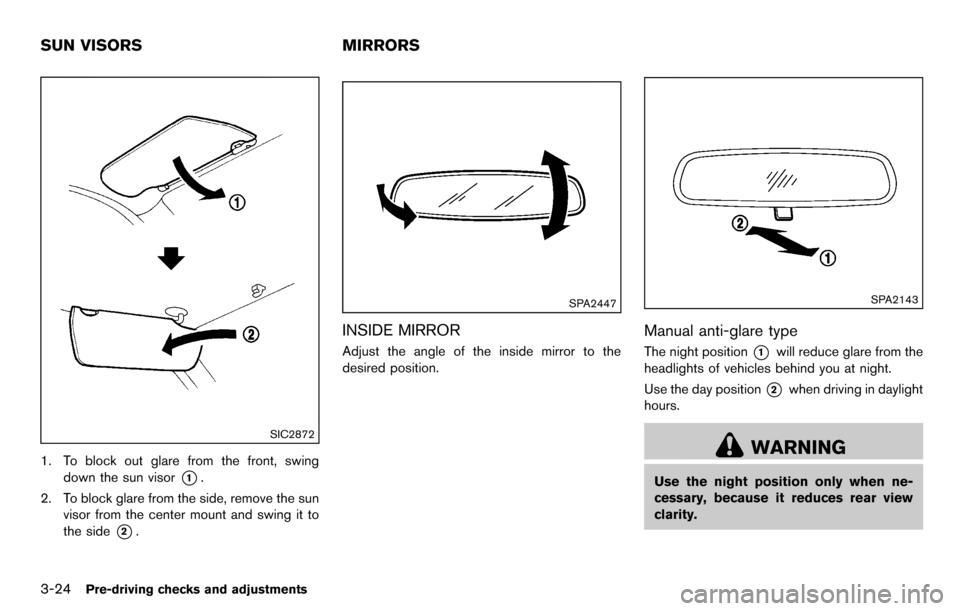
SIC2872
1. To block out glare from the front, swingdown the sun visor
*1.
2. To block glare from the side, remove the sun visor from the center mount and swing it to
the side
*2.
SPA2447
INSIDE MIRROR
Adjust the angle of the inside mirror to the
desired position.
SPA2143
Manual anti-glare type
The night position*1will reduce glare from the
headlights of vehicles behind you at night.
Use the day position
*2when driving in daylight
hours.
WARNING
Use the night position only when ne-
cessary, because it reduces rear view
clarity.
SUN VISORS MIRRORS
Page 144 of 331
4-4Center display, heater, air conditioner, audio and phone systems
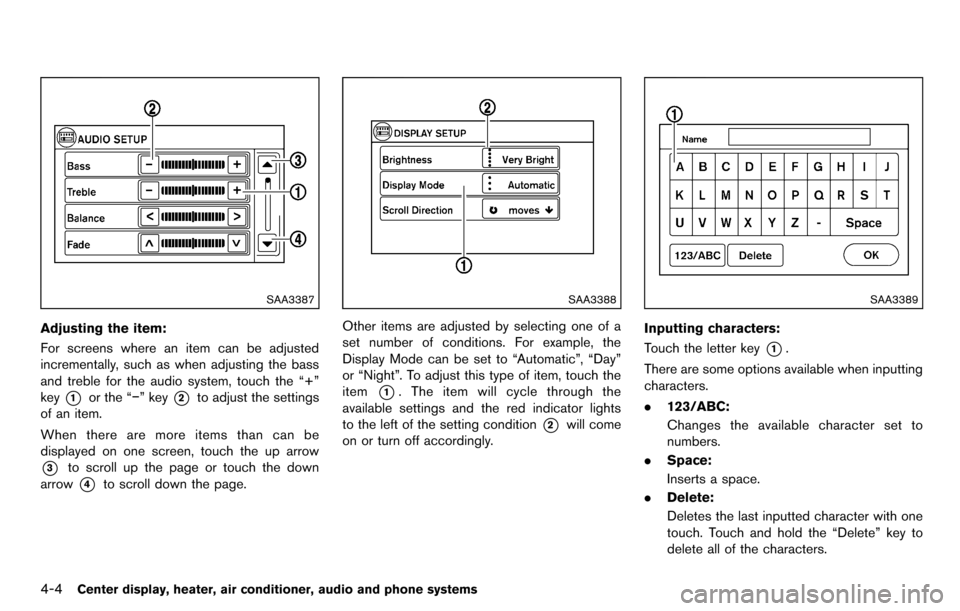
SAA3387
Adjusting the item:
For screens where an item can be adjusted
incrementally, such as when adjusting the bass
and treble for the audio system, touch the “+”
key
*1or the “−” key*2to adjust the settings
of an item.
When there are more items than can be
displayed on one screen, touch the up arrow
*3to scroll up the page or touch the down
arrow
*4to scroll down the page.
SAA3388
Other items are adjusted by selecting one of a
set number of conditions. For example, the
Display Mode can be set to “Automatic”, “Day”
or “Night”. To adjust this type of item, touch the
item
*1. The item will cycle through the
available settings and the red indicator lights
to the left of the setting condition
*2will come
on or turn off accordingly.
SAA3389
Inputting characters:
Touch the letter key
*1.
There are some options available when inputting
characters.
. 123/ABC:
Changes the available character set to
numbers.
. Space:
Inserts a space.
. Delete:
Deletes the last inputted character with one
touch. Touch and hold the “Delete” key to
delete all of the characters.
Page 157 of 331
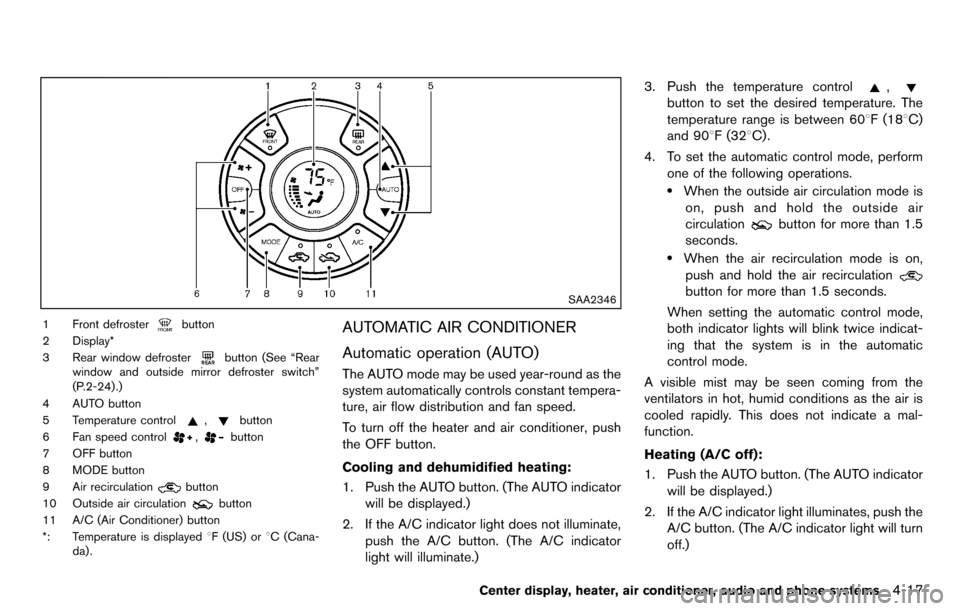
SAA2346
1 Front defrosterbutton
2 Display*
3 Rear window defroster
button (See “Rear
window and outside mirror defroster switch”
(P.2-24) .)
4 AUTO button
5 Temperature control
,button
6 Fan speed control
,button
7 OFF button
8 MODE button
9 Air recirculation
button
10 Outside air circulation
button
11 A/C (Air Conditioner) button
*: Temperature is displayed 8F (US) or8C (Cana-
da) .
AUTOMATIC AIR CONDITIONER
Automatic operation (AUTO)
The AUTO mode may be used year-round as the
system automatically controls constant tempera-
ture, air flow distribution and fan speed.
To turn off the heater and air conditioner, push
the OFF button.
Cooling and dehumidified heating:
1. Push the AUTO button. (The AUTO indicator will be displayed.)
2. If the A/C indicator light does not illuminate, push the A/C button. (The A/C indicator
light will illuminate.) 3. Push the temperature control
,
button to set the desired temperature. The
temperature range is between 608F (188C)
and 908F (328C) .
4. To set the automatic control mode, perform one of the following operations.
.When the outside air circulation mode ison, push and hold the outside air
circulation
button for more than 1.5
seconds.
.When the air recirculation mode is on,
push and hold the air recirculation
button for more than 1.5 seconds.
When setting the automatic control mode,
both indicator lights will blink twice indicat-
ing that the system is in the automatic
control mode.
A visible mist may be seen coming from the
ventilators in hot, humid conditions as the air is
cooled rapidly. This does not indicate a mal-
function.
Heating (A/C off):
1. Push the AUTO button. (The AUTO indicator will be displayed.)
2. If the A/C indicator light illuminates, push the A/C button. (The A/C indicator light will turn
off.)
Center display, heater, air conditioner, audio and phone systems4-17
Page 158 of 331
4-18Center display, heater, air conditioner, audio and phone systems
3. Push the temperature control,
button to set the desired temperature. The
temperature range is between 608F (188C)
and 908F (328C) .
.Do not set the temperature lower than the outside air temperature. Doing so may
cause the temperature to not be con-
trolled properly.
.If the windows fog up, use dehumidifiedheating instead of the A/C off heating.
Dehumidified defrosting/defogging:
1. Push the front defroster
button. (The
indicator light will illuminate.)
2. Turn the temperature control
,
button to set the desired temperature..To remove moisture or fog on the front window quickly, set the temperature to
the high temperature and the fan speed
to their maximum level.
.After the windshield is cleared, push thefront defroster
button again. (The
indicator light will turn off.)
.When the front defrosterbutton is
pushed, the air conditioner will automa-
tically turn on to defog the windshield.
The outside air circulation mode will be
selected to improve the defogging per-
formance.
Manual operation
The manual mode can be used to control the
heater and air conditioner to your desired
settings.
To turn off the heater and air conditioner, push
the OFF button.
Fan speed control:
Turn the fan speed control
,dial to
adjust the fan speed.
Air flow control:
Push the MODE button to change the air flow
mode.
— Air flows from the center and side ventilators.
— Air flows from the center and sideventilators and foot outlets.
— Air flows mainly from the foot outlets.
— Air flows from the defroster outlets andfoot outlets.
Temperature control:
Push the temperature control
,button
to set the desired temperature.
The temperature range is between 608F (188C)
and 908F (328C) .
Air recirculation:
Push the air recirculation
button to change
the air circulation mode. When the indicator light illuminates, the flowing air is recirculated inside
the vehicle.
Outside air circulation:
Push the outside air circulation
button to
change the air circulation mode. When the
indicator light illuminates, the flowing air is
drawn from outside the vehicle.
Automatic air intake control:
To set the automatic control mode, perform one
of the following operations.
. When the outside air circulation mode is on,
push and hold the outside air circulation
button for more than 1.5 seconds.
. When the air recirculation mode is on, push
and hold the air recirculation
button for
more than 1.5 seconds.
When setting the automatic control mode, both
indicator lights will blink twice indicating that the
system is in the automatic control mode.