2012 NISSAN CUBE warning lights
[x] Cancel search: warning lightsPage 132 of 331
3-20Pre-driving checks and adjustments
WARNING
.Always be sure the back door has
been closed securely to prevent it
from opening while driving.
. Do not drive with the back door
open. This could allow dangerous
exhaust gases to be drawn into the
vehicle. See “Exhaust gas (carbon
monoxide)” (P.5-2) of this manual.
. Make sure that all passengers have
their hands, etc. inside the vehicle
before closing the back door.
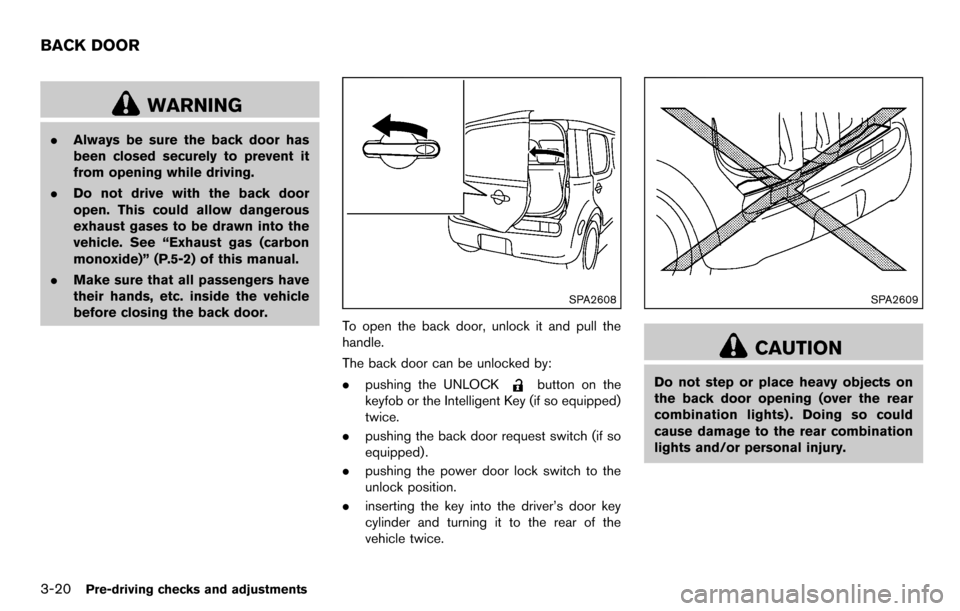
SPA2608
To open the back door, unlock it and pull the
handle.
The back door can be unlocked by:
.pushing the UNLOCK
button on the
keyfob or the Intelligent Key (if so equipped)
twice.
. pushing the back door request switch (if so
equipped) .
. pushing the power door lock switch to the
unlock position.
. inserting the key into the driver’s door key
cylinder and turning it to the rear of the
vehicle twice.
SPA2609
CAUTION
Do not step or place heavy objects on
the back door opening (over the rear
combination lights) . Doing so could
cause damage to the rear combination
lights and/or personal injury.
BACK DOOR
Page 136 of 331
3-24Pre-driving checks and adjustments
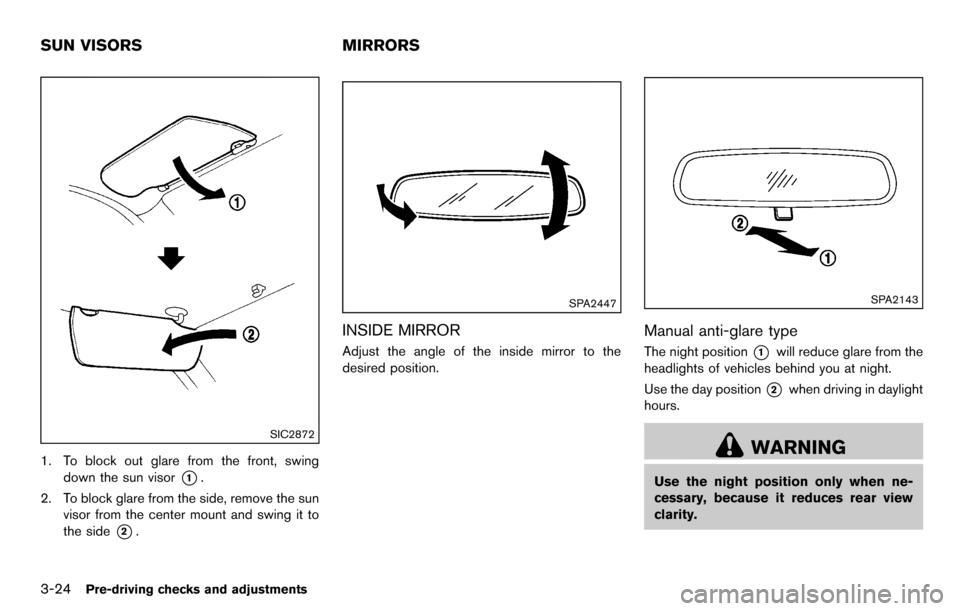
SIC2872
1. To block out glare from the front, swingdown the sun visor
*1.
2. To block glare from the side, remove the sun visor from the center mount and swing it to
the side
*2.
SPA2447
INSIDE MIRROR
Adjust the angle of the inside mirror to the
desired position.
SPA2143
Manual anti-glare type
The night position*1will reduce glare from the
headlights of vehicles behind you at night.
Use the day position
*2when driving in daylight
hours.
WARNING
Use the night position only when ne-
cessary, because it reduces rear view
clarity.
SUN VISORS MIRRORS
Page 216 of 331
5-12Starting and driving
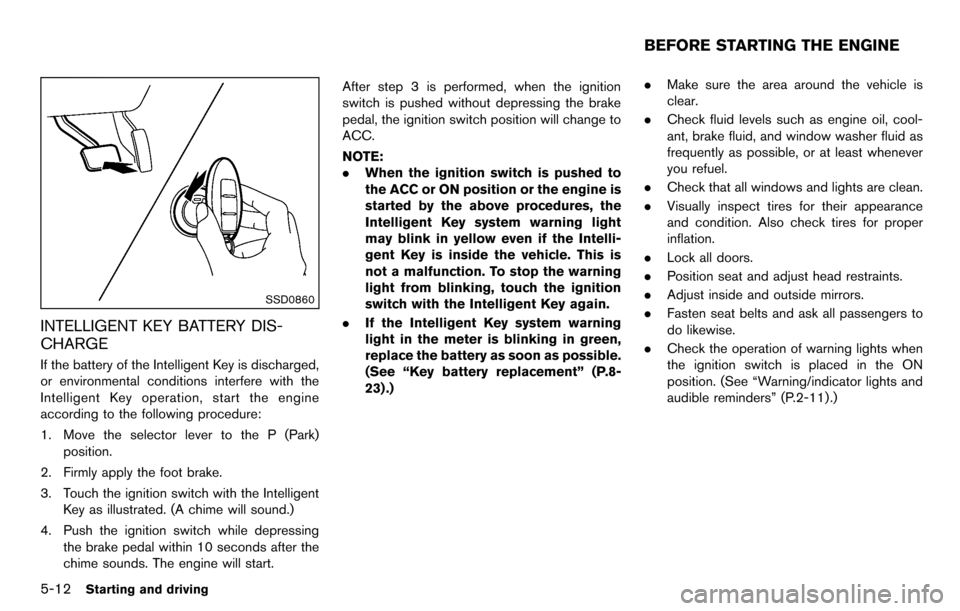
SSD0860
INTELLIGENT KEY BATTERY DIS-
CHARGE
If the battery of the Intelligent Key is discharged,
or environmental conditions interfere with the
Intelligent Key operation, start the engine
according to the following procedure:
1. Move the selector lever to the P (Park)position.
2. Firmly apply the foot brake.
3. Touch the ignition switch with the Intelligent Key as illustrated. (A chime will sound.)
4. Push the ignition switch while depressing the brake pedal within 10 seconds after the
chime sounds. The engine will start. After step 3 is performed, when the ignition
switch is pushed without depressing the brake
pedal, the ignition switch position will change to
ACC.
NOTE:
.
When the ignition switch is pushed to
the ACC or ON position or the engine is
started by the above procedures, the
Intelligent Key system warning light
may blink in yellow even if the Intelli-
gent Key is inside the vehicle. This is
not a malfunction. To stop the warning
light from blinking, touch the ignition
switch with the Intelligent Key again.
. If the Intelligent Key system warning
light in the meter is blinking in green,
replace the battery as soon as possible.
(See “Key battery replacement” (P.8-
23) .) .
Make sure the area around the vehicle is
clear.
. Check fluid levels such as engine oil, cool-
ant, brake fluid, and window washer fluid as
frequently as possible, or at least whenever
you refuel.
. Check that all windows and lights are clean.
. Visually inspect tires for their appearance
and condition. Also check tires for proper
inflation.
. Lock all doors.
. Position seat and adjust head restraints.
. Adjust inside and outside mirrors.
. Fasten seat belts and ask all passengers to
do likewise.
. Check the operation of warning lights when
the ignition switch is placed in the ON
position. (See “Warning/indicator lights and
audible reminders” (P.2-11) .)
BEFORE STARTING THE ENGINE
Page 222 of 331
5-18Starting and driving
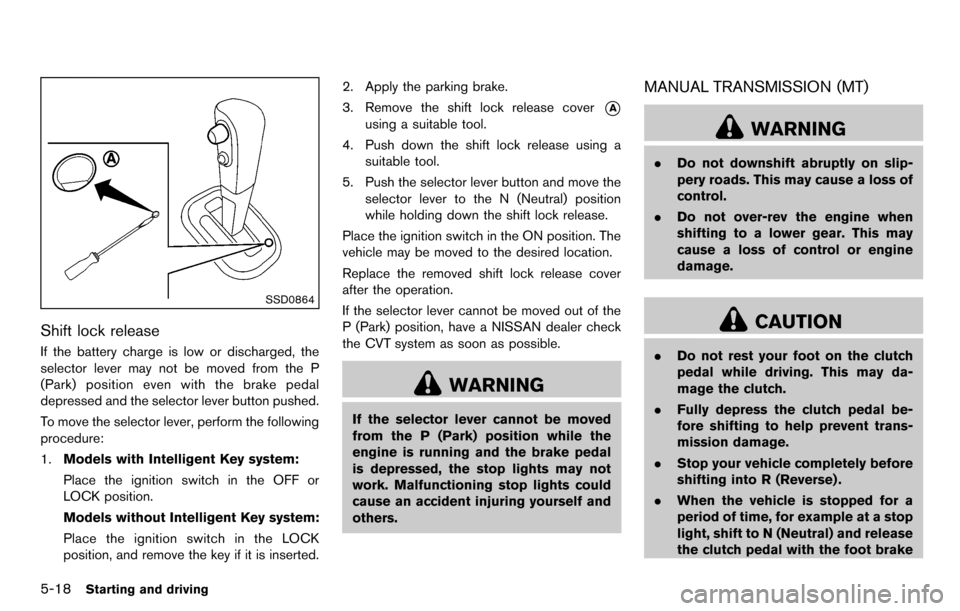
SSD0864
Shift lock release
If the battery charge is low or discharged, the
selector lever may not be moved from the P
(Park) position even with the brake pedal
depressed and the selector lever button pushed.
To move the selector lever, perform the following
procedure:
1.Models with Intelligent Key system:
Place the ignition switch in the OFF or
LOCK position.
Models without Intelligent Key system:
Place the ignition switch in the LOCK
position, and remove the key if it is inserted. 2. Apply the parking brake.
3. Remove the shift lock release cover
*A
using a suitable tool.
4. Push down the shift lock release using a suitable tool.
5. Push the selector lever button and move the selector lever to the N (Neutral) position
while holding down the shift lock release.
Place the ignition switch in the ON position. The
vehicle may be moved to the desired location.
Replace the removed shift lock release cover
after the operation.
If the selector lever cannot be moved out of the
P (Park) position, have a NISSAN dealer check
the CVT system as soon as possible.
WARNING
If the selector lever cannot be moved
from the P (Park) position while the
engine is running and the brake pedal
is depressed, the stop lights may not
work. Malfunctioning stop lights could
cause an accident injuring yourself and
others.
MANUAL TRANSMISSION (MT)
WARNING
. Do not downshift abruptly on slip-
pery roads. This may cause a loss of
control.
. Do not over-rev the engine when
shifting to a lower gear. This may
cause a loss of control or engine
damage.
CAUTION
.Do not rest your foot on the clutch
pedal while driving. This may da-
mage the clutch.
. Fully depress the clutch pedal be-
fore shifting to help prevent trans-
mission damage.
. Stop your vehicle completely before
shifting into R (Reverse) .
. When the vehicle is stopped for a
period of time, for example at a stop
light, shift to N (Neutral) and release
the clutch pedal with the foot brake
Page 238 of 331
6-2In case of emergency
To shut off the engine in an emergency situation
while driving, perform the following procedure:
.Rapidly push the push-button ignition switch
3 consecutive times in less than 1.5
seconds, or
. Push and hold the push-button ignition
switch for more than 2 seconds.TIRE PRESSURE MONITORING SYS-
TEM (TPMS)
This vehicle is equipped with the Tire Pressure
Monitoring System (TPMS) . It monitors tire
pressure of all tires except the spare. When
the low tire pressure warning light is lit, and the
CHECK TIRE PRES (pressure) warning mes-
sage is displayed in the vehicle information
display, one or more of your tires is significantly
under-inflated. If the vehicle is being driven with
low tire pressure, the TPMS will activate and
warn you of it by the low tire pressure warning
light. This system will activate only when the
vehicle is driven at speeds above 16 MPH (25
km/h). For more details, see “Warning/indicator
lights and audible reminders” (P.2-11) and “Tire
Pressure Monitoring System (TPMS)” (P.5-3) .
WARNING
.If the low tire pressure warning light
illuminates while driving, avoid sud-
den steering maneuvers or abrupt
braking, reduce vehicle speed, pull
off the road to a safe location and
stop the vehicle as soon as possi-
ble. Driving with under-inflated tires
may permanently damage the tires
and increase the likelihood of tire failure. Serious vehicle damage
could occur and may lead to an
accident and could result in serious
personal injury. Check the tire pres-
sure for all four tires. Adjust the tire
pressure to the recommended COLD
tire pressure shown on the Tire and
Loading Information label to turn
the low tire pressure warning light
OFF. If you have a flat tire, replace it
with a spare tire as soon as possi-
ble.
. When a spare tire is mounted or a
wheel is replaced, the TPMS will not
function and the low tire pressure
warning light will flash for approxi-
mately 1 minute. The light will
remain on after 1 minute. Contact
your NISSAN dealer as soon as
possible for tire replacement and/
or system resetting.
. Replacing tires with those not ori-
ginally specified by NISSAN could
affect the proper operation of the
TPMS.
. Do not inject any tire liquid or
aerosol tire sealant into the tires,
as this may cause a malfunction of
EMERGENCY ENGINE SHUT OFF
(models with Intelligent Key system) FLAT TIRE
Page 246 of 331
6-10In case of emergency
SCE0862
WARNING
Always follow the instructions below.
Failure to do so could result in damage
to the charging system and cause
personal injury.
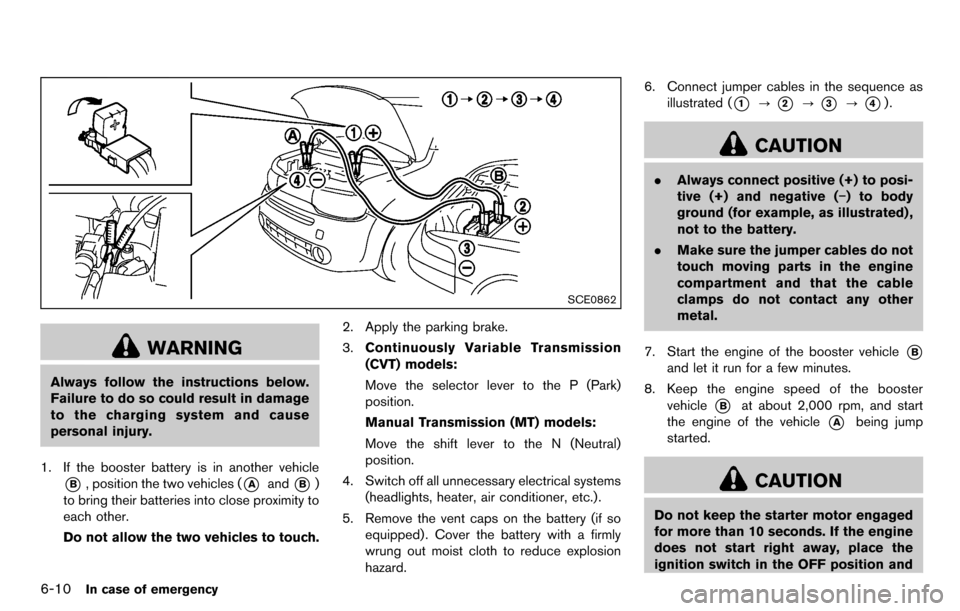
1. If the booster battery is in another vehicle
*B, position the two vehicles (*Aand*B)
to bring their batteries into close proximity to
each other.
Do not allow the two vehicles to touch. 2. Apply the parking brake.
3.
Continuously Variable Transmission
(CVT) models:
Move the selector lever to the P (Park)
position.
Manual Transmission (MT) models:
Move the shift lever to the N (Neutral)
position.
4. Switch off all unnecessary electrical systems (headlights, heater, air conditioner, etc.).
5. Remove the vent caps on the battery (if so equipped) . Cover the battery with a firmly
wrung out moist cloth to reduce explosion
hazard. 6. Connect jumper cables in the sequence as
illustrated (
*1?*2?*3?*4).
CAUTION
.Always connect positive (+) to posi-
tive (+) and negative (−) to body
ground (for example, as illustrated) ,
not to the battery.
. Make sure the jumper cables do not
touch moving parts in the engine
compartment and that the cable
clamps do not contact any other
metal.
7. Start the engine of the booster vehicle
*B
and let it run for a few minutes.
8. Keep the engine speed of the booster vehicle
*Bat about 2,000 rpm, and start
the engine of the vehicle
*Abeing jump
started.
CAUTION
Do not keep the starter motor engaged
for more than 10 seconds. If the engine
does not start right away, place the
ignition switch in the OFF position and
Page 263 of 331
8 Maintenance and do-it-yourself
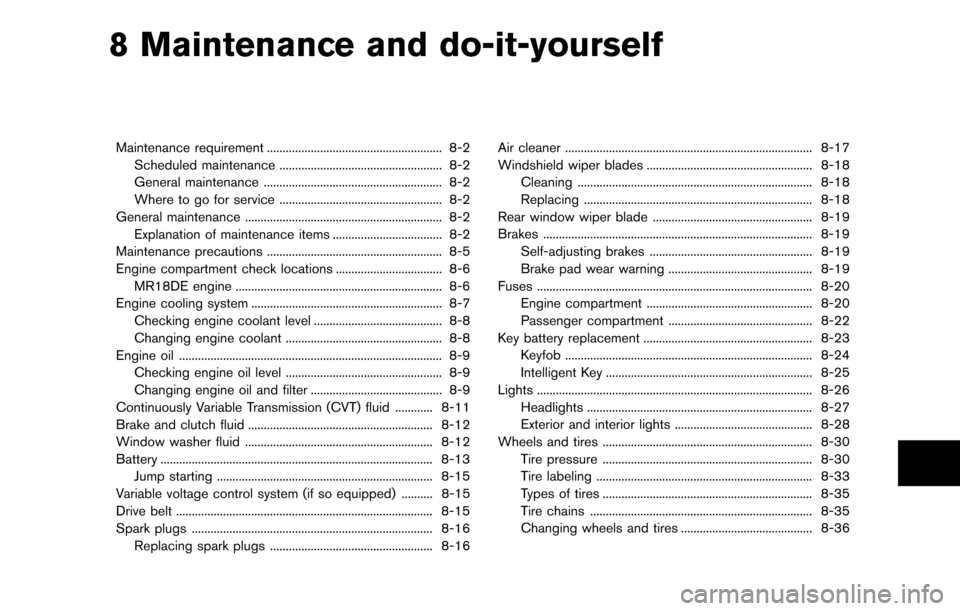
Maintenance requirement ........................................................ 8-2Scheduled maintenance .................................................... 8-2
General maintenance ......................................................... 8-2
Where to go for service .................................................... 8-2
General maintenance ............................................................... 8-2 Explanation of maintenance items ................................... 8-2
Maintenance precautions ........................................................ 8-5
Engine compartment check locations .................................. 8-6 MR18DE engine .................................................................. 8-6
Engine cooling system ............................................................. 8-7
Checking engine coolant level ......................................... 8-8
Changing engine coolant .................................................. 8-8
Engine oil ........................................................................\
............ 8-9
Checking engine oil level .................................................. 8-9
Changing engine oil and filter .......................................... 8-9
Continuously Variable Transmission (CVT) fluid ............ 8-11
Brake and clutch fluid ........................................................... 8-12
Window washer fluid ............................................................ 8-12
Battery ........................................................................\
............... 8-13 Jump starting ..................................................................... 8-15
Variable voltage control system (if so equipped) .......... 8-15
Drive belt ........................................................................\
.......... 8-15
Spark plugs ........................................................................\
..... 8-16
Replacing spark plugs .................................................... 8-16 Air cleaner ........................................................................\
....... 8-17
Windshield wiper blades ..................................................... 8-18 Cleaning ........................................................................\
... 8-18
Replacing ........................................................................\
. 8-18
Rear window wiper blade ................................................... 8-19
Brakes ........................................................................\
.............. 8-19
Self-adjusting brakes .................................................... 8-19
Brake pad wear warning .............................................. 8-19
Fuses ........................................................................\
................ 8-20 Engine compartment ..................................................... 8-20
Passenger compartment .............................................. 8-22
Key battery replacement ...................................................... 8-23 Keyfob ........................................................................\
....... 8-24
Intelligent Key .................................................................. 8-25
Lights ........................................................................\
................ 8-26 Headlights ........................................................................\
8-27
Exterior and interior lights ............................................ 8-28
Wheels and tires ................................................................... 8-30 Tire pressure ................................................................... 8-30
Tire labeling ..................................................................... 8-33
Types of tires ................................................................... 8-35
Tire chains ....................................................................... 8-35
Changing wheels and tires .......................................... 8-36
Page 265 of 331
Lights*:Clean the headlights on a regular basis.
Make sure that the headlights, stop lights, tail
lights, turn signal lights, and other lights are all
operating properly and installed securely. Also
check headlight aim.
Road wheel nuts (lug nuts)*: When checking
the tires, make sure no wheel nuts are missing,
and check for any loose wheel nuts. Tighten if
necessary.
Tire rotation*: Tires should be rotated every
7,500 miles (12,000 km).
Tires*: Check the pressure with a gauge often
and always prior to long distance trips. If
necessary, adjust the pressure in all tires,
including the spare, to the pressure specified.
Check carefully for damage, cuts or excessive
wear.
Tire Pressure Monitoring System (TPMS)
transmitter components: Replace the TPMS
transmitter grommet seal, valve core and cap
when the tires are replaced due to wear or age.
Wheel alignment and balance: If the vehicle
should pull to either side while driving on a
straight and level road, or if you detect uneven or
abnormal tire wear, there may be a need for
wheel alignment.
If the steering wheel or seat vibrates at normal
highway speeds, wheel balancing may be
needed. For additional information regarding tires, refer
to “Important Tire Safety Information” (US) or
“Tire Safety Information” (Canada) in the War-
ranty Information Booklet.
Windshield:
Clean the windshield on a regular
basis. Check the windshield at least every six
months for cracks or other damage. Have a
damaged windshield repaired by a qualified
repair facility.
Windshield wiper blades*: Check for cracks
or wear if they do not wipe properly.
Inside the vehicle
The maintenance items listed here should be
checked on a regular basis, such as when
performing scheduled maintenance, cleaning
the vehicle, etc.
Accelerator pedal: Check the pedal for
smooth operation and make sure the pedal
does not catch or require uneven effort. Keep
the floor mat away from the pedal.
Brake pedal: Check the pedal for smooth
operation. If the brake pedal suddenly goes
down further than normal, the pedal feels
spongy or the vehicle seems to take longer to
stop, see a NISSAN dealer immediately. Keep
the floor mat away from the pedal.
Brakes: Check that the brakes do not pull the
vehicle to one side when applied. Continuously Variable Transmission (CVT)
P (Park) position mechanism:
On a fairly
steep hill, check that the vehicle is held securely
with the selector lever in the P (Park) position
without applying any brakes.
Parking brake: Check the parking brake
operation regularly. The vehicle should be
securely held on a fairly steep hill with only the
parking brake applied. If the parking brake needs
adjusted, see a NISSAN dealer.
Seat belts: Check that all parts of the seat belt
system (for example, buckles, anchors, adjusters
and retractors) operate properly and smoothly,
and are installed securely. Check the belt
webbing for cuts, fraying, wear or damage.
Seats: Check seat position controls such as
seat adjusters, seatback recliners, etc. to ensure
they operate smoothly and that all latches lock
securely in every position. Check that the head
restraints move up and down smoothly and that
the locks (if so equipped) hold securely in all
latched positions.
Steering wheel: Check for changes in the
steering conditions, such as excessive free play,
hard steering or strange noises.
Warning lights and chimes: Make sure that
all warning lights and chimes are operating
properly.
Maintenance and do-it-yourself8-3