2012 NISSAN CUBE ECO mode
[x] Cancel search: ECO modePage 129 of 331
SPA2252
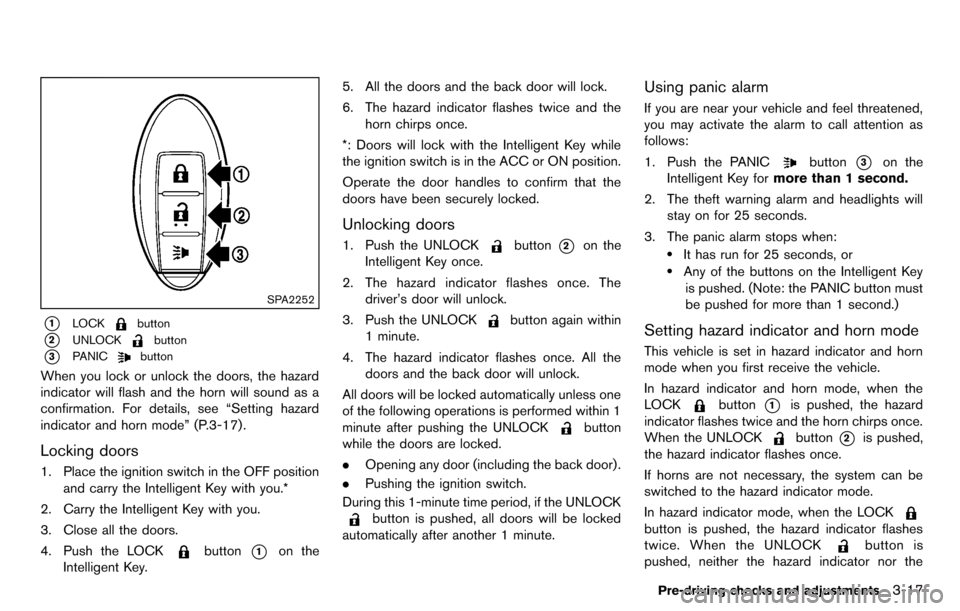
*1LOCKbutton
*2UNLOCKbutton
*3PANICbutton
When you lock or unlock the doors, the hazard
indicator will flash and the horn will sound as a
confirmation. For details, see “Setting hazard
indicator and horn mode” (P.3-17) .
Locking doors
1. Place the ignition switch in the OFF positionand carry the Intelligent Key with you.*
2. Carry the Intelligent Key with you.
3. Close all the doors.
4. Push the LOCK
button*1on the
Intelligent Key. 5. All the doors and the back door will lock.
6. The hazard indicator flashes twice and the
horn chirps once.
*: Doors will lock with the Intelligent Key while
the ignition switch is in the ACC or ON position.
Operate the door handles to confirm that the
doors have been securely locked.
Unlocking doors
1. Push the UNLOCKbutton*2on the
Intelligent Key once.
2. The hazard indicator flashes once. The driver’s door will unlock.
3. Push the UNLOCK
button again within
1 minute.
4. The hazard indicator flashes once. All the doors and the back door will unlock.
All doors will be locked automatically unless one
of the following operations is performed within 1
minute after pushing the UNLOCK
button
while the doors are locked.
. Opening any door (including the back door) .
. Pushing the ignition switch.
During this 1-minute time period, if the UNLOCK
button is pushed, all doors will be locked
automatically after another 1 minute.
Using panic alarm
If you are near your vehicle and feel threatened,
you may activate the alarm to call attention as
follows:
1. Push the PANIC
button*3on the
Intelligent Key for more than 1 second.
2. The theft warning alarm and headlights will stay on for 25 seconds.
3. The panic alarm stops when:
.It has run for 25 seconds, or.Any of the buttons on the Intelligent Key is pushed. (Note: the PANIC button must
be pushed for more than 1 second.)
Setting hazard indicator and horn mode
This vehicle is set in hazard indicator and horn
mode when you first receive the vehicle.
In hazard indicator and horn mode, when the
LOCK
button*1is pushed, the hazard
indicator flashes twice and the horn chirps once.
When the UNLOCK
button*2is pushed,
the hazard indicator flashes once.
If horns are not necessary, the system can be
switched to the hazard indicator mode.
In hazard indicator mode, when the LOCK
button is pushed, the hazard indicator flashes
twice. When the UNLOCK
button is
pushed, neither the hazard indicator nor the
Pre-driving checks and adjustments3-17
Page 130 of 331
3-18Pre-driving checks and adjustments
horn operates.Hazard indicator and horn mode:
Operation
DOOR LOCK DOOR UNLOCK
Pushing door handle request switch or back door request switch HAZARD -
twice
OUTSIDE CHIME - twiceHAZARD -
once
OUTSIDE CHIME - once
Pushing
orbutton HAZARD -
twice
HORN - once HAZARD -
once
HORN - none
Hazard indicator mode:
Operation DOOR LOCKDOOR UNLOCK
Pushing door handle request switch or back door request switch HAZARD -
twice
OUTSIDE CHIME - none HAZARD - none
OUTSIDE CHIME - none
Pushing
orbutton HAZARD -
twice
HORN - none HAZARD - none
HORN - none
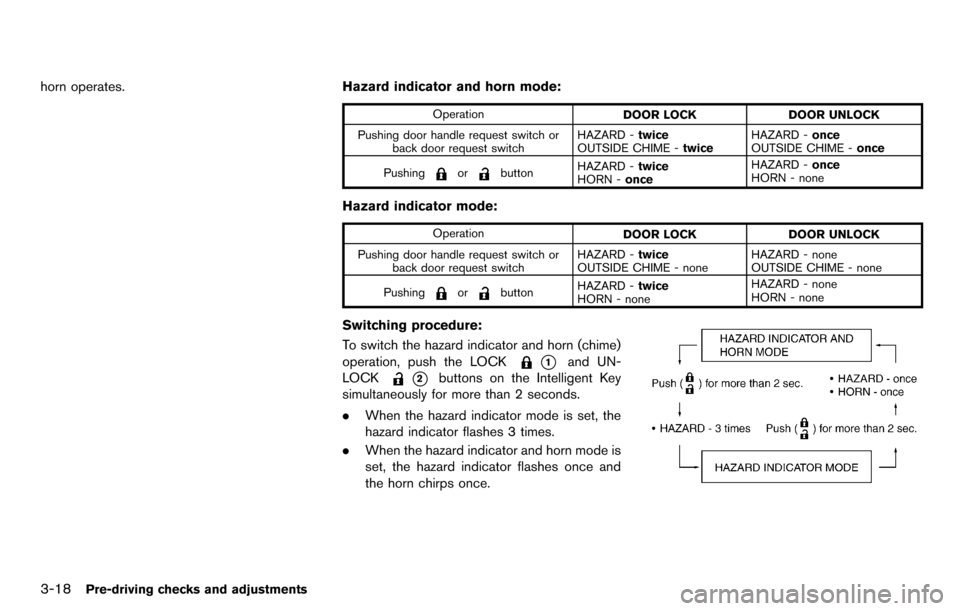
Switching procedure:
To switch the hazard indicator and horn (chime)
operation, push the LOCK
*1and UN-
LOCK
*2buttons on the Intelligent Key
simultaneously for more than 2 seconds.
. When the hazard indicator mode is set, the
hazard indicator flashes 3 times.
. When the hazard indicator and horn mode is
set, the hazard indicator flashes once and
the horn chirps once.
Page 134 of 331
3-22Pre-driving checks and adjustments
.Do not fill a portable fuel container
in the vehicle or trailer. Static elec-
tricity can cause an explosion of
flammable liquid, vapor or gas in
any vehicle or trailer. To reduce the
risk of serious injury or death when
filling portable fuel containers:
— Always place the container on
the ground when filling.
— Do not use electronic devices when filling.
— Keep the pump nozzle in contact with the container while you are
filling it.
— Use only approved portable fuel containers for flammable liquid.
CAUTION
. The LOOSE FUEL CAP warning
message will be displayed if the
fuel-filler cap is not properly tigh-
tened. It may take a few driving trips
for the message to be displayed.
Failure to tighten the fuel-filler cap
properly after the LOOSE FUEL CAP
warning message is displayed may cause the
Malfunction Indicator
Light (MIL) to illuminate.
. Failure to tighten the fuel-filler cap
properly may cause the
mal-
function indicator light (MIL) to
illuminate. If the
light illumi-
nates because the fuel-filler cap is
loose or missing, tighten or install
the cap and continue to drive the
vehicle. The
light should turn off
after a few driving trips. If the
light does not turn off after a few
driving trips, have the vehicle in-
spected by a NISSAN dealer.
For additional information, see
“Malfunction Indicator Light (MIL)”
(P.2-17) .
. If fuel is spilled on the vehicle body,
flush it away with water to avoid
paint damage.
SIC4712
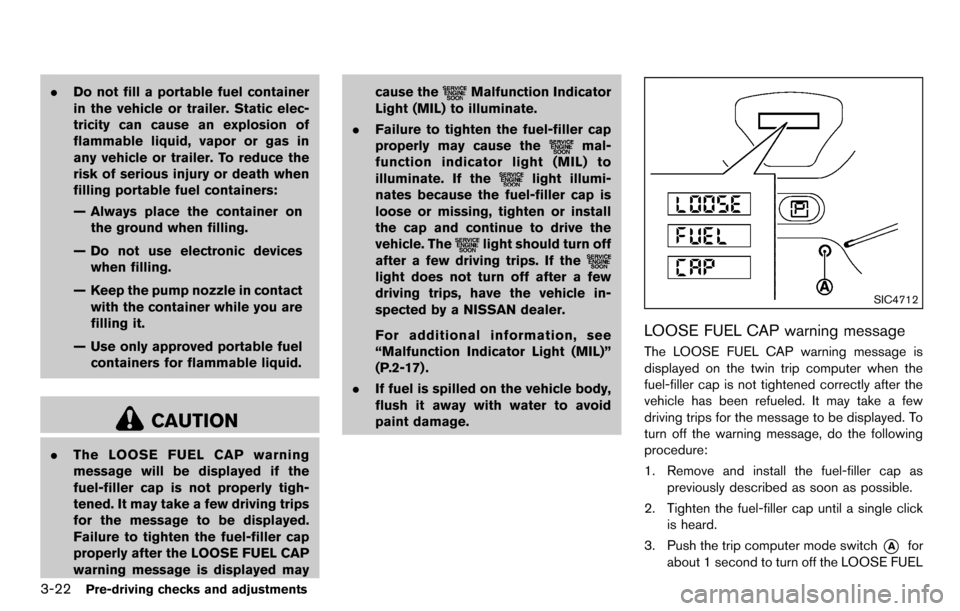
LOOSE FUEL CAP warning message
The LOOSE FUEL CAP warning message is
displayed on the twin trip computer when the
fuel-filler cap is not tightened correctly after the
vehicle has been refueled. It may take a few
driving trips for the message to be displayed. To
turn off the warning message, do the following
procedure:
1. Remove and install the fuel-filler cap as
previously described as soon as possible.
2. Tighten the fuel-filler cap until a single click is heard.
3. Push the trip computer mode switch
*Afor
about 1 second to turn off the LOOSE FUEL
Page 145 of 331
.OK:
Completes the character input.
Touch screen maintenance
If you clean the display screen, use a dry, soft
cloth. If additional cleaning is necessary, use a
small amount of neutral detergent with a soft
cloth. Never spray the screen with water or
detergent. Dampen the cloth first and then wipe
the screen.
HOW TO USE THE BACK BUTTON
Push theBACK button to return to the
previous screen.
HOW TO USE BRIGHTNESS CON-
TROL AND DISPLAY ON/OFF BUTTON
To change the display brightness, push the
button. Pushing the button again will change the
display to the day or the night display.
If no operation is performed within 5 seconds,
the display will return to the previous display.
Push and hold the
button for more than two
seconds to turn the display off. Push the button
again to turn the display on.
SAA3390
HOW TO USE THE SETUP BUTTON
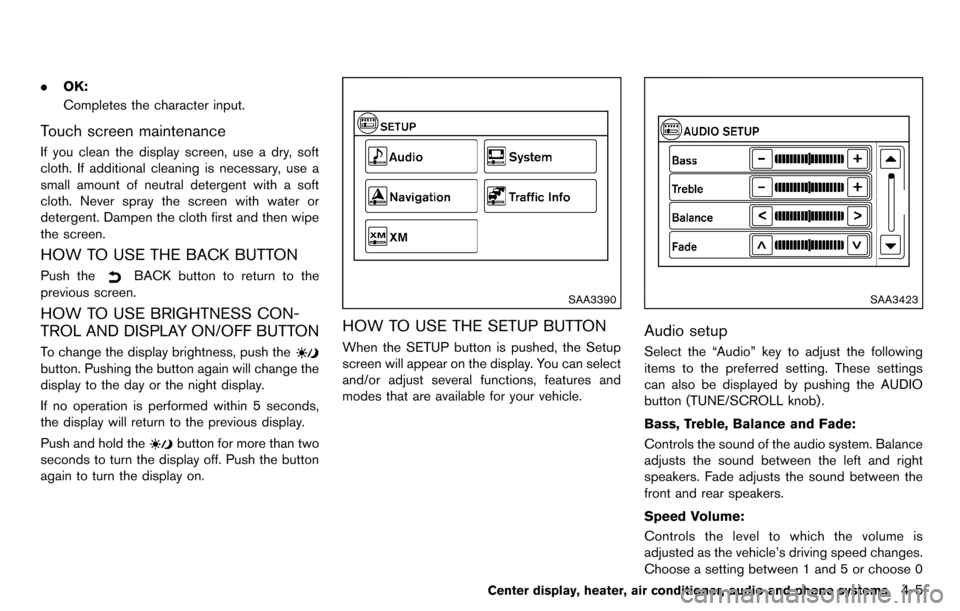
When the SETUP button is pushed, the Setup
screen will appear on the display. You can select
and/or adjust several functions, features and
modes that are available for your vehicle.
SAA3423
Audio setup
Select the “Audio” key to adjust the following
items to the preferred setting. These settings
can also be displayed by pushing the AUDIO
button (TUNE/SCROLL knob).
Bass, Treble, Balance and Fade:
Controls the sound of the audio system. Balance
adjusts the sound between the left and right
speakers. Fade adjusts the sound between the
front and rear speakers.
Speed Volume:
Controls the level to which the volume is
adjusted as the vehicle’s driving speed changes.
Choose a setting between 1 and 5 or choose 0
Center display, heater, air conditioner, audio and phone systems4-5
Page 153 of 331
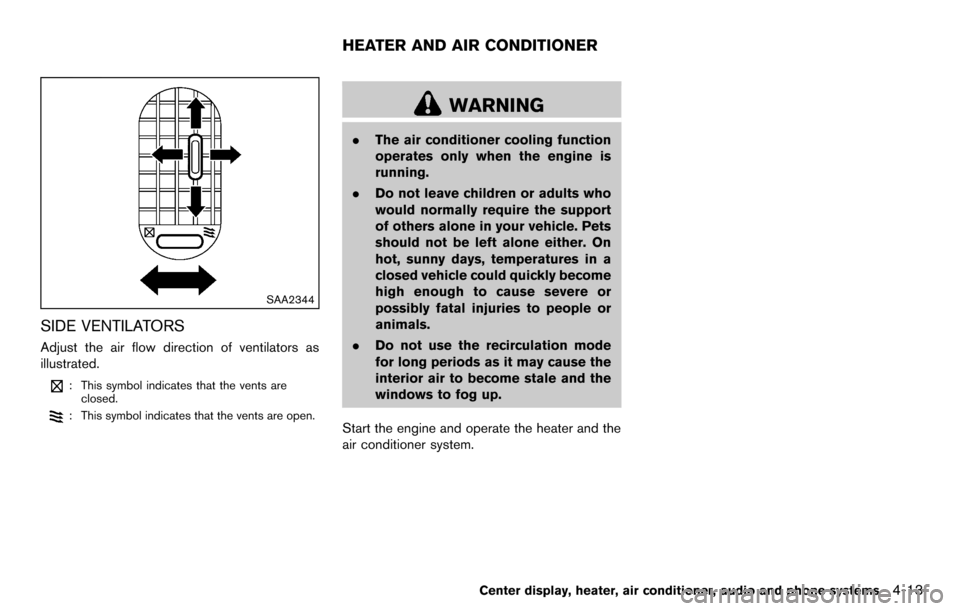
SAA2344
SIDE VENTILATORS
Adjust the air flow direction of ventilators as
illustrated.
: This symbol indicates that the vents areclosed.
: This symbol indicates that the vents are open.
WARNING
. The air conditioner cooling function
operates only when the engine is
running.
. Do not leave children or adults who
would normally require the support
of others alone in your vehicle. Pets
should not be left alone either. On
hot, sunny days, temperatures in a
closed vehicle could quickly become
high enough to cause severe or
possibly fatal injuries to people or
animals.
. Do not use the recirculation mode
for long periods as it may cause the
interior air to become stale and the
windows to fog up.
Start the engine and operate the heater and the
air conditioner system.
Center display, heater, air conditioner, audio and phone systems4-13
HEATER AND AIR CONDITIONER
Page 157 of 331
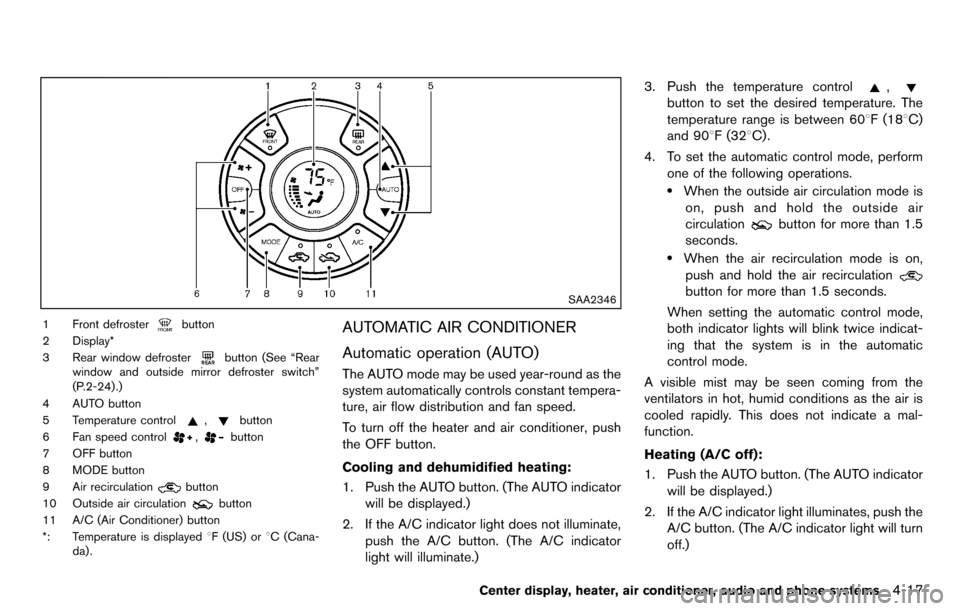
SAA2346
1 Front defrosterbutton
2 Display*
3 Rear window defroster
button (See “Rear
window and outside mirror defroster switch”
(P.2-24) .)
4 AUTO button
5 Temperature control
,button
6 Fan speed control
,button
7 OFF button
8 MODE button
9 Air recirculation
button
10 Outside air circulation
button
11 A/C (Air Conditioner) button
*: Temperature is displayed 8F (US) or8C (Cana-
da) .
AUTOMATIC AIR CONDITIONER
Automatic operation (AUTO)
The AUTO mode may be used year-round as the
system automatically controls constant tempera-
ture, air flow distribution and fan speed.
To turn off the heater and air conditioner, push
the OFF button.
Cooling and dehumidified heating:
1. Push the AUTO button. (The AUTO indicator will be displayed.)
2. If the A/C indicator light does not illuminate, push the A/C button. (The A/C indicator
light will illuminate.) 3. Push the temperature control
,
button to set the desired temperature. The
temperature range is between 608F (188C)
and 908F (328C) .
4. To set the automatic control mode, perform one of the following operations.
.When the outside air circulation mode ison, push and hold the outside air
circulation
button for more than 1.5
seconds.
.When the air recirculation mode is on,
push and hold the air recirculation
button for more than 1.5 seconds.
When setting the automatic control mode,
both indicator lights will blink twice indicat-
ing that the system is in the automatic
control mode.
A visible mist may be seen coming from the
ventilators in hot, humid conditions as the air is
cooled rapidly. This does not indicate a mal-
function.
Heating (A/C off):
1. Push the AUTO button. (The AUTO indicator will be displayed.)
2. If the A/C indicator light illuminates, push the A/C button. (The A/C indicator light will turn
off.)
Center display, heater, air conditioner, audio and phone systems4-17
Page 158 of 331
4-18Center display, heater, air conditioner, audio and phone systems
3. Push the temperature control,
button to set the desired temperature. The
temperature range is between 608F (188C)
and 908F (328C) .
.Do not set the temperature lower than the outside air temperature. Doing so may
cause the temperature to not be con-
trolled properly.
.If the windows fog up, use dehumidifiedheating instead of the A/C off heating.
Dehumidified defrosting/defogging:
1. Push the front defroster
button. (The
indicator light will illuminate.)
2. Turn the temperature control
,
button to set the desired temperature..To remove moisture or fog on the front window quickly, set the temperature to
the high temperature and the fan speed
to their maximum level.
.After the windshield is cleared, push thefront defroster
button again. (The
indicator light will turn off.)
.When the front defrosterbutton is
pushed, the air conditioner will automa-
tically turn on to defog the windshield.
The outside air circulation mode will be
selected to improve the defogging per-
formance.
Manual operation
The manual mode can be used to control the
heater and air conditioner to your desired
settings.
To turn off the heater and air conditioner, push
the OFF button.
Fan speed control:
Turn the fan speed control
,dial to
adjust the fan speed.
Air flow control:
Push the MODE button to change the air flow
mode.
— Air flows from the center and side ventilators.
— Air flows from the center and sideventilators and foot outlets.
— Air flows mainly from the foot outlets.
— Air flows from the defroster outlets andfoot outlets.
Temperature control:
Push the temperature control
,button
to set the desired temperature.
The temperature range is between 608F (188C)
and 908F (328C) .
Air recirculation:
Push the air recirculation
button to change
the air circulation mode. When the indicator light illuminates, the flowing air is recirculated inside
the vehicle.
Outside air circulation:
Push the outside air circulation
button to
change the air circulation mode. When the
indicator light illuminates, the flowing air is
drawn from outside the vehicle.
Automatic air intake control:
To set the automatic control mode, perform one
of the following operations.
. When the outside air circulation mode is on,
push and hold the outside air circulation
button for more than 1.5 seconds.
. When the air recirculation mode is on, push
and hold the air recirculation
button for
more than 1.5 seconds.
When setting the automatic control mode, both
indicator lights will blink twice indicating that the
system is in the automatic control mode.
Page 161 of 331
Static and flutter: During signal interference from
buildings, large hills or due to antenna position,
usually in conjunction with increased distance
from the station transmitter, static or flutter can
be heard. This can be reduced by lowering the
treble setting to reduce the treble response.
Multipath reception: Because of the reflective
characteristics of FM signals, direct and re-
flected signals reach the receiver at the same
time. The signals may cancel each other,
resulting in momentary flutter or loss of sound.
AM radio reception:
AM signals, because of their low frequency, can
bend around objects and skip along the ground.
In addition, the signals can be bounced off the
ionosphere and bent back to earth. Because of
these characteristics. AM signals are also
subject to interference as they travel from
transmitter to receiver.
Fading: Occurs while the vehicle is passing
through freeway underpasses or in areas with
many tall buildings. It can also occur for several
seconds during ionospheric turbulence even in
areas where no obstacles exist.
Static: Caused by thunderstorms, electrical
power lines, electric signs and even traffic lights.Satellite radio reception (if so equipped):
When the satellite radio is first installed or the
battery has been replaced, the satellite radio
may not work properly. This is not a malfunction.
Wait more than 10 minutes with the satellite
radio ON and the vehicle away from any metal or
large buildings for the satellite radio to receive all
of the necessary data.
The satellite radio mode requires an active XM
®
Satellite Radio subscription. The satellite radio is
not available in Alaska, Hawaii and Guam.
Satellite radio performance may be affected if
cargo carried on the roof blocks the satellite
radio signal.
If possible, do not put cargo near the satellite
antenna.
A buildup of ice on the satellite radio antenna
can affect satellite radio performance. Remove
the ice to restore satellite radio reception.
SAA0480
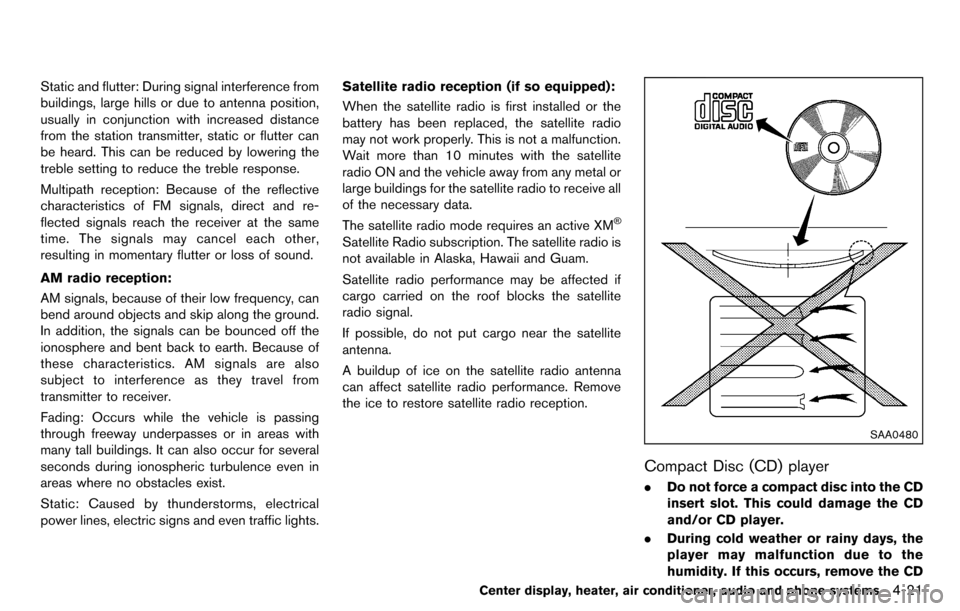
Compact Disc (CD) player
. Do not force a compact disc into the CD
insert slot. This could damage the CD
and/or CD player.
. During cold weather or rainy days, the
player may malfunction due to the
humidity. If this occurs, remove the CD
Center display, heater, air conditioner, audio and phone systems4-21