2012 NISSAN CUBE change time
[x] Cancel search: change timePage 174 of 331
4-34Center display, heater, air conditioner, audio and phone systems
the button is pushed. (When the last track on
the CD is skipped through, the first track will be
played.)
When the
button is pushed, the track being
played returns to its beginning. Push several
times to skip back through tracks. The CD will
go back the number of times the button is
pushed.
REPEAT (RPT)/RANDOM
(RDM) play:
When the RPT or RDM button is pushed while a
CD is being played, the play pattern can be
changed as follows:
RPT button:
1 Disc Repeat (Normal play) ↔1 Track Repeat
RDM button:
1 Disc Repeat (Normal play) ↔1 Disc Random The display shows the following symbols:
(No mark): 1 Disc Repeat
1: 1 Track Repeat
RDM: 1 Disc Random
CD EJECT:
When the CD EJECT button is pushed with the
CD loaded, the CD will be ejected.
When this button is pushed while the CD is
being played, the CD will be ejected and the
system will turn off.
If the CD is ejected and is not removed, it
will be pulled back into the slot to protect
it.
SCAN tuning:
When the SCAN tuning button is pushed while
the CD is being played, the beginning of all the
tracks on the CDs will be played for 10 seconds
in sequence.
Pushing the button again during this 10 second
period will stop SCAN tuning.
If the SCAN tuning button is not pushed within
10 seconds, SCAN tuning continues to move to
the next CD track.
AUX (Auxiliary) input
AUX IN jack:
The AUX IN jack is located on the audio unit.
The AUX IN audio input jack accepts any
standard analog audio input such as from a
portable cassette tape/CD player, MP3 player or
laptop computer.
AUX (Auxiliary) button:
Push the AUX button to play a compatible
device when it is plugged into the AUX IN jack.
When the AUX button is pushed with no device
plugged into the jack, the audio system does not
change to the AUX mode (the AUX button is
invalid).
NISSAN strongly recommends using a stereo
mini plug cable when connecting your music
device to the audio system. Music may not play
properly when a monaural cable is used.
Page 178 of 331
4-38Center display, heater, air conditioner, audio and phone systems
is not available, pressing the DISP button will
only switch between the frequency display and
the PS display.
Compact Disc (CD) player operation
Place the ignition switch in the ACC or ON
position, and insert the CD into the slot with the
label side facing up. The CD will be guided
automatically into the slot and start playing.
After loading the disc, the number of tracks on
the disc will appear on the display.
If the radio is already operating, it will auto-
matically turn off and the CD will play.
If the system has been turned off while the CD
was playing, pushing the PWR button will start
the CD.
Do not use 3.1 in (8 cm) discs.
CD PLAY:
When the CD button is pushed with the system
off and the CD loaded, the system will turn on
and the CD will start to play.
When the CD button is pushed with the CD
loaded and the radio playing, the radio will
automatically be turned off and the CD will start
to play.
CD play information:
When the DISP button is pushed for less than
1.5 seconds while the CD is being played, the
disc information display will change as follows:
CD:
CD with MP3 or WMA:
FF (Fast Forward) , REW (Re-
wind):
CD:
Push the FF or REW button while a CD is
playing to fast-forward or rewind through the
track. When the button is released, the CD will
return to normal play speed.
CD with MP3 or WMA:
When the FF or REW button is pushed for less
than 1.5 seconds while the CD is being played,
the folders in the CD will change.
Push the FF or REW button for more than 1.5
seconds while CD is playing to fast-forward or
rewind through the track. When the button is released, the CD will return to the normal play
speed.
APS (Automatic Program
Search) FF, APS REW:
When the
button is pushed while the CD is
being played, the program next to the present
one will start to play from its beginning. Push
several times to skip through programs. The CD
will advance the number of times the button is
pushed. (When the last program on the CD is
skipped through, the first program will be
played.)
When the
button is pushed, the program
being played returns to its beginning. Push
several times to skip back through programs.
The CD will go back the number of times the
button is pushed.
SCAN tuning:
When the SCAN tuning button is pushed for
more than 1.5 seconds while the CD is being
played, the beginning of all the tracks of CD will
be played for 10 seconds in sequence.
Pushing the button again during this 10 second
period will stop SCAN tuning.
If the SCAN tuning button is not pushed within
10 seconds, SCAN tuning moves to the next
disc program.
Page 182 of 331
4-42Center display, heater, air conditioner, audio and phone systems
FM-AM-SAT RADIO WITH COMPACT
DISC (CD) PLAYER (Type C)
For all operation precautions, see “Audio opera-
tion precautions” (P.4-20) .
The satellite radio mode requires an active XM
Satellite Radio subscription. The satellite radio is
not available in Alaska, Hawaii and Guam.
It may take some time to receive the activation
signal after subscribing the XM Satellite Radio.
After receiving the activation signal, an available
channel list will be automatically updated in the
radio. For XM, place the ignition switch in LOCK
to ACC to update the channel list.
Audio main operation
Head unit:
The auto loudness circuit enhances the low and
high frequency ranges automatically in both
radio reception and CD playback.
ON·OFF/Volume control:
Place the ignition switch in the ACC or ON
position, and then push the ON·OFF button
while the system is off to turn on the last audio
source, which was playing immediately before
the system was turned off. While the system is
on, pushing the ON·OFF button turns the system
off.
Turn the VOL control knob to adjust the volume.Adjusting tone quality and speaker bal-
ance:
To adjust Bass, Treble, Balance and Fade, push
the Audio control knob. When the display shows
the setting you want to change (Bass, Treble,
Balance and Fade) , rotate the Audio control
knob to set the desired setting. For the other
setting methods, see “How to use the setup
button” (P.4-5).
This audio system is equipped with Speed
Volume for audio. When this feature is active,
the audio volume increases/decreases in re-
sponse to an increase/decrease in the speed
that the vehicle is being driven. For more details,
see “How to use the setup button” (P.4-5) .
Adjusting AUX level:
The volume level of incoming sound can be
selected from “Quiet”, “Medium” and “Loud”
when an auxiliary device is connected to the
system. For more details, see “How to use the
setup button” (P.4-5) .
Switching the display:
Pushing the AUX button will switch the displays
between USB/iPod
®and AUX.
Adjusting clock:
For information about adjusting the clock dis-
play, see “How to use the setup button” (P.4-5) .
FM-AM-SAT radio operation
When the radio band select button is pushed
while the ignition switch is in the ACC or ON
position, the radio will come on at the channel
last played.
The last channel played will also come on when
the ON·OFF button is pushed to ON.
If another audio source is playing when the radio
band select button is turned to ON, the audio
source will automatically be turned off and the
last radio channel played will come on.
When the stereo broadcast signal is weak, the
radio will automatically change from stereo to
monaural reception.
FM·AM radio band select:
Pushing the FM·AM radio band select button will
change the band as follows:
AM ?FM1 ?FM2 ?AM
XM radio band select:
Pushing the XM radio band select button will
change the band as follows:
XM1 ?XM2 ?XM3 ?XM1
The satellite radio is not available in Alaska,
Hawaii and Guam.
Page 186 of 331
4-46Center display, heater, air conditioner, audio and phone systems
If another audio source is playing and a USB
memory is inserted, push the AUX button
repeatedly until the center display changes to
the USB memory mode.
SEEK/CATEGORY button:
Push the SEEK/CATEGORY button
while
an audio file on the USB device is playing to
return to the beginning of the current track. Push
the SEEK/CATEGORY button
several
times to skip backward several tracks.
Push the SEEK/CATEGORY button
while
an audio file on the USB device is playing to
advance one track. Push the SEEK/CATEGORY
button
several times to skip forward several
tracks. If the last track in a folder on the USB
device is skipped, the first track of the next folder
is played.
Push and hold the SEEK/CATEGORY button
orfor 1.5 seconds while an audio file
on the USB device is playing to reverse or fast
forward the track being played. The track plays
at an increased speed while reversing or fast
forwarding. When the button is released, the
audio file returns to normal play speed.
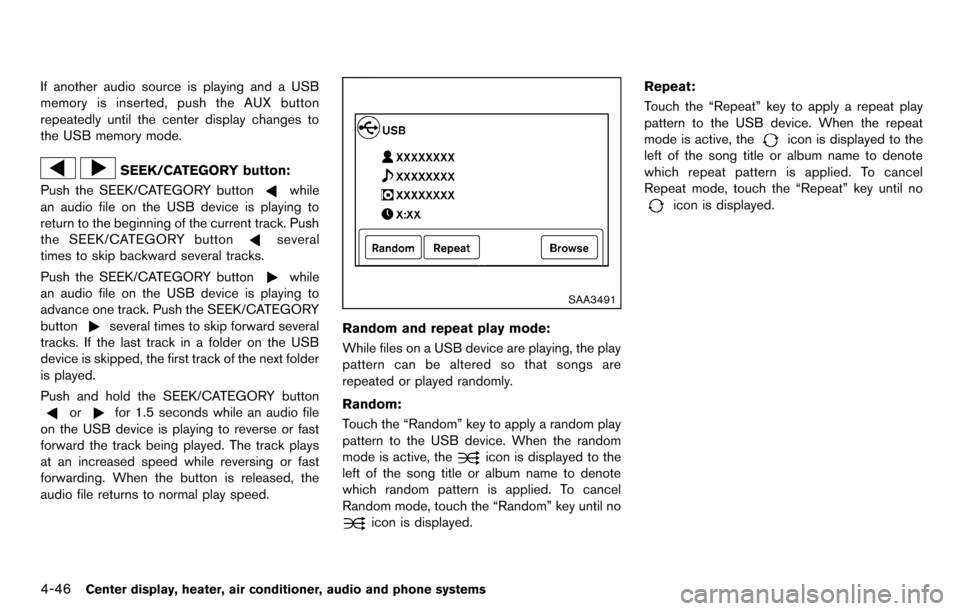
SAA3491
Random and repeat play mode:
While files on a USB device are playing, the play
pattern can be altered so that songs are
repeated or played randomly.
Random:
Touch the “Random” key to apply a random play
pattern to the USB device. When the random
mode is active, the
icon is displayed to the
left of the song title or album name to denote
which random pattern is applied. To cancel
Random mode, touch the “Random” key until no
icon is displayed. Repeat:
Touch the “Repeat” key to apply a repeat play
pattern to the USB device. When the repeat
mode is active, the
icon is displayed to the
left of the song title or album name to denote
which repeat pattern is applied. To cancel
Repeat mode, touch the “Repeat” key until no
icon is displayed.
Page 190 of 331
4-50Center display, heater, air conditioner, audio and phone systems
SAT (XM1, XM2 or XM3) (if so equipped)
If no CD is loaded or AUX and/or iPod®are not
connected, the CD, AUX and/or iPod®modes
will be skipped.
VOLUME control switch
Push up or down the VOLUME control switch to
increase or decrease the volume.
Tuning switch
Memory change (radio):
Push the tuning switch for less than 1.5 seconds
to change the next or previous radio preset.
SEEK tuning (radio):
Push the tuning switch for more than 1.5
seconds to seek the next or previous radio
station.
Next/Previous Track and Fast Forward/
Rewind (CD, USB and iPod
®):
Push the tuning switch for less than 1.5 seconds
to return to the beginning of the present
program or skip to the next program. Push
several times to skip back or skip through
programs.
This system searches for the blank intervals
between selections. If there is a blank interval
within one program or there is no interval
between programs, the system may not stop in the desired or expected location.
Push the tuning switch for more than 1.5
seconds while the CD, USB or iPod
®are being
played to fast forward or rewind through the
program. When the tuning switch is released,
CD, USB or iPod
®will return to normal play
speed.
SAA2102
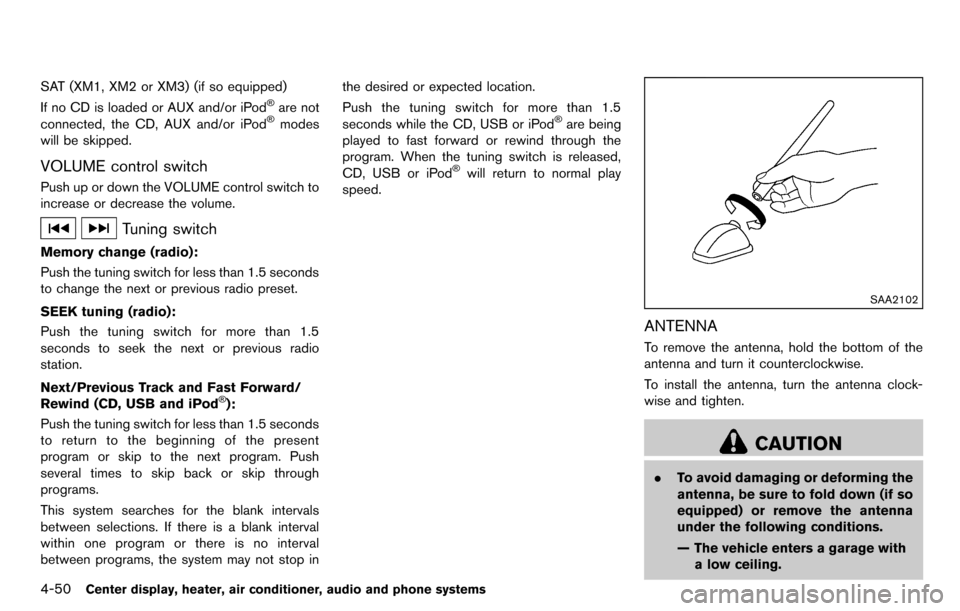
ANTENNA
To remove the antenna, hold the bottom of the
antenna and turn it counterclockwise.
To install the antenna, turn the antenna clock-
wise and tighten.
CAUTION
. To avoid damaging or deforming the
antenna, be sure to fold down (if so
equipped) or remove the antenna
under the following conditions.
— The vehicle enters a garage with
a low ceiling.
Page 196 of 331
4-56Center display, heater, air conditioner, audio and phone systems
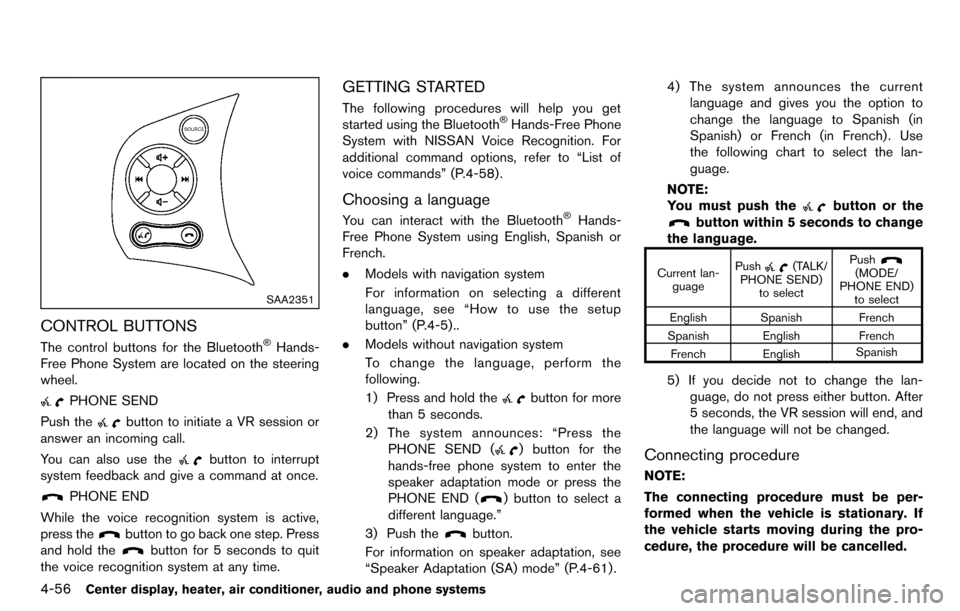
SAA2351
CONTROL BUTTONS
The control buttons for the Bluetooth®Hands-
Free Phone System are located on the steering
wheel.
PHONE SEND
Push the
button to initiate a VR session or
answer an incoming call.
You can also use the
button to interrupt
system feedback and give a command at once.
PHONE END
While the voice recognition system is active,
press the
button to go back one step. Press
and hold the
button for 5 seconds to quit
the voice recognition system at any time.
GETTING STARTED
The following procedures will help you get
started using the Bluetooth®Hands-Free Phone
System with NISSAN Voice Recognition. For
additional command options, refer to “List of
voice commands” (P.4-58) .
Choosing a language
You can interact with the Bluetooth®Hands-
Free Phone System using English, Spanish or
French.
. Models with navigation system
For information on selecting a different
language, see “How to use the setup
button” (P.4-5)..
. Models without navigation system
To change the language, perform the
following.
1) Press and hold the
button for more
than 5 seconds.
2) The system announces: “Press the PHONE SEND (
) button for the
hands-free phone system to enter the
speaker adaptation mode or press the
PHONE END (
) button to select a
different language.”
3) Push the
button.
For information on speaker adaptation, see
“Speaker Adaptation (SA) mode” (P.4-61) . 4) The system announces the current
language and gives you the option to
change the language to Spanish (in
Spanish) or French (in French) . Use
the following chart to select the lan-
guage.
NOTE:
You must push the
button or the
button within 5 seconds to change
the language.
Current lan- guage Push(TALK/
PHONE SEND) to select Push(MODE/
PHONE END) to select
English Spanish French
Spanish English French
French English Spanish
5) If you decide not to change the lan-
guage, do not press either button. After
5 seconds, the VR session will end, and
the language will not be changed.
Connecting procedure
NOTE:
The connecting procedure must be per-
formed when the vehicle is stationary. If
the vehicle starts moving during the pro-
cedure, the procedure will be cancelled.
Page 201 of 331
“Previous Name”*D
Use the Previous Name command to move the
previous name of list.
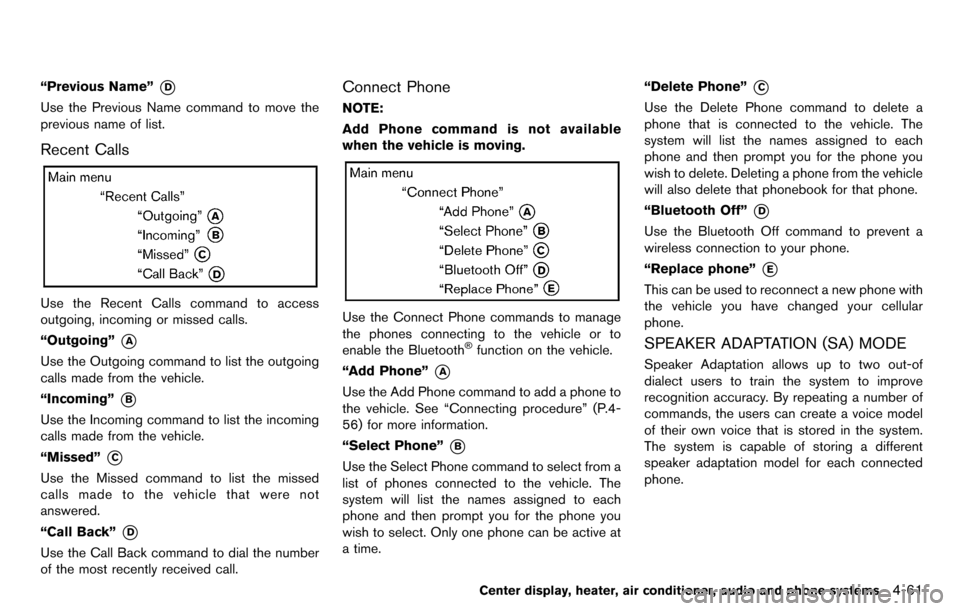
Recent Calls
Use the Recent Calls command to access
outgoing, incoming or missed calls.
“Outgoing”
*A
Use the Outgoing command to list the outgoing
calls made from the vehicle.
“Incoming”
*B
Use the Incoming command to list the incoming
calls made from the vehicle.
“Missed”
*C
Use the Missed command to list the missed
calls made to the vehicle that were not
answered.
“Call Back”
*D
Use the Call Back command to dial the number
of the most recently received call.
Connect Phone
NOTE:
Add Phone command is not available
when the vehicle is moving.
Use the Connect Phone commands to manage
the phones connecting to the vehicle or to
enable the Bluetooth
®function on the vehicle.
“Add Phone”
*A
Use the Add Phone command to add a phone to
the vehicle. See “Connecting procedure” (P.4-
56) for more information.
“Select Phone”
*B
Use the Select Phone command to select from a
list of phones connected to the vehicle. The
system will list the names assigned to each
phone and then prompt you for the phone you
wish to select. Only one phone can be active at
a time. “Delete Phone”
*C
Use the Delete Phone command to delete a
phone that is connected to the vehicle. The
system will list the names assigned to each
phone and then prompt you for the phone you
wish to delete. Deleting a phone from the vehicle
will also delete that phonebook for that phone.
“Bluetooth Off”
*D
Use the Bluetooth Off command to prevent a
wireless connection to your phone.
“Replace phone”
*E
This can be used to reconnect a new phone with
the vehicle you have changed your cellular
phone.
SPEAKER ADAPTATION (SA) MODE
Speaker Adaptation allows up to two out-of
dialect users to train the system to improve
recognition accuracy. By repeating a number of
commands, the users can create a voice model
of their own voice that is stored in the system.
The system is capable of storing a different
speaker adaptation model for each connected
phone.
Center display, heater, air conditioner, audio and phone systems4-61
Page 206 of 331
5-2Starting and driving
WARNING
.Do not leave children or adults who
would normally require the support
of others alone in your vehicle. Pets
should not be left alone either. They
could accidentally injure themselves
or others through inadvertent op-
eration of the vehicle. Also, on hot,
sunny days, temperatures in a
closed vehicle could quickly become
high enough to cause severe or
possibly fatal injuries to people or
animals.
. Properly secure all cargo with ropes
or straps to help prevent it from
sliding or shifting. Do not place
cargo higher than the seatbacks. In
a sudden stop or collision, unse-
cured cargo could cause personal
injury.
EXHAUST GAS (carbon monoxide)
WARNING
.Do not breathe exhaust gases; they
contain colorless and odorless car-
bon monoxide. Carbon monoxide is
dangerous. It can cause uncon-
sciousness or death.
. If you suspect that exhaust fumes
are entering the vehicle, drive with
all windows fully open, and have the
vehicle inspected immediately.
. Do not run the engine in closed
spaces such as a garage.
. Do not park the vehicle with the
engine running for any extended
length of time.
. Keep the back door closed while
driving, otherwise exhaust gases
could be drawn into the passenger
compartment. If you must drive with
the back door open, follow these
precautions:
1) Open all the windows.
2) Set the
air recirculation to
off and the fan control to high to
circulate the air. .
If electrical wiring or other cable
connections must pass to a trailer
through the seal on the back door or
the body, follow the manufacturer’s
recommendation to prevent carbon
monoxide entry into the vehicle.
. If a special body, camper or other
equipment is added for recreational
or other usage, follow the manufac-
turer’s recommendation to prevent
carbon monoxide entry into the
vehicle. (Some recreational vehicle
appliances such as stoves, refrig-
erators, heaters, etc. may also gen-
erate carbon monoxide.)
. The exhaust system and body
should be inspected by a qualified
mechanic whenever:
— The vehicle is raised for service.
— You suspect that exhaust fumes
are entering into the passenger
compartment.
— You notice a change in the sound of the exhaust system.
— You have had an accident invol- ving damage to the exhaust
system, underbody, or rear of
the vehicle.
PRECAUTIONS WHEN STARTING
AND DRIVING