2012 NISSAN CUBE CD player
[x] Cancel search: CD playerPage 170 of 331
4-30Center display, heater, air conditioner, audio and phone systems
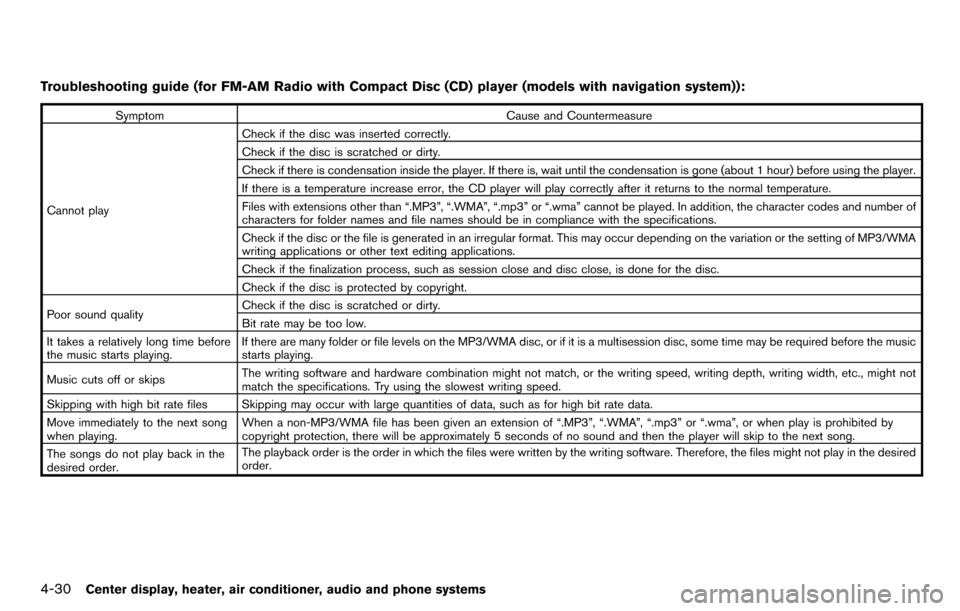
Troubleshooting guide (for FM-AM Radio with Compact Disc (CD) player (models with navigation system)):
SymptomCause and Countermeasure
Cannot play Check if the disc was inserted correctly.
Check if the disc is scratched or dirty.
Check if there is condensation inside the player. If there is, wait until the condensation is gone (about 1 hour) before using the player.
If there is a temperature increase error, the CD player will play correctly after it returns to the normal temperature.
Files with extensions other than “.MP3”, “.WMA”, “.mp3” or “.wma” cannot be played. In addition, the character codes and number of
characters for folder names and file names should be in compliance with the specifications.
Check if the disc or the file is generated in an irregular format. This may occur depending on the variation or the setting of MP3/WMA
writing applications or other text editing applications.
Check if the finalization process, such as session close and disc close, is done for the disc.
Check if the disc is protected by copyright.
Poor sound quality Check if the disc is scratched or dirty.
Bit rate may be too low.
It takes a relatively long time before
the music starts playing. If there are many folder or file levels on the MP3/WMA disc, or if it is a multisession disc, some time may be required before the music
starts playing.
Music cuts off or skips The writing software and hardware combination might not match, or the writing speed, writing depth, writing width, etc., might not
match the specifications. Try using the slowest writing speed.
Skipping with high bit rate files Skipping may occur with large quantities of data, such as for high bit rate data.
Move immediately to the next song
when playing. When a non-MP3/WMA file has been given an extension of “.MP3”, “.WMA”, “.mp3” or “.wma”, or when play is prohibited by
copyright protection, there will be approximately 5 seconds of no sound and then the player will skip to the next song.
The songs do not play back in the
desired order. The playback order is the order in which the files were written by the writing software. Therefore, the files might not play in the desired
order.
Page 171 of 331
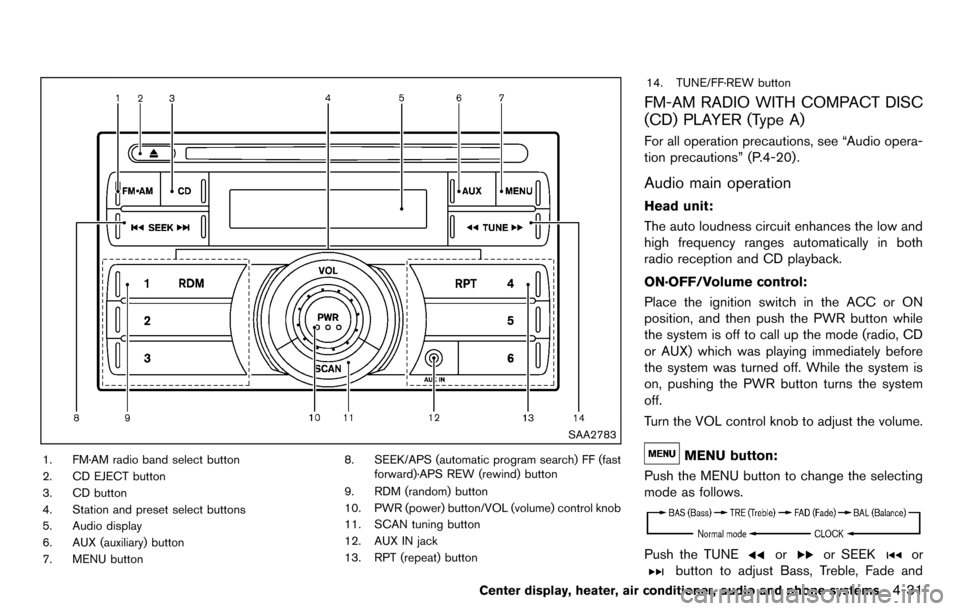
SAA2783
1. FM·AM radio band select button
2. CD EJECT button
3. CD button
4. Station and preset select buttons
5. Audio display
6. AUX (auxiliary) button
7. MENU button8. SEEK/APS (automatic program search) FF (fast
forward)·APS REW (rewind) button
9. RDM (random) button
10. PWR (power) button/VOL (volume) control knob
11. SCAN tuning button
12. AUX IN jack
13. RPT (repeat) button 14. TUNE/FF·REW button
FM-AM RADIO WITH COMPACT DISC
(CD) PLAYER (Type A)
For all operation precautions, see “Audio opera-
tion precautions” (P.4-20) .
Audio main operation
Head unit:
The auto loudness circuit enhances the low and
high frequency ranges automatically in both
radio reception and CD playback.
ON·OFF/Volume control:
Place the ignition switch in the ACC or ON
position, and then push the PWR button while
the system is off to call up the mode (radio, CD
or AUX) which was playing immediately before
the system was turned off. While the system is
on, pushing the PWR button turns the system
off.
Turn the VOL control knob to adjust the volume.
MENU button:
Push the MENU button to change the selecting
mode as follows.
Push the TUNEoror SEEKor
button to adjust Bass, Treble, Fade and
Center display, heater, air conditioner, audio and phone systems4-31
Page 173 of 331
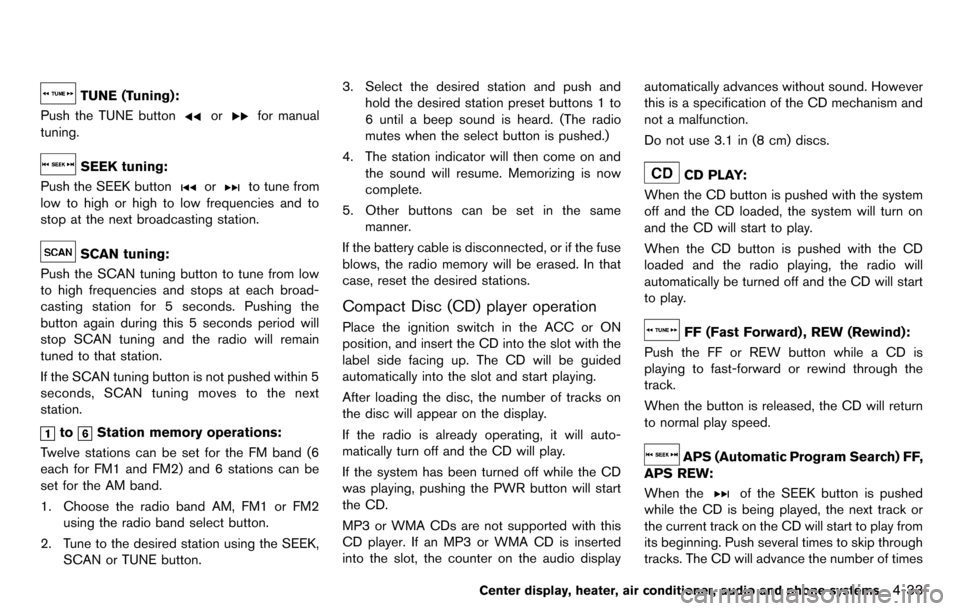
TUNE (Tuning):
Push the TUNE button
orfor manual
tuning.
SEEK tuning:
Push the SEEK button
orto tune from
low to high or high to low frequencies and to
stop at the next broadcasting station.
SCAN tuning:
Push the SCAN tuning button to tune from low
to high frequencies and stops at each broad-
casting station for 5 seconds. Pushing the
button again during this 5 seconds period will
stop SCAN tuning and the radio will remain
tuned to that station.
If the SCAN tuning button is not pushed within 5
seconds, SCAN tuning moves to the next
station.
toStation memory operations:
Twelve stations can be set for the FM band (6
each for FM1 and FM2) and 6 stations can be
set for the AM band.
1. Choose the radio band AM, FM1 or FM2 using the radio band select button.
2. Tune to the desired station using the SEEK, SCAN or TUNE button. 3. Select the desired station and push and
hold the desired station preset buttons 1 to
6 until a beep sound is heard. (The radio
mutes when the select button is pushed.)
4. The station indicator will then come on and the sound will resume. Memorizing is now
complete.
5. Other buttons can be set in the same manner.
If the battery cable is disconnected, or if the fuse
blows, the radio memory will be erased. In that
case, reset the desired stations.
Compact Disc (CD) player operation
Place the ignition switch in the ACC or ON
position, and insert the CD into the slot with the
label side facing up. The CD will be guided
automatically into the slot and start playing.
After loading the disc, the number of tracks on
the disc will appear on the display.
If the radio is already operating, it will auto-
matically turn off and the CD will play.
If the system has been turned off while the CD
was playing, pushing the PWR button will start
the CD.
MP3 or WMA CDs are not supported with this
CD player. If an MP3 or WMA CD is inserted
into the slot, the counter on the audio display automatically advances without sound. However
this is a specification of the CD mechanism and
not a malfunction.
Do not use 3.1 in (8 cm) discs.
CD PLAY:
When the CD button is pushed with the system
off and the CD loaded, the system will turn on
and the CD will start to play.
When the CD button is pushed with the CD
loaded and the radio playing, the radio will
automatically be turned off and the CD will start
to play.
FF (Fast Forward) , REW (Rewind):
Push the FF or REW button while a CD is
playing to fast-forward or rewind through the
track.
When the button is released, the CD will return
to normal play speed.
APS (Automatic Program Search) FF,
APS REW:
When the
of the SEEK button is pushed
while the CD is being played, the next track or
the current track on the CD will start to play from
its beginning. Push several times to skip through
tracks. The CD will advance the number of times
Center display, heater, air conditioner, audio and phone systems4-33
Page 174 of 331
4-34Center display, heater, air conditioner, audio and phone systems
the button is pushed. (When the last track on
the CD is skipped through, the first track will be
played.)
When the
button is pushed, the track being
played returns to its beginning. Push several
times to skip back through tracks. The CD will
go back the number of times the button is
pushed.
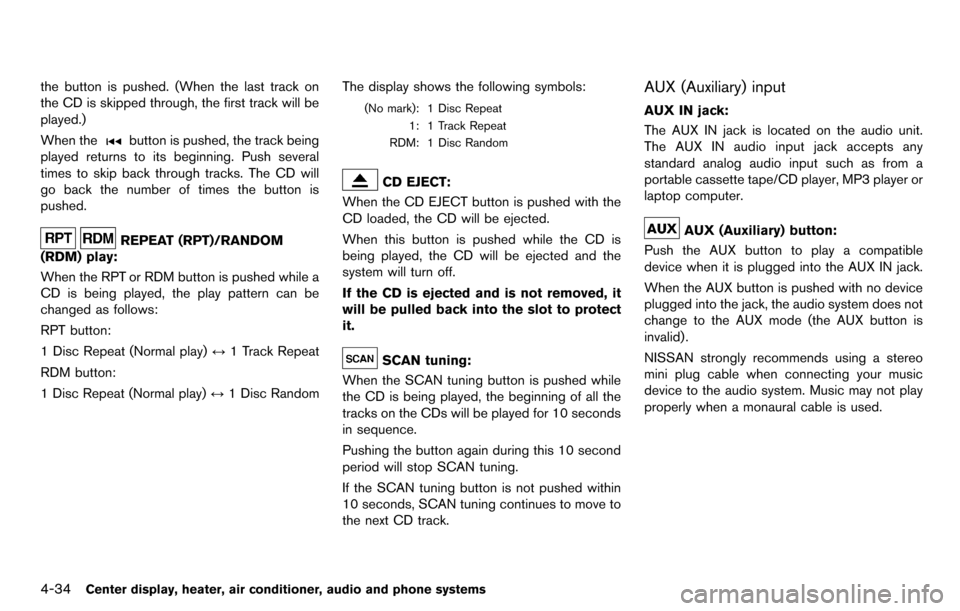
REPEAT (RPT)/RANDOM
(RDM) play:
When the RPT or RDM button is pushed while a
CD is being played, the play pattern can be
changed as follows:
RPT button:
1 Disc Repeat (Normal play) ↔1 Track Repeat
RDM button:
1 Disc Repeat (Normal play) ↔1 Disc Random The display shows the following symbols:
(No mark): 1 Disc Repeat
1: 1 Track Repeat
RDM: 1 Disc Random
CD EJECT:
When the CD EJECT button is pushed with the
CD loaded, the CD will be ejected.
When this button is pushed while the CD is
being played, the CD will be ejected and the
system will turn off.
If the CD is ejected and is not removed, it
will be pulled back into the slot to protect
it.
SCAN tuning:
When the SCAN tuning button is pushed while
the CD is being played, the beginning of all the
tracks on the CDs will be played for 10 seconds
in sequence.
Pushing the button again during this 10 second
period will stop SCAN tuning.
If the SCAN tuning button is not pushed within
10 seconds, SCAN tuning continues to move to
the next CD track.
AUX (Auxiliary) input
AUX IN jack:
The AUX IN jack is located on the audio unit.
The AUX IN audio input jack accepts any
standard analog audio input such as from a
portable cassette tape/CD player, MP3 player or
laptop computer.
AUX (Auxiliary) button:
Push the AUX button to play a compatible
device when it is plugged into the AUX IN jack.
When the AUX button is pushed with no device
plugged into the jack, the audio system does not
change to the AUX mode (the AUX button is
invalid).
NISSAN strongly recommends using a stereo
mini plug cable when connecting your music
device to the audio system. Music may not play
properly when a monaural cable is used.
Page 175 of 331
SAA2782
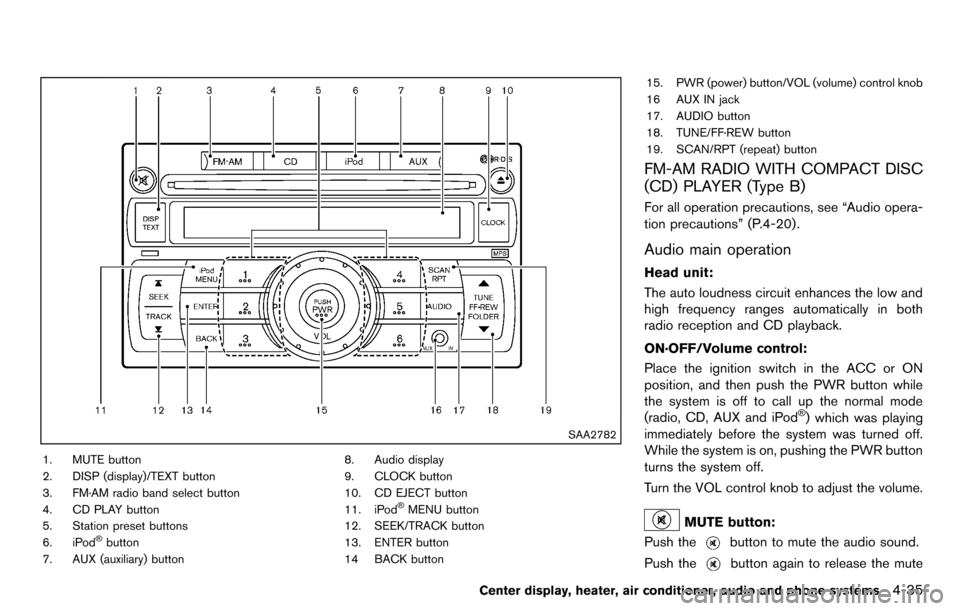
1. MUTE button
2. DISP (display)/TEXT button
3. FM·AM radio band select button
4. CD PLAY button
5. Station preset buttons
6. iPod
®button
7. AUX (auxiliary) button 8. Audio display
9. CLOCK button
10. CD EJECT button
11. iPod
®MENU button
12. SEEK/TRACK button
13. ENTER button
14 BACK button 15. PWR (power) button/VOL (volume) control knob
16 AUX IN jack
17. AUDIO button
18. TUNE/FF·REW button
19. SCAN/RPT (repeat) button
FM-AM RADIO WITH COMPACT DISC
(CD) PLAYER (Type B)
For all operation precautions, see “Audio opera-
tion precautions” (P.4-20) .
Audio main operation
Head unit:
The auto loudness circuit enhances the low and
high frequency ranges automatically in both
radio reception and CD playback.
ON·OFF/Volume control:
Place the ignition switch in the ACC or ON
position, and then push the PWR button while
the system is off to call up the normal mode
(radio, CD, AUX and iPod
®) which was playing
immediately before the system was turned off.
While the system is on, pushing the PWR button
turns the system off.
Turn the VOL control knob to adjust the volume.
MUTE button:
Push the
button to mute the audio sound.
Push the
button again to release the mute
Center display, heater, air conditioner, audio and phone systems4-35
Page 178 of 331
4-38Center display, heater, air conditioner, audio and phone systems
is not available, pressing the DISP button will
only switch between the frequency display and
the PS display.
Compact Disc (CD) player operation
Place the ignition switch in the ACC or ON
position, and insert the CD into the slot with the
label side facing up. The CD will be guided
automatically into the slot and start playing.
After loading the disc, the number of tracks on
the disc will appear on the display.
If the radio is already operating, it will auto-
matically turn off and the CD will play.
If the system has been turned off while the CD
was playing, pushing the PWR button will start
the CD.
Do not use 3.1 in (8 cm) discs.
CD PLAY:
When the CD button is pushed with the system
off and the CD loaded, the system will turn on
and the CD will start to play.
When the CD button is pushed with the CD
loaded and the radio playing, the radio will
automatically be turned off and the CD will start
to play.
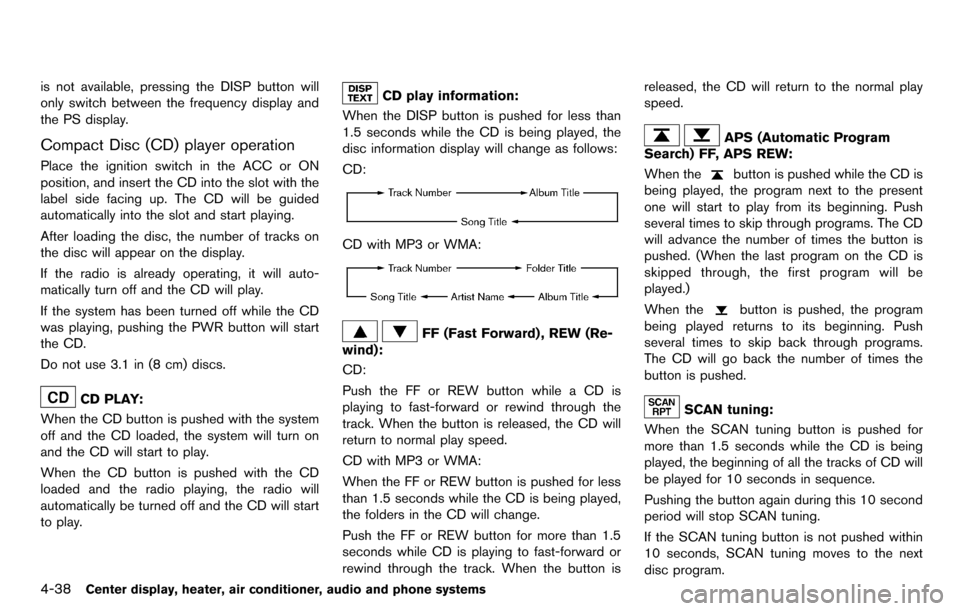
CD play information:
When the DISP button is pushed for less than
1.5 seconds while the CD is being played, the
disc information display will change as follows:
CD:
CD with MP3 or WMA:
FF (Fast Forward) , REW (Re-
wind):
CD:
Push the FF or REW button while a CD is
playing to fast-forward or rewind through the
track. When the button is released, the CD will
return to normal play speed.
CD with MP3 or WMA:
When the FF or REW button is pushed for less
than 1.5 seconds while the CD is being played,
the folders in the CD will change.
Push the FF or REW button for more than 1.5
seconds while CD is playing to fast-forward or
rewind through the track. When the button is released, the CD will return to the normal play
speed.
APS (Automatic Program
Search) FF, APS REW:
When the
button is pushed while the CD is
being played, the program next to the present
one will start to play from its beginning. Push
several times to skip through programs. The CD
will advance the number of times the button is
pushed. (When the last program on the CD is
skipped through, the first program will be
played.)
When the
button is pushed, the program
being played returns to its beginning. Push
several times to skip back through programs.
The CD will go back the number of times the
button is pushed.
SCAN tuning:
When the SCAN tuning button is pushed for
more than 1.5 seconds while the CD is being
played, the beginning of all the tracks of CD will
be played for 10 seconds in sequence.
Pushing the button again during this 10 second
period will stop SCAN tuning.
If the SCAN tuning button is not pushed within
10 seconds, SCAN tuning moves to the next
disc program.
Page 181 of 331
AUX (Auxiliary) input
AUX IN jack:
The AUX IN jack is located on the audio unit.
The AUX IN audio input jack accepts any
standard analog audio input such as from a
portable cassette tape/CD player, MP3 player or
laptop computer.
AUX (Auxiliary) button:
With an AUX device plugged in, push the AUX
button repeatedly until the display changes to
the AUX mode.
When the AUX button is pushed with no device
plugged into the jack, the audio system does not
change to the AUX mode.
NISSAN strongly recommends using a stereo
mini plug cable when connecting your music
device to the audio system. Music may not play
properly when a monaural cable is used.
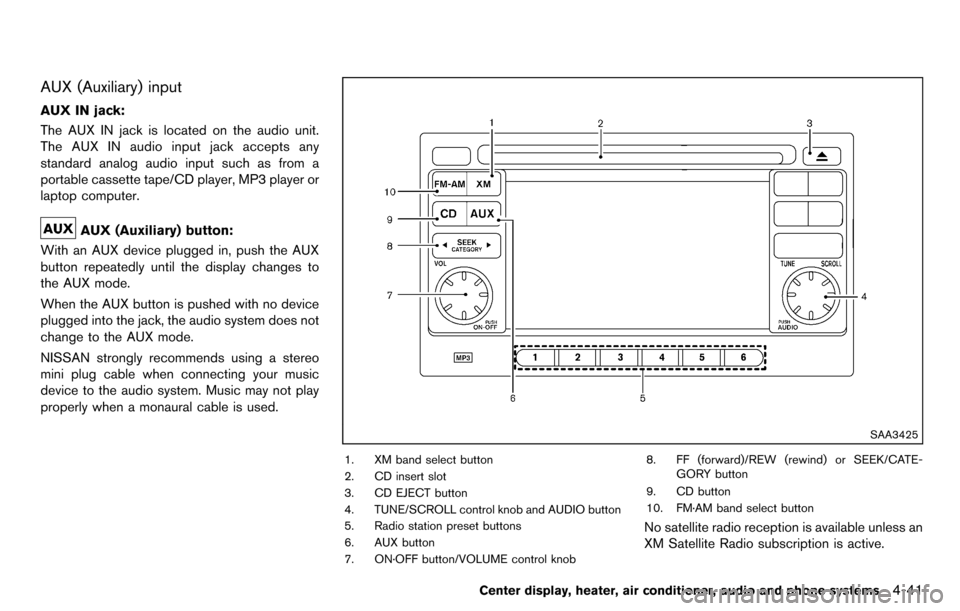
SAA3425
1. XM band select button
2. CD insert slot
3. CD EJECT button
4. TUNE/SCROLL control knob and AUDIO button
5. Radio station preset buttons
6. AUX button
7. ON·OFF button/VOLUME control knob 8. FF (forward)/REW (rewind) or SEEK/CATE-
GORY button
9. CD button
10. FM·AM band select button
No satellite radio reception is available unless an
XM Satellite Radio subscription is active.
Center display, heater, air conditioner, audio and phone systems4-41
Page 182 of 331
4-42Center display, heater, air conditioner, audio and phone systems
FM-AM-SAT RADIO WITH COMPACT
DISC (CD) PLAYER (Type C)
For all operation precautions, see “Audio opera-
tion precautions” (P.4-20) .
The satellite radio mode requires an active XM
Satellite Radio subscription. The satellite radio is
not available in Alaska, Hawaii and Guam.
It may take some time to receive the activation
signal after subscribing the XM Satellite Radio.
After receiving the activation signal, an available
channel list will be automatically updated in the
radio. For XM, place the ignition switch in LOCK
to ACC to update the channel list.
Audio main operation
Head unit:
The auto loudness circuit enhances the low and
high frequency ranges automatically in both
radio reception and CD playback.
ON·OFF/Volume control:
Place the ignition switch in the ACC or ON
position, and then push the ON·OFF button
while the system is off to turn on the last audio
source, which was playing immediately before
the system was turned off. While the system is
on, pushing the ON·OFF button turns the system
off.
Turn the VOL control knob to adjust the volume.Adjusting tone quality and speaker bal-
ance:
To adjust Bass, Treble, Balance and Fade, push
the Audio control knob. When the display shows
the setting you want to change (Bass, Treble,
Balance and Fade) , rotate the Audio control
knob to set the desired setting. For the other
setting methods, see “How to use the setup
button” (P.4-5).
This audio system is equipped with Speed
Volume for audio. When this feature is active,
the audio volume increases/decreases in re-
sponse to an increase/decrease in the speed
that the vehicle is being driven. For more details,
see “How to use the setup button” (P.4-5) .
Adjusting AUX level:
The volume level of incoming sound can be
selected from “Quiet”, “Medium” and “Loud”
when an auxiliary device is connected to the
system. For more details, see “How to use the
setup button” (P.4-5) .
Switching the display:
Pushing the AUX button will switch the displays
between USB/iPod
®and AUX.
Adjusting clock:
For information about adjusting the clock dis-
play, see “How to use the setup button” (P.4-5) .
FM-AM-SAT radio operation
When the radio band select button is pushed
while the ignition switch is in the ACC or ON
position, the radio will come on at the channel
last played.
The last channel played will also come on when
the ON·OFF button is pushed to ON.
If another audio source is playing when the radio
band select button is turned to ON, the audio
source will automatically be turned off and the
last radio channel played will come on.
When the stereo broadcast signal is weak, the
radio will automatically change from stereo to
monaural reception.
FM·AM radio band select:
Pushing the FM·AM radio band select button will
change the band as follows:
AM ?FM1 ?FM2 ?AM
XM radio band select:
Pushing the XM radio band select button will
change the band as follows:
XM1 ?XM2 ?XM3 ?XM1
The satellite radio is not available in Alaska,
Hawaii and Guam.