2012 NISSAN CUBE display
[x] Cancel search: displayPage 199 of 331
commands.
.“Help” — The system announces the avail-
able commands.
. “Go back/Correction” — The system an-
nounces “Go back,” ends the VR session
and returns to the call.
. “Cancel/Quit” — The system announces
“Cancel,” ends the VR session and returns
to the call.
. “Send/Enter/Call/Dial” — Use the Send
command to enter numbers, “*” or “#”
during a call. For example, if you were
directed to dial an extension by an auto-
mated system:
Say: “Send one two three four.”
The system acknowledges the command
and sends the tones associated with the
numbers. The system then ends the VR
session and returns to the call. Say “star” for
“*”, say “pound” for “#”.
. “Transfer call” — Use the Transfer Call
command to transfer the call from the
Bluetooth
®Hands-Free Phone System to
the cellular phone when privacy is desired.
The system announces, “Transfer call. Call
transferred to privacy mode.” The system
then ends the VR session.
To reconnect a call from the cellular phone
to the Bluetooth
®Hands-Free Phone sys- tem, push the
button.
. “Mute” — Use the Mute command to mute
your voice so the other party cannot hear it.
Use the mute command again to unmute
your voice.
NOTE:
If a call is ended or the cellular phone
network connection is lost while the Mute
feature is on, the Mute feature will be reset
to “off” for the next call so the other party
can hear your voice.
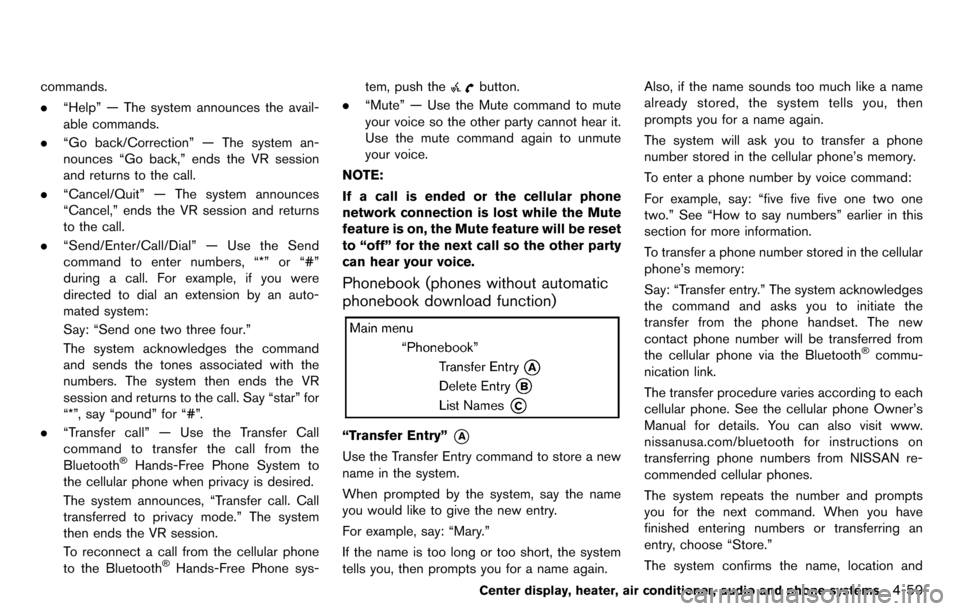
Phonebook (phones without automatic
phonebook download function)
“Transfer Entry”*A
Use the Transfer Entry command to store a new
name in the system.
When prompted by the system, say the name
you would like to give the new entry.
For example, say: “Mary.”
If the name is too long or too short, the system
tells you, then prompts you for a name again. Also, if the name sounds too much like a name
already stored, the system tells you, then
prompts you for a name again.
The system will ask you to transfer a phone
number stored in the cellular phone’s memory.
To enter a phone number by voice command:
For example, say: “five five five one two one
two.” See “How to say numbers” earlier in this
section for more information.
To transfer a phone number stored in the cellular
phone’s memory:
Say: “Transfer entry.” The system acknowledges
the command and asks you to initiate the
transfer from the phone handset. The new
contact phone number will be transferred from
the cellular phone via the Bluetooth
®commu-
nication link.
The transfer procedure varies according to each
cellular phone. See the cellular phone Owner’s
Manual for details. You can also visit www.
nissanusa.com/bluetooth for instructions on
transferring phone numbers from NISSAN re-
commended cellular phones.
The system repeats the number and prompts
you for the next command. When you have
finished entering numbers or transferring an
entry, choose “Store.”
The system confirms the name, location and
Center display, heater, air conditioner, audio and phone systems4-59
Page 200 of 331
4-60Center display, heater, air conditioner, audio and phone systems
number.
“Delete Entry”
*B
Use the Delete Entry command to delete one
entry from the phonebook. After the system
acknowledges a command, say the name to
delete or say “List Names” to choose an entry.
“List Names”
*C
Use the List Names command to hear all the
names in the phonebook. The system recites the
phonebook entries but does not include the
actual phone numbers. When playback of the
list is complete, the system returns to the main
menu.
Playback of the list can be stopped at any time
by pushing the
button on the steering
wheel. The system ends the VR session.
Phonebook (phones with automatic
phonebook download function)
NOTE:
Phonebook commands are not available
when the vehicle is moving.
For phones that support automatic download of
the phonebook (PBAP Bluetooth®profile) , the
“Phonebook” command is used to manage
entries to the vehicle phonebook. You can say
the name of an entry at this menu to initiate
dialing of that entry.
The phonebook stores up to 1000 names for
each phone paired with the system. Each name
can have up to 4 locations/phone numbers
associated with it.
When a phone is connected to the system, the
phonebook is automatically downloaded to the
vehicle. This feature allows you to access your
phonebook from the Bluetooth system and call
contacts by name. You can record a custom
voice tag for contact names that the system has
difficulty recognizing. For more information see
“Record Name” in this section.
NOTE:
Each phone has its own separate phone-
book. You cannot access Phone A’s phone-
book if you are currently connected with Phone B.
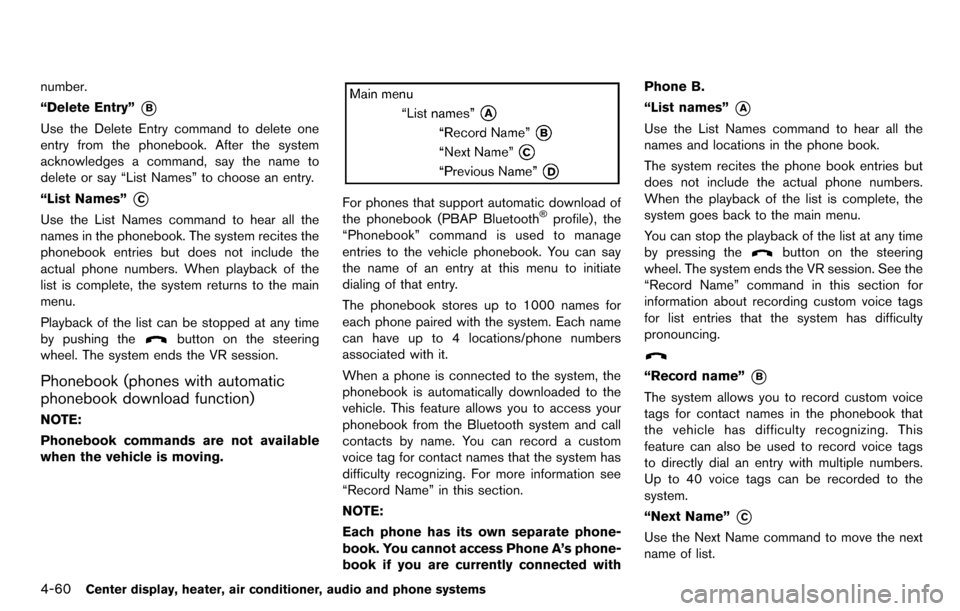
“List names”
*A
Use the List Names command to hear all the
names and locations in the phone book.
The system recites the phone book entries but
does not include the actual phone numbers.
When the playback of the list is complete, the
system goes back to the main menu.
You can stop the playback of the list at any time
by pressing the
button on the steering
wheel. The system ends the VR session. See the
“Record Name” command in this section for
information about recording custom voice tags
for list entries that the system has difficulty
pronouncing.
“Record name”*B
The system allows you to record custom voice
tags for contact names in the phonebook that
the vehicle has difficulty recognizing. This
feature can also be used to record voice tags
to directly dial an entry with multiple numbers.
Up to 40 voice tags can be recorded to the
system.
“Next Name”
*C
Use the Next Name command to move the next
name of list.
Page 201 of 331
“Previous Name”*D
Use the Previous Name command to move the
previous name of list.
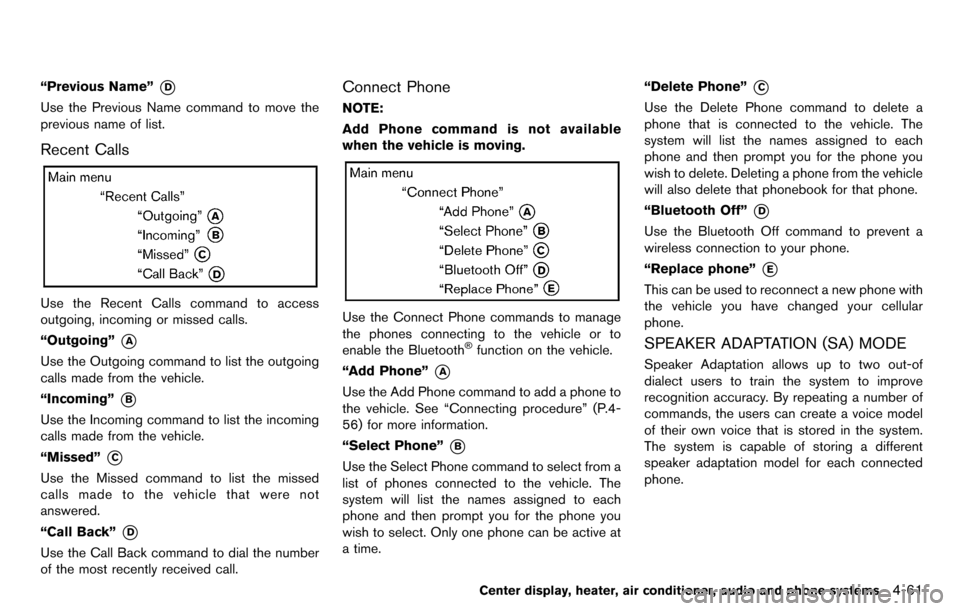
Recent Calls
Use the Recent Calls command to access
outgoing, incoming or missed calls.
“Outgoing”
*A
Use the Outgoing command to list the outgoing
calls made from the vehicle.
“Incoming”
*B
Use the Incoming command to list the incoming
calls made from the vehicle.
“Missed”
*C
Use the Missed command to list the missed
calls made to the vehicle that were not
answered.
“Call Back”
*D
Use the Call Back command to dial the number
of the most recently received call.
Connect Phone
NOTE:
Add Phone command is not available
when the vehicle is moving.
Use the Connect Phone commands to manage
the phones connecting to the vehicle or to
enable the Bluetooth
®function on the vehicle.
“Add Phone”
*A
Use the Add Phone command to add a phone to
the vehicle. See “Connecting procedure” (P.4-
56) for more information.
“Select Phone”
*B
Use the Select Phone command to select from a
list of phones connected to the vehicle. The
system will list the names assigned to each
phone and then prompt you for the phone you
wish to select. Only one phone can be active at
a time. “Delete Phone”
*C
Use the Delete Phone command to delete a
phone that is connected to the vehicle. The
system will list the names assigned to each
phone and then prompt you for the phone you
wish to delete. Deleting a phone from the vehicle
will also delete that phonebook for that phone.
“Bluetooth Off”
*D
Use the Bluetooth Off command to prevent a
wireless connection to your phone.
“Replace phone”
*E
This can be used to reconnect a new phone with
the vehicle you have changed your cellular
phone.
SPEAKER ADAPTATION (SA) MODE
Speaker Adaptation allows up to two out-of
dialect users to train the system to improve
recognition accuracy. By repeating a number of
commands, the users can create a voice model
of their own voice that is stored in the system.
The system is capable of storing a different
speaker adaptation model for each connected
phone.
Center display, heater, air conditioner, audio and phone systems4-61
Page 202 of 331
4-62Center display, heater, air conditioner, audio and phone systems
Training procedure
1. Position the vehicle in a reasonably quietoutdoor location.
2. Sit in the driver’s seat with the engine running, the parking brake on, and the
transmission in Park.
3. Press and hold the
button for more than
5 seconds.
4. The system announces: “Press the PHONE SEND (
) button for the hands-free
phone system to enter the speaker adapta-
tion mode or press the PHONE END (
)
button to select a different language.”
5. Press the
button.
For information on selecting a different
language, see “Choosing a language” (P.4-
56).
6. If the connected phone is already in use, the system will prompt you to overwrite. Follow
the instructions provided by the system.
7. When preparation is complete and you are ready to begin, press the
button.
8. The SA mode will be explained. Follow the instructions provided by the system.
9. When training is finished, the system will tell you an adequate number of phrases have
been recorded. 10. The system will announce that speaker
adaptation has been completed and the
system is ready.
The SA mode will stop if:
. The
button is pressed for more than 5
seconds in SA mode.
. The vehicle is driven during SA mode.
. The ignition switch is turned to the OFF or
LOCK position.
Training phrases
During the SA mode, the system instructs you to
say the following phrases.
(The system will prompt you for each phrase.)
.phonebook transfer entry
. dial 30429
. delete call back number
. incoming
. transfer entry
. 8 pause 9 3 2 pause 7
. delete all entries
. call 7 2409
. phonebook delete entry
. next entry
. dial star 2170
. yes .
no
. select
. missed
. dial 85692
. Bluetooth on
. Outgoing
. call 3 1902
. 9 7 pause pause 3 0 8
. cancel
. call back number
. call star 2095
. delete phone
. dial 83051
. Record name
. 4 3 pause 2 9 pause 0
. delete redial number
. phonebook list names
. call 8 0541
. correction
. setup main menu
. dial 74018
. memo pad delete
. delete
. dial 97266
. call 7 6301
Page 203 of 331

.go back
. call 5 6280
. dial 66437
Center display, heater, air conditioner, audio and phone systems4-63
Page 204 of 331
4-64Center display, heater, air conditioner, audio and phone systems
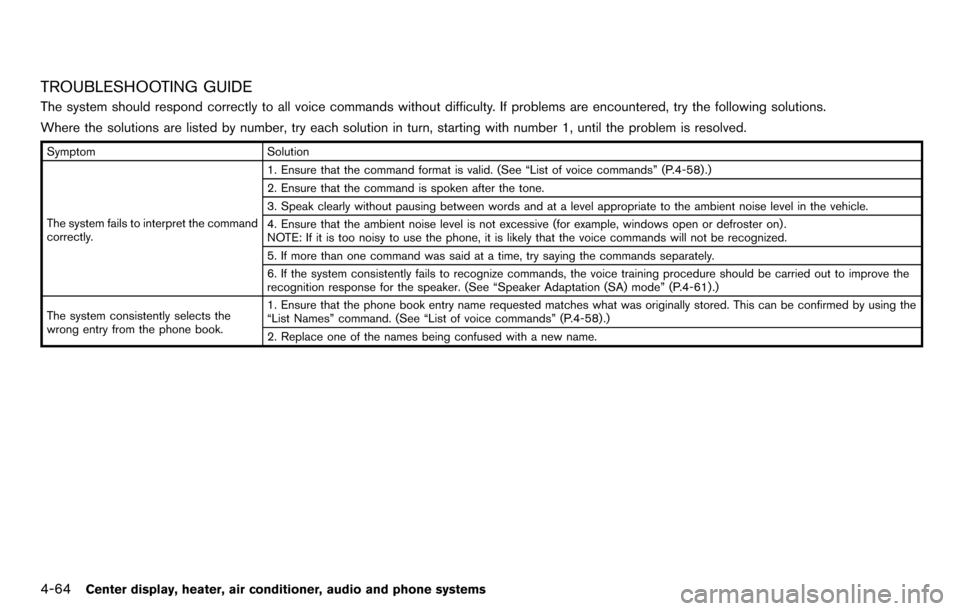
TROUBLESHOOTING GUIDE
The system should respond correctly to all voice commands without difficulty. If problems are encountered, try the following solutions.
Where the solutions are listed by number, try each solution in turn, starting with number 1, until the problem is resolved.
SymptomSolution
The system fails to interpret the command
correctly. 1. Ensure that the command format is valid. (See “List of voice commands” (P.4-58) .)
2. Ensure that the command is spoken after the tone.
3. Speak clearly without pausing between words and at a level appropriate to the ambient noise level in the vehicle.
4. Ensure that the ambient noise level is not excessive (for example, windows open or defroster on) .
NOTE: If it is too noisy to use the phone, it is likely that the voice commands will not be recognized.
5. If more than one command was said at a time, try saying the commands separately.
6. If the system consistently fails to recognize commands, the voice training procedure should be carried out to improve the
recognition response for the speaker. (See “Speaker Adaptation (SA) mode” (P.4-61) .)
The system consistently selects the
wrong entry from the phone book. 1. Ensure that the phone book entry name requested matches what was originally stored. This can be confirmed by using the
“List Names” command. (See “List of voice commands” (P.4-58) .)
2. Replace one of the names being confused with a new name.
Page 208 of 331
5-4Starting and driving
pressure telltale.
Your vehicle has also been equipped with a
TPMS malfunction indicator to indicate when the
system is not operating properly. The TPMS
malfunction indicator is combined with the low
tire pressure telltale. When the system detects a
malfunction, the telltale will flash for approxi-
mately one minute and then remain continuously
illuminated. This sequence will continue upon
subsequent vehicle start-ups as long as the
malfunction exists. When the malfunction indi-
cator is illuminated, the system may not be able
to detect or signal low tire pressure as intended.
TPMS malfunctions may occur for a variety of
reasons, including the installation of replace-
ment or alternate tires or wheels on the vehicle
that prevent the TPMS from functioning properly.
Always check the TPMS malfunction telltale
after replacing one or more tires or wheels on
your vehicle to ensure that the replacement or
alternate tires and wheels allow the TPMS to
continue to function properly.
Additional information
.The TPMS does not monitor the tire
pressure of the spare tire.
. The TPMS will activate only when the
vehicle is driven at speeds above 16 MPH
(25 km/h) . Also, this system may not detect
a sudden drop in tire pressure (for example a flat tire while driving) .
. The low tire pressure warning light does not
automatically turn off when the tire pressure
is adjusted. After the tire is inflated to the
recommended pressure, the vehicle must be
driven at speeds above 16 MPH (25 km/h)
to activate the TPMS and turn off the low tire
pressure warning light. Use a tire pressure
gauge to check the tire pressure.
. The CHECK TIRE PRES (pressure) warning
message is displayed in the vehicle informa-
tion display when the low tire pressure
warning light is illuminated and low tire
pressure is detected. The CHECK TIRE
PRES warning message turns off when the
low tire pressure warning light turns off. The
low tire pressure warning light remains
illuminated until the tires are inflated to the
recommended COLD tire pressure. The
CHECK TIRE PRES warning message is
displayed each time the ignition switch is
placed in the ON position as long as the low
tire pressure warning light remains illumi-
nated. (See “Check tire pressure warning
message” (P.2-6).)
. The CHECK TIRE PRES warning message
is not displayed if the low tire pressure
warning light illuminates to indicate a TPMS
malfunction. .
Tire pressure rises and falls depending on
the heat caused by the vehicle’s operation
and the outside temperature. Low outside
temperature can lower the temperature of
the air inside the tire which can cause a
lower tire inflation pressure. This may cause
the low tire pressure warning light to
illuminate. If the warning light illuminates in
low ambient temperature, check the tire
pressure for all four tires.
For additional information, see “Low tire pres-
sure warning light” (P.2-14) and “Tire Pressure
Monitoring System (TPMS)” (P.6-2) .
WARNING
. If the low tire pressure warning light
illuminates while driving, avoid sud-
den steering maneuvers or abrupt
braking, reduce vehicle speed, pull
off the road to a safe location and
stop the vehicle as soon as possi-
ble. Driving with under-inflated tires
may permanently damage the tires
and increase the likelihood of tire
failure. Serious vehicle damage
could occur and may lead to an
accident and could result in serious
personal injury. Check the tire pres-
Page 238 of 331
6-2In case of emergency
To shut off the engine in an emergency situation
while driving, perform the following procedure:
.Rapidly push the push-button ignition switch
3 consecutive times in less than 1.5
seconds, or
. Push and hold the push-button ignition
switch for more than 2 seconds.TIRE PRESSURE MONITORING SYS-
TEM (TPMS)
This vehicle is equipped with the Tire Pressure
Monitoring System (TPMS) . It monitors tire
pressure of all tires except the spare. When
the low tire pressure warning light is lit, and the
CHECK TIRE PRES (pressure) warning mes-
sage is displayed in the vehicle information
display, one or more of your tires is significantly
under-inflated. If the vehicle is being driven with
low tire pressure, the TPMS will activate and
warn you of it by the low tire pressure warning
light. This system will activate only when the
vehicle is driven at speeds above 16 MPH (25
km/h). For more details, see “Warning/indicator
lights and audible reminders” (P.2-11) and “Tire
Pressure Monitoring System (TPMS)” (P.5-3) .
WARNING
.If the low tire pressure warning light
illuminates while driving, avoid sud-
den steering maneuvers or abrupt
braking, reduce vehicle speed, pull
off the road to a safe location and
stop the vehicle as soon as possi-
ble. Driving with under-inflated tires
may permanently damage the tires
and increase the likelihood of tire failure. Serious vehicle damage
could occur and may lead to an
accident and could result in serious
personal injury. Check the tire pres-
sure for all four tires. Adjust the tire
pressure to the recommended COLD
tire pressure shown on the Tire and
Loading Information label to turn
the low tire pressure warning light
OFF. If you have a flat tire, replace it
with a spare tire as soon as possi-
ble.
. When a spare tire is mounted or a
wheel is replaced, the TPMS will not
function and the low tire pressure
warning light will flash for approxi-
mately 1 minute. The light will
remain on after 1 minute. Contact
your NISSAN dealer as soon as
possible for tire replacement and/
or system resetting.
. Replacing tires with those not ori-
ginally specified by NISSAN could
affect the proper operation of the
TPMS.
. Do not inject any tire liquid or
aerosol tire sealant into the tires,
as this may cause a malfunction of
EMERGENCY ENGINE SHUT OFF
(models with Intelligent Key system) FLAT TIRE