2012 NISSAN CUBE stop start
[x] Cancel search: stop startPage 84 of 331
2-12Instruments and controls
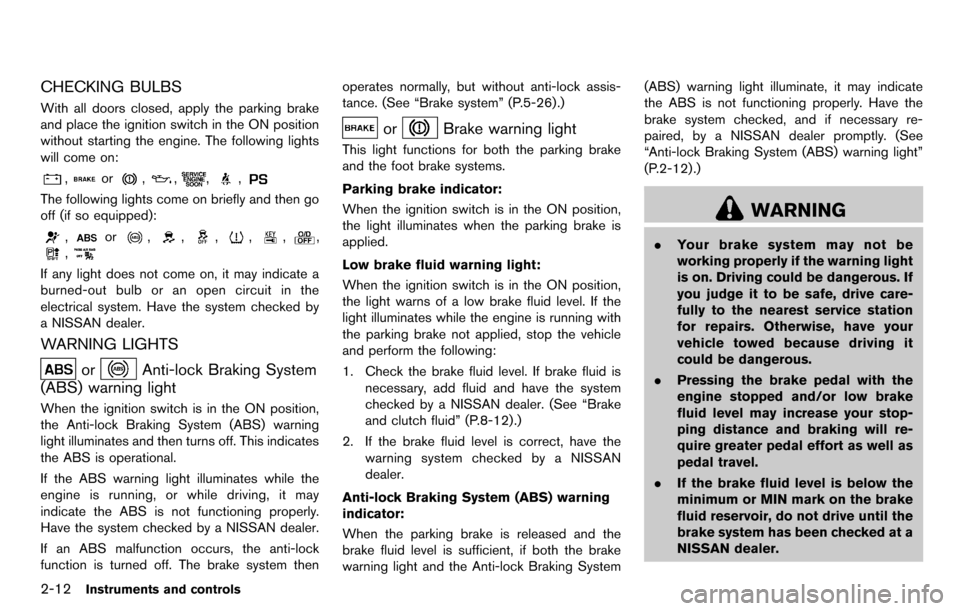
CHECKING BULBS
With all doors closed, apply the parking brake
and place the ignition switch in the ON position
without starting the engine. The following lights
will come on:
,or,,,,
The following lights come on briefly and then go
off (if so equipped):
,or,,,,,,
,
If any light does not come on, it may indicate a
burned-out bulb or an open circuit in the
electrical system. Have the system checked by
a NISSAN dealer.
WARNING LIGHTS
orAnti-lock Braking System
(ABS) warning light
When the ignition switch is in the ON position,
the Anti-lock Braking System (ABS) warning
light illuminates and then turns off. This indicates
the ABS is operational.
If the ABS warning light illuminates while the
engine is running, or while driving, it may
indicate the ABS is not functioning properly.
Have the system checked by a NISSAN dealer.
If an ABS malfunction occurs, the anti-lock
function is turned off. The brake system then operates normally, but without anti-lock assis-
tance. (See “Brake system” (P.5-26).)
orBrake warning light
This light functions for both the parking brake
and the foot brake systems.
Parking brake indicator:
When the ignition switch is in the ON position,
the light illuminates when the parking brake is
applied.
Low brake fluid warning light:
When the ignition switch is in the ON position,
the light warns of a low brake fluid level. If the
light illuminates while the engine is running with
the parking brake not applied, stop the vehicle
and perform the following:
1. Check the brake fluid level. If brake fluid is
necessary, add fluid and have the system
checked by a NISSAN dealer. (See “Brake
and clutch fluid” (P.8-12).)
2. If the brake fluid level is correct, have the warning system checked by a NISSAN
dealer.
Anti-lock Braking System (ABS) warning
indicator:
When the parking brake is released and the
brake fluid level is sufficient, if both the brake
warning light and the Anti-lock Braking System (ABS) warning light illuminate, it may indicate
the ABS is not functioning properly. Have the
brake system checked, and if necessary re-
paired, by a NISSAN dealer promptly. (See
“Anti-lock Braking System (ABS) warning light”
(P.2-12) .)
WARNING
.
Your brake system may not be
working properly if the warning light
is on. Driving could be dangerous. If
you judge it to be safe, drive care-
fully to the nearest service station
for repairs. Otherwise, have your
vehicle towed because driving it
could be dangerous.
. Pressing the brake pedal with the
engine stopped and/or low brake
fluid level may increase your stop-
ping distance and braking will re-
quire greater pedal effort as well as
pedal travel.
. If the brake fluid level is below the
minimum or MIN mark on the brake
fluid reservoir, do not drive until the
brake system has been checked at a
NISSAN dealer.
Page 85 of 331
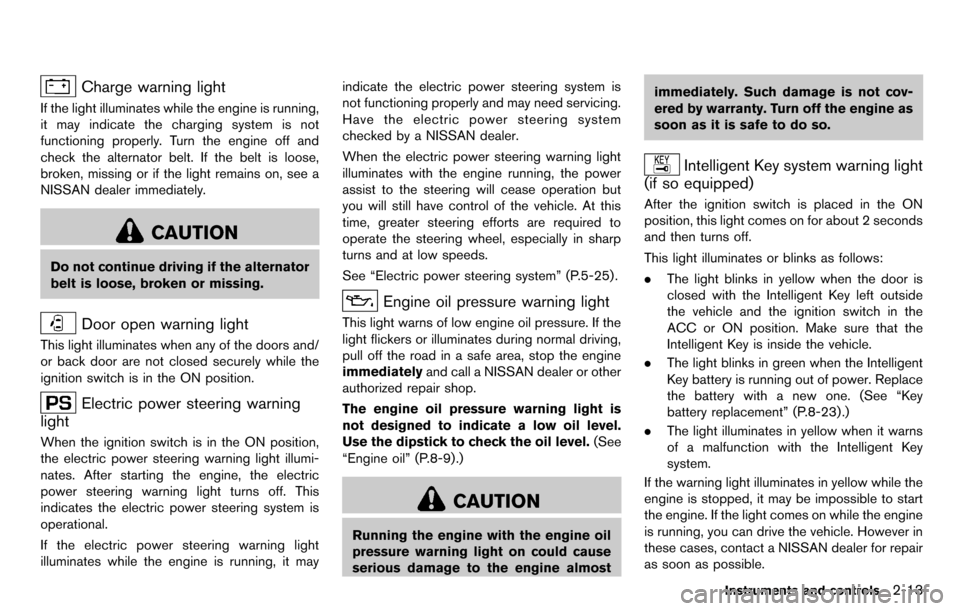
Charge warning light
If the light illuminates while the engine is running,
it may indicate the charging system is not
functioning properly. Turn the engine off and
check the alternator belt. If the belt is loose,
broken, missing or if the light remains on, see a
NISSAN dealer immediately.
CAUTION
Do not continue driving if the alternator
belt is loose, broken or missing.
Door open warning light
This light illuminates when any of the doors and/
or back door are not closed securely while the
ignition switch is in the ON position.
Electric power steering warning
light
When the ignition switch is in the ON position,
the electric power steering warning light illumi-
nates. After starting the engine, the electric
power steering warning light turns off. This
indicates the electric power steering system is
operational.
If the electric power steering warning light
illuminates while the engine is running, it may indicate the electric power steering system is
not functioning properly and may need servicing.
Have the electric power steering system
checked by a NISSAN dealer.
When the electric power steering warning light
illuminates with the engine running, the power
assist to the steering will cease operation but
you will still have control of the vehicle. At this
time, greater steering efforts are required to
operate the steering wheel, especially in sharp
turns and at low speeds.
See “Electric power steering system” (P.5-25) .
Engine oil pressure warning light
This light warns of low engine oil pressure. If the
light flickers or illuminates during normal driving,
pull off the road in a safe area, stop the engine
immediately
and call a NISSAN dealer or other
authorized repair shop.
The engine oil pressure warning light is
not designed to indicate a low oil level.
Use the dipstick to check the oil level. (See
“Engine oil” (P.8-9).)
CAUTION
Running the engine with the engine oil
pressure warning light on could cause
serious damage to the engine almost immediately. Such damage is not cov-
ered by warranty. Turn off the engine as
soon as it is safe to do so.
Intelligent Key system warning light
(if so equipped)
After the ignition switch is placed in the ON
position, this light comes on for about 2 seconds
and then turns off.
This light illuminates or blinks as follows:
. The light blinks in yellow when the door is
closed with the Intelligent Key left outside
the vehicle and the ignition switch in the
ACC or ON position. Make sure that the
Intelligent Key is inside the vehicle.
. The light blinks in green when the Intelligent
Key battery is running out of power. Replace
the battery with a new one. (See “Key
battery replacement” (P.8-23) .)
. The light illuminates in yellow when it warns
of a malfunction with the Intelligent Key
system.
If the warning light illuminates in yellow while the
engine is stopped, it may be impossible to start
the engine. If the light comes on while the engine
is running, you can drive the vehicle. However in
these cases, contact a NISSAN dealer for repair
as soon as possible.
Instruments and controls2-13
Page 92 of 331
2-20Instruments and controls
a. the LOCKbutton on the keyfob or
Intelligent Key (if so equipped)
b. any request switch (Intelligent Key equipped model)
c. the power door lock switch
d. the key — master or mechanical (Intelli- gent Key equipped model)
4. Confirm that the security indicator light illuminates. The security indicator light stays
on for about 30 seconds. The vehicle
security system is now pre-armed. After
about 30 seconds the vehicle security
system automatically shifts into the armed
phase. The security light begins to flash
once every approximately 3 seconds. If,
during this 30-second pre-arm time period,
the door is unlocked, or the ignition switch is
placed in the ACC or ON position, the
system will not arm.
Even when the driver and/or passengers
are in the vehicle, the system will activate
with all doors locked with the ignition
switch in the LOCK position. When turning
the ignition switch to the ACC or ON
position, the system will be released.Vehicle security system activation
The vehicle security system will give the follow-
ing alarm:
. The headlights blink and the horn sounds
intermittently.
. The alarm automatically turns off after
approximately 50 seconds. However, the
alarm reactivates if the vehicle is tampered
with again.
The alarm is activated by:
. Unlocking the door without using the keyfob,
the Intelligent Key (if so equipped) the
request switch (if so equipped) or the key.
(Even if the door is opened by releasing the
door inside lock knob, the alarm will
activate.)
How to stop an activated alarm
The alarm will stop by unlocking a door by
pushing the UNLOCK
button on the keyfob
or Intelligent Key, pushing the request switch or
using the key. The alarm will not stop if the
ignition switch is placed in the ACC or ON
position.
If the system does not operate as de-
scribed above, have it checked by a
NISSAN dealer.
NISSAN VEHICLE IMMOBILIZER SYS-
TEM
The NISSAN Vehicle Immobilizer System will not
allow the engine to start without the use of the
registered key.
If the engine fails to start using the registered
key, it may be due to interference caused by
another registered key, an automated toll road
device or automated payment device on the key
ring. Restart the engine using the following
procedures:
1. Leave the ignition switch in the ON position
for approximately 5 seconds.
2. Place the ignition switch in the OFF or LOCK position and wait approximately 10
seconds.
3. Repeat step 1 and 2 again.
4. Restart the engine while holding the device (which may have caused the interference)
separate from the registered key.
If this procedure allows the engine to start,
NISSAN recommends placing the regis-
tered key on a separate key ring to avoid
interference from other devices.
Statement related to section 15 of FCC
rules for NISSAN Vehicle Immobilizer
System (CONT ASSY-BCM. ANT ASSY-
IMMOBILISER)
Page 127 of 331
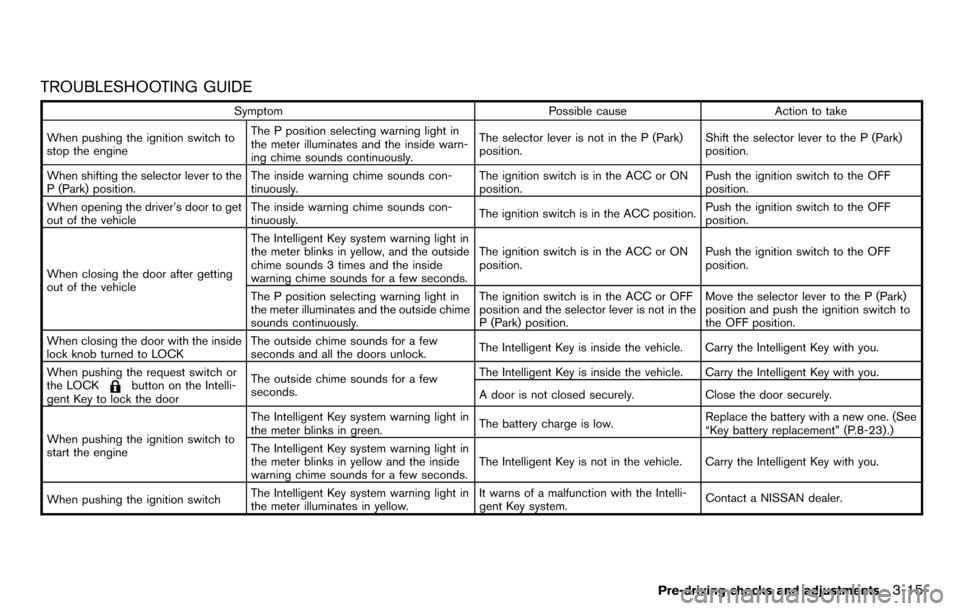
TROUBLESHOOTING GUIDE
SymptomPossible causeAction to take
When pushing the ignition switch to
stop the engine The P position selecting warning light in
the meter illuminates and the inside warn-
ing chime sounds continuously.
The selector lever is not in the P (Park)
position.
Shift the selector lever to the P (Park)
position.
When shifting the selector lever to the
P (Park) position. The inside warning chime sounds con-
tinuously. The ignition switch is in the ACC or ON
position.Push the ignition switch to the OFF
position.
When opening the driver’s door to get
out of the vehicle The inside warning chime sounds con-
tinuously.
The ignition switch is in the ACC position.Push the ignition switch to the OFF
position.
When closing the door after getting
out of the vehicle The Intelligent Key system warning light in
the meter blinks in yellow, and the outside
chime sounds 3 times and the inside
warning chime sounds for a few seconds.
The ignition switch is in the ACC or ON
position.
Push the ignition switch to the OFF
position.
The P position selecting warning light in
the meter illuminates and the outside chime
sounds continuously. The ignition switch is in the ACC or OFF
position and the selector lever is not in the
P (Park) position.Move the selector lever to the P (Park)
position and push the ignition switch to
the OFF position.
When closing the door with the inside
lock knob turned to LOCK The outside chime sounds for a few
seconds and all the doors unlock.
The Intelligent Key is inside the vehicle. Carry the Intelligent Key with you.
When pushing the request switch or
the LOCK
button on the Intelli-
gent Key to lock the door The outside chime sounds for a few
seconds.
The Intelligent Key is inside the vehicle. Carry the Intelligent Key with you.
A door is not closed securely.
Close the door securely.
When pushing the ignition switch to
start the engine The Intelligent Key system warning light in
the meter blinks in green.
The battery charge is low.Replace the battery with a new one. (See
“Key battery replacement” (P.8-23) .)
The Intelligent Key system warning light in
the meter blinks in yellow and the inside
warning chime sounds for a few seconds. The Intelligent Key is not in the vehicle. Carry the Intelligent Key with you.
When pushing the ignition switch The Intelligent Key system warning light in
the meter illuminates in yellow. It warns of a malfunction with the Intelli-
gent Key system.
Contact a NISSAN dealer.
Pre-driving checks and adjustments3-15
Page 133 of 331
SPA2336
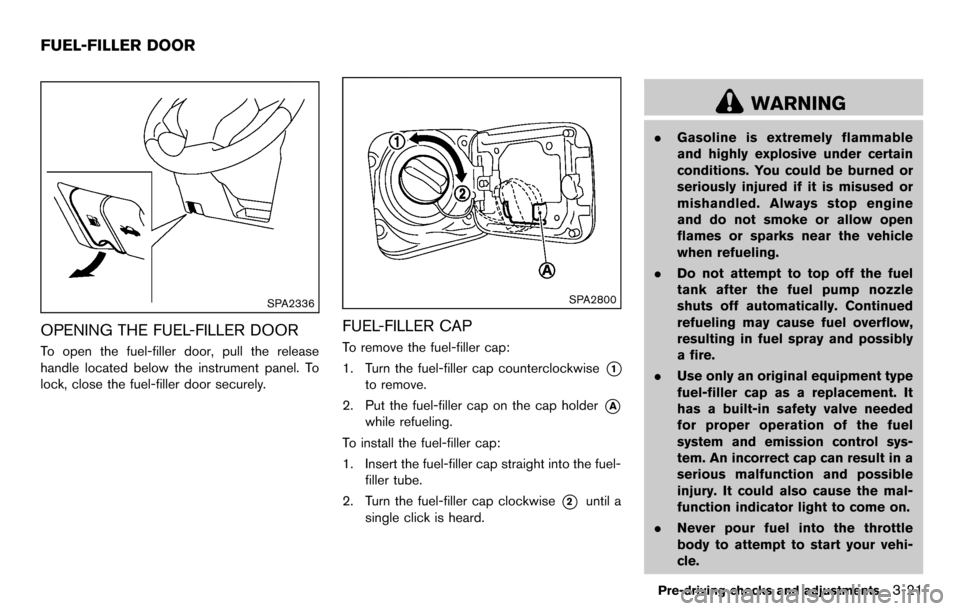
OPENING THE FUEL-FILLER DOOR
To open the fuel-filler door, pull the release
handle located below the instrument panel. To
lock, close the fuel-filler door securely.
SPA2800
FUEL-FILLER CAP
To remove the fuel-filler cap:
1. Turn the fuel-filler cap counterclockwise
*1
to remove.
2. Put the fuel-filler cap on the cap holder
*A
while refueling.
To install the fuel-filler cap:
1. Insert the fuel-filler cap straight into the fuel- filler tube.
2. Turn the fuel-filler cap clockwise
*2until a
single click is heard.
WARNING
. Gasoline is extremely flammable
and highly explosive under certain
conditions. You could be burned or
seriously injured if it is misused or
mishandled. Always stop engine
and do not smoke or allow open
flames or sparks near the vehicle
when refueling.
. Do not attempt to top off the fuel
tank after the fuel pump nozzle
shuts off automatically. Continued
refueling may cause fuel overflow,
resulting in fuel spray and possibly
a fire.
. Use only an original equipment type
fuel-filler cap as a replacement. It
has a built-in safety valve needed
for proper operation of the fuel
system and emission control sys-
tem. An incorrect cap can result in a
serious malfunction and possible
injury. It could also cause the mal-
function indicator light to come on.
. Never pour fuel into the throttle
body to attempt to start your vehi-
cle.
Pre-driving checks and adjustments3-21
FUEL-FILLER DOOR
Page 173 of 331
TUNE (Tuning):
Push the TUNE button
orfor manual
tuning.
SEEK tuning:
Push the SEEK button
orto tune from
low to high or high to low frequencies and to
stop at the next broadcasting station.
SCAN tuning:
Push the SCAN tuning button to tune from low
to high frequencies and stops at each broad-
casting station for 5 seconds. Pushing the
button again during this 5 seconds period will
stop SCAN tuning and the radio will remain
tuned to that station.
If the SCAN tuning button is not pushed within 5
seconds, SCAN tuning moves to the next
station.
toStation memory operations:
Twelve stations can be set for the FM band (6
each for FM1 and FM2) and 6 stations can be
set for the AM band.
1. Choose the radio band AM, FM1 or FM2 using the radio band select button.
2. Tune to the desired station using the SEEK, SCAN or TUNE button. 3. Select the desired station and push and
hold the desired station preset buttons 1 to
6 until a beep sound is heard. (The radio
mutes when the select button is pushed.)
4. The station indicator will then come on and the sound will resume. Memorizing is now
complete.
5. Other buttons can be set in the same manner.
If the battery cable is disconnected, or if the fuse
blows, the radio memory will be erased. In that
case, reset the desired stations.
Compact Disc (CD) player operation
Place the ignition switch in the ACC or ON
position, and insert the CD into the slot with the
label side facing up. The CD will be guided
automatically into the slot and start playing.
After loading the disc, the number of tracks on
the disc will appear on the display.
If the radio is already operating, it will auto-
matically turn off and the CD will play.
If the system has been turned off while the CD
was playing, pushing the PWR button will start
the CD.
MP3 or WMA CDs are not supported with this
CD player. If an MP3 or WMA CD is inserted
into the slot, the counter on the audio display automatically advances without sound. However
this is a specification of the CD mechanism and
not a malfunction.
Do not use 3.1 in (8 cm) discs.
CD PLAY:
When the CD button is pushed with the system
off and the CD loaded, the system will turn on
and the CD will start to play.
When the CD button is pushed with the CD
loaded and the radio playing, the radio will
automatically be turned off and the CD will start
to play.
FF (Fast Forward) , REW (Rewind):
Push the FF or REW button while a CD is
playing to fast-forward or rewind through the
track.
When the button is released, the CD will return
to normal play speed.
APS (Automatic Program Search) FF,
APS REW:
When the
of the SEEK button is pushed
while the CD is being played, the next track or
the current track on the CD will start to play from
its beginning. Push several times to skip through
tracks. The CD will advance the number of times
Center display, heater, air conditioner, audio and phone systems4-33
Page 178 of 331
4-38Center display, heater, air conditioner, audio and phone systems
is not available, pressing the DISP button will
only switch between the frequency display and
the PS display.
Compact Disc (CD) player operation
Place the ignition switch in the ACC or ON
position, and insert the CD into the slot with the
label side facing up. The CD will be guided
automatically into the slot and start playing.
After loading the disc, the number of tracks on
the disc will appear on the display.
If the radio is already operating, it will auto-
matically turn off and the CD will play.
If the system has been turned off while the CD
was playing, pushing the PWR button will start
the CD.
Do not use 3.1 in (8 cm) discs.
CD PLAY:
When the CD button is pushed with the system
off and the CD loaded, the system will turn on
and the CD will start to play.
When the CD button is pushed with the CD
loaded and the radio playing, the radio will
automatically be turned off and the CD will start
to play.
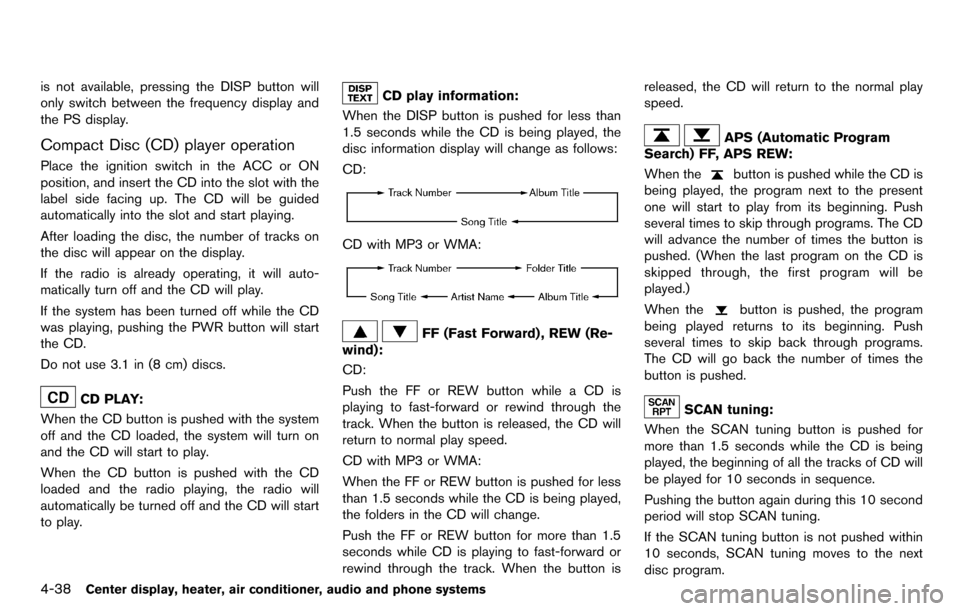
CD play information:
When the DISP button is pushed for less than
1.5 seconds while the CD is being played, the
disc information display will change as follows:
CD:
CD with MP3 or WMA:
FF (Fast Forward) , REW (Re-
wind):
CD:
Push the FF or REW button while a CD is
playing to fast-forward or rewind through the
track. When the button is released, the CD will
return to normal play speed.
CD with MP3 or WMA:
When the FF or REW button is pushed for less
than 1.5 seconds while the CD is being played,
the folders in the CD will change.
Push the FF or REW button for more than 1.5
seconds while CD is playing to fast-forward or
rewind through the track. When the button is released, the CD will return to the normal play
speed.
APS (Automatic Program
Search) FF, APS REW:
When the
button is pushed while the CD is
being played, the program next to the present
one will start to play from its beginning. Push
several times to skip through programs. The CD
will advance the number of times the button is
pushed. (When the last program on the CD is
skipped through, the first program will be
played.)
When the
button is pushed, the program
being played returns to its beginning. Push
several times to skip back through programs.
The CD will go back the number of times the
button is pushed.
SCAN tuning:
When the SCAN tuning button is pushed for
more than 1.5 seconds while the CD is being
played, the beginning of all the tracks of CD will
be played for 10 seconds in sequence.
Pushing the button again during this 10 second
period will stop SCAN tuning.
If the SCAN tuning button is not pushed within
10 seconds, SCAN tuning moves to the next
disc program.
Page 183 of 331
TUNE (Tuning):
.For AM and FM radio
Turn the TUNE knob for manual tuning.
. For XM Satellite Radio
Turn the TUNE knob to seek channels from
all of the categories when any category is
not selected.
SEEK tuning:
. For AM and FM radio
Push the SEEK/CATEGORY button
or
to tune from low to high or high to low
frequencies and to stop at the next broad-
casting station.
. For XM Satellite Radio
Push the SEEK/CATEGORY button
or
to tune to the first channel of the next or
previous category.
Tuning with the touch screen (AM and FM
radio):
When in AM or FM mode, the radio can be
tuned using the touch screen. To bring up the
visual tuner, touch the “Tune” key on the lower
right corner of the screen. A screen appears
with a bar running from low frequencies on the
left to high frequencies on the right. Touch the
screen at the location of the frequency you wish
to tune and the station will change to that frequency. To return to the regular radio display
screen, touch the “OK” key.
toStation memory operations:
12 stations/channels can be set for the FM band
(6 each for FM1 and FM2), 18 for XM radio (6
each for XM1, XM2 and XM3) and 6 stations
can be set for the AM band.
1. Choose the radio band using the radio band select button.
2. Tune to the desired station/channel using the SEEK/CATEGORY button or the TUNE
knob.
3. Push and hold the desired station preset button
tountil the beep sound is
heard.
4. The station indicator will then come on and the sound will resume. Memorizing is now
complete.
5. Other buttons can be set in the same manner.
If the battery cable is disconnected, or if the fuse
opens, the radio memory will be erased. In that
case, reset the desired stations/channels.
Channels (XM Satellite Radio):
When the XM Satellite Radio is being played,
select “Channels” key to display a list of
channels. Select a preferred channel from the list to change to that channel.
Categories (XM Satellite Radio):
When the XM Satellite Radio is being played,
select “Categories” key to display a list of
channels. Select a preferred channel from the
list to display options within that category.
Compact Disc (CD) player operation
Place the ignition switch in the ACC or ON
position and insert the Compact Disc (CD) into
the slot with the label side facing up. The CD will
be guided automatically into the slot and start
playing.
If the radio is already operating, it will auto-
matically turn off and the CD will play.
If the system has been turned off while the CD
was playing, pushing the ON·OFF button will
start the CD.
Do not use 3.1 in (8 cm) discs.
PLAY:
When the CD button is pushed with the system
off and the CD loaded, the system will turn on
and the CD will start to play.
When the CD button is pushed with the CD
loaded and the radio playing, the radio will
automatically be turned off and the CD will start
to play.
Center display, heater, air conditioner, audio and phone systems4-43