2012 NISSAN ARMADA display
[x] Cancel search: displayPage 2 of 20
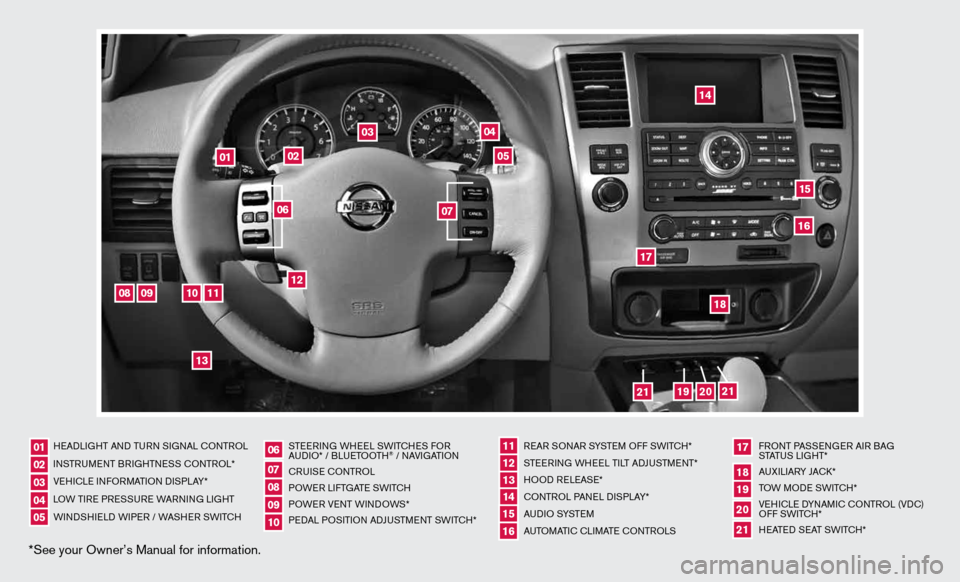
*See your Owner’s Manual for information.
HeAd LiGHT And Tu Rn S iG nAL c OnTROL
in STR uM enT BR iGHTne SS cOnTROL*
Ve Hic Le infORMATi On di SPLAY*
LOW T iRe PRe SSuRe WARnin G LiGHT
W ind SHieL d W iPeR / WASHeR SW iT c H STee
Rin G WH eeL SW iTc HeS fOR
A udi O* / BLueTOOTH
® / nAVi GATiOn
cR uiSe cOn TROL
POW eR LifTGATe SW iTc H
POW eR VenT W indOWS*
P ed AL POS iTiOn Ad Ju STM enT SW iTc H* R
eAR SO nAR SYSTe M Off SW iTc H*
ST eeRin G WHeeL T iLT AdJu STMen T*
HOO d ReLeAS e*
cOn TROL PA neL diSPLAY*
A u d i O SYST eM
A uTOMATic c LiMATe c OnTROLS f
RO nT PASS enGeR Ai R BAG
STATu S LiGHT*
A u XiLiARY JA ck*
TOW MOde SWiTcH*
Ve Hic Le d YnAM ic cOnTROL (Vdc)
Off SWi TcH*
H eATed S eAT SWiTc H*
0102030405
0607080910
11 12131415
17
16
18192021
01
02
04
03
05
08
09
10
11
12
13
14
1516
17
18
19
21
21
20
06
07
Page 4 of 20
tirE Pr Essur E monitorin G systEm (tPms)
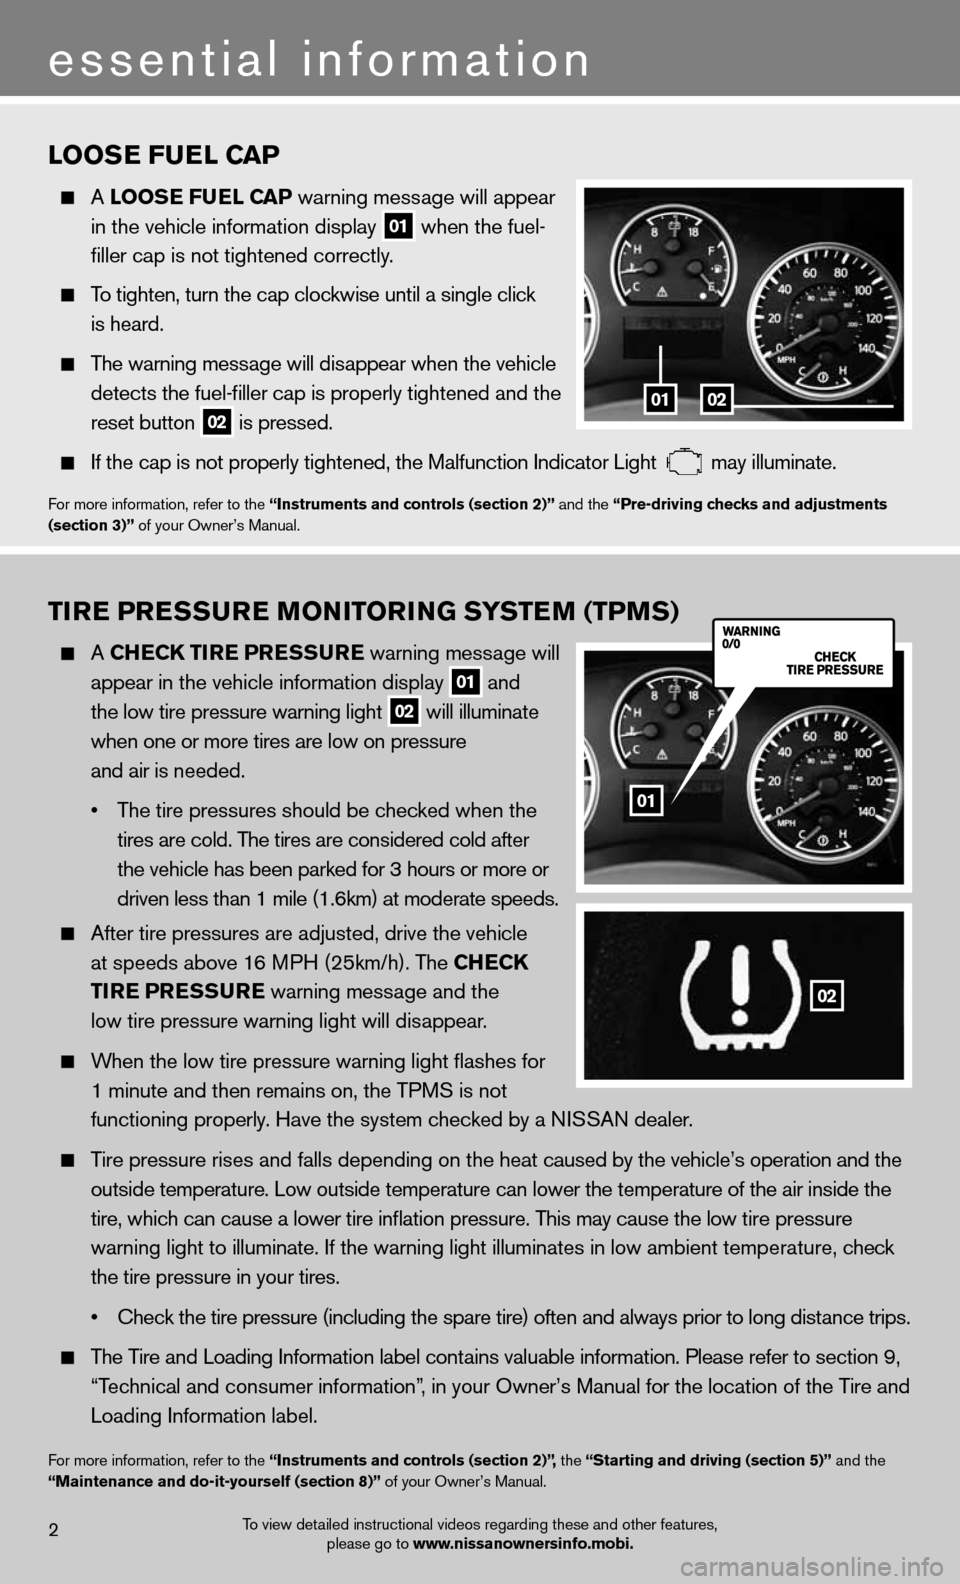
A ChEC k tirE PrEssurE warning message will
appear in the vehicle information display
01 and
the low tire pressure warning light 02 will illuminate
when one or more tires are low on pressure
and air is needed.
• The tire pressures should be checked when the
tires are cold. The tires are considered cold after
the vehicle has been parked for 3 hours or more or
driven less than 1 mile (1.6km) at moderate speeds.
After tire pressures are adjusted, drive the vehicle
at speeds above 16 MPH (25km/h). The Ch ECk
tirE P rEssurE warning message and the
low tire pressure warning light will disappear.
When the low tire pressure warning light flashes for
1 minute and then remains on, the TPMS is not
functioning properly. Have the system checked by a ni SSAn dealer.
Tire pressure rises and falls depending on the heat caused by the vehicle’s operation and the
outside temperature. Low outside temperature can lower the temperature o\
f the air inside the
tire, which can cause a lower tire inflation pressure. This may cause the low tire pressure
warning light to illuminate. if the warning light illuminates in low ambient temperature, check
the tire pressure in your tires.
• Check the tire pressure (including the spare tire) often and always prior to long distance trips.
The Tire and Loading information label contains valuable information. Please refer to section 9,
“Technical and consumer information”, in your Owner’s Manual for the location of the Tire and
Loading information label.
for more information, refer to the “instruments and controls (section 2)”, the “starting and driving (section 5)” and the
“maintenance and do-it-yourself (section 8)” of your Owner’s Manual.
loos E fuEl C aP
A loos E fuEl CaP warning message will appear
in the vehicle information display
01 when the fuel-
filler cap is not tightened correctly.
To tighten, turn the cap clockwise until a single click
is heard.
The warning message will disappear when the vehicle
detects the fuel-filler cap is properly tightened and the
reset button
02 is pressed.
if the cap is not properly tightened, the Malfunction indicator Light may illuminate.
f
or more information, refer to the “instruments and controls (section 2)” and the “Pre-driving checks and adjustments
(section 3)” of your Owner’s Manual.
2
essential information
0102
To view detailed instructional videos regarding these and other features, please go to www.nissanownersinfo.mobi.
02
01
Page 11 of 20
9To view detailed instructional videos regarding these and other features, please go to www.nissanownersinfo.mobi.
04 station s
ElEC t Buttons
eighteen stations can be set in any combination of f M, AM and XM satellite radio stations.
To store a station in a preset, first select a preset bank A, B or c by pressing the
PrEs Et a·B·C button
05 .
Then select the radio band by pressing the AM•FM/SAT button
06 and tune to the
desired AM, f M or XM satellite radio station.
Next, press and hold the desired station select button (1-6) until a beep is heard and the
sound is briefly muted. The channel indicator will appear and the sound will resume.
Programming is now complete.
To retrieve a previously set station, select the radio band where the preset was stored
then press the corresponding station select button (1-6).
for more information, refer to the “monitor, climate, audio, phone and voice recognition systems (section 4)” of your
Owner’s Manual.
Cruis E Control
The cruise control system enables you to set a constant
cruising speed once the vehicle has reached 25 mph.
The system will automatically maintain the set speed
until you tap the brake pedal, accelerate, cancel or
turn the system off.
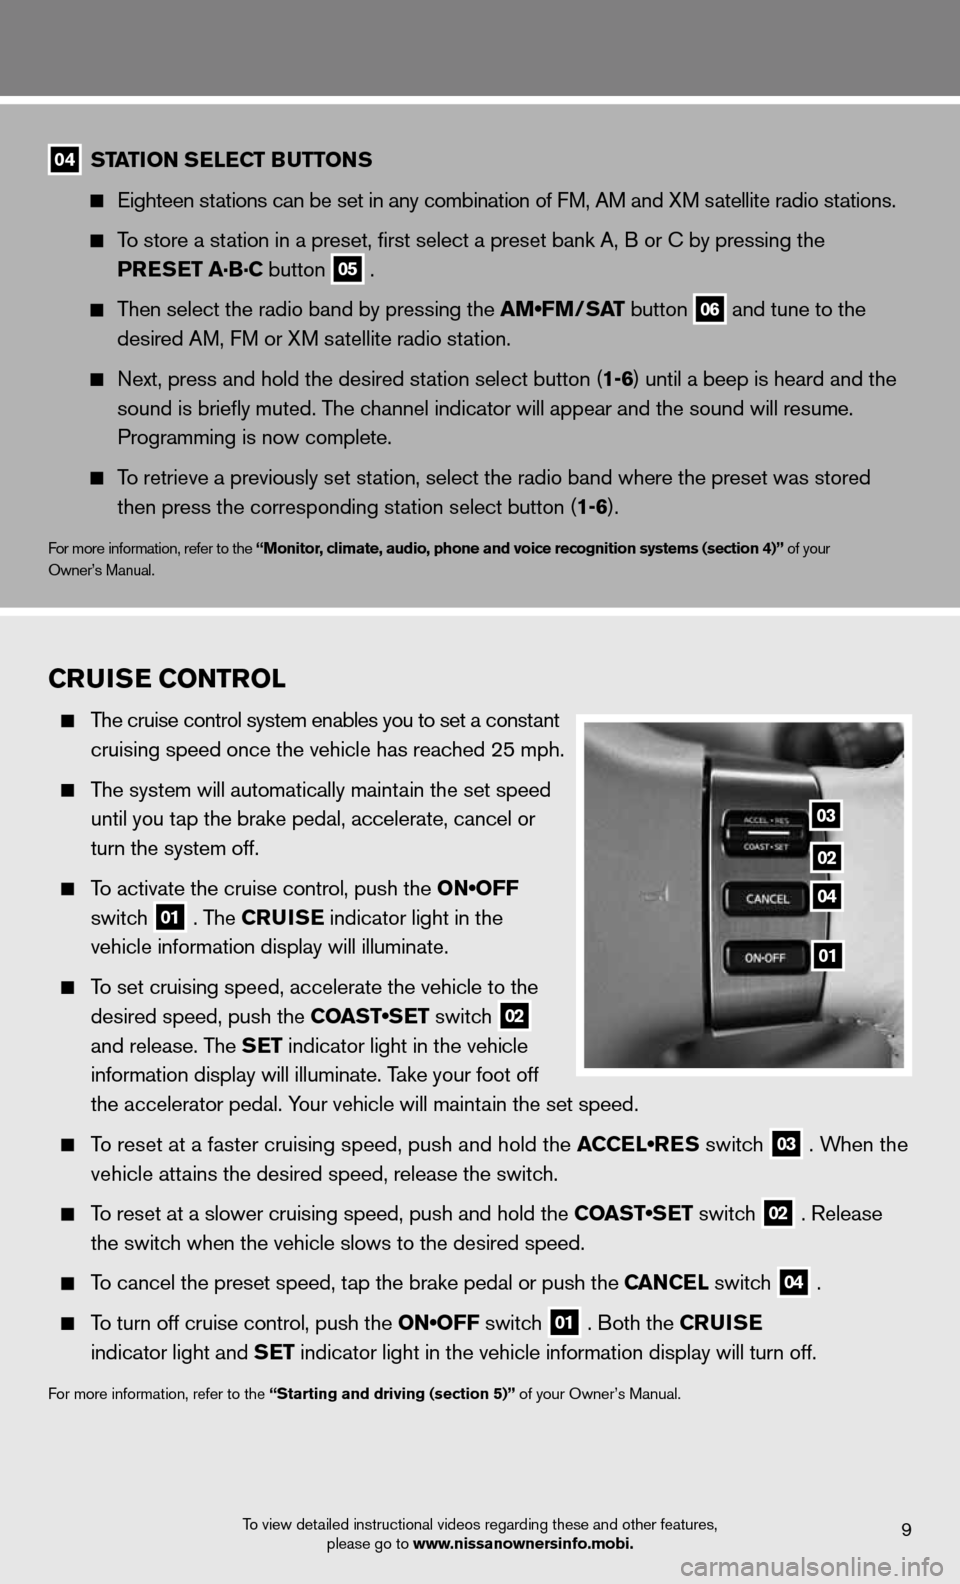
To activate the cruise control, push the ON•OFF
switch
01 . The C
ruisE indicator light in the
vehicle information display will illuminate.
To set cruising speed, accelerate the vehicle to the
desired speed, push the COAST•SET switch
02
and release. The s
Et indicator light in the vehicle
information display will illuminate. Take your foot off
the accelerator pedal. Your vehicle will maintain the set speed.
To reset at a faster cruising speed, push and hold the ACCEL•RES switch
03 . When the
vehicle attains the desired speed, release the switch.
To reset at a slower cruising speed, push and hold the COAST•SET switch
02 . Release
the switch when the vehicle slows to the desired speed.
To cancel the preset speed, tap the brake pedal or push the C anCEl switch
04 .
To turn off cruise control, push the ON•OFF switch
01 . Both the C
ruisE
indicator light and s Et indicator light in the vehicle information display will turn off.
for more information, refer to the “starting and driving (section 5)” of your Owner’s Manual.
03
02
04
01
Page 13 of 20
system guide
triP Com PutEr (if so equipped)
Press the info button on the control Panel, then
select the “Trip computer” key using the ni SSAn
controller and press the E ntEr button.
The trip computer will display the following items:
• Elapsed t ime – Journey time since the last reset.
• Driving Distance – distance driven since the last reset.
• average speed – Average speed driven since the last reset.
for more information, refer to the “monitor, climate, audio, phone and voice recognition systems (section 4)” of your
Owner’s Manual.
To view detailed instructional videos regarding these and other features, please go to www.nissanownersinfo.mobi.11
Blu Etooth® han Ds-fr EE Phon E systEm (if so equipped)
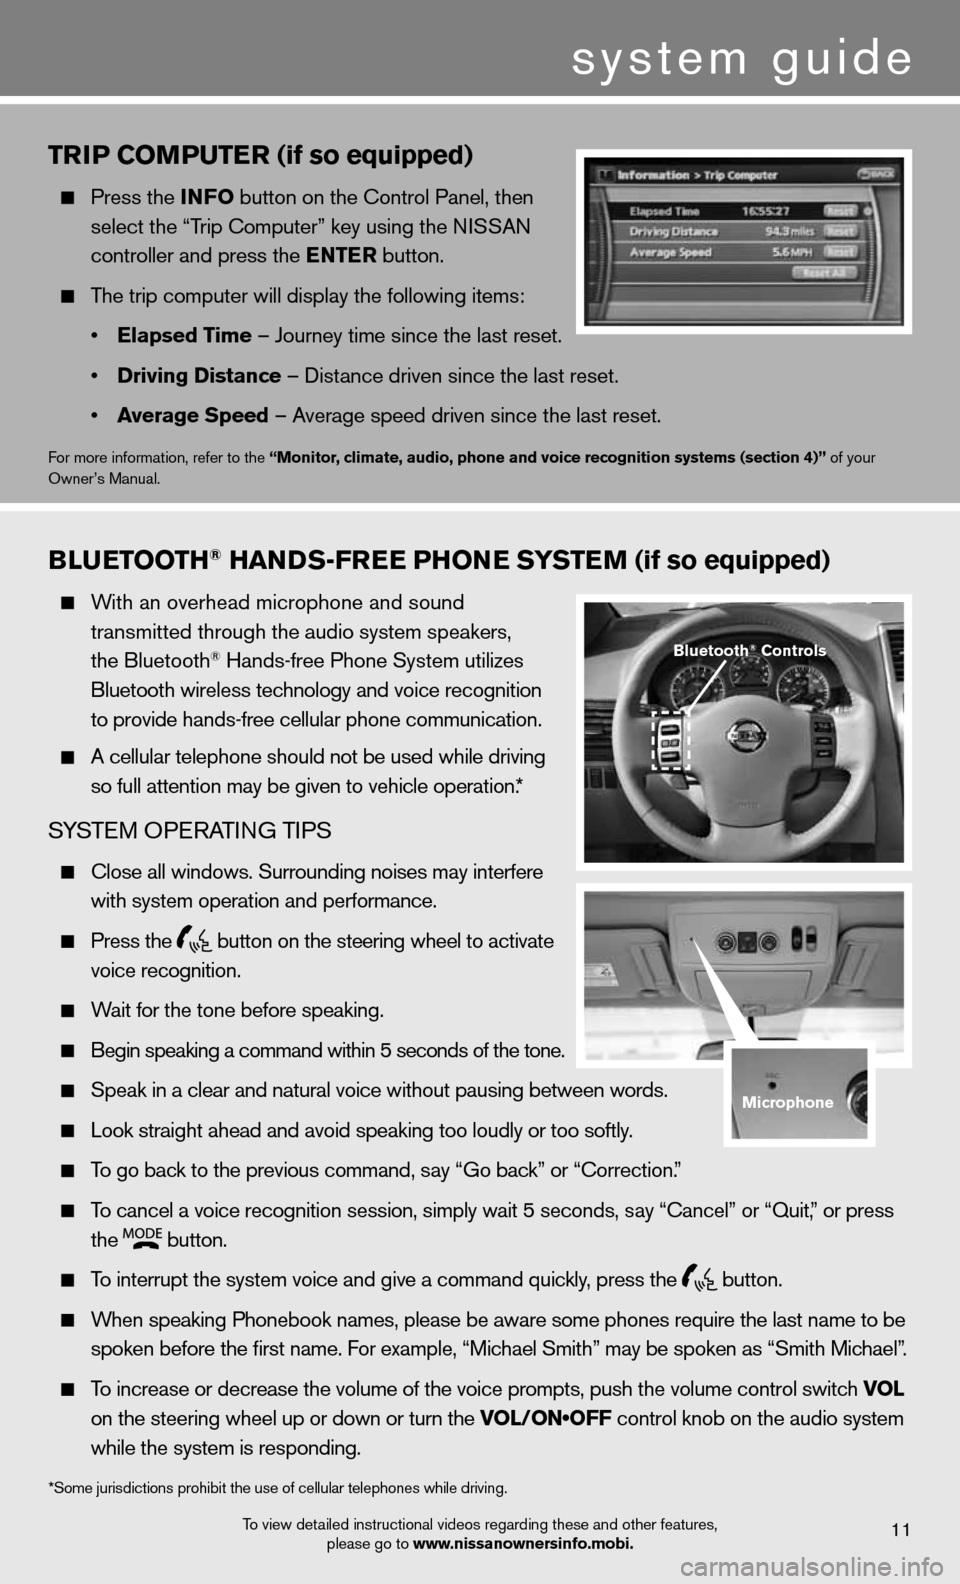
With an overhead microphone and sound
transmitted through the audio system speakers,
the Bluetooth
® Hands-free Phone System utilizes
Bluetooth wireless technology and voice recognition
to provide hands-free cellular phone communication.
A cellular telephone should not be used while driving
so full attention may be given to vehicle operation.*
SYSTe M OPeRATin G TiPS
close all windows. Surrounding noises may interfere
with system operation and performance.
Press the
button on the steering wheel to activate
voice recognition.
Wait for the tone before speaking.
Begin speaking a command within 5 seconds of the tone.
Speak in a clear and natural voice without pausing between words.
Look straight ahead and avoid speaking too loudly or too softly.
To go back to the previous command, say “Go back” or “correction.”
To cancel a voice recognition session, simply wait 5 seconds, say “cancel” or “Quit,” or press
the
button.
To interrupt the system voice and give a command quickly, press the
button.
When speaking Phonebook names, please be aware some phones require the la\
st name to be
spoken before the first name. For example, “Michael Smith” may be spoken as “Smith Michael”.
To increase or decrease the volume of the voice prompts, push the volume \
control switch vol
on the steering wheel up or down or turn the VOL/ON•OFF control knob on the audio system
while the system is responding.
*Some jurisdictions prohibit the use of cellular telephones while drivin\
g.
Bluetooth® Controls
microphone
Page 17 of 20
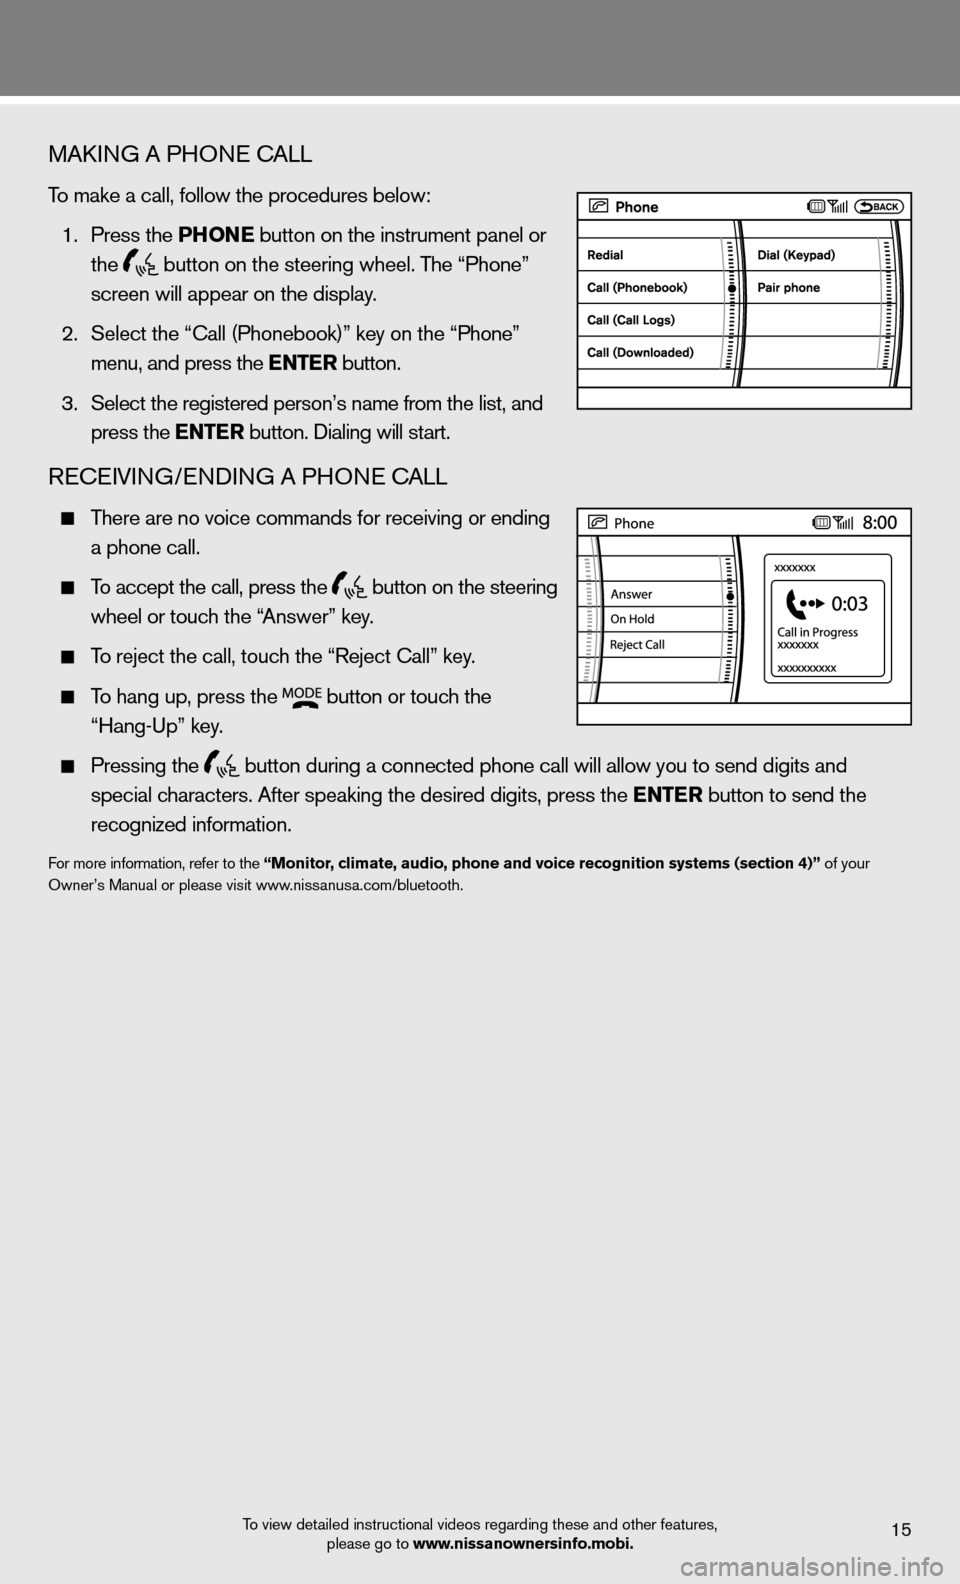
MAkinG A PHO ne cALL
To make a call, follow the procedures below:
1. Press the Phon E button on the instrument panel or
the
button on the steering wheel. The “Phone”
screen will appear on the display.
2. Select the “call (Phonebook)” key on the “Phone”
menu, and press the E ntEr button.
3. Select the registered person’s name from the list, and
press the E ntEr button. dialing will start.
Recei Vin G/endin G A PHOne cALL
There are no voice commands for receiving or ending
a phone call.
To accept the call, press the
button on the steering
wheel or touch the “Answer” key.
To reject the call, touch the “Reject call” key.
To hang up, press the
button or touch the
“Hang-up” key.
Pressing the
button during a connected phone call will allow you to send digits and
special characters. After speaking the desired digits, press the E ntEr button to send the
recognized information.
for more information, refer to the “monitor, climate, audio, phone and voice recognition systems (section 4)” of your
Owner’s Manual or please visit www.nissanusa.com/bluetooth.
To view detailed instructional videos regarding these and other features, please go to www.nissanownersinfo.mobi.
15
Page 18 of 20
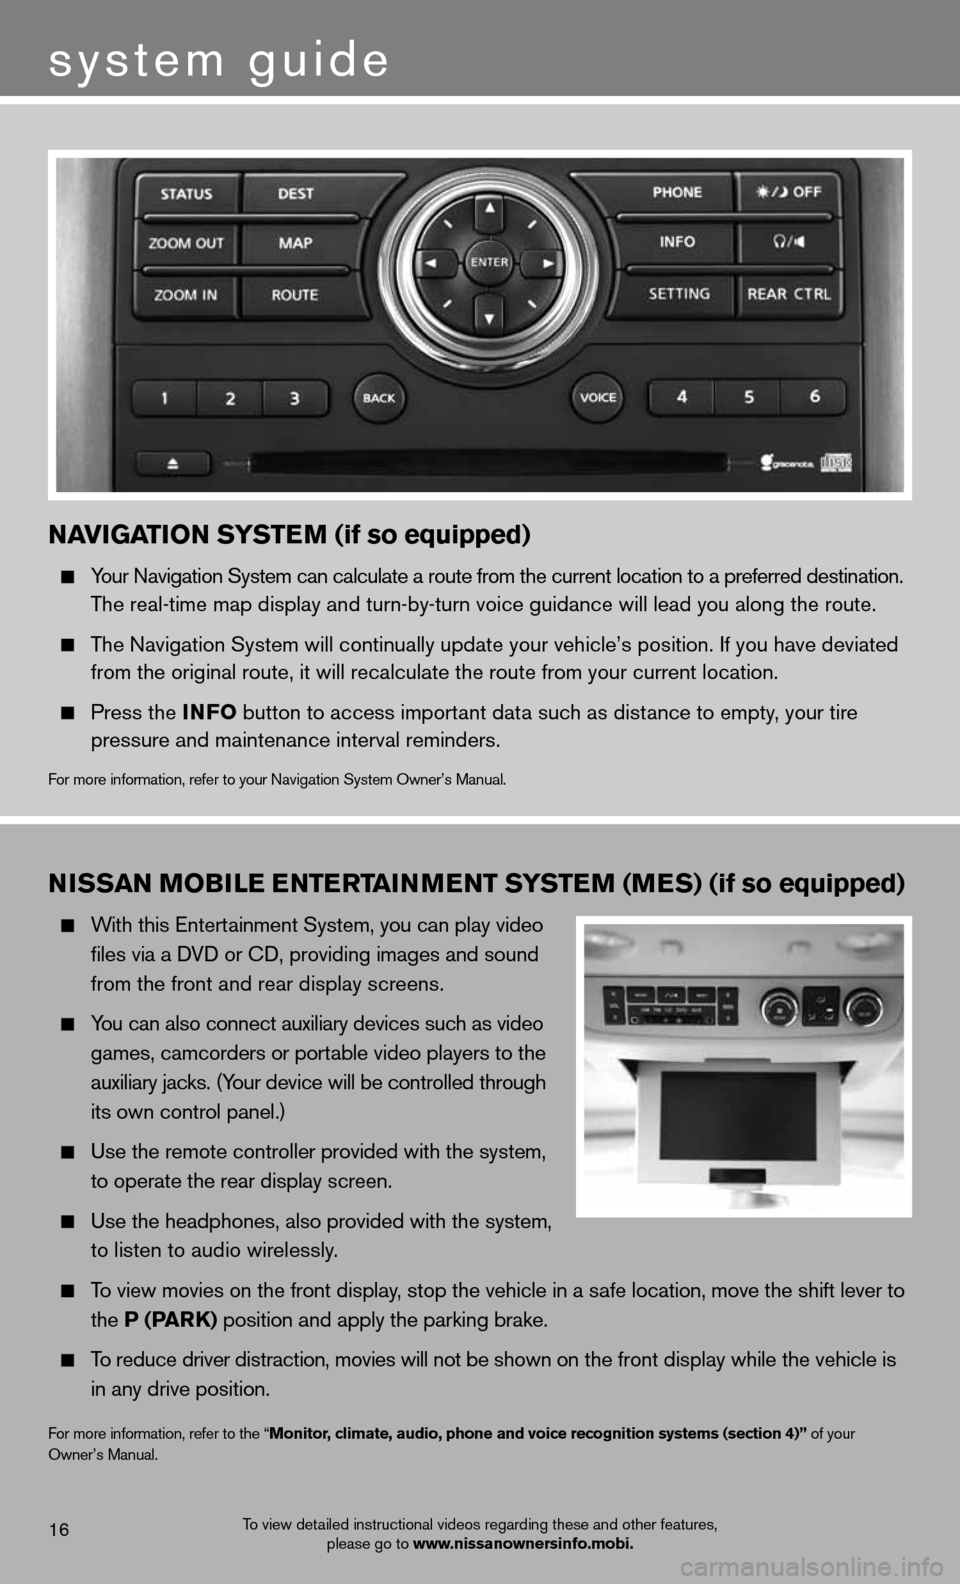
nissan moBilE EntErtainm Ent systE m (mEs) (if so equipped)
With this entertainment System, you can play video
files via a d Vd or cd, providing images and sound
from the front and rear display screens.
You can also connect auxiliary devices such as video
games, camcorders or portable video players to the
auxiliary jacks. (Your device will be controlled through
its own control panel.)
use the remote controller provided with the system,
to operate the rear display screen.
use the headphones, also provided with the system,
to listen to audio wirelessly.
To view movies on the front display, stop the vehicle in a safe location, move the shift lever to
the P (P ark) position and apply the parking brake.
To reduce driver distraction, movies will not be shown on the front display while the vehicle is
in any drive position.
for more information, refer to the “monitor, climate, audio, phone and voice recognition systems (section 4)” of your
Owner’s Manual.
To view detailed instructional videos regarding these and other features, please go to www.nissanownersinfo.mobi.16
system guide
naviGation systE m (if so equipped)
Your navigation System can calculate a route from the current location to a pr\
eferred destination.
The real-time map display and turn-by-turn voice guidance will lead you a\
long the route.
The navigation System will continually update your vehicle’s position. if you have deviated
from the original route, it will recalculate the route from your current\
location.
Press the info button to access important data such as distance to empty, your tire
pressure and maintenance interval reminders.
for more information, refer to your navigation System Owner’s Manual.