2012 NISSAN ARMADA lights
[x] Cancel search: lightsPage 209 of 489
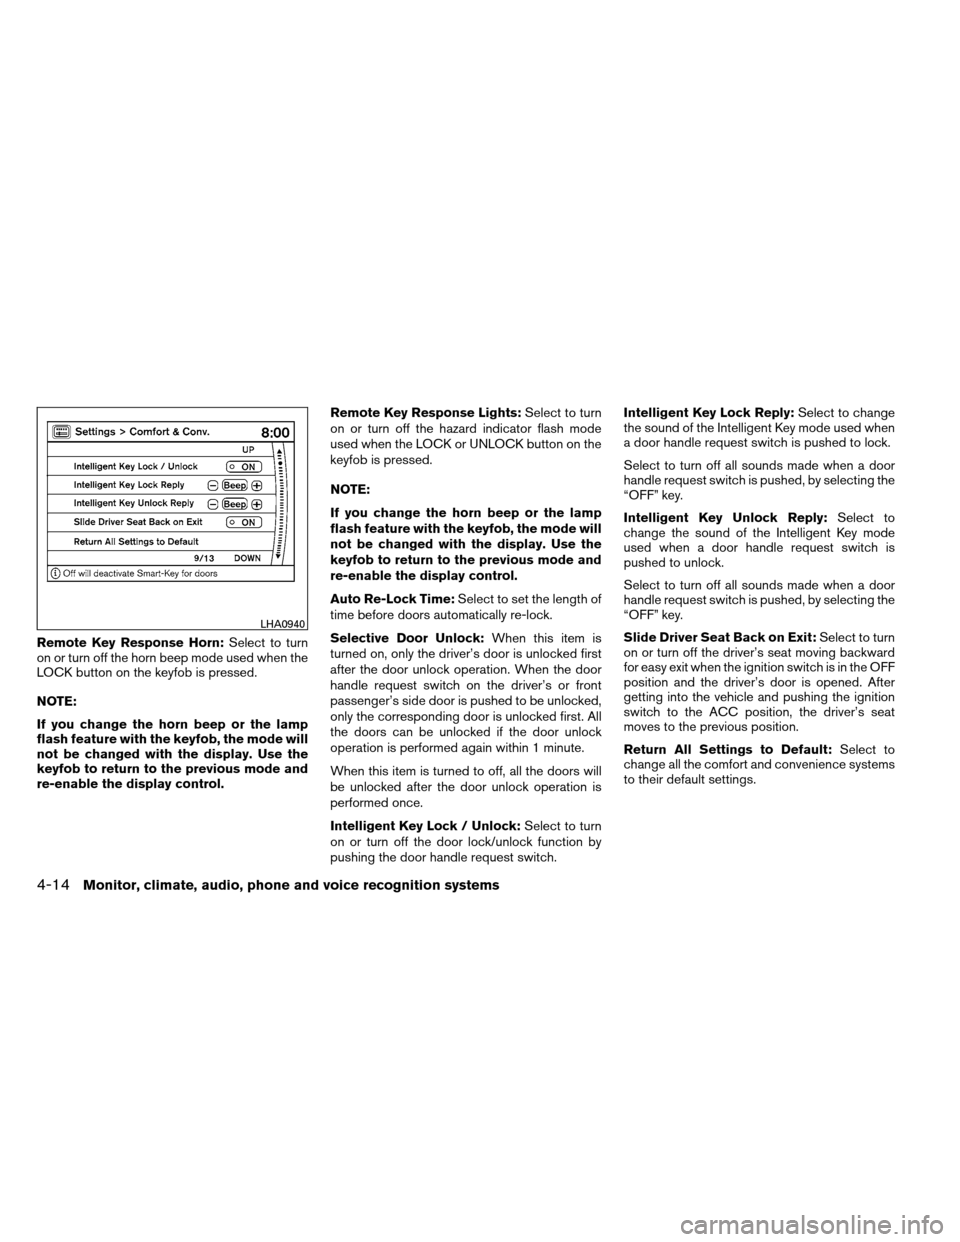
Remote Key Response Horn:Select to turn
on or turn off the horn beep mode used when the
LOCK button on the keyfob is pressed.
NOTE:
If you change the horn beep or the lamp
flash feature with the keyfob, the mode will
not be changed with the display. Use the
keyfob to return to the previous mode and
re-enable the display control. Remote Key Response Lights:
Select to turn
on or turn off the hazard indicator flash mode
used when the LOCK or UNLOCK button on the
keyfob is pressed.
NOTE:
If you change the horn beep or the lamp
flash feature with the keyfob, the mode will
not be changed with the display. Use the
keyfob to return to the previous mode and
re-enable the display control.
Auto Re-Lock Time: Select to set the length of
time before doors automatically re-lock.
Selective Door Unlock: When this item is
turned on, only the driver’s door is unlocked first
after the door unlock operation. When the door
handle request switch on the driver’s or front
passenger’s side door is pushed to be unlocked,
only the corresponding door is unlocked first. All
the doors can be unlocked if the door unlock
operation is performed again within 1 minute.
When this item is turned to off, all the doors will
be unlocked after the door unlock operation is
performed once.
Intelligent Key Lock / Unlock: Select to turn
on or turn off the door lock/unlock function by
pushing the door handle request switch. Intelligent Key Lock Reply:
Select to change
the sound of the Intelligent Key mode used when
a door handle request switch is pushed to lock.
Select to turn off all sounds made when a door
handle request switch is pushed, by selecting the
“OFF” key.
Intelligent Key Unlock Reply: Select to
change the sound of the Intelligent Key mode
used when a door handle request switch is
pushed to unlock.
Select to turn off all sounds made when a door
handle request switch is pushed, by selecting the
“OFF” key.
Slide Driver Seat Back on Exit: Select to turn
on or turn off the driver’s seat moving backward
for easy exit when the ignition switch is in the OFF
position and the driver’s door is opened. After
getting into the vehicle and pushing the ignition
switch to the ACC position, the driver’s seat
moves to the previous position.
Return All Settings to Default: Select to
change all the comfort and convenience systems
to their default settings.
LHA0940
4-14Monitor, climate, audio, phone and voice recognition systems
Page 224 of 489
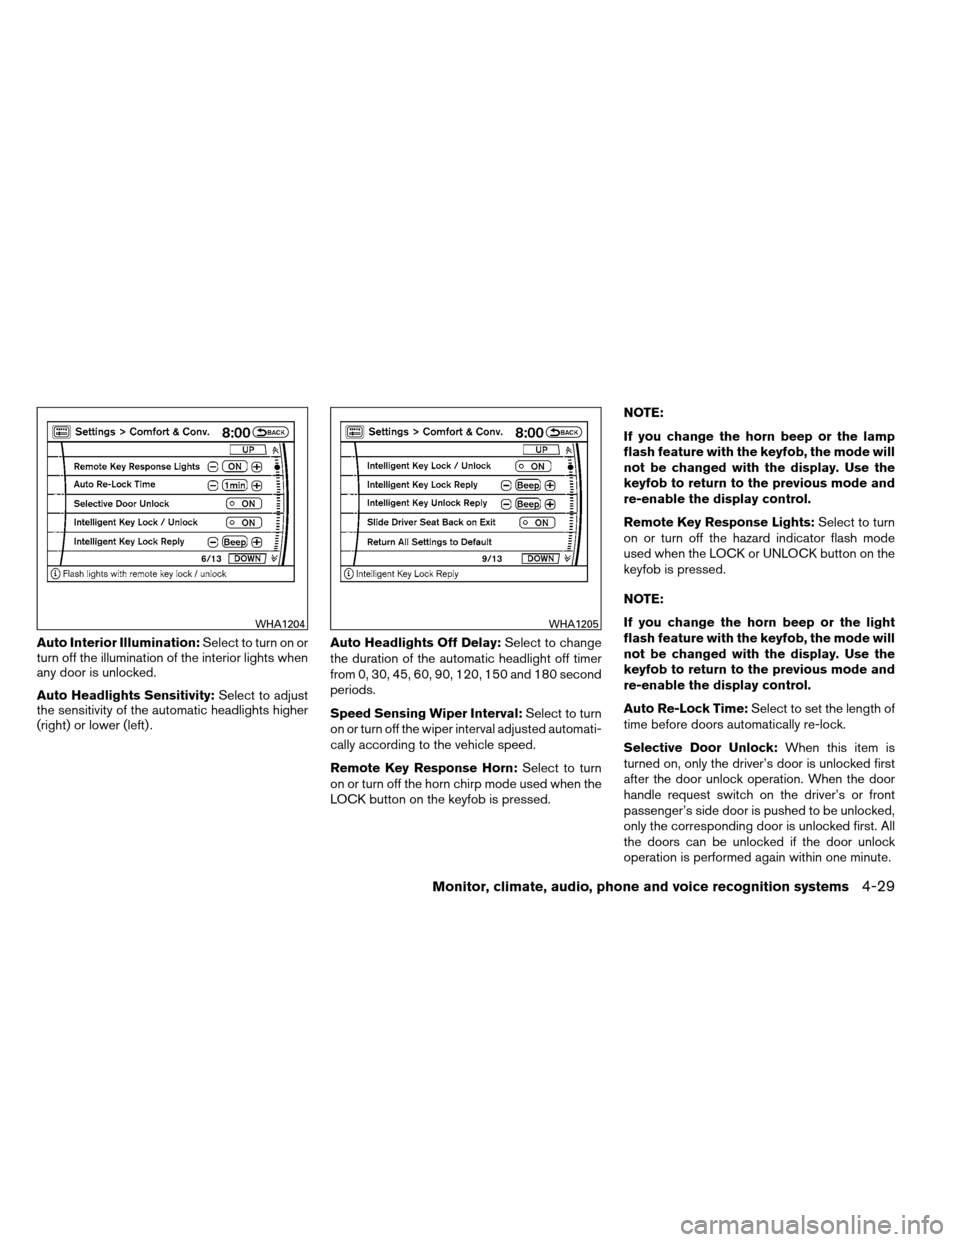
Auto Interior Illumination:Select to turn on or
turn off the illumination of the interior lights when
any door is unlocked.
Auto Headlights Sensitivity: Select to adjust
the sensitivity of the automatic headlights higher
(right) or lower (left) . Auto Headlights Off Delay:
Select to change
the duration of the automatic headlight off timer
from 0, 30, 45, 60, 90, 120, 150 and 180 second
periods.
Speed Sensing Wiper Interval: Select to turn
on or turn off the wiper interval adjusted automati-
cally according to the vehicle speed.
Remote Key Response Horn: Select to turn
on or turn off the horn chirp mode used when the
LOCK button on the keyfob is pressed. NOTE:
If you change the horn beep or the lamp
flash feature with the keyfob, the mode will
not be changed with the display. Use the
keyfob to return to the previous mode and
re-enable the display control.
Remote Key Response Lights:
Select to turn
on or turn off the hazard indicator flash mode
used when the LOCK or UNLOCK button on the
keyfob is pressed.
NOTE:
If you change the horn beep or the light
flash feature with the keyfob, the mode will
not be changed with the display. Use the
keyfob to return to the previous mode and
re-enable the display control.
Auto Re-Lock Time: Select to set the length of
time before doors automatically re-lock.
Selective Door Unlock: When this item is
turned on, only the driver’s door is unlocked first
after the door unlock operation. When the door
handle request switch on the driver’s or front
passenger’s side door is pushed to be unlocked,
only the corresponding door is unlocked first. All
the doors can be unlocked if the door unlock
operation is performed again within one minute.
WHA1204WHA1205
Monitor, climate, audio, phone and voice recognition systems4-29
Page 235 of 489
RADIO
Place the ignition switch in the ACC or ON
position and press the VOL (volume)/ON·OFF
(power) knob to turn the radio on. If you listen to
the radio with the engine not running, the ignition
switch should be placed in the ACC position.
Radio reception is affected by station signal
strength, distance from radio transmitter, build-
ings, bridges, mountains and other external influ-
ences. Intermittent changes in reception quality
normally are caused by these external influences.
Using a cellular phone in or near the ve-
hicle may influence radio reception quality.
Radio reception
Your NISSAN radio system is equipped with
state-of-the-art electronic circuits to enhance ra-
dio reception. These circuits are designed to
extend reception range, and to enhance the qual-
ity of that reception.
However, there are some general characteristics
of both FM and AM radio signals that can affect
radio reception quality in a moving vehicle, even
when the finest equipment is used. These char-
acteristics are completely normal in a given re-
ception area and do not indicate any malfunction
in your NISSAN radio system.Reception conditions will constantly change be-
cause of vehicle movement. Buildings, terrain,
signal distance and interference from other ve-
hicles can work against ideal reception. De-
scribed below are some of the factors that can
affect your radio reception.
Some cellular phones or other devices may
cause interference or a buzzing noise to come
from the audio system speakers. Storing the de-
vice in a different location may reduce or elimi-
nate the noise.
FM RADIO RECEPTION
Range: FM range is normally limited to 25 – 30 mi
(40 – 48 km) , with monaural (single channel) FM
having slightly more range than stereo FM. Exter-
nal influences may sometimes interfere with FM
station reception even if the FM station is within
25 mi (40 km) . The strength of the FM signal is
directly related to the distance between the
transmitter and receiver. FM signals follow a line-
of-sight path, exhibiting many of the same char-
acteristics as light. For example, they will reflect
off objects.
Fade and drift: As your vehicle moves away from
a station transmitter, the signals will tend to fade
and/or drift.
Static and flutter: During signal interference from
buildings, large hills or due to antenna position
(usually in conjunction with increased distance
from the station transmitter) , static or flutter can
be heard. This can be reduced by adjusting the
treble control to reduce treble response.
Multipath reception: Because of the reflective
characteristics of FM signals, direct and reflected
signals reach the receiver at the same time. The
signals may cancel each other, resulting in mo-
mentary flutter or loss of sound.
AM RADIO RECEPTION
AM signals, because of their low frequency, can
bend around objects and skip along the ground.
In addition, the signals can be bounced off the
ionosphere and bent back to earth. Because of
these characteristics, AM signals are also sub-
ject to interference as they travel from transmitter
to receiver.
Fading: Occurs while the vehicle is passing
through freeway underpasses or in areas with
many tall buildings. It can also occur for several
seconds during ionospheric turbulence even in
areas where no obstacles exist.
Static: Caused by thunderstorms, electrical
power lines, electric signs and even traffic lights.
AUDIO SYSTEM
4-40Monitor, climate, audio, phone and voice recognition systems
Page 350 of 489
NISSAN VEHICLE IMMOBILIZER
SYSTEM
The NISSAN Vehicle Immobilizer system will not
allow the engine to start without the use of the
registered key.
If the engine fails to start using a registered key
(for example, when interference is caused by
another registered key, an automated toll road
device or automatic payment device on the key
ring) , restart the engine using the following pro-
cedure:1. Leave the ignition switch in the ON position for approximately 5 seconds.
2. Place the ignition switch in the OFF or LOCK position, and wait approximately 10
seconds.
3. Repeat steps 1 and 2.
4. Restart the engine while holding the device (which may have caused the interference)
separate from the registered key.
If the no start condition re-occurs, NISSAN rec-
ommends placing the registered key on a sepa-
rate key ring to avoid interference from other
devices. ●
Make sure the area around the vehicle is
clear.
● Check fluid levels such as engine oil, cool-
ant, brake fluid, and windshield-washer fluid
as frequently as possible, or at least when-
ever you refuel.
● Check that all windows and lights are clean.
● Visually inspect tires for their appearance
and condition. Also check tires for proper
inflation.
● Check that all doors are closed.
● Position seat and adjust head restraint and
headrests (if so equipped) .
● Adjust inside and outside mirrors.
● Fasten seat belts and ask all passengers to
do likewise.
● Check the operation of warning lights when
the ignition switch is placed in the ON posi-
tion. See “Warning/indicator lights and au-
dible reminders” in the “Instruments and
controls” section of this manual. 1. Apply the parking brake.
2. Move the shift selector to P (Park) or N
(Neutral) . P (Park) is recommended.
The shift selector cannot be moved out
of P (Park) and into any of the other
gear positions if the ignition switch is
turned to the OFF position or if the key
is removed from the ignition switch.
The starter is designed not to operate if
the shift selector is in any of the driving
positions.
3. Crank the engine with your foot off the
accelerator pedal by placing the ignition
switch in the START position. Release the
key when the engine starts. If the engine
starts, but fails to run, repeat the above
procedure.
● If the engine is very hard to start in ex-
tremely cold weather or when restarting,
depress the accelerator pedal a little (ap-
proximately 1/3 to the floor) and hold it
and then crank the engine. Release the
key and the accelerator pedal when the
engine starts.
BEFORE STARTING THE ENGINE STARTING THE ENGINE
Starting and driving5-13
Page 355 of 489
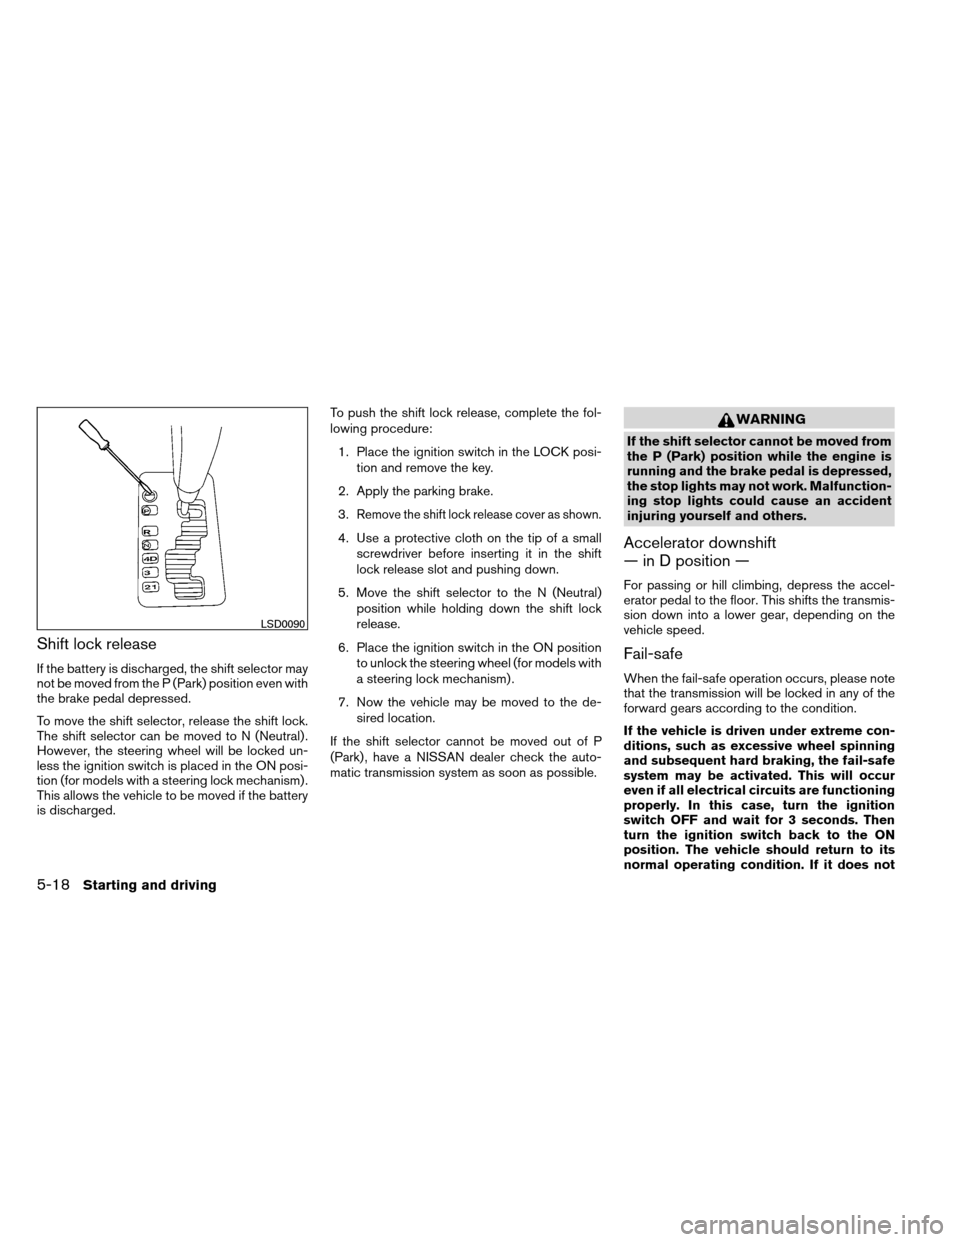
Shift lock release
If the battery is discharged, the shift selector may
not be moved from the P (Park) position even with
the brake pedal depressed.
To move the shift selector, release the shift lock.
The shift selector can be moved to N (Neutral) .
However, the steering wheel will be locked un-
less the ignition switch is placed in the ON posi-
tion (for models with a steering lock mechanism) .
This allows the vehicle to be moved if the battery
is discharged.To push the shift lock release, complete the fol-
lowing procedure:
1. Place the ignition switch in the LOCK posi- tion and remove the key.
2. Apply the parking brake.
3.
Remove the shift lock release cover as shown.
4. Use a protective cloth on the tip of a small screwdriver before inserting it in the shift
lock release slot and pushing down.
5. Move the shift selector to the N (Neutral) position while holding down the shift lock
release.
6. Place the ignition switch in the ON position to unlock the steering wheel (for models with
a steering lock mechanism) .
7. Now the vehicle may be moved to the de- sired location.
If the shift selector cannot be moved out of P
(Park) , have a NISSAN dealer check the auto-
matic transmission system as soon as possible.
WARNING
If the shift selector cannot be moved from
the P (Park) position while the engine is
running and the brake pedal is depressed,
the stop lights may not work. Malfunction-
ing stop lights could cause an accident
injuring yourself and others.
Accelerator downshift
— in D position —
For passing or hill climbing, depress the accel-
erator pedal to the floor. This shifts the transmis-
sion down into a lower gear, depending on the
vehicle speed.
Fail-safe
When the fail-safe operation occurs, please note
that the transmission will be locked in any of the
forward gears according to the condition.
If the vehicle is driven under extreme con-
ditions, such as excessive wheel spinning
and subsequent hard braking, the fail-safe
system may be activated. This will occur
even if all electrical circuits are functioning
properly. In this case, turn the ignition
switch OFF and wait for 3 seconds. Then
turn the ignition switch back to the ON
position. The vehicle should return to its
normal operating condition. If it does not
LSD0090
5-18Starting and driving
Page 362 of 489
*2: While changing in and out of 4LO, the ignition switch must be ON and the vehicle’s engine must be running for a shift to take place and for the indicatorlights (4WD shift and 4LO position indicator) to be operable. Otherwise, the shift will not take place and no indicator lights will be on or flashing.
*3: Make sure the transfer 4LO position indicator light turns on when you shift the 4WD shift switch to 4LO. The
indicator light will also turn on when
4LO is selected. See “Vehicle Dynamic Control (VDC) system” later in this section.
Starting and driving5-25
Page 371 of 489
The VDC system can help the driver to maintain
control of the vehicle, but it can not prevent loss
of vehicle control in all driving situations.
When the VDC system operates, the
indi-
cator in the instrument panel flashes so note the
following:
● The road may be slippery or the system may
determine some action is required to help
keep the vehicle on the steered path.
● You may feel a pulsation in the brake pedal
and hear a noise or vibration from under the
hood. This is normal and indicates that the
VDC system is working properly.
● Adjust your speed and driving to the road
conditions.
See “Slip indicator light” and ”Vehicle Dynamic
Control (VDC) OFF indicator light” in the ”Instru-
ments and controls” section.
If a malfunction occurs in the system, the
andindicator lights come on in the instru-
ment panel. The VDC system automatically turns
off when these indicator lights are on.
The VDC OFF switch is used to turn off the VDC
system. The
indicator illuminates to indi-
cate the VDC system is off. When the VDC switch is used to turn off the
system, the VDC system still operates to prevent
one drive wheel from slipping by transferring
power to a non slipping drive wheel. The
indicator flashes if this occurs. All other VDC
functions are off and the
indicator will not
flash.
The VDC system is automatically reset to on
when the ignition switch is placed in the off
position then back to the on position.
The computer has a built in diagnostic feature
that tests the system each time you start the
engine and move the vehicle forward or in reverse
at a slow speed. When the self-test occurs, you
may hear a clunk noise and/or feel a pulsation in
the brake pedal. This is normal and is not an
indication of a malfunction.
WARNING
● The VDC system is designed to help the
driver maintain stability but does not
prevent accidents due to abrupt steer-
ing operation at high speeds or by care-
less or dangerous driving techniques.
Reduce vehicle speed and be especially
careful when driving and cornering on
slippery surfaces and always drive
carefully. ●
Do not modify the vehicle’s suspension.
If suspension parts such as shock ab-
sorbers, struts, springs, stabilizer bars,
bushings and wheels are not NISSAN
recommended for your vehicle or are
extremely deteriorated, the VDC system
may not operate properly. This could
adversely affect vehicle handling per-
formance, and the
indicator may
flash or both the
andindi-
cator lights may illuminate.
● If brake related parts such as brake
pads, rotors and calipers are not
NISSAN recommended or are extremely
deteriorated, the VDC system may not
operate properly and both the
and theindicator lights may
illuminate.
● If engine control related parts are not
NISSAN recommended or are extremely
deteriorated, both the
andindicator lights may illuminate.
5-34Starting and driving
Page 372 of 489
●When driving on extremely inclined sur-
faces such as higher banked corners,
the VDC system may not operate prop-
erly and the
indicator may flash or
both the
andindicator
lights may illuminate. Do not drive on
these types of roads.
● When driving on an unstable surface
such as a turntable, ferry, elevator or
ramp, the
indicator may flash or
both the
andindicator
lights may illuminate. This is not a mal-
function. Restart the engine after driv-
ing onto a stable surface.
● If wheels or tires other than the NISSAN
recommended ones are used, the VDC
system may not operate properly and
the
indicator may flash or both
the
andindicator lights may
illuminate.
● The VDC system is not a substitute for
winter tires or tire chains on a snow
covered road.
WARNING
● Always turn and look back before back-
ing up. The RSS is not a substitute for
proper backing procedures.
● Read and understand the limitations of
the rear sonar system as contained in
this section. Inclement weather may af-
fect the function of the RSS; this may
include reduced performance or a false
activation.
● This system is not designed to prevent
contact with small or moving objects. ●
The system is designed as an aid to the
driver in detecting large stationary ob-
jects to help avoid damaging the ve-
hicle. The system will not detect small
objects below the bumper, and may not
detect objects close to the bumper or
on the ground.
● If your vehicle sustains damage to the
rear bumper fascia, leaving it mis-
aligned or bent, the sensing zone may
be altered causing inaccurate measure-
ment of obstacles or false alarms.
The Rear Sonar System (RSS) sounds a tone to
warn the driver of obstacles near the rear bumper
when the shift selector is in R (Reverse) . The
system may not detect objects at speeds above 3
mph (5 km/h) and may not detect certain angular
or moving objects.
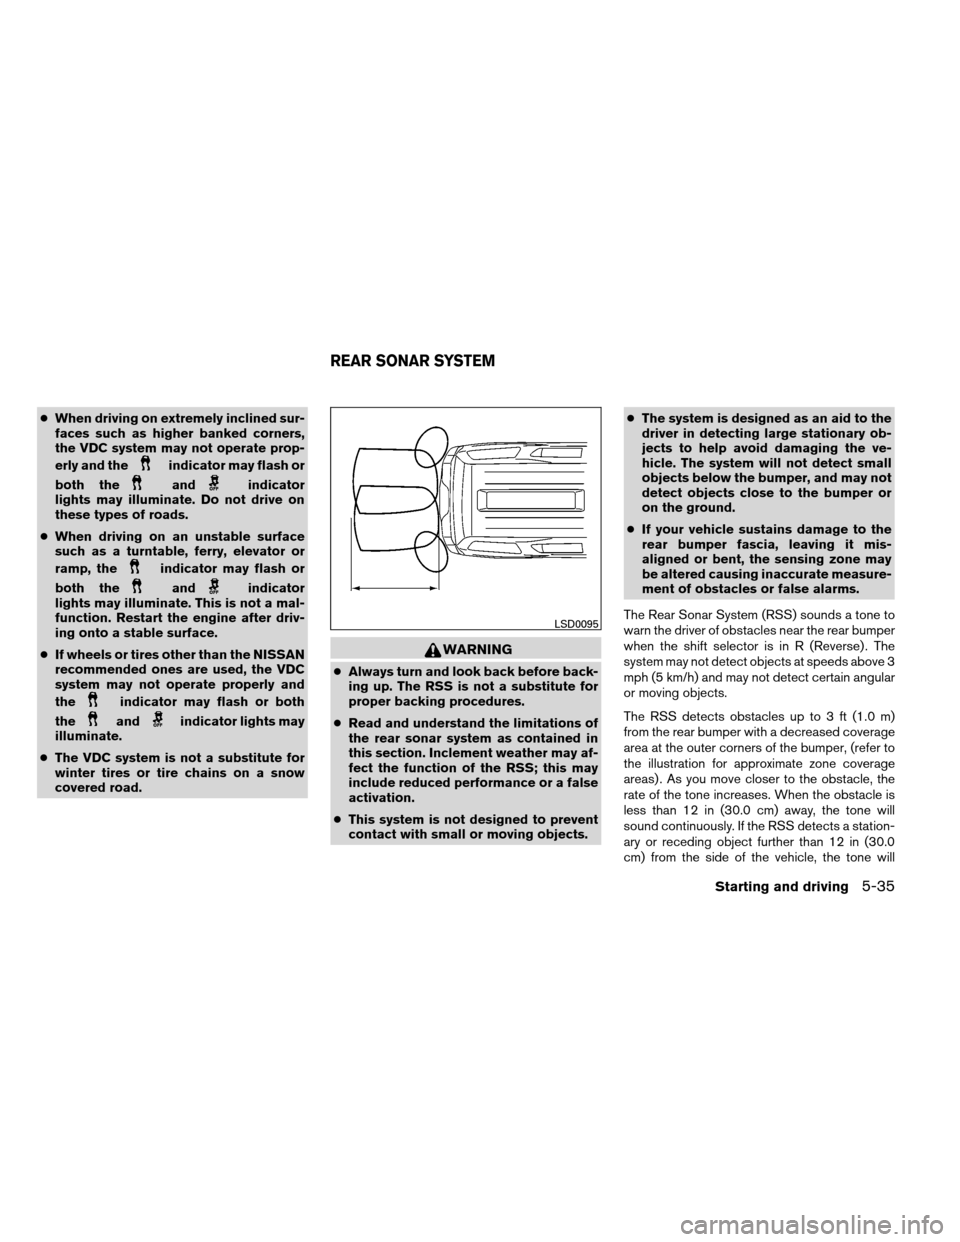
The RSS detects obstacles up to 3 ft (1.0 m)
from the rear bumper with a decreased coverage
area at the outer corners of the bumper, (refer to
the illustration for approximate zone coverage
areas) . As you move closer to the obstacle, the
rate of the tone increases. When the obstacle is
less than 12 in (30.0 cm) away, the tone will
sound continuously. If the RSS detects a station-
ary or receding object further than 12 in (30.0
cm) from the side of the vehicle, the tone will
LSD0095
REAR SONAR SYSTEM
Starting and driving5-35